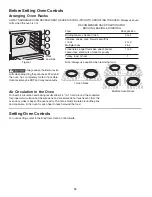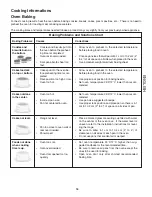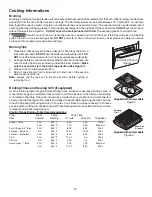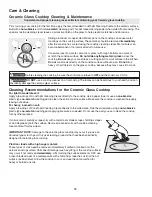
background image

22

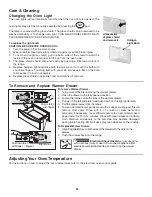
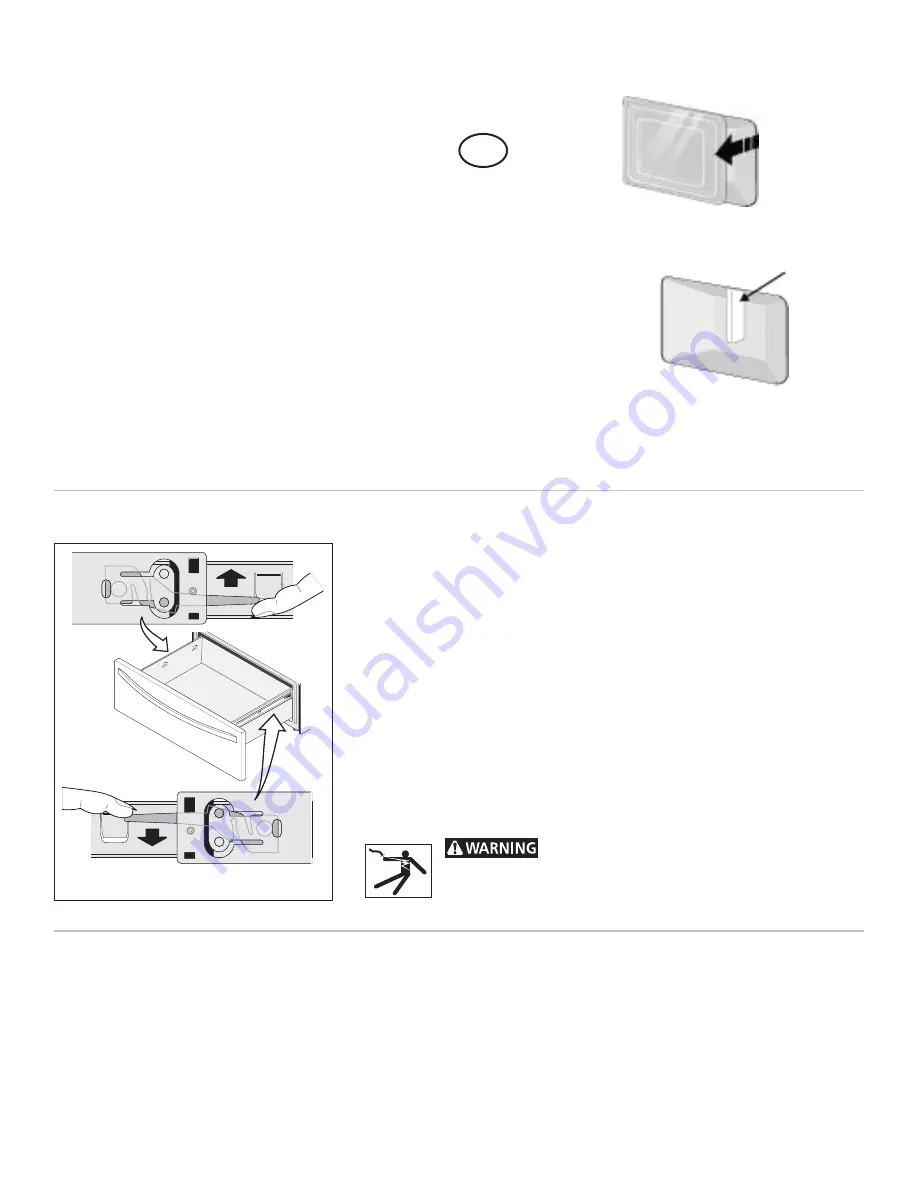
To Remove and Replace Warmer Drawer

To remove Warmer Drawer:

1. Turn power off before removing the warmer drawer.
2. Open the drawer to the fully opened position.
3. Locate the latches on both sides of the warmer drawer.
4. Pull up on the left glide latch and push down on the right glide latch.
5. Pull the drawer away from the range.
6. To clean warmer drawer, gently scour with a soapy scouring pad, this will

remove most spots. Rinse with a 1:1 solution of clear water and
ammonia. If necessary, cover difficult spots with an ammonia-soaked
paper towel for 30 to 40 minutes. Rinse with clean water and a damp
cloth. Remove all cleaners or the porcelain may become damaged
during future heating. DO NOT use spray oven cleaners on the cooktop.

To Replace Warmer Drawer:

1. Align the glide latches on both sides of the drawer with the slots on the

drawer.

2. Push the drawer back into the range.

  Electrical Shock Hazard

 can occur and re-

sult in serious injury or death. Disconnect appliance from
electric power before cleaning and servicing the warmer
drawer.

Care & Cleaning

Adjusting Your  Oven Temperature

For instructions on how to adjust the oven temperature refer to the electronic oven control guide.

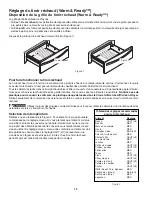
Latch

Latch

Left Glide

Right Glide

Pull up latch

with finger

Pull down latch
with finger

Figure 1

Changing the Oven Light

The oven lights will automatically turn ON when the oven door is opened. The

oven lights may also be manually operated by pressing the 

O

N/

O

FF

O

VEN

L

IGHT

 pad.

The lamp is covered with a glass shield. The glass shield can be removed to be
cleaned manually or to change oven light. THIS GLASS SHIELD MUST BE IN
PLACE WHENEVER THE OVEN IS IN USE.

To replace the light bulb:
CAUTION: BE SURE THE OVEN IS COOL.

1.

Turn the power off at the main source.

2.

Wear a leather-faced glove for protection against possible broken glass.

3.

To remove the glass shield, pull the back side of the shield toward the
inside of the oven in a manner to lift it up from the oven side.

4.

The glass shield should come out easily by pushing a little toward front of
the range.

5.

Replace halogen light appliance bulb taking care not to touch the bulb with
your bare fingers. Touching bulb with your skin can leave a film on the bulb
that causes it to burn out quickly.

6.

Replace glass shield in opposite order and manner of removal.

Lift backside
of glass shield
and remove it.

Halogen
Light Bulb

Содержание c970-44096

Страница 1: ...ENGLISH 1 Electric Range Slide in models Use Care Guide www sears ca Sears Canada Inc Toronto Ontario Canada M5B 2B8 318203844 0806 Rev A ...

Страница 2: ...s belts light bulbs and bags 4 A service technician to instruct the user in correct product installation operation or maintenance 5 A service technician to clean or maintain this product 6 Damage to or failure of this product if it is not installed operated or maintained according to the all instructions supplied with the product 7 Damage to or failure of this product resulting from accident abuse...

Страница 3: ...ing and maintaining any appliance Serial Plate Location You will find the model and serial number printed on the serial plate The serial plate is located along the interior side trim and visible when the oven door is opened Remembertorecordtheserialnumberforfuturereference Product Record In this space below record the date of purchase model and serialnumberofyourproduct Youwillfindthemodelandseria...

Страница 4: ...ren climbing on the range to reach items could be seriously injured Do not leave children alone Children should not be left alone or unattended in the area where an appliance is in use They should never be allowed to sit or stand on any part of the appliance DO NOT TOUCH SURFACE UNITS AREAS NEAR THESE UNITS OVEN HEATING ELEMENTS OR INTE RIOR SURFACES OF THE OVEN OR WARMER DRAWER if equipped Both s...

Страница 5: ...azed Cooking Utensils Only certain types of glass glass ceramic ceramic earthenware or other glazed utensils are suitable for rangetop service without breaking due to the sudden change in temperature Check the manufacturer s recommendations for rangetop use Do Not Use Decorative Surface Element Covers If an element is accidentally turned on the decorative cover will become hot and possibly melt Bu...

Страница 6: ... directions for use Be aware that excess residue from cleaners and aerosols may ignite causing damage and or injury SELF CLEANING OVENS Clean in the self cleaning cycle only the parts of the oven listed in this owner s guide Before self cleaning the oven remove the broiler pan and any utensils stored in the oven Do not clean the oven door gasket The door gasket is essential for a good seal Care sh...

Страница 7: ...c Oven Control with Clock and Kitchen Timer Warm Ready Drawer Control Indicator Light Left Rear Element Control Left Front Element Control Warmer Zone Control Indicator Light Right Rear Element Control Halogen Oven Light Adjustable Oven Racks Broil Element One Piece Door Handle Style varies with model Glass Front Oven Door Style varies with model Oven Vent Self Cleaning Convection Oven Right Front...

Страница 8: ...ss Locations of the Radiant Surface Elements and Controls Your range is equipped with radiant surface elements with differentwattageratings Theabilitytoheatfoodquickerand inlargervolumesincreasesastheelementwattageincreases The radiant surface elements are located on the cooktop as follows Two 6 inch radiant elements located at the right rear and left rear position Two 9 12 inch double elements lo...

Страница 9: ... broiling MEDIUMHIGH 5 8 Continue a rapid boil fry deep fat fry MEDIUM 5 Maintainaslowboil thickensaucesandgravies steamvegetables MEDIUM LOW 2 4 Keep foods cooking poach stew LOW Lo 2 Keep warm melt simmer Figure 1 Setting Surface Controls continued Usethechart Figure1 todeterminethecorrectsettingforthekindoffoodyouarepreparing The Simmer settings are used to simmer and keep larger quantities of ...

Страница 10: ...ace element provides a constant amount of heat at each setting A glowingredsurfaceheatingareaextendingbeyondthe bottomedgeofthecookwareindicatesthecookwareis too small for the surface heating area 4 When cooking has completed turn the surface control knobtoOFFbeforeremovingthecookware Note The Surface Indicator light will come on when the control knobisturnedonandwillcontinuetoglowuntiltheglass co...

Страница 11: ...s towels or wooden spoons could catch fire if placed too close to the surface elements or burners TheWarmerZonewillnotglowredwhenitishot butbecomeshotenoughtocauseburns Avoidplacinghands on or near the Warmer Zone until the Warmer Zone Hot Surface indicator light is OFF Always use potholders or oven mitts when removing food from the warmer zone as cookware and plates will be hot Figure 1 Setting W...

Страница 12: ... maintain quality Do not use plastic wrap to cover food Plastic may melt onto the drawer and be very difficult to clean Use only utensils and cookware recommended for oven use in the Warmer Drawer AlwaysusepotholdersorovenmittswhenremovingfoodfromtheWarmerDrawerascookwareandplates will be hot and you can be burned Figure 2 WarmerDrawerRecommendedFood SettingsTable Food Item Setting Bacon HI Hambur...

Страница 13: ...the padattheWarmerDrawercontrolposition TheWarmerDrawer indicator light will flash Note If no further pads are touched within 25 seconds the request to power the Warmer Drawer ON will clear 2 Set the desired power level Touch once to turn ON the power level for HI see Figure 2 or to turn ON the power level for LO see Figure 4 The WarmerDrawerindicatorlightlocatedabovetheON OFFpadwillturnONsteady 3...

Страница 14: ... leave metal marks which will resemble scratches Remove these marks immediately COPPER Excellentheatconductorbutdiscolourseasily Mayleavemetalmarksonceramicglass seeAluminumabove STAINLESS STEEL Slow heat conductor with uneven cooking results Is durable easy to clean and resists staining CASTIRON Apoorheatconductorhoweverwillretainheatverywell Cooksevenlyoncecookingtemperatureisreached Not recomme...

Страница 15: ...EOVENISCOOL PRIORTOOPERATINGTHEOVEN Alwaysuseoven mitts when the oven is hot RECOMMENDED RACK POSITIONS FOR BROILING BAKING ROASTING Food Rack position Broiling meats chicken or fish 3 or 4 Cookies cakes pies biscuits muffins 1 rack 2 or 3 Multiple racks 2 4 Frozen pies angel food cake yeast bread 1 or 2 casseroles small cuts of meat or poultry Turkey roast or ham 1 Note Always use caution when re...

Страница 16: ...n to preheat to the selected temperature before placing food in oven Choose pan sizes that will permit 5 1 cm to 10 2 cm 2 to 4 of air space on all sides when placed in the oven Use a medium weight aluminum baking sheet Allow oven to preheat to the selected temperature before placing food in the oven Use proper rack position for baking needs Set oven temperature 25 F 12 C lower than recom mended S...

Страница 17: ...e broil stop position See Figure 1 3 Preheat for 5 minutes before broiling 4 Broil on one side until food is browned turn and cook on the second side Season and serve Note Always pull the rack out to the stop position before turning or removingfood Broil Stop Position Figure 1 Electric Range Broiling Table Recommendations Food Rack Temp Cook Time Item Position Setting 1st side 2ndside Doneness Ste...

Страница 18: ... REAL STEEL Stainless Steel some models Clean the stainless with warm soapy water using a clean sponge or cloth Rinse with clean water and dry with a soft clean cloth DO NOT use ANY store bought cleaners like Stainless Steel cleaners or any other types of cleaners containing any abrasive chlorides chlorines or ammonia It is recommended to use mild dish soap and water or a 50 50 solution of water a...

Страница 19: ... immediately if spilled or melted onto the ceramic cooktop surface Permanent damage such as pitting of the cooktop surface may occur if not removed immediately After turning the surface elements OFF use a razor blade scraper or a metal spatula with a mitt and scrape the soil from the hot surface as illustrated Allow the cooktop to cool and use the same method for heavy or burned on soils Ceramic G...

Страница 20: ...l all the oven racks are fully in place 2 Do not hit the glass with pots pans or any other object 3 Scratching hitting jarring or stressing the glass may weaken its structure causing an increased risk of breakage at a later time Ceramic Glass Cooktop Cleaning Maintenance Continued Do not use the following on the ceramic glass cooktop Do not use abrasive cleaners and scouring pads such as metal and...

Страница 21: ...se hot soapy water and a cloth Large spillovers can cause heavy smoke or fire when subjected to high temperatures DO NOT allow food spills with a high sugar or acid content such as tomatoes sauerkraut fruit juices or pie filling to remain on the surface as they may cause a dull spot even after cleaning 2 Clean any soil from the oven frame and the door liner see illustration These areas heat suffic...

Страница 22: ...ature For instructions on how to adjust the oven temperature refer to the electronic oven control guide Latch Latch Left Glide Right Glide Pull up latch with finger Pull down latch with finger Figure 1 Changing the Oven Light The oven lights will automatically turn ON when the oven door is opened The oven lights may also be manually operated by pressing the ON OFF OVEN LIGHT pad The lamp is covere...

Страница 23: ...at evenly Because lightweight pans heat unevenly foods may burn easily 1 Triple or dual radiant element provides a constant amount of heat at each setting Irregular glowing effect is depending of the element design and doesn t affect performance of the element 1 Coarse particles such as salt or sand between cooktop and utensils can cause scratches Be sure cooktop surface and bottoms of utensils ar...

Страница 24: ...ed off 1 Excessive spillovers in oven Set self clean cycle for a longer cleaning time 2 Excessive spillovers in oven This is normal especially for pie spillovers or large amounts of grease on the oven bottom Wipe up excessive spillovers before starting the self clean cycle If flames or excessive smoke are present stop the self clean cycle and follow the steps under Stopping or Interrupting the Sel...

Страница 25: ...FRANÇAIS 1 Cuisinière électrique Modèles encastrables Manuel d utilisation et d entretien www sears ca Sears Canada Inc Toronto Ontario Canada M5B 2B8 318203844 0806 Rev A ...

Страница 26: ...isation autre que celle pour laquellel appareilaétéconçu 8 Aux dommages ou aux pannes causés par l utilisation de détergents de nettoyants de produits chimiques ou d accessoires autres que ceux recommandés dans les instructions fournies avec cet appareil 9 Aux dommages affectant les pièces ou les systèmes ou aux pannes causées par des modifications non autorisées de l appareil Exonérationdegaranti...

Страница 27: ... appareil pour en savoir davantage sur cet appareil Ceguidedonnedesinstructionsgénéralespourvotreappareiletdesrenseignementss appliquantàplusieursmodèles Votre appareil peut ne pas avoir toutes les caractéristiques décrites Les figures montrées dans ce manuel sont représentatives et peuvent ne pas illustrer identiquement les caractéristiques de votre appareil Note Les instructions données dans ce ...

Страница 28: ...s enfants dans les armoires au dessus de l appareil Ne laissez pas les enfants seuls ou sans surveillance dans un lieu où un appareil fonctionne Ne les laissez ja mais s asseoir ou se tenir debout sur une pièce quelconque de l appareil NE TOUCHEZ PAS AUX ÉLÉMENTS DE SURFACE AUX ZONES À PROXIMITÉ DE CEUX CI AUX ÉLÉMENTS OU AUX SURFACES INTÉRIEURES DU FOUR OU DU TIROIR RÉCHAUD SI FOURNI Les éléments...

Страница 29: ...s son N utilisez pas de couvercles décoratifs pour éléments de surface Si un élément est accidentellement allumé le couvercle risque de chauffer et éventuellement de fondre Vous ne verrez pas que l élément est allumé Vous risquez de vous brûler en touchant les couvercles Aussi il y a un risque d endommager la surface de cuisson Ne cuisinez pas sur une plaque de cuisson brisée Si la plaque se brise...

Страница 30: ...re feu et de causer des CONSERVEZ CES INSTRUCTIONS dommages et ou des blessures FOURSAUTONETTOYANTS Ne nettoyez dans le cycle autonettoyant que les parties du four énumérées dans le présent Guide de l utilisateur Avant d utiliser le cycle autonettoyant enlevez la lèchefrite et tout ustensile se trouvant dans le four Ne nettoyez pas le joint d étanchéité de la porte Faites attention pour ne pas le ...

Страница 31: ...re cuisinière encastrable Contrôleur électronique avec minuterie et horloge Contrôle et lampe témoin de la zone réchaud Contrôleet lampe témoin du tiroirréchaud Bouton de commande de l élémentarrièregauche Bouton de commande de l élémentarrièredroit Lumièrehalogène defour Four autonettoyant Grilles de four ajustables Évent du four Bouton de commande de l élément avant droit Poignée de porte monobl...

Страница 32: ...e fond de l ustensile n est pas plat Référez vous à la section Choix des Ustensiles de cuisine pour la cuisson sur les foyers en page 13 NOTE pour les modèles ayant une surface de cuisson en vitrocéramique blanche seulement En raison de l intensité élevée de la chaleur produite par les éléments de surface la surface vitrocéramique deviendra verte quand l élément sera éteint Ce phénomène est normal...

Страница 33: ...est utilisée afin de conserver chaude une grande quantité d aliments tel que les soupes ou les ragoûts La plus basse température de la fonction mijotant est idéale pour les aliments délicats ou pour faire fondre le chocolat ou le beurre Note La grosseur ou le type d ustensile utilisés influenceront le réglage nécessaire pour obtenir de bons résultats culinaires Les éléments radiants peuvent semble...

Страница 34: ...on en repositionnant le bouton à un réglage plus faible Chacun des éléments de cuisson produit une chaleur constante Si un halo rouge déborde de l ustensile de cuisson ceci indique que le diamètre de ce dernier est trop petit pour l élément utilisé 4 Lorsque la cuisson est complétée tournez le bouton de commande à la position Arrêt avant de retirer l ustensile de l élément Note Le témoin lumineux ...

Страница 35: ...alampetémoin de la zone réchaud clignotera Note Si aucunes touches n est appuyée dans les 25 secondes suivantes la commande pour allumer la zone réchaud sera annulée 2 Sur le contrôleur de la zone réchaud appuyez sur la touche une fois pour allumer l élément en position HI voir Figure 2 ou une fois pour allumer l élément en position LO voir Figure 5 La lampe témoin située au dessus de la touche ON...

Страница 36: ...ez seulement de la vaisselle des ustensiles et plats à cuisiner recommandés pour la cuisson au four dans le tiroir réchaud Utilisez toujours des poignées ou des mitaines pour four pour retirer les aliments du tiroir réchaud car les ustensiles et plats s y trouvant sont chauds Figure 2 Sélection de la température Référez vous au tableau de la Figure 2 Si un aliment n est pas énuméré commencez par l...

Страница 37: ...contrôleur du tiroir réchaud La lampe témoin du tiroirréchaudclignotera Note Sivousn appuyezsuraucunestouchesdansles 25 secondes qui suivent la demande d allumer le tiroir réchaud s annulera 2 Sur le contrôleur du tiroir réchaud appuyez sur la touche une fois pour allumer l élément en position HI voir Figure 2 ou une fois pour allumer l élément en position LO voir Figure 4 La lampe témoin située a...

Страница 38: ...gratignures Enlevez ces marques immédiatement CUIVRE Excellent conducteur de chaleur mais décolore rapidement Peut laisser des marques métalliques sur la table de cuisson vitrocéramique voir Aluminium plus haut ACIER INOXYDABLE Conducteur de chaleur lent donnant des résultats de cuisson inégaux Durable facile à nettoyer et résistant aux taches FONTE Conducteurdechaleurpauvreparcontreellelaconserve...

Страница 39: ...us retirez la nourriture du four positions des grilles Figure1 Types de grilles de four Servez vous toujoursdemitainesoudegants isolants pour ajuster les grilles du four Attendez que le four soit complètement refroidi si possible Les grilles de four peuvent être CHAUDES et causer des brûlures Réglage de la commande du four Référez vous au feuillet d instructions de la commande électronique du four...

Страница 40: ...é La porte du four a été ouverte trop souvent Tableau des problèmes de cuisson au four et de leurs Solutions Solutions Laissez le four se réchauffer à la température voulue avant d y placer les aliments Choisissez des tailles de moule qui laisseront dans le four 5 1 à 10 2 cm 2 à 4 d espace libre tout autour du moule Utilisez une tôle à biscuit en aluminium d épaisseur moyenne Laissez le four préc...

Страница 41: ...z ou diminuez le temps de grillage ainsi que la position de la grille du four pour obtenir le résultat désiré Si la nourriture que vous grillez n est pas dans la liste suivez les instructions de votre recette et surveillez la cuisson Utilisez la grille de cuisson optionel sur commande pour les viandes et les steaks Avant de placer la viande assurez vous de chauffer la grille de cuisson en utilisan...

Страница 42: ...ier inoxydable avec le fini Real Steel certains modèles Nettoyez les surfaces en acier inoxydable avec un linge ou une éponge propre et de l eau tiède savonneuse Rincez avec de l eau propre et essuyez avec un linge propre et doux N utilisez pas de produits spécialisés pour le nettoyage de l acier inoxydable ni des produits de nettoyage contenant des concentrations élevées de chlore de chlorures d ...

Страница 43: ...itrocéramique avant qu elle ne soit complètement refroidie Les vapeurs nocives qui seraient générées peuvent nuire à votre santé et la réaction chimique pourrait endommager la surface de cuisson Recommandations pour le nettoyage de la surface de cuisson en vitrocéramique Saleté légère à modérée Appliquez quelques gouttes de crème de nettoyage pour table de cuisson directement sur la table de cuiss...

Страница 44: ...e déposer la porte à plat Pour enlever la porte du four 1 Ouvrez la porte complètement 2 Faites pivoter vers le haut les deux loquets mobiles se trouvant sur les supports des charnières et engagez les dans les crochets des bras des charnières Figure 1 Il se peut qu il soit nécessaire d exercer une légère pression sur la porte pour que les loquets s engagentcomplètement 3 Avec une main de chaque cô...

Страница 45: ...rmettre à des renversements qui contiennent beaucoup de sucre ou qui ont un niveau d acidité élevé tels que tomates choucroute jus de fruits ou garnitures de tarte de demeurer en surface car ils peuvent causer la formation de taches qui resteront sans éclat même après le nettoyage 2 Nettoyez toute saleté présente sur le cadre avant du four ainsi que l intérieur de la porte Ces surfaces deviennent ...

Страница 46: ...sère gauche Glissière droite Remontez le loquet avec le doigt Abaissez le loquet avec le doigt Figure 1 Risque de choc électrique pouvant occasionner des blessures graves ou la mort Débranchez l appareil du courant électrique avant le service d entretien ou avant d enlever ou de replacer le tiroir réchaud Entretien et nettoyage Pour remplacer la lampe du four ATTENTION ASSUREZ VOUS QUE LE FOUR A S...

Страница 47: ...hauf fent mieux que celles à fond tordu Le matériel et le poids des ustensiles de cuisine affectent la cuisson Les casseroles de poids moyen ou lourd chauffent d une manière uniforme Les casseroles légères ne chauffent pas d une manière uniforme et les aliments peuvent brûler plus facilement 1 L élément de surface double ou triple fournit une quantité constante de chaleur pour chaque réglage L irr...

Страница 48: ...mmandés pour la recette Si la température du four est trop froide ou trop chaude consultez la section Ajustement de la température du four dans le feuillet de la commande électronique du four 1 Un ventilateur démarrera et arrêtera automatiquement afin de refroidir les pièces internes de l appareil Ceci est normal et il est possible que ce ventilateur continue de fonctionner même si le four est à l...

Отзывы: