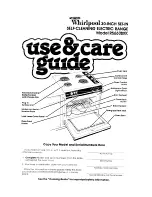
background image

Содержание 4558 - 30 in. Electric Drop-In Range

Страница 1: ...p in models _ e Estufa el_ctrica IVIodelosempotrables _s U S y ClJ Models Modelos 790 4558 790 4559 Color number n0mero de color Sears Roebuck and Co Hoffman Estates IL 60179 U S A www sears com P N 318205808 Rev B 0908 ...

Страница 2: ...other than those recommended in all instructions supplied with the product 9 Damage to or failure of parts or systems resulting from unauthorized modifications made to this product Disclaimer of implied warranties limitation of remedies Customer s sole and exclusive remedy under this limited warranty shall be product repair as provided herein Implied warranties including warranties of merchantabil...

Страница 3: ...ation Instructions To reduce the risk of tipping the range oven must be secured by properly installed anti tip bracket s provided with the range To check if the bracket s is installed properly remove the lower panel or storage drawer and verify that the anti tip bracket s is engaged Refer to the Installation Instructions for proper anti tip bracket s installation child on an open door may cause th...

Страница 4: ...ome hot and possibly melt Burns will occur if the hot covers are touched Damage may also be done to the cooktop FOR COOKTOPS WITH COIL ELEMENTS ONLY Do Not Immerse or Soak Removable Surface Heating Elements Surface heating elements should never be im merse in water Heating elements clean themselves during normal operation Make Sure Drip Pans or Drip Bowls Are in Place Absence of these pans or bowl...

Страница 5: ...al oven cleaner or oven liner protective coating of any kind should be used in or around any part of the oven Do not clean door gasket The door gasket is es sential for a good seal Care should be taken not to rub damage or move the gasket Remove oven racks Oven racks color will change if left in the oven during a self cleaning cycle The health of some birds is extremely sensitive to the fumes give...

Страница 6: ...model Door Handle Style varies with model Models with Ceramic Glass Cooktop 6 Single Radiant Element 6 Single Radiant Element 6 9 Dual Radiant Element 6 9 Dual Hot Surface Radiant Element Indicator Light Note The features of your range will vary according to model Models with Coil Surface Elements Removable 8 Coil Surface Element Removable 6 Coil Surface Element Removable Element Drip Bowls Remova...

Страница 7: ...will spread to areas beyond the surface elements The areas surrounding the elements may become hot enough to cause burns Figure 2 NOTE White glass cooktops only Due to the high intensity of heat generated by the surface elements the glass surface will turn light green when the element is first turned off This phenomenon is normal and the glass will come back to its original white color after it ha...

Страница 8: ... place plastic items such as salt and pepper shakers spoon holders or plastic wrappings on top of the range when it is in use These items could melt or ignite Potholders towels or wooden spoons could catch fire if placed too close to the surface elements Operating Single Radiant Surface Elements The cooktop has single radiant surface elements at 2 locations the right and left rear Figure 2 element...

Страница 9: ...the entire surface heating element Check for flatness by rotating a ruler across the bottom of the cookware See Figure 5 Be sure to follow the recommendations for using cookware as shown in Figure 6 Note The size and type of cookware used will influence the setting needed for best cooking results Figure 5 Cookware Material types The cookware material determines how evenly and quickly heat is trans...

Страница 10: ...nd Replacing Oven Racks To remove pull the rack forward until it stops Lift up front of rack and slide out To replace fit the rack onto the guides on the oven walls Tilt the front of the rack upward and slide the rack back into place Arranging Oven Racks ALWAYS ARRANGE OVEN RACKS WHEN THE OVEN IS COOL PRIOR TO OPERATING THE OVEN Always use oven mitts when the oven is hot RECOMMENDED RACK POSITIONS...

Страница 11: ...KED LIGHTS The OVEN Jight will glow each time the oven turns on to maintain the set oven temperature The PREHEAT light will glow when the oven is first set to operate or if the desired temperature is reset higher than the actual oven temperature The DOOR LOCKED light will flash when the oven door locks and unlocks or when using the Self Clean cycle or when the oven door lockout is activated The in...

Страница 12: ...t time has run out the timer will beep 3 times It will then continue to beep 3 times every 60 seconds until _ _ pad is pressed Note The indicator light located above the pad will glow while the minute timer is active Note The timer does not start or stop cooking It serves as an extra timer in the kitchen that will beep when the set time has run out The timer can be used alone or during any of the ...

Страница 13: ...o override this feature for continuous baking To set control for continuous baking 1 Press and hold pad down for 5 seconds until tone is heard hr will appear in display for continuous cooking The current time of day will return to the display 2 To cance theCont nuous Bake funct on press ano noo pad for5seconds until tone isheard 12hr will appear in display indicating that the control has returned ...

Страница 14: ... time of day 2 Place the food in the oven 3 Press pad o appears in the display 4 Within 5 seconds press the _ or V pad The display will show 350 F 177 C By holding the_ or V pad the temperature can then be adjusted in 5 F increments 1 C if the control is set to display Celsius Press ad 00 5 p will flash in the dtsplay HR MIN 6 Press he _ or V pad until the desired baking time appears 7 Press pad T...

Страница 15: ...n overcrowded Oven door opened too frequently Allow oven to preheat to the selected temperature before placing food in oven Choose pan sizes that will permit 2 to 4 5 1cm to 10 2cm of air space on all sides when placed in the ove n Use a medium weight aluminum baking sheet Allow oven to preheat to the selected temperature before placing food in the oven Use proper rack position for baking needs Se...

Страница 16: ...oiling is finished press s_P pad 7 When Broil Rack Position Table Refer to Figure 3 Note It is recommended to cook food 3 to 5 inches away from the broil element Not supplied with appliance Figure 1 Note The broiler pan and the insert are available by mail order Note The broiler pan and the insert allows grease to drain and be kept away from the high heat of the broiler DO NOT use the pan without ...

Страница 17: ... Hold OFF at any time press _ _ pad The Warm Hold indicator light above the pad will turn OFF cCy Adjusting the Oven Temperature Your oven temperature control has been precisely set at the factory This setting may differ from your previous oven however so your recipe times may not give you the results you expect If you think that the oven is cooking too hot or too cool for your recipe times you ca...

Страница 18: ...luminum foil These items cannot withstand high cleaning temperatures Oven racks do not have to be removed but remaining in the oven during the Self Clean will turn them slightly blue and dull their finish If left in after the cycle is complete and the oven has cooled rub the sides of the oven racks with wax paper or a cloth containing a small amount of salad oil this will make the racks glide easi...

Страница 19: ...or the oven door to lock 6 CLn will appear in the display during the Self Clean cycle and the LOCK light will glow until the Self Cleaning cycle is complete or cancelled and the oven temperature has cooled When the Self Clean Cycle is Completed 1 The time of day or End will appear in the display window and the Clean and LOCK light will continue to glow 2 Once the oven has cooled down for about 1 H...

Страница 20: ...Oven Racks Gentle scouring with a soapy scouring pad will remove most spots Rinse with a 1 1 solution of clear water and ammonia If necessary cover difficult spots with an ammonia soaked paper towel for 30 to 40 minutes Rinse with clean water and a damp cloth and then scrub with a soap filled scouring pad Rinse and wipe dry with a clean cloth Remove all cleaners or the porcelain may become damaged...

Страница 21: ...ll pans immediately 2 Put on an oven mitt wipe up carefully or move hot spills away from the element area with a clean damp cloth 3 Allow the cooktop to cool Follow the instructions above for heavy burned on soil Use a soap filled scouring pad with warm water or cover heavily soiled spots with a solution of clear water and ammonia Scour gently Rinse and wipe dry with a clean cloth If any soil rema...

Страница 22: ...t slide anything metal or glass across the cooktop Do not use your cooktop as a cutting board or work surface in the kitchen Do not cook foods directly on the cooktop surface without a pan Do not drop heavy or hard objects on the glass cooktop because they may cause it to crack Cleaning Recommendations for the Ceramic Glass Cooktop Before cleaning the cooktop be sure the controls are turned to OFF...

Страница 23: ...nly Some models are equipped with stainless steel exterior parts Special care and cleaning are required for maintaining the appearance of stainless parts Please refer to the table provided at the beginning of the General Care Cleaning section in this Use Care Guide Changing Oven Light Be sure the oven is unplugged and all parts are COOL before replacing the oven light bulb Do not turn the oven lig...

Страница 24: ...ller pins located on each side of the oven door frame See Fig 4 The hook of the hinge arms must be fully seated onto the roller pins 3 Fully open the oven door horizontal with floor See Fig 1 4 Push the door hinge locks up towards and into the oven frame on both left and right oven door hinges See Fig 2 to the locked position 5 Close the oven door Special Door Care Instructions Most oven doors con...

Страница 25: ... used Surface element too Incorrect control setting Raise or lower setting until proper amount of heat is obtained Dial hot or not hot enough markings are an indicator of relative heat settings and will vary slightly Voltage is incorrect Be sure appliance is properly connected to the specified power source If you are not sure about this requirement call 1 800 4 MY HOME for service See back cove r ...

Страница 26: ...ven Temperature section in this Use and Care Guide A cooling fan may automatically turn on and off to cool internal parts It is normal and the fan may continue to run after the range has been turned OFF but may also stop immediately to turn ON after a while Excessive spillovers in oven Set self clean cycle for a longer cleaning time Excessive spillovers in oven This is normal especially for pie sp...

Страница 27: ...su nuevo producto El acuerdo incluye Io siguiente Piezas y mano de obra necesarias para contribuir a mantener el funcionamiento adecuado de los productos utilizados en condiciones normales de uso no s61o en case de defectos de los productos Nuestra cobertura va mucho mas alia que la garantia del producto No se aplican deducibles ni exclusiones per fallas del funcionamiento es decir verdadera prote...

Страница 28: ...ur Home For repair of carry in items like vacuums lawn equipment and electronics call anytime for the location of your nearest Sears Parts Repair Service Center 1 800 488 1222 U S A 1 800 469 4663 Canada www sears com www sears ca To purchase a protection agreement on a product serviced by Sears 1 800 827 6655 U S A 1 800 361 6665 Canada Para pedir servicio de reparaci6n a domicilio y para ordenar...

Отзывы: