background image


SI-BM05 


Ultrasound/High Frequency 


2 Functions 


- High Frequency 
- Ultrasound 


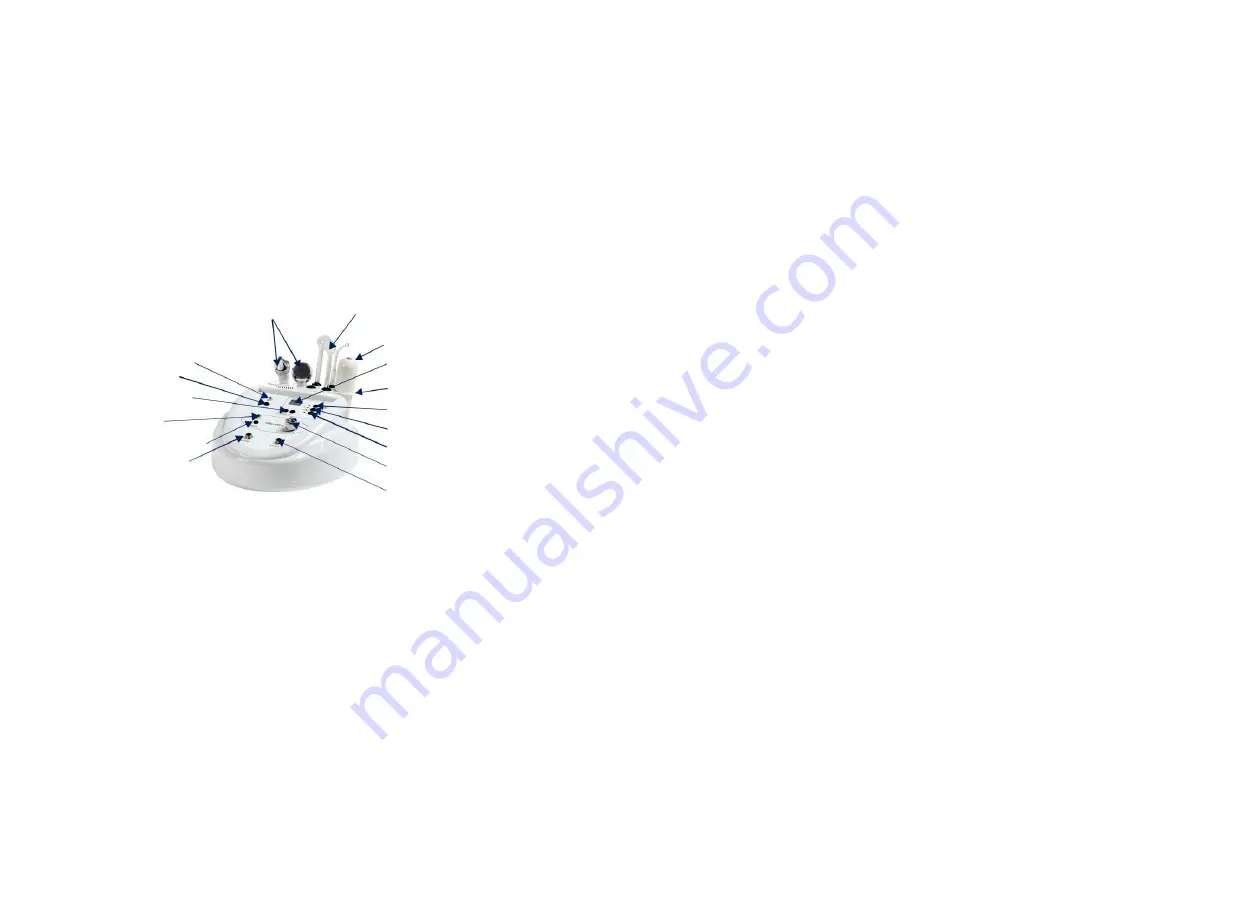
Machine Structure 


Ultrasound Probes 

High Frequency Glass Tubes 

Ultrasound Indicator Light 

High Frequency Handpiece 

Ultrasound Display 

Ultrasound Power 

Accessories Holder 

Ultrasound Down/Up 


High Frequency 

Ultrasound On/Off 

Indicator Light 

Ultrasound Mode 

High Frequency Power 

Ultrasound Power 

Ultrasound Output 

High Frequency Intensity 


High Frequency Output 


Operating Instructions for High Frequency Function 


1. Connect the High Frequency handle's wire to the machine (it only fits 

one way) making sure to fasten it into place the securing ring. 

2. Simply insert the desired glass electrode (metal end first) into the 

hole at the end of the handle. 

3. Using the power switch, turn the machine to the 

“on” position and the 

glass electrode should light up. 

4. To control the intensity of the electrode, use the knob located at the 

center of the face place labeled 

“Min/Max”. Turning this knob allows 

the user to adjust the current to match the desired need. 

5. When the machine is not in use, make sure the power switch is in the 

“Off” position. 


Operating Instruction for Ultrasonic function 


I. Preparation 


(1) .  Before  start  the  ultrasonic,  cleanse  the  area  to  be  worked. 

After cleansed, apply suitable lotion and gel to the skin. 


(2) . Press Power On/Off for Ultrasonic to start the function. 

(3) . Output intensity display on Intensity window, Press Intensity 

“up” and 

“down” button to set output intensity, output intensity classify into 9 
levels, from minimum 0 to maximum 1.8 Watts/cm. Each level is 0.2 
Watts/cm. For Facial work, low to mid intensity is recommended. For 
Body work, mid to maximum intensity 


is recommended. 


II. Face Treatment 


(1) . Connect Face Electrode (big one) into Face Electrode output. 
(2) . Press Intensity 

“up” and “down” button to set output 

intensity to your need. 

(3) .  Press  Pulse/Continuing  mode  to  select  Pulse  or  Continuing 

wave, Pulse/Continuing wave indicator will light on. 

(4) . Apply the Electrode working on the face. 
 

III. Eye Treatment 


(1) .  Connect  Eye  Electrode  (small  one)  into  Electrode  output. 

(Should take out the Face Electrode first) 


(2) .  Press  Intensity 

“up”  and  “down”  button  to  set  output 

intensity to your need. 

(3) .  Press  Pulse/Continuing  mode  to  select  Pulse  or  Continuing 

wave, Pulse/Continuing wave indicator will light on. 

(4) . Apply the Electrode working around the Eye area. 
 
*** 

Important: 


1.  Clean skin with clear water. 

2.  Never stop the electrode on the skin in one spot. 


3. Always keeps the electrode moving across the skin. 

4.  Never point the electrode towards chest area. 


5.  Do not immerse the handle or the machine into water. 
6.  Store in a dry cool place. 


Safety Warning 


1. When proceed deep cleaning or Galvanic, 

accompanies with suitable emulsion or gel. 

2.  Do not modify the equipment. 
3.  Do not immerse the handle or the machine into water. 
4. When adjust the intensity, slightly increase from low to max. 
5. After usage, clean the accessories and store in a cool and dry 

place. The machine should be grounding. 


Specifications: 


Voltage: 
110V/60Hz 


Power: 22W 


14


15 

Содержание HB-MF01

Страница 1: ...Kendal Microdermabrasion Machines Instructions...

Страница 2: ...n 25 Skin Scrubber Function 26 Photon Function 28 Vacuum Spray 30 BIO microcurrent 31 High Frequency Function 33 Galvanic Function 34 Trouble Shooting 35 General Safety Warning 35 General Important In...

Страница 3: ...d tips X 9 Cotton filter X 1 package small round filter for the stainless steel wand Rubber rings and fuses Full detailed English manual instructions Specifications Voltage 220V 240V 50Hz 100V 120V 60...

Страница 4: ...ions Specifications Voltage 100V 240V Power 22W Packing Size 28 26 20cm G W 3kg Voltage 100V 240V Power 22W Packing Size 28 26 20cm G W 3kg SI BM02 Diamond Dermabrasion 3 Functions Diamond Dermabrasio...

Страница 5: ...age 100V 240V Power 22W Packing Size 30 26 24cm G W 2 2kg HB MF03 3 In 1 Diamond Dermabrasion 3 Functions Diamond Dermabrasion Ultrasonic Skin Scrubber Machine Structure Scrubber Ultrasonic Exchange T...

Страница 6: ...and destroy the control board of the whole machine 3 After operating turn off the power buttons and disconnect the power cord then disconnect and clean accessories Package Included Diamond Dermabrasi...

Страница 7: ...Set the TIMER Diamond Press ON Diamond ON OFF to start Adjust the Intensity Knob for the suction you want Press OFF Diamond ON OFF after use Ultrasonic Press Wrinkle and adjust the INTENSITY Press to...

Страница 8: ...he control to the left 6 When the machine is not in use make sure the power switch is Off High Frequency Function 1 Connect the High Frequency handle s wire to the machine it only fits one way making...

Страница 9: ...nsity up and down button to set output intensity output intensity classify into 9 levels from minimum 0 to maximum 1 8 Watts cm Each level is 0 2 Watts cm For Facial work low to mid intensity is recom...

Страница 10: ...serious injury to the person s in contact with the machine SI BM08 BIO Face Lift Functions BIO Machine Structure Bio microcurrent facelift is a non surgical non invasive cosmetic technique that provid...

Страница 11: ...ap Please insert the Cotton stick which you can find them in the plastic bag then dampen the cotton with anti wrinkle essence or other kind of essences Note Handles with damp cotton stick conducts ele...

Страница 12: ...with water to clean diam on hands after the cleaning put it into the solution cosist of 75 alcohol for 5 10 minutes take it out and wipe it to complete dry Then use UV light or high temperature for st...

Страница 13: ...22 23...

Страница 14: ...24 25...

Страница 15: ...26 27...

Страница 16: ...28 29...

Страница 17: ...sun damage treatment and cellulite Can work on whole body such as face neck hips breast etc Smash fat cells and burn fats Most people need a course of around 10 microcurrent sessions to see the full b...

Страница 18: ...and you can feel the micro current working obviously Even your eye can feel light changes due to the pulse of micro current High Frequency Function Function Promote blood circulation strengthen activ...

Страница 19: ...s to the surface At the same time the positive ions gives you a fresh look and plump the skin banishing wrinkles Galvanic function operation 1 Plug the electrode handle to the positive output of galva...

Страница 20: ...36...

Отзывы: