15
Installing the Ribbon
Installing the Ribbon
Installing the Ribbon
Installing the Ribbon
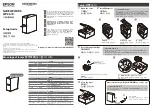
1)
To replace the printer ribbon, pull the existing
ribbon cartridge
forward to remove it; see figure 6.
2)
Insert the new cartridge with the paper under the ribbon. Turn
the knob toward the arrow to tighten the ribbon.
3)
Change the ribbon before it becomes worn out. Do not attempt
to re-ink a spent ribbon cartridge.
Caution
Caution
Caution
Caution
Do not use the printer if the ribbon a
Do not use the printer if the ribbon a
Do not use the printer if the ribbon a
Do not use the printer if the ribbon and paper are not properly installed as this can
nd paper are not properly installed as this can
nd paper are not properly installed as this can
nd paper are not properly installed as this can cause damage to the
cause damage to the
cause damage to the
cause damage to the
print head mechanism.
print head mechanism.
print head mechanism.
print head mechanism.
Always make sure to install the paper roll so that the paper comes from front top of
Always make sure to install the paper roll so that the paper comes from front top of
Always make sure to install the paper roll so that the paper comes from front top of
Always make sure to install the paper roll so that the paper comes from front top of roll. If the paper roll is
roll. If the paper roll is
roll. If the paper roll is
roll. If the paper roll is
installed backwards the paper can bind on the printed
installed backwards the paper can bind on the printed
installed backwards the paper can bind on the printed
installed backwards the paper can bind on the printed circuit board causing a paper jam.
circuit board causing a paper jam.
circuit board causing a paper jam.
circuit board causing a paper jam.
If for any reason the paper becomes jammed, immediately take the printer off line
If for any reason the paper becomes jammed, immediately take the printer off line
If for any reason the paper becomes jammed, immediately take the printer off line
If for any reason the paper becomes jammed, immediately take the printer off line by pressing the
by pressing the
by pressing the
by pressing the
<SLCT> button once and slowly pulling out the paper. Paper jams
<SLCT> button once and slowly pulling out the paper. Paper jams
<SLCT> button once and slowly pulling out the paper. Paper jams
<SLCT> button once and slowly pulling out the paper. Paper jams can damage the print mechanism
can damage the print mechanism
can damage the print mechanism
can damage the print mechanism
requiring replacement.
requiring replacement.
requiring replacement.
requiring replacement.
Warranty
The Keltron Corporation warrants all products against defects in workmanship, materials, and construction
under normal use and service for a period of ONE YEAR, except radio transceivers which carry a 36-month
warranty, from the date of shipment. Keltron Corporation's responsibility under this warranty is limited to
the repair or replacement of defective parts that are returned to the factory, freight prepaid. Repaired parts
are returned to the customer from the factory, freight prepaid.
This warranty does not extend to any of our products that in our opinion have been subjected to misuse,
neglect, accident, improper installation, or misapplication. The warranty does not extend to products that
have been repaired or altered outside our factory without our written approval.
Except as provided above, Keltron Corporation makes no warranty of any kind, express or implied, except
that the goods sold under this agreement shall be of the standard quality of Keltron Corporation, and the
buyer assumes all risk and liability resulting from the use of the goods. Keltron Corporation neither
assumes nor authorizes any person to assume for Keltron Corporation any other liability in connection with
the sale or use of the goods sold, and there are no oral or written agreements or warranties collateral to or
affecting this agreement. Further, Keltron Corporation shall not be liable for consequential damages
resulting from any breach of warranty.
Figure
Figure
Figure
Figure 6
6
6
6