background image

46

Étape 1.6 (suite)

ENCADREMENT DE L’OUVERTURE BRUTE

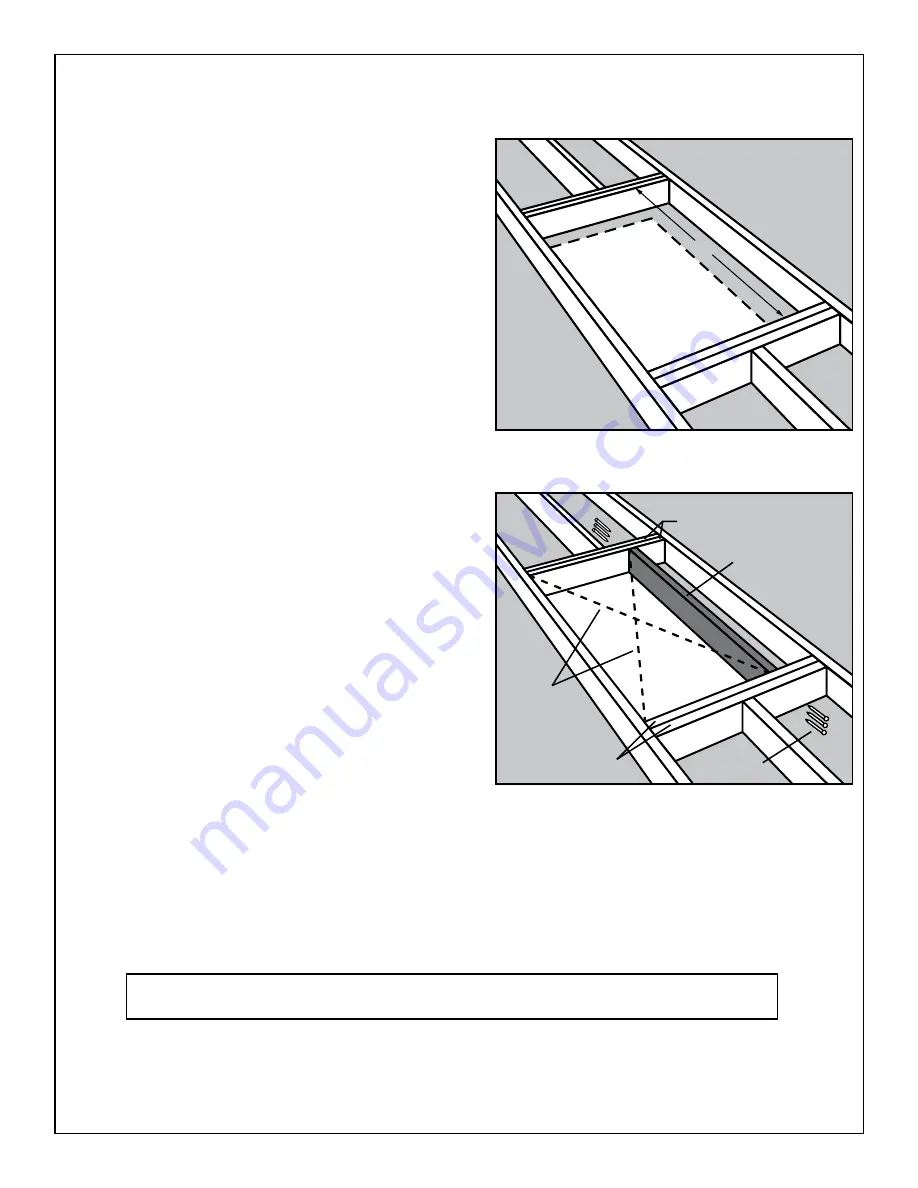
Installation de tirants :
ÉTAPE 1.  

Mesurez la longueur d’entretoise “S” entre les 
rives (Voir la Figure 17).

ÉTAPE 2.  

Coupez une entretoise à cette longueur. 
Utilisez des pièces de bois de la taille d’une 
solive.

ÉTAPE 3.  

Si la solive de plafond ne procure pas un 
côté de l’encadrement, coupez alors une 
deuxième entretoise de la même longueur 
que la première. Notez qu’un seul tirant est 
nécessaire en Figure 17 parce que la solive de 
plafond constitue un côté de l’encadrement.

ÉTAPE 4.  

Positionnez la ou les entretoises le long 
du ou des côtés non-encadrés de votre 
emplacement (Voyez la Figure 18). Vériiez que 
les dimensions intérieures de l’encadrement 
restent à au moins à 57.1 x 137.2 cm (W2208, 
W2210 et WU2210) ou 63.5 x 137.2 cm 
(W2508 et W2510). 

ÉTAPE 5.  

Pour ixer le ou les tirants sur les chevêtres, 
utilisez des clous qui soient suffisamment 
longs pour traverser les deux chevêtres et 
entrer dans le tirant d’au moins 2.5 cm. Mettez 
la ou les entretoises perpendiculairement 
aux rives et plantez (3) clous 16d au travers 
des rives et dans l’entretoise. Vériiez la 
perpendicularité, puis clouez à l’autre 
extrémité. Vériiez la perpendicularité des côtés 
de l’ouverture en mesurant ses diagonales. 

Ces mesures doivent être égales à 3 mm 
près pour que la perpendicularité soit 
acceptable 

(Voyez la Figure 18).

FIGURE 17

S

FIGURE 18

Chevêtres

Tirant 

Mesures 

diagonales

Chevêtres

Clous

VOTRE OUVERTURE BRUTE EST PRÊTE, PASSEZ À L’ÉTAPE 4 (PAGE 32) - PRÉPARATION/ 

CONFECTION DE L’OUVERTURE POUR ÉCHELLE DE GRENIER

Содержание W2200 Series

Страница 1: ...ODAS LAS INSTRUCCIONES PUEDEN RESULTAR EN LESIONES GRAVES CETTE CHELLE D CHELLE EST CON UE POUR UNE UTILISATION R SIDENTIELLE UNIQUEMENT LISEZ CES INSTRUCTIONS COMPL TEMENT AVANT DE COMMENCER LE TRAVA...

Страница 2: ......

Страница 3: ...DED 3 Lag Screws optional 16d Nails 8d Nails 1 x 4 temporary support slats 2 pieces approximately 32 long Braces with same dimensions as joists 1 4 or 3 8 plywood for shims TOOLS NEEDED Hammer Ladder...

Страница 4: ...SCREWS ARE SECURELY FASTENED Remove cord and pull handle from stairway place through hole in plywood door and knot the end STEP 4 PREPARING MAKING THE ATTIC LADDER OPENING A If it is necessary to modi...

Страница 5: ...NT MOUNTING OF STAIRWAY A Be sure stairway is square and level in the rough opening If the stair frame has bowed while the stairway was in inventory nails and blocks of wood used as shims will straigh...

Страница 6: ...a hammer to remove see FIGURE 4C PIVOT PLATE END BOARD PIANO HINGE BRACKETS MEASURE THESE DISTANCES CUT ACCORDING TO MEASUREMENT TRIM LINE A A B B FIGURE 4B FIGURE 4C WARNING The bottom section must...

Страница 7: ...ponents of heating cooling systems embedded in the ceiling joists made of materials other than wood metal reinforced plaster suspended ceilings If your ceiling contains any of the above do not attempt...

Страница 8: ...u can get into the overhead space without stepping above the working height of the ladder The working height of the ladder is two steps down from the top Your stepladder must also have a Duty Rating t...

Страница 9: ...Step 3 Go into the overhead space and ind the area above your chosen location This area may be located by A Listening for tapping from below B Measuring distances from walls or other objects common to...

Страница 10: ...desired make sure that there is enough room to do so C Check above your chosen location for hazards and obstructions such as Electric wire Pipes Heating and cooling ducts Furnaces Hot water heaters or...

Страница 11: ...be used as a side of the frame you will build This will simplify framing the rough opening Step 6 Cut out the rest of the ceiling within the marked outline following these instructions A Do not cut a...

Страница 12: ...his mark B If the chosen location is perpendicular to the joists mark the rough opening width on top of the joists See Figure 8 Do not cut the joist at this mark Step 2 Cut 2 joist sized boards long e...

Страница 13: ...are lat and vertical 2x joist thickness Cut Here Section of joist to be removed Cut Here Dotted line indicates your chosen location 2x joist thickness Section 1 6 FRAMING THE ROUGH OPENING Before Proc...

Страница 14: ...nd into the header See Figure 12 It is very important that header board is vertically plumb as well as horizontally square to side joists STEP 5 Position the second header 54 from the irst one and rep...

Страница 15: ...the cut joist s with 3 16d nails See Figure 15 STEP 5 Check header for squareness then drive 3 16d nails through each joist into each end of the header See Figure 15 STEP 6 Place a second header agai...

Страница 16: ...hat the inside dimensions of the frame are 22 1 2 x 54 W2208 W2210 and WU2210 or 25 x 54 W2508 and W2510 STEP 5 To attach the stringer s to the headers use nails that are long enough to go through bot...

Страница 17: ......

Страница 18: ...vos 16d Clavos 8d Tablillas de soporte temporal de 1 x 4 2 piezas de 32 de longitud aprox Refuerzos diagonales con las mismas dimensiones de las vigas Madera laminada de 1 4 3 8 para las cu as HERRAMI...

Страница 19: ...1 3 p gina 23 para veriicar que la altura del cielo raso el espacio de aterrizaje y el espacio libre para giro son apropiados PASO 4 PREPARACI N ELABORACI N DE LA ABERTURA PARA LA ESCALERA DE TICO A...

Страница 20: ...ecto y nivelada en la abertura preliminar Si el marco de la escalera se ha encorvado pandeado mientras la escalera estaba almacenada los clavos y los bloques de madera utilizados como cu as lo enderez...

Страница 21: ...ESTAS DISTANCIAS CORTE DE ACUERDO A LA MEDICI N L NEA DE CORTE A A B B FIGURA 4B FIGURA 4C ADVERTENCIA La secci n inferior debe hacer contacto a ras con el piso No realizar apropiadamente el corte pod...

Страница 22: ...l cielo raso vigas hechas de materiales diferentes a la madera revoque mortero reforzado con metal cielos rasos suspendidos Si su cielo raso contiene alguno de los anteriores elementos no intente inst...

Страница 23: ...acio superior sin pararse m s all de la altura de trabajo de la escalera La altura de trabajo de la escalera es dos pelda os abajo de la meseta supericie superior de la escalera Su escalera tipo tijer...

Страница 24: ...aso 3 Ingrese al espacio superior y encuentre el rea sobre su ubicaci n elegida Esta rea podr a ubicarse A Escuchando al golpear desde abajo B Midiendo distancias desde las paredes u otros objetos com...

Страница 25: ...Revise el espacio sobre su ubicaci n elegida en cuanto a peligros y obstrucciones tales como Cables el ctricos Tuber as Ductos de calentamiento y enfriamiento C maras de calentamiento Calentadores de...

Страница 26: ...un lado del marco que usted construir Esto simpliicar la enmarcaci n de la abertura preliminar Paso 6 Corte el resto del cielo raso dentro del trazo marcado siguiendo estas instrucciones A No corte n...

Страница 27: ...a ubicaci n elegida es perpendicular a las vigas marque el ancho de la apertura preliminar en la parte superior de las vigas Vea la Figura 8 No corte la viga en esta marca Paso 2 Corte 2 tablas de tam...

Страница 28: ...e aqu Secci n de la viga a ser removida Corte aqu La l nea punteada indica su ubicaci n elegida Espesor de 2 vigas Secci n 1 6 ENMARCACI N DE LA ABERTURA PRELIMINAR Antes de proceder Usted debe tener...

Страница 29: ...portante que la tabla de travesa o est en ngulo recto verticalmente y tambi n en ngulo recto horizontalmente con respecto a las vigas laterales PASO 5 Posicione el segundo travesa o 54 pulgadas a part...

Страница 30: ...e la viga s cortada Vea la Figura 15 PASO 5 Veriique el travesa o en cuanto a ngulo recto luego clave 3 clavos 16d a trav s de cada viga dentro de cada extremo del travesa o Vea la Figura 15 PASO 6 Co...

Страница 31: ...teriores del marco son 22 1 2 x 54 W2208 W2210 y WU2210 25 x 54 W2508 y W2510 PASO 5 Para sujetar el travesa o s longitudinal a los travesa os utilice clavos que sean lo suicientemente largos para atr...

Страница 32: ......

Страница 33: ...el Clous 16d Clous 8d Planchettes de support temporaire de 1 x 4 2 morceaux de longueur 32 ou 81 cm environ Entretoises de m mes dimensions que les solives Contreplaqu de 1 4 ou 3 8 pour faire des cal...

Страница 34: ...longueur C R f rez vous l Annexe Section 1 3 Page 37 pour v riier que la hauteur de plafond l espace de r ception apr s d ploiement et l espacement pour le pivotement conviennent bien TAPE 4 PR PARATI...

Страница 35: ...brute Si le cadre de l escalier a travaill pendant que l escalier tait en inventaire des clous et des blocs de bois utilis s comme cales vont le redresser Du cintrage est normal car les pi ces en boi...

Страница 36: ...COUPEZ SELON LES MESURES LIGNE DE COUPE A A B B FIGURE 4B FIGURE 4BC AVERTISSEMENT La section du bas doit arriver pile au plancher Le fait de ne pas couper correctement peut entra ner une contrainte...

Страница 37: ...fond solives constitu es de mat riau autre que du bois pl tre renforc par du m tal plafonds suspendus Si votre plafond comporte un de ces l ments n essayez pas d installer l chelle de grenier Contacte...

Страница 38: ...au dessus sans avoir une marche monter au dessus de la hauteur de travail normale de l escabeau La hauteur de travail normale sur l escabeau est deux marches de son sommet Votre escabeau doit aussi av...

Страница 39: ...4 tape 3 Allez dans l espace du dessus et explorez la zone au dessus de votre choix d emplacement Cette zone peut tre rep r e de ces fa ons A En coutant des cognements port s par en dessous B En mesur...

Страница 40: ...vous qu il y aura assez de place pour le faire C Cherchez au dessus de l emplacement choisi l ventualit de dangers ou d obstruction comme C ble lectrique Tuyaux Conduites de chauffage ou refroidisseme...

Страница 41: ...cela permet que cette solive soit utilis e comme c t pour l encadrement que vous construirez Cela simpliiera l encadrement de l ouverture brute tape 6 Coupez le reste du plafond dans les limites du c...

Страница 42: ...perpendiculaire aux solives marquez la largeur de l ouverture brute sur le dessus des solives Voyez la Figure 8 Ne coupez pas de solive cette marque tape 2 Coupez 2 planches de la taille des solives...

Страница 43: ...solive Coupez ici Section de solive enlever Coupez ici Ligne pointill e indiquant votre emplacement choisi 2 x l paisseur de solive Section 1 6 ENCADREMENT DE L OUVERTURE BRUTE Avant de commencer Vou...

Страница 44: ...rer la rive Voyez la Figure 12 Il est tr s important que le morceau de rive soit d aplomb verticalement comme d querre avec les c t s des solives tape 5 Positionnez la deuxi me rive 137 2 cm de la pre...

Страница 45: ...ec 3 clous 16d Voyez la Figure 15 TAPE 5 V riiez la perpendicularit de la rive et plantez 3 clous 16d au travers de chaque solive dans chacune des extr mit s de la rive Voyez la Figure 15 TAPE 6 Place...

Страница 46: ...s int rieures de l encadrement restent au moins 57 1 x 137 2 cm W2208 W2210 et WU2210 ou 63 5 x 137 2 cm W2508 et W2510 TAPE 5 Pour ixer le ou les tirants sur les chev tres utilisez des clous qui soie...

Страница 47: ......

Страница 48: ...U S 888 523 3370 Canada 877 553 7004 www wernerladder com atticladder Werner Co 93 Werner Rd Greenville PA 16125 9499 Werner Access Products Canada ULC 60 Admiral Blvd Mississauga ON L5T 2W1 PN103943...

Страница 49: ...ODAS LAS INSTRUCCIONES PUEDEN RESULTAR EN LESIONES GRAVES CETTE CHELLE D CHELLE EST CON UE POUR UNE UTILISATION R SIDENTIELLE UNIQUEMENT LISEZ CES INSTRUCTIONS COMPL TEMENT AVANT DE COMMENCER LE TRAVA...

Страница 50: ...Blank...

Страница 51: ...DED 3 Lag Screws optional 16d Nails 8d Nails 1 x 4 temporary support slats 2 pieces approximately 32 long Braces with same dimensions as joists 1 4 or 3 8 plywood for shims TOOLS NEEDED Hammer Ladder...

Страница 52: ...STENED Remove cord and pull handle from stairway place through hole in plywood door and knot the end STEP 4 PREPARING MAKING THE ATTIC LADDER OPENING A If it is necessary to modify an existing opening...

Страница 53: ...AT THIS TIME STEP 7 PERMANENT MOUNTING OF STAIRWAY A Be sure stairway is square and level in the rough opening If the stair frame has bowed while the stairway was in inventory nails and blocks of woo...

Страница 54: ...mer to remove see FIGURE 4C PIVOT PLATE END BOARD PIANO HINGE BRACKETS MEASURE THESE DISTANCES CUT ACCORDING TO MEASUREMENT TRIM LINE A A B B FIGURE 4B FIGURE 4C WARNING component parts of the stairwa...

Страница 55: ...y of the following components of heating cooling systems embedded in the ceiling joists made of materials other than wood metal reinforced plaster suspended ceilings If your ceiling contains any of th...

Страница 56: ...t into the overhead space without stepping above the working height of the ladder The working height of the ladder is two steps down from the top Your stepladder must also have a Duty Rating that is g...

Страница 57: ...ed by A Listening for tapping from below B Measuring distances from walls or other objects common to the overhead space and the room below LS 2 SC FC Description FC Floor to ceiling height SC Swing cl...

Страница 58: ...ing or crawling in the overhead space is desired make sure that there is enough room to do so C Check above your chosen location for hazards and obstructions such as Electric wire Pipes Heating and co...

Страница 59: ...f the frame you will build This will simplify framing the rough opening Step 6 Cut out the rest of the ceiling within the marked outline following these instructions A Do not cut any joists at this ti...

Страница 60: ...his mark B If the chosen location is perpendicular to the joists mark the rough opening width on top of the joists See Figure 8 Do not cut the joist at this mark Step 2 Cut 2 joist sized boards long e...

Страница 61: ...x joist thickness Cut Here Section of joist to be removed Cut Here Dotted line indicates your chosen location 2x joist thickness Section 1 6 FRAMING THE ROUGH OPENING Before Proceeding You should have...

Страница 62: ...nto the header See Figure 12 It is very important that header board is vertically plumb as well as horizontally square to side joists STEP 5 Position the second header 54 from See Figure 13 STEP 6 The...

Страница 63: ...header to the end of the cut joist s with 3 16d nails See Figure 15 STEP 5 Check header for squareness then drive 3 16d nails through each joist into each end of the header See Figure 15 STEP 6 3 16d...

Страница 64: ...ions of the frame are 22 1 2 x 54 W2208 W2210 and WU2210 or 25 x 54 W2508 and W2510 STEP 5 To attach the stringer s to the headers use nails that are long enough to go through both headers and into th...

Страница 65: ...Blank...

Страница 66: ...16d Clavos 8d Tablillas de soporte temporal de 1 x 4 2 piezas de 81 cm de longitud aprox Refuerzos diagonales con las mismas dimensiones de las vigas Madera laminada de 6 35 mm 9 52 mm para las cu as...

Страница 67: ...s PASO 4 PREPARACI N ELABORACI N DE LA ABERTURA PARA LA ESCALERA DE TICO A existente o crear una nueva abertura por favor consulte el Ap ndice Secci n 1 1 p gina 22 B Corte la abertura preliminar a tr...

Страница 68: ...nada los clavos y los bloques de madera utilizados como cu as lo enderezar n El encorvado es normal ya que las piezas de madera est n sometidas a fuerte tensi n del resorte por alg n tiempo antes de l...

Страница 69: ...O MIDA ESTAS DISTANCIAS CORTE DE ACUERDO A LA MEDICI N L NEA DE CORTE A A B B FIGURA 4B FIGURA 4C ADVERTENCIA La secci n inferior debe hacer contacto a ras con el piso No realizar apropiadamente el co...

Страница 70: ...entes de sistemas de calefacci n enfriamiento incrustados en el cielo raso vigas hechas de materiales diferentes a la madera revoque mortero reforzado con metal cielos rasos suspendidos Si su cielo ra...

Страница 71: ...in pararse m s all de la altura de trabajo de la escalera La altura Su escalera tipo tijera tambi n debe tener una Capacidad de Servicio superior a la suma de su peso m s el peso de la escalera de tic...

Страница 72: ...pacio superior y encuentre el rea sobre su ubicaci n elegida Esta rea podr a ubicarse A Escuchando al golpear desde abajo B Midiendo distancias desde las paredes u otros objetos comunes al espacio sup...

Страница 73: ...miento y enfriamiento C maras de calentamiento Calentadores de agua calientes u otras obstrucciones NOTA Para revisar en cuanto a peligros usted deber mover el aislamiento fuera de su ubicaci n elegid...

Страница 74: ...ura a lo largo de una viga del cielo raso permitir utilizar la viga como un lado del marco que usted abertura preliminar Paso 6 Corte el resto del cielo raso dentro del trazo marcado siguiendo estas i...

Страница 75: ...n esta marca B Si la ubicaci n elegida es perpendicular a las vigas marque el ancho de la apertura preliminar en la parte superior de las vigas Vea la Figura 8 No corte la viga en esta marca Paso 2 Co...

Страница 76: ...asegur ndose que los extremos de corte de la viga s son planos y verticales Espesor de 2 vigas Corte aqu Secci n de la viga a ser removida Corte aqu La l nea punteada indica su ubicaci n elegida Espes...

Страница 77: ...a 12 Es muy importante que la tabla de travesa o est en ngulo recto verticalmente y tambi n en ngulo recto horizontalmente con respecto a las vigas laterales PASO 5 Posicione el segundo travesa o 54 p...

Страница 78: ...travesa o al extremo de la viga s cortada Vea la Figura 15 PASO 5 recto luego clave 3 clavos 16d a trav s de cada viga dentro de cada extremo del travesa o Vea la Figura 15 PASO 6 Coloque un segundo t...

Страница 79: ...res del marco son 0 57 m x 1 37 m W2208 W2210 y WU2210 0 64 m x 1 37 m W2508 y W2510 PASO 5 Para sujetar el travesa o s longitudinal a los travesa os utilice clavos que sean lo travesa os y dentro del...

Страница 80: ...Blank...

Страница 81: ...nnel Clous 16d Clous 8d Planchettes de support temporaire de 1 x 4 2 morceaux de longueur 81 cm environ Entretoises de m mes dimensions que les solives Contreplaqu de 6 35 cm ou 9 53 cm pour faire des...

Страница 82: ...z vous l Annexe Section 1 3 Page 38 r ception apr s d ploiement et l espacement pour le pivotement conviennent bien TAPE 4 PR PARATION EX CUTION DE L OUVERTURE POUR CHELLE DE GRENIER A existante ou d...

Страница 83: ...rute Si le cadre de l escalier a travaill pendant que l escalier tait en inventaire des clous et des blocs de bois utilis s comme cales vont le redresser Du cintrage est normal car les pi ces en bois...

Страница 84: ...4BC AVERTISSEMENT La section du bas doit arriver pile au plancher Le fait de ne pas couper correctement peut entra ner une contrainte anormale sur les parties constitutives de l escalier et provoquer...

Страница 85: ...s de syst mes de chauffage refroidissement int gr s dans le plafond solives constitu es de mat riau autre que du bois pl tre renforc par du m tal plafonds suspendus Si votre plafond comporte un de ces...

Страница 86: ...pour pouvoir entrer dans l espace au dessus sans avoir une marche monter au dessus de la hauteur de travail normale de l escabeau La hauteur de travail normale sur l escabeau est deux marches de son...

Страница 87: ...e l emplacement comme d crit aux tapes 3 et 4 tape 3 Allez dans l espace du dessus et explorez la zone au dessus de votre choix d emplacement Cette zone peut tre rep r e de ces fa ons A En coutant des...

Страница 88: ...rcher ou de ramper dans l espace du dessus assurez vous qu il y aura assez de place pour le faire C Cherchez au dessus de l emplacement choisi l ventualit de dangers ou d obstruction comme C ble lectr...

Страница 89: ...ute Remarque En situant au moins un bord de l ouverture contre une solive de plafond cela permet que cette solive soit utilis e comme c t pour l encadrement que vous tape 6 Coupez le reste du plafond...

Страница 90: ...lives marquez la largeur de l ouverture brute sur le dessus des solives Voyez la Figure 8 Ne coupez pas de solive cette marque tape 2 Coupez 2 planches de la taille des solives assez longues pour reli...

Страница 91: ...rticales 2 x l paisseur de solive Coupez ici Section de solive enlever Coupez ici Ligne pointill e indiquant votre emplacement choisi 2 x l paisseur de solive Section 1 6 ENCADREMENT DE L OUVERTURE BR...

Страница 92: ...oyez la Figure 12 Il est tr s important que le morceau de rive soit d aplomb verticalement comme d querre avec les c t s des solives tape 5 Positionnez la deuxi me rive 137 2 cm de la premi re et r p...

Страница 93: ...t de solive coup e avec 3 clous 16d Voyez la Figure 15 TAPE 5 plantez 3 clous 16d au travers de chaque solive dans chacune des extr mit s de la rive Voyez la Figure 15 TAPE 6 Placez une deuxi me rive...

Страница 94: ...des c t s non encadr s de votre les dimensions int rieures de l encadrement restent au moins 57 1 x 137 2 cm W2208 W2210 et WU2210 ou 63 5 x 137 2 cm W2508 et W2510 TAPE 5 utilisez des clous qui soie...

Страница 95: ...Blank...

Страница 96: ...phone U S 888 523 3371 Canada 877 553 7004 www kellerladder net Werner Co 93 Werner Rd Greenville PA 16125 9499 Werner Access Products Canada ULC 60 Admiral Blvd Mississauga ON L5T 2W1 2016 Werner Co...

Отзывы: