background image

Thank you for choosing a KED helmet. Protective helmets are personal 

protective equipment and help prevent head injuries or at least 

significantly reduce them. Please take some time to read the following 

information and adjust your helmet. It will benefit your safety and 

ensure the highest level of comfort.

Detailed information and illustrations can be found on the  

front pages.

1. General Information

This bike helmet represents the best possible protection for  

the head against external damage and meets the latest technological 

standards. However, no guarantee can be provided for the total preven-

tion of injuries. This bike helmet complies with the European standard 

EN 1078. 

The helmet complies with the European Regulation (EU) 2016/425 and 

therefore bears the CE mark. As part of this standard, the helmets are 

tested for shock absorption, the effectiveness of the retention system, 

as well as the protection zones and the field of vision.

2. Selecting the right helmet size

A helmet can only protect the wearer if it fits properly. Measure your 

head circumference at the widest point and then select the appropriate 

size. The dimensions can be found on a label inside the helmet. 

The helmet must feel secure and comfortable on the head. Try several 

helmets and you will notice some differences right away. Take a look in 

the mirror too; the helmet should suit you.

3. Adapting the size adjustment system

A good fit is a prerequisite for the best possible protection. This is why 

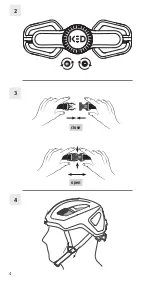
this helmet is equipped with a K-FIT adjustment system. By turning the 

adjustment wheel you can set the head ring to suit you. Turning the 

wheel in the ‘-’ direction tightens the head ring, turning the wheel in the 

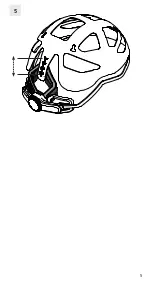
‘+’ direction loosens the head ring (see illustration 2). The helmet is also 

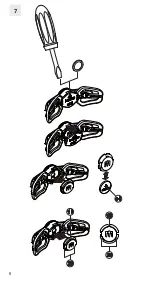
equipped with a height adjustment function (see illustration 5)

.

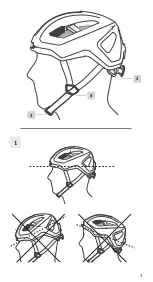
4. Correct positioning

Always put your helmet on your head horizontally so that your forehead 

is protected but your view is not impaired. Your helmet should also not 

sit pushed backwards over the head (see illustration 1).

5. Firm fit

You can check that your helmet is sitting firmly by lightly shaking your 

INSTRUCTION MANUAL

GB

12

Содержание REACH AR-1

Страница 1: ...GEBRAUCHSANLEITUNG MANUAL REACH AR DT 1 KEDAHAED COM DE MANUAL MODE D EMPLOI GB F...

Страница 2: ...Notified Body No 0560 Les casques de v lo KED sont conformes la norme suivante EN 1078 2012 A1 2012 Regulation EU 2016 425 Telefication B V Edisonstraat 12A 6902 PK Zevenaar The Netherlands Notified B...

Страница 3: ...3 4 2 1 3...

Страница 4: ...2 3 close open 4 4...

Страница 5: ...5 5...

Страница 6: ...7 6...

Страница 7: ...or detachment topview CH manual Visor detachment sideview REACH AR DT 1 KED DOCK AND REFLECTOR Visor attachment Visor detachment side view top view Reflector attachment Reflector detachment PUSH from...

Страница 8: ...der Schutzzonen und das Sichtfeld gepr ft 2 Auswahl der richtigen Helmgr e Ein Helm kann Sie nur dann sch tzen wenn er richtig sitzt Messen Sie Ihren Kopfumfang an der breitesten Stelle und w hlen Si...

Страница 9: ...fliegen b Der Kinnriemen sollte eng anliegen es darf aber nicht zu Behinderungen beim Atmen oder Schlucken kommen 7 Extras 7 1 Beleuchtung Das K FIT Verstellsystem ist mit einer Blinkleuchte ausgestat...

Страница 10: ...gebenenfalls auch bei begleitenden Kindern Den Helm nicht bemalen bekleben oder lackieren In Farben Klebern und Lacken k nnen Bestandteile enthalten sein welche die Stabilit t des Helmes und damit die...

Страница 11: ...rtenrein Geben Sie Pappe und Karton zum Altpapier Folien in die Wertstoffsammlung Batterien d rfen nicht im Hausm ll entsorgt werden 11 Garantie Sie erhalten zwei Jahre Garantie auf Material und Herst...

Страница 12: ...e A helmet can only protect the wearer if it fits properly Measure your head circumference at the widest point and then select the appropriate size The dimensions can be found on a label inside the he...

Страница 13: ...The K FIT adjustment system is equipped with a flashing light You can turn the flashing light on and off by pressing it in the middle The following functions are available Press once for a continuous...

Страница 14: ...ess Do not make any changes to the helmet shell Never drill into it or screw objects into it In the event of a fall or a stronger impact the protective effect of the helmet shell can be severely impai...

Страница 15: ...s in the recycling bin Batteries must not be disposed of as household waste 11 Warranty You receive a two year warranty for material and manufacturing defects The warranty does NOT cover regular wear...

Страница 16: ...tif de port et des zones de protection ainsi que leur champ de vision 2 S lection de la taille de casque adapt e Pour une protection correcte votre casque doit bien vous tenir Mesurez la circonf rence...

Страница 17: ...plaque de verrouillage sur la partie m le et ajustez la longueur de la sangle voir image 6 R p tez ce processus jusqu ce que le syst me de courroie soit serr et bien ajust Refermez la plaque de verro...

Страница 18: ...ski les motos et les cyclomoteurs Assurez vous que le casque est bien ajust avant de commencer rouler Le syst me de verrouillage de la mentonni re doit toujours tre compl tement ferm Les sangles doiv...

Страница 19: ...e l adresse suivante https www kedahead com 10 limination liminez les emballages en fonction de leur type Jetez les cartons aux d chets papier et les films aux d chets plastiques Ne jetez pas les pile...

Страница 20: ...Test body Telefication B V Edisonstraat 12A 6902 PK Zevenaar The Netherlands Notified Body No 0560 Falls Sie Fragen haben oder weitere Informationen ber unsere Produkte ben tigen wenden Sie sich bitt...

Отзывы: