background image

20

MENU BUTTON - OPERATIONS

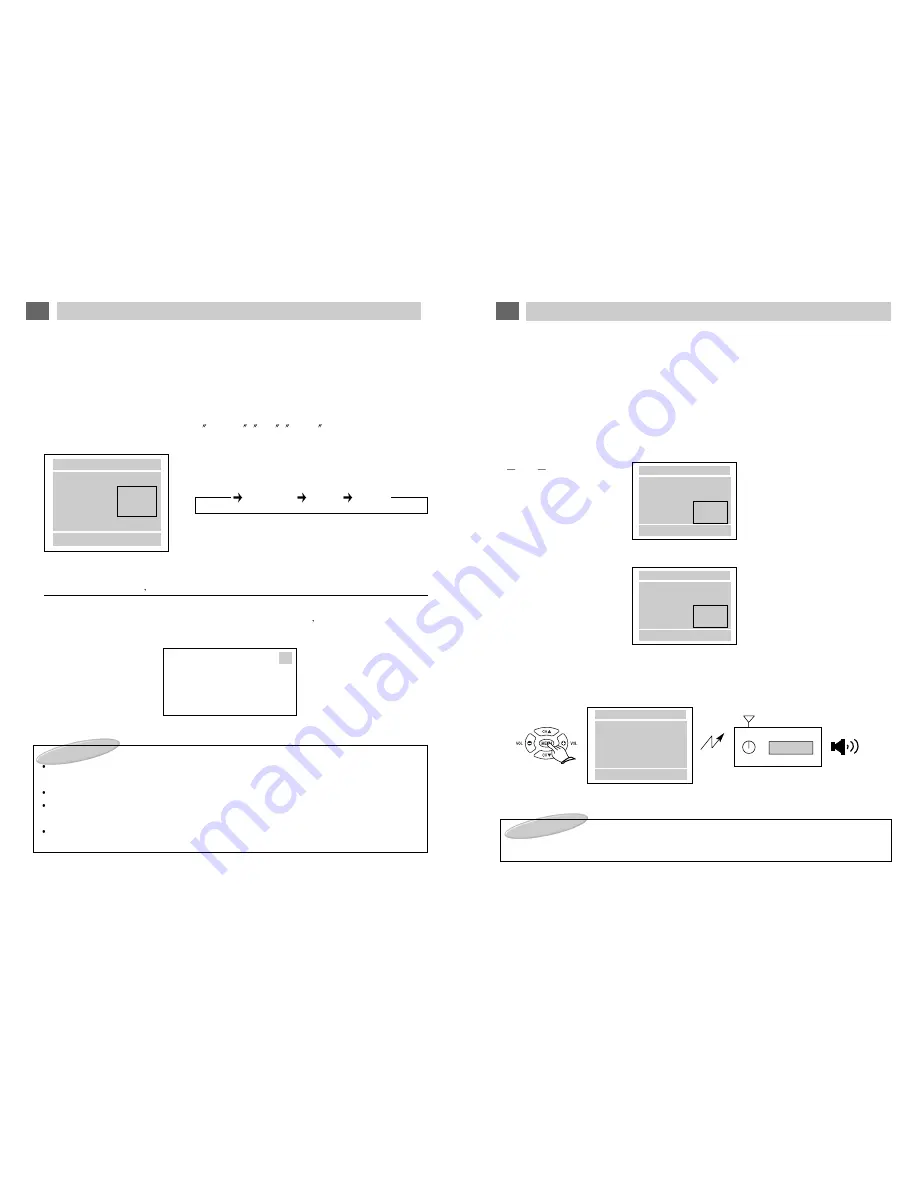
(3) FM BROADCAST MODE & FM FREQUENCY

This function allows you to listen to the audio signal from the selected program source (TV, A/V1, A/V2, or
A/V3) on the vehicle's radio. 

Procedure
1. Press the MENU button as many times as necessary to select "FM MODE".
2. Press the VOLUME 

+

button as many times as necessary to set FM MODE as desired to:

"OFF", "MODE1" or "MODE2".

3. If "MODE1" was set in Step 2 above, press the MENU button again to select "FM FREQ.", then press

the VOLUME -

/ +

buttons repeatedly to choose one of 4 preset FM Frequencies: 88.3MHz,

88.7MHz, 89.1MHz or 90.3MHz.

OR

If "MODE2" was set in Step 2 above, press the MENU button again to select "FM FREQ.", then press
the VOLUME -

/ +

buttons to choose any FM Frequency from 88.3MHz to 95.0MHz in 0.1MHz

(100KHz) increments. 

4. Tune the vehicle's radio to the frequency chosen in Step 3 above.

It may be necessary to repeat Step 3, choosing a different frequency each time, before you are able
to receive a satisfactory signal. The best signal is usually obtained by choosing a frequency that is not
actively broadcasting in your area. Also note that better results may be obtained if the vehicle's anten-
na can be lowered independently. 

Example - Receiving Audio through the FM Radio at 88.7MHz. 

88.7MHz

SCAN

FM

SPEAKER

<CAR RADIO>

NOTE 
The FM Transmitter Antenna (Page 8#9) should be installed in the direction of the vehicle's main FM
Antenna. 
Never adjust the LA01 coil on the FM Transmitter board. It was optimally adjusted at the factory. 

MENU
AUTOPROGRAM
CHANNEL LIST
MTS:STEREO
FM MODE
FM FREQ
LANGUAGE

MENU : NEXT  + -:SEL

MODE1
MODE2
OFF

MENU
AUTOPROGRAM
CHANNEL LIST
MTS:STEREO
FM MODE
FM FREQ
LANGUAGE

MENU : NEXT  + -:ADJ

88.3MHz
88.4MHz
95.0MHz

MENU
AUTOPROGRAM
CHANNEL LIST
MTS:STEREO
FM MODE  MODE 1
FM FREQ.  88.7MHz
LANGUAGE  ENGLISH

MENU:NEXT  +:ENTER

19

MENU BUTTON - OPERATIONS

(3) MTS

Your TV set incorporates an MTS(Multichannel Television Sound) decoder to receive stereo broad-
casts and any accompanying SAP (Second Audio Program), such as a bilingual broadcast.

The sound will be available : 

1. Press the button

To change the reception mode among

STEREO ,  SAP ,  MONO

Whenever  this button is

pressed, the mode will be changed as follows.

In this mode, the STEREO SAP indicates that MTS mode is being broadcasted.

When the power is switched-on or channel is changed, the STEREO SAP symbol is automati-
cally displayed, depending on the current broadcast.

NOTES:

If the received signal is weak, noise may be heard.
In such a case, press button to set the MONO mode for better sound reception.
If the received  SAP signal is weak, the SAP will not be heard.
Even if both STEREO and SAP broadcasts are received, both broadcasts cannot be heard at a
time.
Transmission of CABLE TV  signals differ from off-air TV broadcasts. 
It is possible the TV sound(MTS) may not be received satisfactorily.

MENU

AUTOPROGRAM
CHANNEL LIST
MTS
FM MODE
FM FREA
LANGUAGE : ENGLISH

MENU : NEXT +-:ENTER

STEREO
SAT
MONO

STEREO  

SAP  

MONO

2

TV

STEREO SAP

Содержание LSM104

Страница 1: ... INTENDED PRIMARILY AS A MONITOR FOR A VIDEO CASSETTE PLAYER VIDEO GAME OR CAMERA TELEVISION BROADCAST RECEPTION WILL BE ADVERSELY AFFECTED BY CONDITIONS SUCH AS MOTION CHANGE OF DIRECTION ATMOSPHERIC ACTIVITY AND LOCAL SURROUNDINGS IT IS THEREFORE LIKELY THAT BROADCAST PICTURE QUALITY WILL BE MARGINAL WHEN THIS SYSTEM IS USED IN A MOBILE ENVIRONMENT MOBILE APPLICATIONS THIS PRODUCT HAS BEEN DESIG...

Страница 2: ...rvice person nel 3 IMPORTANT SAFEGUARDS FCC WARNINGS This equipment may generate or use radio frequency energy Change or modifications to this equip ment may cause harmful interference unless the modifications are expressly approved in the instruc tion manual The user could lose the authorization to operate this equipment if an unauthorized change or modifi cation is made CAUTION RISK OF ELECTRIC ...

Страница 3: ...tructions Adjust only those controls that are covered by the operating instructions as an improper adjustment of other controls may result in damage and will often require extensive work by a qualified techni cian to restore the product to its normal operation e lf the product has been dropped or the cabinet has been damaged f When the product exhibits a distinct change in performance this indicat...

Страница 4: ... any KEC Mobile Applications VCP NOTES Automatic Power On Function This system will automatically power on whenever the LCD screen is lowered to its viewing position Automatic Power Off Function This system will automatically turn off approximately 15 minutes after it last receives a video signal Memory Power On Function If this system was in power on mode when power was last removed unplugged or ...

Страница 5: ...onal vehicle lighting 8 LCD PANEL DROP DOWN BUTTON Push to release LCD Panel from stored position 9 LAMP POWER INPUT WIRES 12V Constant Chassis Ground Door Switch 10 AUTO POWER SWITCH Lowering LCD Panel automatically turns power on 11 TV VIDEO BUTTON Selects program source Broadcast TV A V1 A V2 A V3 12 MENU BUTTON Displays on screen Main menu 13 PICTURE BUTTON Displays on screen Picture menu 14 C...

Страница 6: ...nu item The selected item will be displayed in MAGENTA If the final item in the menu list is selected pressing again will remove the menu from the screen This button is duplicated on the LSM104 s Control Panel 5 VOLUME DOWN UP BUTTONS These 2 buttons are primarily used in conjunction with the MENU 4 and PICTURE 13 buttons However if speakers are connected to the EXTERNAL SPEAKERS OUTPUT CONNECTOR ...

Страница 7: ...urces Videocassette Player Video Game DVD Player Camcorder etc Direct connection results in superior video quality and should be used whenever the external program source provides direct outputs Refer to the instruction manual supplied with each external instrument for details 12 SIGNAL CONNECTION continued IR TRANSMITTER TRANSMITTER POSITIONING SELECTING THE PROGRAM SOURCE Press the TV VIDEO butt...

Страница 8: ...un to a source of unswitched 12V power White wire Connect to positive door switch This wire will have 12V power when a door is opened IMPORTANT NOTE NEGATIVE POSITIVE DOOR CIRCUITS The 3 wire harness for the LSM104 s built in dome lights is color coded for use in vehicles that employ a negative door circuit This includes most US and imported vehicles Most Ford Motor Company vehicles and some impor...

Страница 9: ...irst there will be a delay of about 5 seconds before the channel changes 4 If external speakers are connected to the EXTERNAL SPEAKERS OUTPUT CONNEC TOR the VOLUME buttons on the Remote Control may be used to adjust the speak er s volume The volume level will be shown on the screen with a bar scale and a reference number 0 100 as shown 16 LSM104 OPERATION NOTE The volume level can be muted instant...

Страница 10: ...E button A display of channels will appear Press the CHANNEL buttons to select the channel you wish to view AUTO PROGRAMMING 5 EXIT 18 MENU BUTTON OPERATIONS CHANNEL LIST 5 7 8 10 15 PREV NEXT CHANNEL LIST 5 7 8 10 15 18 20 PREV NEXT The MENU button gives you access to a variety of TV and Monitor functions 1 Press the MENU button on the Remote Control The first time it is pressed the following dis...

Страница 11: ... Antenna Never adjust the LA01 coil on the FM Transmitter board It was optimally adjusted at the factory MENU AUTOPROGRAM CHANNEL LIST MTS STEREO FM MODE FM FREQ LANGUAGE MENU NEXT SEL MODE1 MODE2 OFF MENU AUTOPROGRAM CHANNEL LIST MTS STEREO FM MODE FM FREQ LANGUAGE MENU NEXT ADJ 88 3MHz 88 4MHz 95 0MHz MENU AUTOPROGRAM CHANNEL LIST MTS STEREO FM MODE MODE 1 FM FREQ 88 7MHz LANGUAGE ENGLISH MENU N...

Страница 12: ...RP COLOR TINT STRONG BRIGHT SHARP VIVID GREENISH ITEM VOLUME NOTES ON THE PICTURE FUNCTIONS Picture adjustments are only memorized if the STATUS Mode see next page is set to CUSTOM Color LCD screens operate differently than conventional color picture tubes As you operate the pic ture controls you will notice that the range of adjustment is somewhat less dramatic than would occur with a conventiona...

Страница 13: ...EP 30 OFF 15 30 45 60 90 120 150 180 The STATUS button on the Remote Control lets you select between a CUSTOM adjustable picture set ting mode or any one of 3 factory preset picture modes Pressing the PICTURE button repeatedly changes the mode as follows 1 CUSTOM mode 2 STANDARD mode 3 DYNAMIC mode 5 NO DISPLAY 4 MILD mode PICTURE MODE Select this mode to view a picture that may be adjusted to you...

Страница 14: ...onal streaks and in some cases causes loss of contrast in the picture IMPORTANT NOTE WHEN USED IN A VEHICLE THIS SYSTEM IS INTENDED PRIMARILY AS A MONITOR FOR A VIDEO CASSETTE PLAYER VIDEO GAME OR CAMERA TELEVISION BROADCAST RECEPTION WILL BE ADVERSELY AFFECTED BY CONDITIONS SUCH AS MOTION CHANGE OF DIRECTION ATMOSPHERIC ACTIVITY AND LOCAL SUR ROUNDINGS IT IS THEREFORE LIKELY THAT BROADCAST PICTUR...

Страница 15: ...manual SYMPTOM No image no sound Is the system receiving power page 12 Is the TV VIDEO selector set properly page 15 Are connections to other equipment properly made page 11 12 Sound but no image Are contrast and brightness adjusted properly page 19 Are video connections from other equipment properly made page 11 12 Unstable picture on screen Is antenna cable connected and located properly page 11...

Отзывы: