-24-
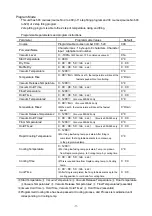
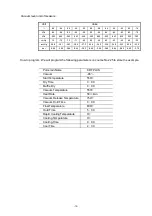
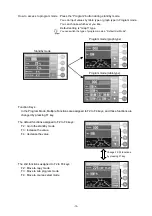
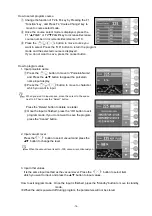
Drawing 4
Temperature
Nuts
Sensor
Drawing 3
Screws
Drawing 1
Right Cover
Left Cover
Screws
Drawing 2
Muffle
Screws
Cover
Maintenance Part Replacements
Make sure that main power is off and muffle heat is sufficiently low before you start.
This may cause fire or electric shock.
Temperature Sensor Replacement
1. Remove the 4 screws shown on drawing 1 to remove the left
cover and right cover.
2. Remove the 4 screws shown on drawing 2 to remove the
muffle cover.
3. Remove the 2 screws shown on drawing 3 to remove the
red and white line connected to the temperature sensor.
4. Remove the 2 nuts shown on drawing 4 to remove the
temperature sensor.
5. Install the new temperature sensor. We will complete installation
by following the previous direction in reverse order.
Caution) The temperature sensor has polarity. Re-connect the red line to
the “+” terminal and re-connect the white line to another terminal.
6. Once the replacement is complete, re-plug the power cord
into the electrical outlet and power on the unit.
7. Check to see if the temperature rises. If the temperature
lowers or display 0
℃
, the connection line to the temperature
sensor is reversed. Please re-check.
- The replacement is complete. -


