background image

5

Deutsch

h

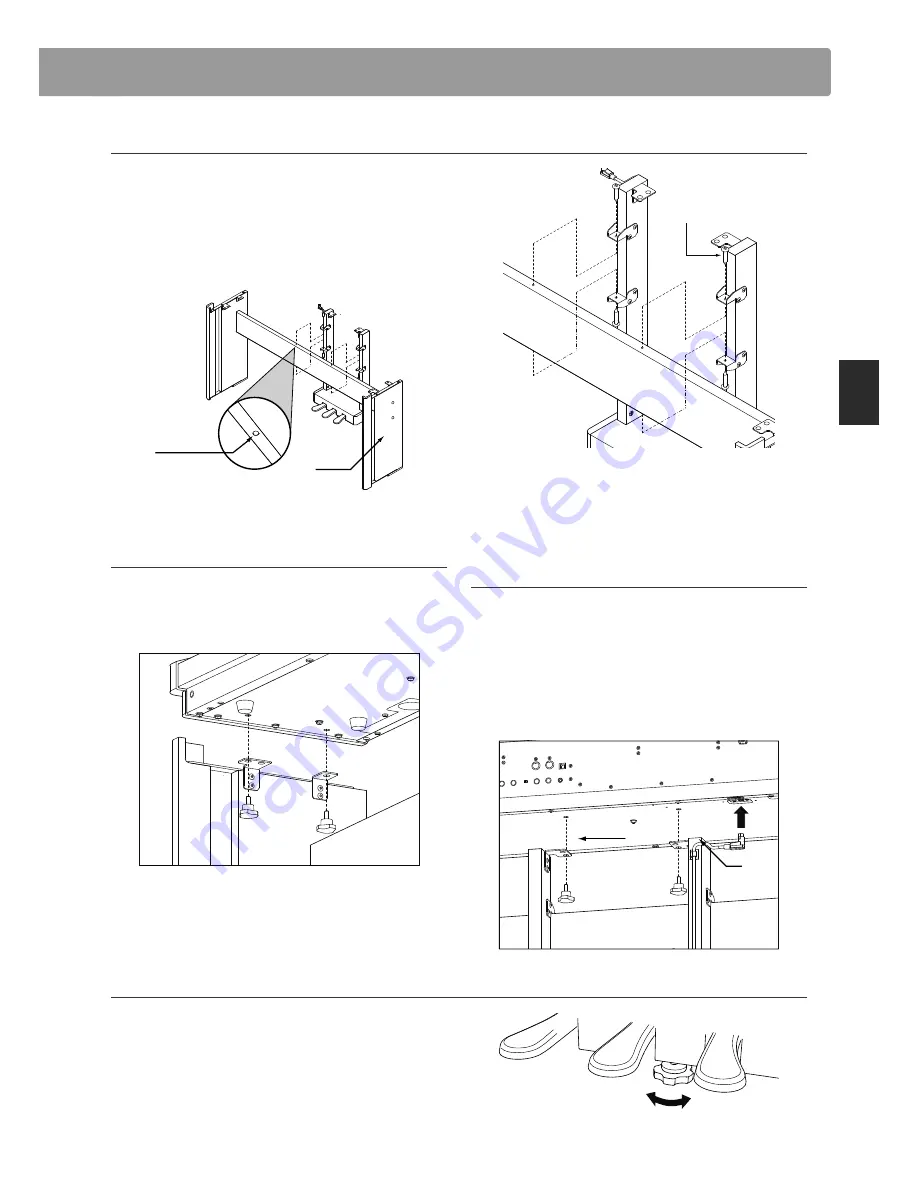
5. Befestigung und Anschluss der Pedaleinheit 

F-301 mit dem ES7/ES8

Die Pedaleinheit F-301 wird nun mit 2 Einhandschrauben 

e

 am 

ES7/ES8 befestigt.

* Prüfen Sie den festen Sitz der 2 Einhandschrauben.

Stecken Sie den Pedalkabelstecker in die dafür vorgesehene 

PEDAL Buchse. Zum Schluss fixieren Sie das Pedalkabel mit Hilfe 

der 3 Kabel Clips  

h

 an der Rückseite des Pedalbeines.

3. Zusammenbau der Pedaleinheit F-301 mit dem Ständer HM-4

Entfernen Sie die Aufkleber auf der Rückwand des HM-4 

Ständers.

Setzen Sie die Pedaleinheit auf die Rückwand des HM-4 Ständers, 

sodass die Führungswinkel mit den Löchern übereinstimmen. 

Nun verschrauben Sie beides mit den vier kurzen Schrauben 

f

.

* Prüfen Sie den festen Sitz der 4 Schrauben.

HM-4

Aufkleber

h

e

kurze Schraube

4. Befestigung des ES7/ES8 auf dem Ständer

Befestigen Sie nun das ES7/ES8 mit den 4 Einhandschrauben auf 

dem Ständer HM-4.

* Prüfen Sie den festen Sitz der 4 Einhandschrauben.

6. Justieren der Einstellschraube

Drehen Sie nun die Einstellschraube so weit aus der Pedalbox 

a

 raus, dass sie den Fußboden berührt.

Содержание F-301

Страница 1: ...nglish Deutsch Fran ais Espa ol Italiano F 301 Assembly Instructions F 301 Aufbauanleitung Instructions d assemblage du F 301 Instrucciones de montaje del F 301 Istruzioni di assemblaggio F 301 ES7 ES...

Страница 2: ...en moving the piano raise the Adjuster Bolt and readjust after moving Included parts Before attempting to assemble the F 301 pedal unit please ensure that all parts below are included A Phillips head...

Страница 3: ...the hole patches from the back board of the HM 4 stand Fasten the F 301 pedal unit to the HM 4 stand using four short screws f at the top and bottom of the back board Ensure that all four screws are t...

Страница 4: ...ie vorher die Einstellschraube etwas h her ein ohne Bodenkontakt Beiliegende Teile Vergewissern Sie sich vor dem Aufbau der Pedaleinheit F 301 dass alle nachfolgend aufgelisteten Teile vollst ndig vor...

Страница 5: ...er HM 4 Entfernen Sie die Aufkleber auf der R ckwand des HM 4 St nders Setzen Sie die Pedaleinheit auf die R ckwand des HM 4 St nders sodass die F hrungswinkel mit den L chern bereinstimmen Nun versch...

Страница 6: ...d placez le piano montez le boulon r gulateur puis r ajustez le une fois le piano en place Pi ces Avant de commencer le montage du le F 301 p dalier assurez vous que toutes les pi ces ci dessous sont...

Страница 7: ...tections d orifice du pied HM 4 Fixez le p dalier F 301 au pied HM 4 l aide des quatre vis courtes f en haut et en bas du panneau arri re Veillez ce que toutes les vis soient fermement serr es HM 4 pr...

Страница 8: ...no elevar el tornillo de ajuste y reajustar despu s de haber realizado el cambio de sitio Piezas incluidas Antes de montar la unidad de pedal F 301 aseg rese de que todas las piezas mostradas m s abaj...

Страница 9: ...trasera del soporte HM 4 Fije la unidad de pedal F 301 al soporte HM 4 utilizando cuatro tornillos cortos f en la parte superior e inferior de la placa trasera Aseg rese de que los cuatro tornillos es...

Страница 10: ...re la pedaliera ed evitare instabilit o danni 7 In caso di spostamento dello strumento rialzare la manopola e regolarla nuovamente dopo lo spostamento Parti Prima di procedere all assemblaggio del ped...

Страница 11: ...nnello posteriore del supporto HM 4 Unire il pedale F 301 al supporto HM 4 con quattro viti corte f sopra e sotto il pannello posteriore Assicurarsi che tutte e quattro le viti siano fissate saldament...

Страница 12: ...F 301 Assembly Instructions KPSZ 0520 OW1090EGFSI J1506 Printed in Indonesia Copyright 2015 Kawai Musical Instruments Mfg Co Ltd All Rights Reserved 817471 R101...

Отзывы: