background image

Page

82

7

APPENDICES

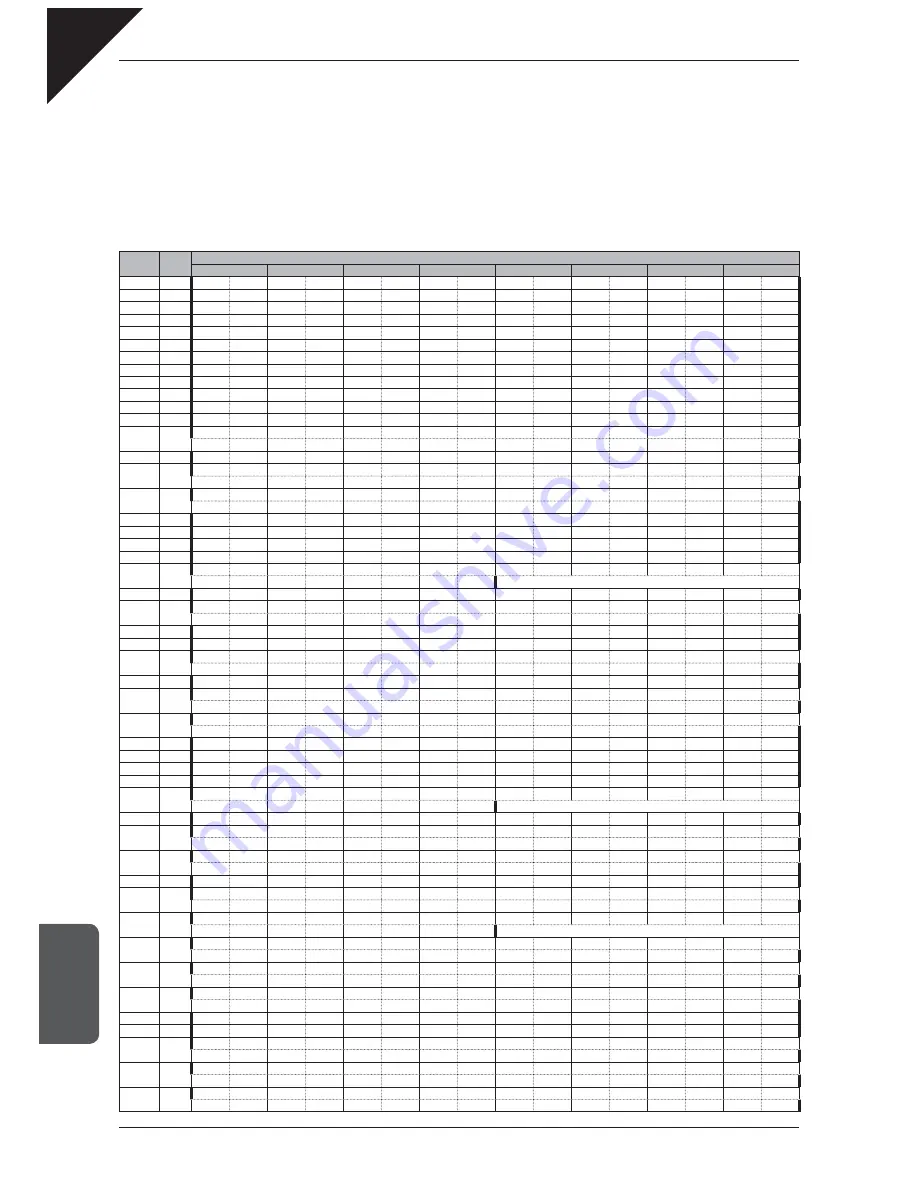
Display

No. of 

bars

Chord pattern

1 (9)

2 (10)

3 (11)

4 (12)

5 (13)

6 (14)

7 (15)

8 (16)

C53

8

CM7

B

M7

CM7

B

M7

Am7

D7

D7(

5)

Dm7

G7

G7(

5)

C54

8

F

m7(

5)

F7

Em7

A7

A7(

5)

Dm7

G7

G7(

5)

CM7

Gm7

C7

C55

8

FM7

FmM7

Em7

E7

Am7

Dm7

G7sus4

CM7

C56

8

CM7

FM7

Bm7(

5)

E7

Am7

C7

FM7

Em7

Am7

Dm7

G7sus4

G7

C57

8

C

G/B

F/A

C/G

F

C/E

D7/F

G7

C

G/B

F/A

C/G

D7/F

D7

G7sus4

G7

C58

8

CM7

FM7

Dm7

G7sus4

G7

FM7

G7

Em7

Am7

Dm7

G7sus4

G7

C59

8

FM7

CM7

FM7

CM7

Em7(

5)

A7

Dm7

Fm7

G7sus4

G7

C60

8

C

F

C

F

Am

Dm

G

C61

8

C

F

C

F

G

Am

F

G

C

C62

8

C

Am

Dm

G

C

Am

Dm

G

Em

Am

Dm

G7

Em

Am

Dm

G7

C63

8

Cm7

Gm7

Cm7

Gm7

Cm7

Gm7

Cm7

Gm7

Fm7

G7

A

7

G7

C64

8

C

CM7

C7

F

Dm7

Am7

D7

G7

C65

16

Cm7

F7

Cm7

F7

Fm7

B

7

Cm7

C7

Fm7

F

dim

G7(

5)

C66

8

C

Am

Dm

G

C

C67

16

Am7

D7

G7sus4

C

Am7

D7

G7sus4

C

Fm7

E7

Am7

D7

G7sus4

C

C68

16

C7

F7

C7

G7

F7

C69

8

Cm7

B

7sus4

C70

8

Dm7

E

7sus4

Dm7

E

7sus4

C71

8

C7

F7

B

7

G7

C7

F7

C72

8

C7

E

7

B

F

C

G7

C73

12

C7

F7

C7

G7

F7

C7

F7

C7

F7

C74

8

Cm

B

A

7

Cm

D

7

C75

16

C

F7

C

B

C

G7

C7

G7

C7

C76

8

C7

B

7

C7

B

7

F7

C77

8

C

G7

C7

F7

C

F

G7

C

F

C

G7

C78

16

C

CM7

C7

F

Dm7

G7

Em7

Am7

Dm7

G7

C

C79

8

C7

F7

C7

F7

D7

G7

D7

G7

C80

16

C

G7

C

G7

C

F

C

G7

C

C7

F

C

D7

G7

C81

16

C

C7

F

C

G7

C

C7

F

C

G7

C

C82

8

C7

F7

C7

F7

Dm7

G7

F7

C83

8

C7

E

7

D7

F7

A

7

G7

C84

8

C7sus4

C7

C7sus4

B

7sus4

B

7

B

7sus4

A

7sus4

A

7

A

7sus4

G7sus4

G7

G7sus4

C85

8

C

G

F7

B

C

G

C86

12

C6

C7

F7

C6

G7

F7

C6

C87

8

C

G

Em7

Am7

Dm7

D7

G7

C

G

Em7

A7

Dm7

G7

C

C88

16

C

CM7

C7

F

Fm6

Em7

A7

Dm7

G7

C

CM7

C7

F

Fm6

Em7

A7

Dm7

G7

C

Fm6

C

C89

16

F

G7

Em7

Am7

Dm7

G7

C

CM7

C7

F

Fm6

Em7

A7

D7sus4

D7

G7sus4

G7

C90

8

C

F

C

G7

C

F

C

G7

C

C91

16

C

G

B

Am

F

C

D7

G7

C92

12

C9

F13

C9

F13

C9

A7(

13)

Dm9

G13

C9

A7(

13)

Dm9

G13

C93

16

C

CM7

C7

FM7

Dm

DmM7

Dm7

G7

C

CM7

Em7(

5)

A7

Dm7

Fm7

Em7

A7

Dm7

G7

C94

16

Fm7

B

7

E

M7

E

6

E

m7

A

7

D

M7

D

6

C

m7

F

7

Bm7

E7

Am7

D7

Dm7

G7

C95

16

Cm7

Fm7

B

7

E

M7

A7

A

M7

Dm7(

5)

G7

G7(

5)

Cm7

C7

Fm7

B

7

Gm7

C7

C7(

5)

Fm7

B

7

E

6

G7

G7(

5)

C96

8

Cm7

C97

8

A

m7

D

7

G

M7

C

M7

A

m7

D

7

G

M7

Fm7

B

7

E

M7

A

M7

Fm7

B

7

G7

G7(

5)

C98

16

Cm7

Cdim

B

M7

Cm7

Cdim

B

M7

Gm7

C7

C7(

5)

Fm7

Fm7(

5)

E

M7

Dm7

D

M7

Cm7

E

M7

Dm7

D

M7

Cm7

G7

G7(

5)

Cm6

Cm7

C99

16

C

D7

Dm7

G7

C

C

D7

Dm7

G7

C

C

CM7

C7

F

Fm

C

C

A7

D7

Dm7

G7

C

C00

16

Cm

G7

Cm

G7

Cm

Fm

Cm

G7

Cm

C7

Fm

Cm

D7

G7

ES6̲EN.indd   82

2008/06/12   11:14:32

Содержание ES6

Страница 1: ...2 PLAYING THE PIANO 4 REGISTRATION 5 RHYTHM SECTION 7 APPENDICES 3 SONG RECORDER 6 FUNCTION SETTINGS 1 INTRODUCTION Owner s Manual...

Страница 2: ......

Страница 3: ...8 TRANSPOSE 26 9 METRONOME 27 STARTING THE METRONOME 27 CHANGING THE METRONOME TIME SIGNATURE 27 ADJUSTING THE METRONOME VOLUME 28 3 SONG RECORDER 29 1 RECORDING A SONG 29 RECORDING A SECOND PART 30...

Страница 4: ...se instructions 3 Heed all warnings 4 Follow all instructions 5 Do not use this apparatus near water 6 Clean only with dry cloth 7 Do not block any ventilation openings Install in accordance with the...

Страница 5: ...d in an emergency because electricity is always charging while the plug is in the AC outlet even in a power switch off condition The chair must be used properly it must be used only when playing the p...

Страница 6: ...the keyboard action resulting in breakdown of the product Doing so may result in discoloration or deformation of the product When cleaning the product put a soft cloth in lukewarm water squeeze it wel...

Страница 7: ...adian Radio Interference Regulations This instrument complies with the limits for a class B digital apparatus pursuant to the Radio Interference Regulations C R C c 1374 An information on Disposal for...

Страница 8: ...l piano package contains the following items z AC power adaptor PS 154 z Foot pedal F 10H z Music rest z Owner s manual 2 PLAYING THE PIANO 4 REGISTRATION 5 RHYTHM SECTION 7 APPENDICES 3 SONG RECORDER...

Страница 9: ...mic range of the original grand piano from subtle pianissimos to thunderous fortissimos Additional Sound Selection With a total of 32 realistic internal sounds the ES6 digital piano is suitably equipp...

Страница 10: ...ctions effects and reverb settings and many other panel options to be stored to one of the 14 different registration memories and conveniently recalled at the touch of a button page 35 zSOUND SELECTIO...

Страница 11: ...jacks located on the left and right side of the ES6 digital piano are used to connect stereo headphones to the instrument Two pairs of headphones can be connected and used simultaneously zPOWER BUTTO...

Страница 12: ...sustaining the sound after hands are lifted from the keyboard and is also capable of responding to half pedaling The left pedal will behave as a soft pedal softening the sound and reducing its volume...

Страница 13: ...nd the Concert Grand sound will be selected automatically Step 3 Adjust the volume level using the VOLUME slider The VOLUME slider controls the volume level of the built in speakers and connected head...

Страница 14: ...4 Warm Strings 5 Choir 6 Choir 2 7 New Age Pad 8 Atmosphere BASS 1 Wood Bass 2 Electric Bass 3 Fretless Bass 4 W Bass Ride Step 1 Press the E PIANO button The LED indicator for the E PIANO button wil...

Страница 15: ...sichord French Suite No 6 Bach Vibraphone KAWAI Clavi KAWAI STRINGS CHOIR Slow Strings KAWAI String Ensemble Le quattro stagioni La primavera Vivaldi String Pad KAWAI Choir KAWAI Choir2 KAWAI New Age...

Страница 16: ...RHYTHM SECTION button will start to ash and the Rhythm Section demo song will start to play When the Rhythm Section demo song has nished the ES6 digital piano will return to playing the Main Demo song...

Страница 17: ...iano The Concert Grand and Slow Strings sounds will be heard simultaneously Step 3 Press and hold the STRINGS CHOIR button then press the PIANO1 button 2 1 will be shown in the LED display indicating...

Страница 18: ...be shown in the LED display The sum of the primary and secondary sound volume balances will always total 10 e g 1 9 5 5 9 1 etc with larger values producing greater volume Step 6 Press any individual...

Страница 19: ...r section while the Wood Bass sound will be heard in the Lower section The number of keys used for the Upper and Lower sections can be freely adjusted by changing the Split Point The default Split Poi...

Страница 20: ...d Lower sections will be shown in the LED display The sum of the Upper and Lower sections volume balances will always total 10 e g 1 9 5 5 9 1 etc with larger values producing greater volume Step 7 Pr...

Страница 21: ...transposed two octaves up from the original pitch allowing two people to play within the same key range The number of keys used for the Upper and Lower sections can be freely adjusted by changing the...

Страница 22: ...oncert hall or theatre Hall 2 Simulates a larger hall or theatre than Hall 1 Step 1 Press and hold the REVERB button then press the T or S VALUE BALANCE buttons to select the desired reverb type The c...

Страница 23: ...20 foot pedal unit is connected to the ES6 digital piano the rotary speaker effect mode can also be alternated by pressing the left soft pedal Step 1 Press and hold the EFFECTS button then press the...

Страница 24: ...indicators for the TOUCH TRANSPOSE and REVERB buttons will start to flash indicating that the EQ function has been selected The name of the function EQ Equaliser and the current settings will be show...

Страница 25: ...f the touch settings will return to the default setting of Normal however it is possible to use the Memory Backup function to store the preferred TOUCH mode Please refer to the instructions on page 62...

Страница 26: ...dicating that the transpose function has been deactivated Pressing the TRANSPOSE button once again will reactivate the transpose function recalling the previously selected transpose value type Transpo...

Страница 27: ...he metronome The LED indicator for the TEMPO button will turn off indicating that the metronome has been deactivated Any changes made to the metronome tempo will remain until the power is turned off W...

Страница 28: ...DJUSTING THE METRONOME VOLUME The volume level of the metronome can also be adjusted Step 1 Press the TEMPO and BEAT buttons simultaneously The LED indicators for both the TEMPO and BEAT buttons will...

Страница 29: ...important to select the correct part carefully in order to prevent accidentally overwriting a previously recorded part 1 RECORDING A SONG In the following example the SONG1 memory will be used for re...

Страница 30: ...as the newly recorded part is saved to memory Saving may take a few moments During this time the ES6 digital piano will not respond to any other operations To record the part again simply repeat the...

Страница 31: ...be recorded While recording PART2 the previously recorded PART1 will also be played The recording can also be started by pressing the PLAY STOP button instead of pressing a key allowing PART2 to be r...

Страница 32: ...press the PIANO1 button to select the SONG1 memory The LED indicator for the PIANO1 button will start to ash and the LED indicators for the STRINGS CHOIR and BASS buttons will turn on indicating that...

Страница 33: ...ndicators for the STRINGS CHOIR and BASS buttons will turn on indicating that PART1 and PART2 of SONG1 have been recorded Step 2 While holding the PLAY STOP button press the BASS button to deselect PA...

Страница 34: ...SONG1 has been selected for erasure Step 3 While still holding the PLAY STOP and REC buttons press the STRINGS CHOIR button to select PART1 The LED indicator for the STRINGS CHOIR button will turn off...

Страница 35: ...Adlib On Off STORING A REGISTRATION In the following example sound settings will be stored in the rst memory of REGISTRATION1 and the second memory of REGISTRATION3 First memory Press and hold the REG...

Страница 36: ...TRATION3 The LED indicator for the E PIANO button will turn on and 3 2 will be shown in the LED display indicating that the second memory of REGISTRATION3 has been selected Step 3 Press the REGISTRATI...

Страница 37: ...unt in the Basic Variation pattern 1 2 Basic Variation The Basic pattern provides a simple unobtrusive backing accompaniment while the Variation pattern builds on the Basic pattern often adding more c...

Страница 38: ...freely adjusted please refer to the instructions on page 45 for more information When playing a chord in the Lower section the name of the chord will be shown in the LED display Please refer to page...

Страница 39: ...djust the number of bars between each Auto Fill in please refer to the instructions on page 60 Step 2 Play chords in the Lower section of the keyboard The name of the chord will be shown in the LED di...

Страница 40: ...cates that the Variation pattern is selected Step 2 Press the PLAY STOP button to start the Rhythm Section accompaniment The LED indicator for the PLAY STOP button will turn on and the Rhythm Section...

Страница 41: ...will start to play Step 3 Press and hold the RHYTHM SECTION button then press the T or S VALUE BALANCE buttons to select a different Rhythm Section genre The Fill in pattern will be played and the Rh...

Страница 42: ...Step 2 Press the PART button again The LED indicator for the PART button will start to ash indicating that only the Drums part of the Rhythm Section will be played Step 3 Press the PART button once ag...

Страница 43: ...ALUE BALANCE buttons to adjust the Rhythm Section tempo to the desired value The Rhythm Section tempo can be adjusted within the range of 10 400 beats per minute Step 3 Press the TEMPO button once aga...

Страница 44: ...of 1 soft to 10 loud Step 3 Press the TEMPO and BEAT buttons simultaneously again to deactivate the volume adjustment mode The LED indicators for the TEMPO and BEAT buttons will turn off The Rhythm S...

Страница 45: ...used to control the Rhythm Section chord progression The speci ed Rhythm Section Split Point will also be used for the Split mode function Any changes made to the Rhythm Section Split Point will remai...

Страница 46: ...desired Preset Chord Progression style The Preset Chord Progression style number will be shown in the LED display Each Rhythm Section style utilises its own Preset Chord Progression Please refer to p...

Страница 47: ...order function will be used to capture a Custom Chord Progression to the SONG2 memory and then played back Step 1 Press the RHYTHM SECTION button The LED indicator for the RHYTHM SECTION button will t...

Страница 48: ...ECTION button again The LED indicator for the RHYTHM SECTION button will turn off indicating that the Rhythm Section function has been deactivated Step 9 Press and hold the PLAY STOP button then press...

Страница 49: ...ADJUSTING A FUNCTION Step 1 Press and hold the TOUCH and TRANSPOSE buttons then press one of the SOUND SELECTION EFFECTS or REVERB menu buttons Each menu button controls two or three functions Press t...

Страница 50: ...ue The Brilliance value can be set within the range of 10 to 10 Positive values produce a brighter tone while negative values produce a more mellowed tone Step 3 Press one of the TOUCH TRANSPOSE SOUND...

Страница 51: ...ing pitch will increase or decrease in 0 5 Hz increments each time one of the VALUE BALANCE buttons is pressed Step 3 Press one of the TOUCH TRANSPOSE SOUND SELECTION EFFECTS or REVERB buttons to exit...

Страница 52: ...IANO button The LED indicators for the TOUCH TRANSPOSE and E PIANO buttons will start to ash indicating that the Voicing function has been selected The name of the function Vic Voicing and the current...

Страница 53: ...ess the T or S VALUE BALANCE buttons to increase or decrease the Damper Effect level to the desired value The Damper Effect value can be set within the range of 1 to 10 Setting the Damper Effect to Of...

Страница 54: ...level to the desired value The String Resonance value can be set within the range of 1 to 10 Setting the String Resonance to Off will disable the function entirely A String Resonance value of 1 produc...

Страница 55: ...e dissonance for thirds was devised to eliminate the lack of consonances experienced with certain fifths for the Mersenne pure temperament It produces chords that are more beautiful than those with th...

Страница 56: ...e Temperament function is selected press one of the 88 piano keys to select the desired key signature of the temperament The note name of the key pressed will be shown in the display and chosen as the...

Страница 57: ...the Lower Octave Shift to the desired value The Lower Octave Shift value can be set within the range of 0 to 3 Step 3 Press one of the TOUCH TRANSPOSE SOUND SELECTION EFFECTS or REVERB buttons to exi...

Страница 58: ...the damper pedal will not sustain the Lower section sounds Note that regardless of the On or Off setting pressing the damper pedal will always sustain the Upper section sounds Step 3 Press one of the...

Страница 59: ...n set to On pressing the damper pedal will sustain sounds after the keys are released When set to Off pressing the damper pedal will not sustain sounds after the keys are released Step 3 Press one of...

Страница 60: ...g The Auto Fill in setting can be set to play every 4 8 12 or 16 bars Setting the Auto Fill in to Off will disable the Auto Fill in Step 3 Press one of the TOUCH TRANSPOSE SOUND SELECTION EFFECTS or R...

Страница 61: ...Ad Lib setting When set to On pressing one of the topmost 17 keys on the keyboard while using the Rhythm Section will play a musical phrase When set to Off pressing one of the topmost 17 keys on the...

Страница 62: ...ings will be shown in the LED display Step 2 Press the T or S VALUE BALANCE buttons to select the desired Memory Backup function When set to rES Reset the ES6 digital piano will reset all settings to...

Страница 63: ...xchange data back and forth between MIDI devices There are receive MIDI IN and transmit MIDI OUT channels Most musical instruments or devices with MIDI functions are equipped with both MIDI IN and MID...

Страница 64: ...ed musical instrument or device If the optional F 20 foot pedal unit is connected Soft pedal data can also be transmitted Receive volume data The ES6 digital piano will respond to MIDI volume data sen...

Страница 65: ...range of 1 to 16 Step 3 Press one of the TOUCH TRANSPOSE SOUND SELECTION EFFECTS or REVERB buttons to exit MIDI Channel mode The LED indicators for the TOUCH TRANSPOSE and PIANO1 buttons will stop as...

Страница 66: ...function has been selected The name of the function PG Program and a program change number will be shown in the LED display Step 2 Press the T or S VALUE BALANCE buttons to select the desired program...

Страница 67: ...ill play a sound when the keyboard is played With set to Off the ES6 digital piano will not play a sound when the keyboard is played yet will continue to transmit data on the selected MIDI channel to...

Страница 68: ...0 53 6 Choir2 26 95 53 54 7 New Age Pad 27 121 0 89 8 Atmosphere 28 121 0 100 BASS 1 Wood Bass 29 121 0 33 2 Electric Bass 30 121 0 34 3 Fretless Bass 31 121 0 36 4 W Bass Ride 32 95 1 33 MIDI recept...

Страница 69: ...rogram change and other panel information will not be transmitted via MIDI When transmit program change is set to On program change and other panel information will be transmitted via MIDI Step 3 Pres...

Страница 70: ...1 Press and hold the TOUCH and TRANSPOSE buttons then press the HARPSI MALLETS button twice The LED indicators for the TOUCH TRANSPOSE and HARPSI MALLETS buttons will start to ash indicating that the...

Страница 71: ...ttons will stop ashing Any changes made to the Multi timbral mode On Off setting will remain until the power is turned off When the power is turned off the Multi timbral mode On Off setting will retur...

Страница 72: ...ceive MIDI information when Multi timbral mode is activated When set to On the selected channel will receive MIDI information when Multi timbral mode is activated When changing the Channel Mute settin...

Страница 73: ...r can be used to control the output level from the LINE OUT jacks without affecting the level of the LINE IN STEREO audio signal 3 MIDI JACKS These jacks are used to connect external MIDI devices with...

Страница 74: ...ease download the special USB driver software from the KAWAI website at the following URL http www kawai de downloads_en htm To establish MIDI communications with the ES6 digital piano ensure that the...

Страница 75: ...alling the USB driver while starting up the computer while MIDI applications are performing tasks while the ES6 digital piano is communicating with the computer while the computer is in energy saver m...

Страница 76: ...at r73 Motown 2 r22 Roll Beat r74 Gospel Shuf e r23 Light Ride 1 r75 Ragtime r24 Dixie Rock r76 Country Western 16th Latin r25 Surdo Samba Triplet Waltz r77 Triplet Rock 1 r26 Latin Groove r78 Triplet...

Страница 77: ...chord types can also be played by pressing just the notes marked with a symbol C Maj C sus4 C aug C min C M7 C 6 C m7 C mM7 C m6 C 7 C 7 5 C 7 5 C 7sus4 C m7 5 C dim C others D Maj C D sus4 C D aug C...

Страница 78: ...E Maj E sus4 E aug E min E M7 E 6 E m7 E mM7 E m6 E 7 E 7 5 E 7 5 E 7sus4 E m7 5 E dim F others E others E Maj D E sus4 D E aug D E min D E M7 D E 6 D E m7 D E mM7 D E m6 D E 7 D E 7 5 D E 7 5 D E dim...

Страница 79: ...G sus4 F G aug F G min F G M7 F G 6 F G m7 F G mM7 F G m6 F G 7 F G 7 5 F G 7 5 F G dim F G others F G 7sus4 F G m7 5 F A Maj G A sus4 G A aug G A min G A M7 G A 6 G A m7 G A mM7 G A m6 G A 7 G A 7 5...

Страница 80: ...A others B Maj A B sus4 A B aug A B min A B M7 A B 6 A B m7 A B mM7 A B m6 A B 7 A B 7 5 A B 7 5 A B dim A B others A B Maj B sus4 B aug B min B M7 B 6 B m7 B mM7 B m6 B 7 B 7 5 B 7 5 B 7sus4 B m7 5 B...

Страница 81: ...5 F7 C15 8 C7 E 7 F7 C7 C16 16 A M7 Gm7 A M7 Gm7 C7sus4 C7 A M7 Gm7 A M7 G7sus4 G7 C17 8 C CM7 C7 FM7 FmM7 CM7 F m7 5 G7sus4 G7 C18 8 Cm7 Dm7 Gaug Cm7 Dm7 Gaug C19 16 A M7 B 7 E M7 A7 A M7 Gaug Cm7 F...

Страница 82: ...7 8 C G7 C7 F7 C F G7 C F C G7 C78 16 C CM7 C7 F Dm7 G7 Em7 Am7 Dm7 G7 C C79 8 C7 F7 C7 F7 D7 G7 D7 G7 C80 16 C G7 C G7 C F C G7 C C7 F C D7 G7 C81 16 C C7 F C G7 C C7 F C G7 C C82 8 C7 F7 C7 F7 Dm7 G...

Страница 83: ...46 Std1 HHO Room HHO Analog HHO B 1 47 Std1 Mid Tom1 RoomMidTom1 Analog Mid Tom1 C 2 48 Std1 Hi Tom2 RoomHiTom2 Analog Hi Tom2 C 2 49 Std1 Crash1 Analog Crash1 D 2 50 Std1 Hi Tom1 RoomHiTom1 Analog Hi...

Страница 84: ...0 000 notes Demo Songs Main Demo Internal Sound demos 27 songs Rhythm Section demo Other Functions Dual Split Dual Split balance adjust Four Hands Mode Registration EQ 3 types Touch curve 6 types Tran...

Страница 85: ...nel 1 16 con gurable Note Number True voice 9 120 0 127 0 127 9 120 including transpose Velocity Note ON Note OFF 9nH v 1 127 8nH v 0 After Touch Key s Ch s Pitch Bend Control Change 0 32 7 10 11 64 6...

Страница 86: ......

Страница 87: ......

Страница 88: ...ES6 Digital Piano Owner s Manual KPSZ 0236 816280 OW1017E S0805 Version 1 Printed in Indonesia Copyright 2008 KAWAI Musical Instruments Mfg Co Ltd All Rights Reserved...

Отзывы: