5
2. Arrange the brackets into the position shown and
tighten down the nuts. Once the brackets are secure,
turn the unit back into its upright position.
3. Follow the instruction on the previous page
(LED3S19 Assembly instructions) to mount the light
kit to the brackets.
Maintenance Recommendations
•
DO NOT attempt to open light ixtures!
•
Under No Circumstances should anyone enter the water
while a fountain is operating.
•
Please keep the original box for maintenance shipping.
The following maintenance procedures can be utilized to
ensure many years of quality performance from your Kasco
Fountain and Light Kit and reduce the need for more costly
repair work.
PROPER INSTALLATION: Proper installation of Kasco
equipment will include a power source with ground fault
protection. For Fountain models, Kasco provided control
panels included with the unit have built-in ground fault pro-
tection. Ground fault interrupters are a safety feature that
can also alert you to electrical leaks in the equipment. If
you have repeat, consistent trips of the ground fault device,
the equipment should be disconnected and removed from
the water. The power cord should be inspected for dam-
age and you should contact your distributor, or call Kasco
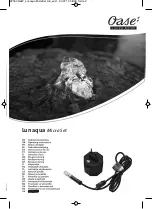
6. Using the cable ties, tie each ixture cord to bottom
leg of mounting brackets using the holes provided.
The will act as a strain relief and will keep the cord
from being damaged by the fountain and balance the
unit properly. Next, cable tie the main power cord to
the loat as shown in Fig. 10.
Fig 10
7. Upon installation of the assembled unit, connect
your LED light kit to your ield installed GFCI pro
-
tected outlet and timer.
Instructions For Mounting LED6S19
Instructions for attaching brackets on the loat prior
to mounting the light ixtures on 2 HP or larger Kasco
units.
Parts needed:
•
Lower loat brackets (6)
• 3/8” washers (3)
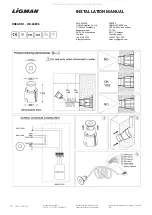
Part 1
Part 2
1. Turn the unit upside down. Loosen and remove the
3/8” nuts on the three 9” bolts that are closest to the
motor unit. Place 2 Lower Float Brackets(Part #1) and
one 3/8” washer(Part #2) on each of the 9” bolts over
the bottom screen clips and replace the 3/8” nut.
Содержание LED6S19-150
Страница 11: ...11...