background image

6

Installation Instructions

PARTS INCLUDED

LL1020

1. 

Light fi xture with 12 Volt 75W MR-16 

2. 

Halogen bulb and 20’ cord (1)
Brass Screws (2)

3. 

Brass Flat Washers (2)

4. 

Retaining Ring (1)

5. 

Mounting Bracket set (1)

6. 

TOOLS & SUPPLIES NEEDED

Flat Head Screw Driver

1. 

Properly sized remote transformer listed for 

2. 

use with submersible luminaries.

STEP ONE:
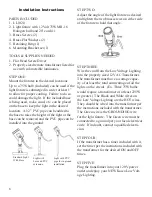
Mount the fi xtures in the desired locations.   
Up to a 75W bulb (Included) can be used if the 
light fi xture is submerged in water at least 1” 
to allow for proper cooling.  Failure to do so 
could damage the light.  If the included base 
is being used, rocks, sand, etc. can be placed 
on the base to keep the light in the desired 
location.  A 1/2” PVC pipe can be added to 
the base to raise the height of the light or the 
base can be removed and the PVC pipe can be 
installed into the ground.

Standard Light
With Base

Light with 
base and PVC 
extension

Light with PVC 
pipe for in ground 
installation

STEP TWO:
Adjust the angle of the light fi xture as desired 
and tighten the two brass screws on either side 
of the fi xture to hold that angle.

STEP THREE:
Wire the cord from the Low Voltage Lighting 
into the properly sized 12V AC Transformer.  
The transformer must have a wattage capac-
ity of at least the total sum wattage of all the 
lights on the circuit.  (Ex. Three 75W bulbs 
would require a transformer of at least 225W 
or greater.)  The Black and White wires on 
the Low Voltage Lighting are the HOT wires.  
They should be wired into the transformer per 
the instructions included with the transformer.  
The Green wire is the GROUNDING wire 
for the light fi xture.  The Green wire must be 
connected to a ground per your local electrical 
code.  If in doubt, contact a qualifi ed electri-
cian.

STEP FOUR:
If the transformer has a timer included with it, 
set the timer per the instructions included with 
the transformer for the desired ON and OFF 
times.

STEP FIVE:
Plug the transformer into your 120V power 
outlet and enjoy your NEW Kasco Low Volt-
age Lighting.

Содержание WaterGlow LL1020

Страница 1: ...ine com sales kacomarine com Contents Important Safety Instructions pg2 General Owner s Instructions pg2 Warranty Policy pg3 Maintenance Recommendations pg5 Installation Instructions pg6 Troubleshooting Tips pg7 Replacement Parts pg8 Customer Repair Form pg9 Rev 11 10 08 Thermal Overload Protection Gasket Potting Eliminate Leaks 3020379 UL 676 8th Ed 2004 ...

Страница 2: ...t submerged and greater than 20 watt bulb is used General Owner s Instructions INSPECT THE SHIPMENT Immediately inspect your Kasco Low Voltage Lighting shipment for any visible damages Also cross reference the Parts Included sheet with the parts supplied to check for shortages Shortages should be reported immediately to your Kasco Marine distributor or representa tive and damages reported to your ...

Страница 3: ...MAGES Warranty is void if The Low Voltage Lighting is not maintained properly according to the Maintenance Rec ommendations supplied in this Owners Manu al The Low Voltage Lighting is returned for repair without the power cord or if the power cord is altered in any way from original ship ment Cuts in the power cord are not covered under warranty The Low Voltage Lighting is damaged by un authorized...

Страница 4: ... ship according to the instruc tions in the previous section Again it is best to send the unit in with the Customer Repair Form near the end of this manual Kasco Marine offers estimates on repairs at the request of the customer The request for estimate should be included in the form that accompanies the returned Light Kit and must include a daytime phone number and or e mail address Estimate optio...

Страница 5: ...ake sure the lens of the light is clean to ensure the brightest light WINTER STORAGE In regions where there is significant freezing in the wintertime the Low Voltage Lighting should be removed from the water to protect them from the expansion pressure of the ice CLEANING Low Voltage Lighting should be removed from the water at least once per year at the end of the season in cold climates to clean ...

Страница 6: ... with PVC pipe for in ground installation STEP TWO Adjust the angle of the light fixture as desired and tighten the two brass screws on either side of the fixture to hold that angle STEP THREE Wire the cord from the Low Voltage Lighting into the properly sized 12V AC Transformer The transformer must have a wattage capac ity of at least the total sum wattage of all the lights on the circuit Ex Thre...

Страница 7: ...ound at www kascomarine com Under the Technical tab My light has been working for sometime but don t seem to be as bright as when first in stalled If this symptom occurs unplug the light In spect the lenses on the lights Over time there could be some algae growth or hard water deposits on the lenses which will block some light Clean the lenses with a soft brush and the light should be bright again...

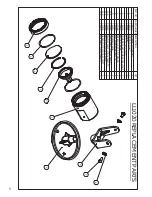
Страница 8: ...CKET LANDSCAPE LIGHT 1 6 348210 BRACKET BASE 1 7 321005 SCREW 1 4 20 X 1 2 BRASS 2 8 321010 FLAT WASHER BRASS 1 4 2 9 348315 RETAINING RING 1 10a 375125 CLEAR LAMP MR 16 75 WATT 1 10b 350125 YELLOW LAMP MR 16 50 WATT 1 10c 350140 RED LAMP MR 16 50 WATT 1 10d 350155 GREEN LAMP MR 16 50 WATT 1 10e 350170 BLUE LAMP MR 16 50 WATT 1 9 LL1020 REPLACEMENT PARTS 10a 8 5 7 1 6 4 2 3 ...

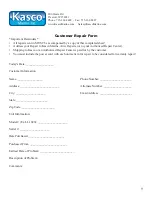
Страница 9: ...with each unit sent in for repair to be considered for warranty repair Today s Date ___________________ Customer Information Name _________________ Phone Number _____________________ Address __________________________ Alternate Number ___________________ City ____________________ Email Address ______________________ State _____________________ Zip Code ______________________ Unit Information Model...

Страница 10: ......

Страница 11: ......

Страница 12: ...10 Kasco Marine Inc 800 Deere Rd Prescott WI 54021 Phone 715 262 4488 Fax 715 262 4487 www kascomarine com sales kascomarine com service kascomarine com 884025 ...

Отзывы: