background image

8

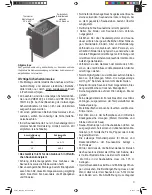
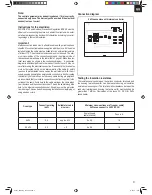
Terminal box  

Foot 

Screws M5 x 12 4x 

2 x Wall bracket

4 x Securing

screws (wood

screws) 5 x 35

Screws 4 x

M5 x 12  

Bottom panel  

Self-tapping

screws 3.9 x 9.5  

and knowledge if they are supervised or have recei-

ved instruction in how to use the equipment safely 

and understand the dangers which result from such 

use. Children are not allowed to play with the equip-

ment. Unless supervised, children are not allowed 

to clean the equipment or carry out user-level main-

tenance work.

Installation instructions

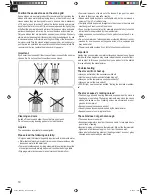
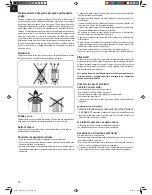
Important.

Do not use any 

fl

 oor coverings under the stove if they are made of in-

fl

 ammable material such as wood, plastic, etc. Ceramic tiles are ideal 

for use in a sauna. The area under the stove may su

 er discoloration, 

even on non-

fl

 ammable 

fl

 ooring or joint material. No compensation will 

be paid for discoloration or damage to 

fl

 ooring or the sauna walls. The 

distance between the rear of the stove and the cabin wall depends on 

the design (wall mounting). The stove must be connected to the electri-

city supply before it is mounted on the wall holder.

Installing the sauna stove

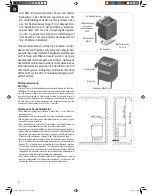
•  A

  x the feet on the rear wall of the stove the screws supplied (4 

screws M5 x 12).

•  Fasten the bottom panel to the inner sheath with 4 self-tapping screws 

3.9 x 9.5.

•  Thread the mains cable into the terminal box through the hole provi-

ded for it.

•  After making the electrical connection of the mains cable, close the 

cover on the terminal box again (with the spacer on the outside).

•  Position the sauna stove in front of the air intake opening. Secure the 

wall bracket to the wall of the  cabin using the wood screws supplied. 

Insert the stone grate (see description entitled ”Placing the sauna 

stones on the stone grate“, section entitled ”Cleaning and care“).

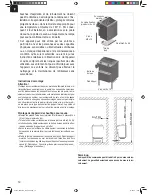
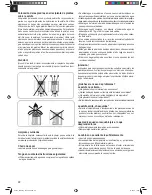
•  For the installation of the sauna stove ensure that the vertical distance 

between the top of the sauna stove and the ceiling of the sauna cabin 

is at least 110 cm and the horizontal (lateral) distance between the 

stove and the wall of the cabin is at least 7 cm. The distance between 

the bottom of the stove and the 

fl

 oor depends on the design of the 

stove (adjustable feet). However, it should be ensured that the stove 

is not placed on a 

fl

 oor made of highly in

fl

 ammable material (wood, 

plastic 

fl

 ooring, etc.). Ideally ceramic tiles or the like should be used in 

the sauna. The distance between the rear wall of the stove and the wall 

of the cabin also depends on the design (wall bracket).

•  The distance between the stove safety grille or the bench and other 

in

fl

 ammable materials from the oven must be at least 7 cm. The height 

of the safety grille must be equal to the height of the stove at the front.

Karibu_Anleitung_37.468.50.indd   8

Karibu_Anleitung_37.468.50.indd   8

13.05.20   16:55

13.05.20   16:55

Содержание 66601

Страница 1: ...leitung Assembly and Operating Instructions Instructions de montage et mode d emploi Istruzioni per il montaggio e l uso Instrucciones de montaje y de servicio Montage instructies en handleiding Návod k montáži a použití Navodila za montažo in obratovanje Karibu_Anleitung_37 468 50 indd 1 Karibu_Anleitung_37 468 50 indd 1 13 05 20 16 55 13 05 20 16 55 ...

Страница 2: ...v za savno na rešetko 34 Kaj narediti pri težavah 34 Risba nadomestnih delov in seznam nadomestnih delov 35 Izjava CE 36 Garancijska listina 40 Servisni obrazec 44 2 3 3 4 4 5 5 5 5 6 6 35 36 43 44 27 2 27 28 28 30 30 36 36 2 7 7 8 8 9 9 9 9 10 10 35 36 37 44 2 11 11 12 12 13 13 13 13 14 14 35 36 37 44 2 15 15 16 16 17 17 17 17 18 18 35 36 38 44 2 19 19 20 20 21 21 21 21 22 22 35 36 38 44 2 23 23 ...

Страница 3: ...che erzeugen Metall Heizstäbe und Steine dehnen sich aus Sauna Einrichtungen und Saunakabinen dürfen nur aus geeignetem harzarmen und unbehandelten Ma terialien z B Nordische Fichte Pappel oder Linde hergestellt werden Die zulässige Höchsttemperatur für Wand und Deckenoberfläche der Saunakabine beträgt 140 Celsius Mit der Zeit dunkeln die Kabinenwände im Bereich des Saunaofens stärker als im Rest ...

Страница 4: ...en oder Schäden am Bodenbelag oder an der Saunawand geleistet Der Ofen muss vor der Wandmontage elektrisch angeschlossen werden Der Saunaofen ist für Kabinengrößen von 6 14m konzipiert Montage des Saunaheizgerätes Füße mittels beigefügten Schrauben 4 Stück M5 x 12 an Ofenrück wandmontieren Bodenblech mit 4 Blechschrauben 3 9 x 9 5 an Innenmantel montieren Die Netzkabeleinführung in den Klemmkasten...

Страница 5: ...er Elektroanschluss ist gemäß Anschlussplan durchzuführen Ein Anschlussplan ist zusätzlich auf der Innenseite der Schaltschachtabdeckung angebracht Nach elektrischem Anschluss Abdeckung anbringen Beachten Sie dass stromführende Leitungen aus Sicherheitsgründen nicht sichtbar an Kabineninnenwände verlegt werden müssen Bei vorgefertigten Sau nakabinen sind im Wandelement mit der Zuluftöffnung meist L...

Страница 6: ... Sicherung in der Hausinstallation ausgelöst Haben Sie die Temperaturregler richtig eingestellt Haben Sie die Zeitschaltuhr vorgewählt FI Schalter löst aus siehe Absatz Prüfung Isolationswiderstand Der Ofen verursacht Knackgeräusche Beim Aufheizen oder im Betrieb dehnen sich die Gehäuseteile und Heiz stäbe aus Die Heizstäbe können Saunasteine verschieben und Geräusche verursachen Knackgeräusche si...

Страница 7: ...rker near the sauna stove than in the rest of the cabin this is nor mal Complaints about this will not be accepted The minimum height of the sauna cabin must be 1 75m interior height Ventilation openings must be provided in every sauna cabin The ventilation opening must be on the wall di rectly below the sauna stove approx 5 10 cm above floor level The waste air must be discharged through an openi...

Страница 8: ...ns cable into the terminal box through the hole provi ded for it After making the electrical connection of the mains cable close the cover on the terminal box again with the spacer on the outside Position the sauna stove in front of the air intake opening Secure the wall bracket to the wall of the cabin using the wood screws supplied Insert the stone grate see description entitled Placing the saun...

Страница 9: ... the internal walls of the cabin for safety reasons In prefabricated sauna cabins the wall element with the air supply opening generally has empty cable conduits or a duct for routing the cable If your cabin does not have any cable routing preparations we recommend that you install a connection socket not supplied to the outside of the cabin Drill a hole in the cabin wall near the cable infeed fro...

Страница 10: ...d as you are comfortable with but do not exceed a volume of 15 g m of cabin volume The liquid should be poured straight on to the stones in the stove and must be spread evenly over all the stones If you use liquid concentrates for example essential oils follow the instructions for use provided by the manufacturer Using excessive concentrations of these products may result in ex plosions Do not use...

Страница 11: ... le peuplier ou le tilleul La température la plus élevée admise pour la surface des murs et le plafond de la cabine de sauna s élève à 140 C Avec le temps les parois de la cabine s assombris sent dans la zone du poêle de sauna plus que dans le reste de la cabine c est normal Les réclamations ne sont pas remboursées La hauteur de la cabine du sauna doit s élever au moins à 1 75 m Il faut prévoir de...

Страница 12: ...n revêtement de sol en matériau inflammable bois ma tières plastiques ou autres sous le poêle Les carreaux de céramique sont fonctionnels dans les saunas Dans la zone sous le poêle les re vêtements de sol non inflammables ou le matériau de jointoiement peu vent changer de couleur Les revêtements du sol ou le mur du sauna dont la couleur a changé ou ceux endommagés ne seront pas rempla cés L écarte...

Страница 13: ...Dans le cas de cabines de sauna préfabriquées des tubes vides sont la plupart du temps dans l élément de paroi avec l ouverture d entrée d air ou une trémie pour la pose des câbles Si vous n avez pas de préparation à la pose de câbles dans votre ca bine nous vous recommandons d installer une boîte de jonction non comprise dans la livraison à l extérieur de la cabine Percez un trou dans le mur de l...

Страница 14: ...eau en fonction de votre bien être Sa quantité ne doit cependant pas dépasser 15 g m3 du volume de la cabine La projection d eau se fait directement sur les pierres chaudes dans le poêle et doit absolument être réparti régulièrement sur les pierres Si vous employez des concentrés pour sauna par exemple des huiles essentielles respectez les consignes du producteur Si vous utilisez des concentration...

Страница 15: ... marittimo La stufa può emettere nella fase di riscaldamento e quando è in funzione dei rumori simili ad oggetti che si spezzano gli elementi riscaldanti di metallo e le pietre si dilatano I dispositivi e le cabine della sauna devono essere fat ti solo di materiale adatto a basso contenuto di resina e non trattato per es abete rosso nordico pioppo o tiglio La temperatura massima consentita per la ...

Страница 16: ...en ti di colore anche su pavimentazioni o materiali per giunti non infiamma bili Non viene effettuato alcun indennizzo per cambiamenti di colore o danni alla pavimentazione o alla parete della sauna La stufa deve es sere collegata elettricamente prima del montaggio alla parete La stufa per sauna è destinata a cabine di dimensioni comprese tra 9 e 14 m Montaggio dell apparecchio di riscaldamento sau...

Страница 17: ... Nel caso di cabine per sauna prefabbrica te sono solitamente già presenti tubi vuoti o pozzetti per la posa dei cavi nell elemento parete con l apertura di ventilazione Se la vostra cabina non fosse predisposta per la posa dei cavi si consiglia di ins tallare una scatola di connessione sul lato esterno della cabina non è compresa tra gli elementi forniti Eseguite un foro nella parete della cabina...

Страница 18: ...tribuita uniformemente sulle pietre Se utilizzate dei concentrati per il getto di vapore per es oli essenziali si devono osservare le avvertenze del produttore L impiego di concentrazioni troppo alte di tali sostanze può provocare rea zioni esplosive Getti di vapore con miscele di bevande alcoliche o altre sostanze non pre viste per la sauna non sono consentite a causa del pericolo di incendio e d...

Страница 19: ...e 140 C Con el tiempo las paredes de la cabina en el área de la estufa de la sauna se van oscureciendo más que en el resto de la cabina lo que es absolutamente nor mal No se aceptan reclamaciones al respecto La altura de la cabina debe ser de mín 1 75 m Es preciso montar rejillas de ventilación y de escape de aire en cada cabina El orificio de ventilación se debe encontrar en la pared justo bajo l...

Страница 20: ...plear baldosas de cerámica Debajo de la estufa incluso los pavimentos no inflamables y las juntas también pueden presentar decoloraciones No se aceptarán devoluciones en caso de decoloración o daños en el suelo o paredes La distancia entre la pared posterior de la sauna y la pared de la cabina depende del modelo soporte de pared Antes del montaje realizar la conexión eléctrica de la estufa al sopo...

Страница 21: ...e la cabina En las cabinas prefabricadas ya se han incluido tubos vacíos para introducir los cables en el elemento de pared que lleva la abertura para la entrada de aire Si su cabina no dispone de los mismos recomendamos instalar una toma de corriente no incluida en la entrega en la pared externa de la cabina Realizar un orificio en la pared de la cabina junto a la entrada de la estufa y la caja d...

Страница 22: ...convenga no obstante el volumen de agua no debe superar los 15 g m del volumen de la cabina El agua se echa directa y homogéneamente sobre las piedras calien tes en la estufa Si se emplean concentrados p ej aceites esenciales se deberán tener en cuenta las instrucciones del fabricante Si emplea altas concentraciones de este producto podrían producirse deflagraciones Están prohibida la adición de b...

Страница 23: ...al b v Scandinavisch sparrenhout populier of lindehout worden vervaardigd De toegestane maximumtemperatuur voor wand en plafondoppervlakken van de saunacabine bedraagt 140 C Mettertijd worden de cabinewanden nabij de sau nakachel donkerder dan in de rest van de cabine dit is normaal Klachten dienaangaande worden niet aanvaard De hoogte van de saunacabine moet ten minste 1 75 m bedragen In iedere s...

Страница 24: ...De afstand tussen achterwand kachel en cabinewand is afhankelijk van het model wandhouder De kachel dient elektrisch te worden aangesloten voordat hij op de wandhouder wordt aangebracht Montage van de saunakachel Voeten op de achterwand van de kachel aanbrengen d m v de bijgeleverde schroeven 4 stuks M5 x 12 Bodemplaat op de binnenste mantel aanbrengen m b v 4 parkerschroeven 3 9 x 9 5 De netkabel...

Страница 25: ...tst Bij voorgefabriceerde saunacabines zijn in het wandelement met de toevoerluchtopening meestal lege buizen of een schacht voor het plaatsen van kabels aanwezig Mocht uw cabi ne niet voorbereid zijn voor het plaatsen van kabels bevelen wij aan aan de buitenzijde van de cabine een contactdoos niet bij de leve ringsomvang inbegrepen te installeren Boor naast de kabelinvoering van de kachel en de c...

Страница 26: ...et algemeen welbevinden de opgiethoeveelheid mag 15 g m cabinevolume niet overschrijden Het opgieten gebeurt rechtstreeks op de warme stenen in de kachel de vloeistof moet gelijkmatig over de stenen worden verdeeld Bij gebruik van opgietconcentraten b v etherische oliën moeten de aanwijzingen van de fabrikant in acht worden genomen Het gebruik van te hoge concentraties van deze middelen kan de fla...

Страница 27: ...inky činí 140 C Stěny kabiny v prostoru saunových kamen tmavnou silněji než zbytek kabiny to je normální Reklamace se nepřijímají Výška kabiny sauny musí činit min 1 75 m V každé saunové kabině musí být větrací a odvětrá vací otvory Na stěně přímo pod saunovými kamny cca 5 10 cm nad zemí musí být větrací otvor Tyto odvětrávací otvory musí být uspořádány v zadní stěně diagonálně ke kamnům v oblasti...

Страница 28: ...před montáží elektricky připojena k držáku na Montáž topení do sauny Podstavce namontujte na zadní stěnu kamen pomocí přiložených šroubů 4 ks M5 x 12 Plech na podlahu namontujte 4 samořeznými šrouby 3 9 x 9 5 na vnitřní plášť Přívod elektrického napájení protáhněte do svorkovnice otvorem který je k tomu určený Po elektrickém připojení síťového kabelu znovu uzavřete svorko vnici krytem rozpěrou smě...

Страница 29: ...ních důvodů nainstalo váno viditelně na vnitřních stěnách kabiny U prefabrikovaných sau nových kabin jsou ve stěnovém prvku s přívodním vzduchovým ot vorem většinou k dispozici prázdné trubky nebo šachta pro instalaci kabelů Pokud vaše kabina nemá žádnou přípravu na instalaci kabelů doporučujeme nainstalovat na vnější stranu kabiny připojovací zásuvku není součástí dodávky Vedle přívodu kabelu kam...

Страница 30: ...e způsobit opaření Polévejte podle vlastního pocitu množství vody při polévání by však nemělo překročit 15 g m objemu kabiny Polévejte přímo horké kameny v kamnech a vodu nalijte stejnoměrně na všechny kameny Jestliže používáte polévací koncentráty např éterické oleje dodržu jte vždy pokyny výrobce Při použití příliš vysokých koncentrací těchto přípravků může dojít k jejich vzplanutí Polévat kamen...

Страница 31: ...najvišja temperatura za površine sten in stropa v kabini savne je 140 C Sčasoma stene kabine na predelu kjer je nameščena peč močneje potemnijo kot preostali del kabine kar je normalno Reklamacije se ne upoštevajo Višina kabine savne mora biti vsaj 1 75 m V vsaki kabini savne predvidite odprtine za prezrače vanje in odzračevanje Odprtino za prezračevanje morate namestiti na steno tik pod pečjo sav...

Страница 32: ...oge montirajte na hrbtno steno peči s priloženimi vijaki 4 kosi M5 x 12 Na notranji plašč montirajte talno pločevino s 4 vijaki za pločevino 3 9 x 9 5 Skoznjik omrežnega kabla vpeljite v omarico s sponkami skozi pred videno vrtino Po električni priključitvi omrežnega kabla ponovno zaprite omarico s sponkami s pokrovom distančnik navzven Peč savne postavite pred odprtino za vstop zraka Stensko drža...

Страница 33: ...jeno nameščati na vidne dele notran jih sten kabine Pri vnaprej izdelanih kabinah savne so v stenskih ele mentih z odprtino za prezračevanje običajno vgrajene prazne cevi ali požirke za polaganje kablov Če v kabini ni pripravljenih napeljav za polaganje kablov priporočamo da na zunanji strani kabine namestite priključno vtičnico ni v obsegu dobave Poleg kabelskega skoznijka peči in priključne vtič...

Страница 34: ...ačiti 15 g m volumna kabine Enakomerno in porazdeljeno čez vse kamne prelivajte neposredno na vroče kamne v peči Če uporabljate koncentrate za preliv npr eterična olja morate upoš tevati napotke proizvajalca Pri uporabi prevelikih koncentracij tega sredstva lahko pride do hitrega izparevanja Prelivi ki so jim primešane alkoholne pijače ali drugi dodatki ki niso predvideni za uporabo v savni so pre...

Страница 35: ...86 70 038 06 Drehknopf Knob 6 086 50 009 70 Relais 6 polig Relay 6 pole 7 086 70 038 07 Zeitschaltuhr 0 4 Std Timer 0 4 hours 8 086 50 009 71 Relais 4 polig Relay 4 pole 9 086 50 009 72 Sensor IS Bereich 70 120 Sensor field 70 120 10 086 89 723 36 Bodenblech Edelstahl Bottom plate stainless steel 11 086 50 331 62 Schraube für Standfuß Screw for base 12 086 50 510 81 Blechschraube für Bodenblech Sc...

Страница 36: ...HPHQW QRXV HQ VHULRQV GpVROpV DQV XQ WHO FDV QRXV YRXV SULRQV GH ELHQ YRXORLU SUHQGUH FRQWDFW DYHF QRWUH VHUYLFH DSUqV YHQWH j OµDGUHVVH LQGLTXpH VXU OH EXOOHWLQ GH JDUDQWLH 1RXV UHVWRQV pJDOHPHQW YRORQWLHUV j YRWUH GLVSRVLWLRQ DX QXPpUR GH WpOpSKRQH GH VHUYLFH LQGLTXp SOXV EDV 3RXU IDLUH YDORLU XQH GHPDQGH GH JDUDQWLH FH TXL VXLW HVW YDODEOH 1 Les conditions de garantie règlent les prestations de...

Страница 37: ...ù nella garanzia A tale scopo inviate l apparecchio all indirizzo del servizio assistenza Nuestros productos están sometidos a un estricto control de calidad No obstante lamentaríamos que este aparato dejara de funcionar correctamente en tal caso le rogamos que se dirija a nuestro servicio de atenciónal cliente en la dirección indicada en la parte inferior de la presente tarjeta de garantía Con mu...

Страница 38: ...neschválených vložných nástrojů nebo příslušenství nedodržování pokynů pro údržbu a bezpečnostních pokynů vniknutí cizích těles do přístroje jako např písek kameny nebo prach použití násilí nebo poškození v důsledku cizích vlivů jako např škody způsobené pádem jakož také běžného opotřebení způsobeného používáním To platí obzvláště pro akumulátory na které přesto poskytujeme záruční lhůtu 12 měsíců...

Страница 39: ...eme neupoštevanja vzdrževalnih ali varnostnih določil vdora tujkov v napravo npr peska kamnov ali prahu upora be sile ali učinkovanja zunanje sile npr škoda pri padcu ter zaradi obrabe ki nastane ob pravilni in običajni uporabi To še zlasti velja za akumulatorje na katere pa kljub temu upoštevamo 12 mesečno garancijsko obdobje Garancijski zahtevek je izničen če so na napravi bili izvajani posegi 3...

Страница 40: ...nés les accessoires et ressources fournies sans composants électroniques Solo per paesi membri dell UE Non gettate gli utensili elettrici nei rifiuti domestici Secondo la Direttiva europea 2002 96 CE sui rifiuti di apparecchiature elettriche ed elettroniche e l applicazione nel diritto nazionale gli elettroutensili usati devono venire raccolti separatamente e smaltiti in modo ecologico Alternativa...

Страница 41: ...Der Nachdruck oder sonstige Vervielfältigung von Dokumentation und Begleitpapieren der Produkte auch auszugsweise ist nur mit ausdrücklicher Zustimmung der ISC GmbH zulässig The reprinting or reproduction by any other means in whole or in part of documentation and papers accompanying products is permitted only with the express consent of ISC GmbH La réimpression ou une autre reproduction de la doc...

Страница 42: ... durch Herunterfallen sowie durch verwendungsgemäßen üblichen Verschleiß ausgeschlossen Dies gilt insbesondere für Akkus auf die wir dennoch eine Garantiezeit von 12 Monaten gewähren Der Garantieanspruch erlischt wenn an dem Gerät bereits Eingriffe vorgenommen wurden 3 Die Garantiezeit beträgt 2 Jahre und beginnt mit dem Kaufdatum des Gerätes Garantieansprüche sind vor Ablauf der Garantiezeit inne...

Страница 43: ...44 ISC GmbH Art Nr 50 009 77 14011 Stand 05 2020 Karibu_Anleitung_37 468 50 indd 44 Karibu_Anleitung_37 468 50 indd 44 13 05 20 16 56 13 05 20 16 56 ...

Отзывы: