


-
4
Slide the four support beams included
in the packaging under the ramp.
Remove the wooden blocks used for ar-
resting the wheels and slide them under
the ramp.
Slide the machine over the prepared
ramp from the pallet.
The machine can be moved in 2 ways:
(1) By pushing it (see Moving sweeper
without engaging self-propulsion).
(2) By driving it (see Moving sweeper by
engaging self-propulsion).
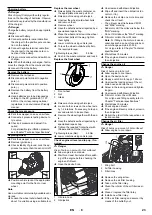
Danger
Risk of injury! Before engaging the free-
wheel operation, the machine must be se-
cured to prevent it rolling away.
Open the device hood.
Engage the freewheel lever in the upper
position.
Note:
If the freewheel lever does not
lock in, then slightly move the machine
forward and backward.
Position freewheel lever up - appliance can be
moved (view from behind)
Caution
Risk of damage to the hydrostatic axle
drive!
Only push sweeper slowly and across short
distances.
–
The travel drive is inoperable.
–
Braking effect exists no more.
After moving the appliance, snap the
freewheel lever into the lower position.
Close cover.
Open the device hood.
Engage the freewheel lever in the lower
position.
Position freewheel lever down - appliance is
ready to start.
Close cover.
Note:
The machine has been fitted with an
automatic parking brake that is activated as
soon as the engine is switched off and the
driver leaves his seat.
Park the sweeper on an even surface.
Remove ignition key.
Check engine oil level.
Check the filling level of the fuel tank at
the fuel gauge.
Check fill level of hydraulic oil.
Check side brush.
Check the roller brush for wear and
wrapped belts.
Empty waste container.
Check tyre pressure.
Check function of seat contact switch.
Check, if the stop switch on the com-
bustion engine is in the "ON" position.
Note:
For description, see section on Care
and maintenance.
Danger
Risk of explosion!
–
Only fuel up while motor is turned off.
–
Only use the fuels specified in the Op-
erations Manual.
–
Do not refuel the machine in enclosed
spaces.
–
Smoking and naked flames are strictly
prohibited.
–
Ensure that no fuel reaches the hot
open surfaces.
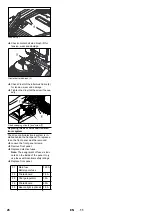
1 Tank lid
2 Tank indicator
3 Fuel tap
Switch off engine.
Open the device hood.
Read the filling level at the fuel gauge.
The red area indicates the filling level.
Open fuel filler cap.
Use and install a funnel with a filter.
Use "regular unleaded petrol".
Tank filling with empty tank approx. 5 li-
tre
Wipe off any spilt fuel, remove funnel
and close fuel filler cap.
Close cover.
Caution
Risk of damage to the drive! Prior to each
run, ensure that the freewheel lever is in the
lower position.
Caution
The air inlets next to the driver's seat must
not be covered. Do not store any objects
next to or behind the seat.
몇
Warning
Long hours of using the appliance can
cause circulation problems in the hands on
account of vibrations.
It is not possible to specify a generally valid
operation time, since this depends on sev-
eral factors:
–
Proneness to blood circulation deficien-
cies (cold, numb fingers).
–
A firm grip impedes blood circulation.
–
Continuous operation is worse than an
operation interrupted by pauses.
In case of regular, long-term operation of
the device and in case of repeated occur-
rence of the symptoms (e.g. cold, numb fin-
gers) please consult a physician.
Pull seat adjustment lever inwards.
Slide seat, release lever and lock in
place.
Check that the seat is properly locked in
position by attempting to move it back-
wards and forwards.
Moving sweeper without engaging
self-propulsion
Moving sweeper by engaging
self-propulsion
Start up
General notes
Prior to start/safety test
Maintenance Works
Refuelling
Operation
Adjusting driver's seat
19
EN
Содержание KM 90/60 R P Adv
Страница 162: ...2 18 15 3 4 162 EL...
Страница 163: ...3 3 4 5 2 1 2 1 2 3 5 4 163 EL...
Страница 164: ...4 1 2 3 4 5 6 Homebase 7 8 9 10 11 12 13 14 15 16 17 18 19 20 21 22 23 24 25 26 27 28 1 2 3 4 5 265 kg 164 EL...
Страница 165: ...5 2 1 2 1 2 3 5 165 EL...
Страница 166: ...6 20 kg 1 2 3 0 1 1 10 10 1 2 5 cm 5 cm 2 166 EL...
Страница 167: ...7 50 mm 3 15 1 2 1 0 0 18 1 0 3 cm3 2 167 EL...
Страница 168: ...8 VDE 0701 K rcher 100 20 K rcher 20 100 200 300 3 4 0 1 2 2 6 168 EL...
Страница 169: ...9 1 2 91 157 1 169 EL...
Страница 170: ...10 1 2 3 1 2 5 1 2 MIN MAX MIN MAX 6 491 538 5 1 5 1 2 3 1 2 3 Z Nm 56 Nm Nm 56 Nm 170 EL...
Страница 171: ...11 1 2 MAX 3 MIN Max Min 40 50 mm 1 0 3 1 0 1 50 70 mm 1 0 1 2 3 171 EL...
Страница 172: ...12 1 0 1 10 15 mm 2 5 10 mm 3 1 3 mm 1 1 2 2 3 4 5 0 3 4 1 2 172 EL...
Страница 173: ...13 1 2 3 3 4 4 5 5 6 6 7 F 1 125 A F 2 7 5 A F 3 15 A F 4 25 A F 5 7 5 A 173 EL...
Страница 174: ...14 K rcher K rcher K rcher 3 K rcher K rcher K rcher T K rcher 2 3 K rcher 0 174 EL...
Страница 192: ...2 192 RU...
Страница 193: ...3 18 15 3 4 3 4 5 2 1 2 1 2 3 5 4 193 RU...
Страница 194: ...4 1 2 3 4 5 6 7 8 9 10 11 12 13 14 15 16 17 18 19 20 21 22 23 24 25 26 27 28 1 2 3 4 5 194 RU...
Страница 195: ...5 1 2 ON 1 2 3 265 kg 195 RU...
Страница 196: ...6 Normal 92 5 20 1 2 3 0 ON 1 1 10 10 1 2 5 5 196 RU...
Страница 197: ...7 2 50 3 15 1 2 1 0 0 197 RU...
Страница 198: ...8 18 1 0 3 3 VDE 0701 K rcher 100 20 K rcher 20 100 200 300 198 RU...
Страница 199: ...9 3 4 0 1 2 2 6 1 2 199 RU...
Страница 200: ...10 91 157 EWG 1 1 2 3 1 2 5 1 2 MIN MAX MIN MAX 6 491 538 5 1 5 56 Nm 56 Nm 200 RU...
Страница 201: ...11 1 2 3 1 2 3 1 2 3 40 50 1 0 3 1 0 1 50 70 201 RU...
Страница 202: ...12 1 0 1 2 3 1 0 1 10 15 2 5 10 3 1 3 202 RU...
Страница 203: ...13 1 1 2 2 3 4 5 0 3 4 1 2 1 2 3 3 4 4 5 5 6 6 7 F 1 125 A F 2 7 5 A F 3 15 A F 4 25 A F 5 7 5 A 203 RU...
Страница 204: ...14 ON K rcher K rcher K rcher 3 K rcher K rcher K rcher K rcher 2 3 K rcher 0 204 RU...
Страница 322: ...2 e 18 15 322 BG...
Страница 323: ...3 3 4 3 4 5 2 1 2 T o 1 2 3 5 4 323 BG...
Страница 324: ...4 1 2 3 4 5 6 Homebase 7 8 9 10 11 12 13 14 15 16 17 18 19 20 21 22 23 24 25 26 27 28 1 2 3 4 5 265 kg 324 BG...
Страница 325: ...5 1 2 ON 1 2 3 5 325 BG...
Страница 326: ...6 20 1 2 3 0 ON 1 1 10 10 1 2 5 c 5 c 2 50 mm 326 BG...
Страница 327: ...7 3 15 1 2 1 0 0 18 1 0 3 3 2 VDE 0701 327 BG...
Страница 328: ...8 K rcher 100 20 Karcher 20 100 200 300 3 4 0 1 2 2 6 1 2 328 BG...
Страница 329: ...9 91 157 1 329 BG...
Страница 330: ...10 1 2 3 1 2 5 1 2 MA 6 491 538 5 1 5 1 2 3 1 2 3 1 2 MAX 3 MIN Nm 56 Nm Nm 56 Nm 330 BG...
Страница 331: ...11 Max Min 40 50 1 0 3 1 0 1 50 70 mm 1 0 1 2 3 331 BG...
Страница 332: ...12 1 0 1 10 15 2 5 10 3 1 3 1 1 2 2 3 4 5 0 3 4 1 2 1 2 3 3 4 4 5 332 BG...
Страница 333: ...13 5 6 6 7 F 1 125 A F 2 7 5 A F 3 15 A F 4 25 A F 5 7 5 A 333 BG...
Страница 334: ...14 ON K rcher K rcher K rcher 3 K rcher K rcher K rcher K rcher 2 3 K rcher 0 334 BG...
Страница 381: ...2 381 UK...
Страница 382: ...3 18 15 3 4 3 4 2 1 2 1 2 3 5 4 382 UK...
Страница 383: ...4 1 2 3 4 5 6 7 8 9 10 11 12 13 14 15 16 17 18 19 20 21 22 23 24 25 26 27 28 1 2 3 4 5 265 kg 383 UK...
Страница 384: ...5 1 2 ON 1 2 3 Normal 92 5 384 UK...
Страница 385: ...6 20 1 2 3 0 ON i 1 1 10 10 1 2 5 5 i 2 50 385 UK...
Страница 386: ...7 i 3 15 1 2 i 1 0 0 18 i 1 0 3 3 386 UK...
Страница 387: ...8 VDE 0701 K rcher 100 20 K rcher 20 100 200 300 3 4 0 1 2 387 UK...
Страница 388: ...9 2 6 1 2 91 157 EWG 388 UK...
Страница 389: ...10 1 1 2 3 1 2 5 1 2 M N MAX M N MAX 6 491 538 5 1 5 1 2 3 56 Nm 56 Nm 389 UK...
Страница 390: ...11 1 2 3 1 2 3 40 50 i 1 0 3 i 1 0 i 1 50 70 i 1 0 390 UK...
Страница 391: ...12 1 2 3 i 1 0 1 10 15 2 5 10 3 1 3 1 1 2 2 3 4 5 391 UK...
Страница 392: ...13 0 3 4 1 2 1 2 3 3 4 4 5 5 6 6 7 F 1 125 A F 2 7 5 A F 3 v 15 A F 4 25 A F 5 7 5 A 392 UK...
Страница 393: ...14 ON Karcher Karcher Karcher 3 Karcher Karcher Karcher Karcher 2 3 Karcher 0 393 UK...
Страница 396: ......
Страница 397: ...http www kaercher com dealersearch...


