background image

Basic Settings and Service Procedures

HDS Middle Range / HDS Premium Range

Page 78 / 127

Service Manual 04.2008

3.1.14

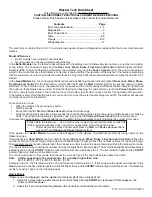
Operating time of the burner since the burner service

Function

95 °C

LED display

Meaning

SI_BRENNER

Display of the burner’s
operating time in hours
since the burner was last
serviced.
The value is displayed
by the LEDs, digit for
digit, whereby each LED
stands for a numerical
value from 0 to 9
according to its number.

Numerical value „0“

Value

The display is repeated
after a pause.

Example:

The burner has been in
operation for 47 hours
since the last time the
burner was serviced.
The LEDs light up in the
following order:

- PAUSE -

.

.

Numerical value „1“

Numerical value „2“

Numerical value „3“

Numerical value „4“

Numerical value „5“

Numerical value „6“

Numerical value „7“

Numerical value „8“

Numerical value „9“

Содержание HDS 10/20

Страница 1: ...Service Manual HDS Middle Range 1 071 1 077 HDS 7 12 HDS 8 17 HDS 9 18 HDS 10 20 HDS Premium Range 1 071 HDS 12 18 HDS 13 20 Service Manual 04 2008 5 906 433 0...

Страница 2: ...HDS Middle Range HDS Premium Range Page 2 127 Service Manual 04 2008...

Страница 3: ...instructions and later for reference purposes Furthermore we regularly provide service information about new product developments Should you have any additions corrections or questions regarding this...

Страница 4: ...ing agent tank 2 32 2 12 Motor air cooled 33 34 2 13 Electrical box air cooled motor 35 2 14 Motor water cooled 36 37 2 15 Electrical box water cooled motor 38 2 16 Pump 39 2 17 Safety block 40 42 2 1...

Страница 5: ...ating hours 89 3 2 11 Handgun switchings since the handgun service 90 3 2 12 Handgun services 90 3 2 13 Handgun services since initial operation 90 3 2 14 Operating time of the burner since the burner...

Страница 6: ...ss steel Working pressure 3 20 MPa 30 200 bar Water volume 350 1300 l h With pressure gauge Overflow valve with pressure and flow control valve Float tank Safety valve Fine water filter Electronics Pr...

Страница 7: ...Softgrip easy press handgun 7 Cap fuel tank 8 High pressure hose 9 Rotatable spray lance 10 High pressure nozzle 11 Transport wheel 2x 12 Transport handle 13 Swivel castor 14 Swivel castor with parkin...

Страница 8: ...cale inhibitor tank 6 Storage mains cable 7 Storage compartment bottom 8 Mains cable 9 Cap cleaning agent tank 2 10 High pressure outlet 1 2 3 4 5 7 8 9 12 10 6 14 16 15 18 17 19 20 11 Chassis 12 Wate...

Страница 9: ...older RH 5 Cap scale inhibitor tank 6 Storage mains cable 7 Hose reel high pressure hose 8 Mains cable 9 Cap cleaning agent tank 2 10 Crank handle hose reel 11 Recess hose reel locking device 12 High...

Страница 10: ...scale inhibitor yellow 10 Indicator LED 9 cleaning agent tank 2 yellow 11 Program switch OFF position 12 Program switch Cold Water Operation position 16 18 1 2 3 4 5 6 7 8 9 10 11 12 13 14 19 20 13 Pr...

Страница 11: ...on Unit was either in continuous operation for 30 minutes or was in standby operation for 30 minutes Fuel tank is empty Add more fuel Cleaning agent tank 1 is empty Add more cleaning agent HDS 12 18 o...

Страница 12: ...1 x flashing 5 hours after running time have expired burner is blocked Insert new scale inhibitor bottle light up Cleaning agent tank 2 is empty Add more cleaning agent HDS 12 18 only 9 Note The tag i...

Страница 13: ...08 Page 13 127 2 1 Control panel Template for numerical value displays The template below can be placed on the LED displays of the control panel for improved recognition of the numerical value display...

Страница 14: ...Unit Function HDS Middle Range HDS Premium Range Page 14 127 Service Manual 04 2008 2 1 Control panel...

Страница 15: ...stment scale inhibitormetering 2 Control circuit transformer T1 3 Current transformer 4 Fuse 2 0 AT 6 644 052 for control circuit transformer T1 5 Terminal strip 6 Earth point 7 Mains cable 8 Adjustme...

Страница 16: ...16 Connection control circuit transformer 2 optional 17 Connection exhaust temperature limiter 18 Connection low water protection 19 Connection scale inhibitor solenoid valve 20 Connection solenoid v...

Страница 17: ...rogram switch Hot Water Steam Ope ration position 6 Program switch 7 Adjustment water temperature 7 9 2 3 4 5 10 11 6 8 14 13 12 1 8 Metering valve cleaning agent 9 Metering range cleaning agent 1 10...

Страница 18: ...op bar Fuel level 8 levels Middle bar Cleaning agent 1 level 4 levels Bottom bar Cleaning agent 2 level 4 levels In the event of a cable break the respective bar is not displayed at all Perform mainte...

Страница 19: ...low or too high or phase has failed or motor current too high Check mains connection Check pump for sluggishness Insufficient water Invert phase in the commuta ting pole plug Switch off unit and let...

Страница 20: ...on Remove leaks in the high pressure system Check contactor Check current transformer installation This fault is not saved Check NTC NTC cable chafed bare Possible causes Fuel solenoid valve Fuel line...

Страница 21: ...hardness This display appears for 3s if the scale inhibitor setting is changed Important Service mode position After switching back on the unit will be in Service mode This display remains until anoth...

Страница 22: ...instructions 3 Retaining screw top storage compartment 4x 4 Storage compartment top 5 Retaining screw control panel 6 Control panel 7 Storage spare nozzles 8 Storage dirt blaster 9 Storage compartmen...

Страница 23: ...Latch unit cover 4 Screwdriver 5 Restraining cable unit cover 6 Lug restraining cable 7 Hinge unit cover 2x Open unit cover and remove if necessary To open the unit cover 2 use a screwdriver 4 to pus...

Страница 24: ...ure and flow control valve 7 Pump head 8 Chassis 9 Oil drain plug 10 Screw plug with suction hose connection cleaning agent tank 2 11 Water hose to the pump 12 Housing fine water filter 13 SDS hose to...

Страница 25: ...the Service switch and the control panel can be used to edit the unit s settings From the Service position the Ser vice switch can be turned a little bit further into the SET position From this positi...

Страница 26: ...Manual 04 2008 2 7 Fuel tank Fuel tank diesel heating oil 1 Cap fuel tank 2 Seal fuel tank cap 3 Tank inlet fuel tank with prefilter 4 Fuel filter 5 Level sensor fuel tank 6 Fuel tank diesel heating o...

Страница 27: ...g at the Service switch The setting is described under 2 6 Service switch Metering takes place in Program switch position Eco and Hot Water only at a water temperature set to 50 C The empty signal is...

Страница 28: ...itches off to protect against limescale and a corresponding fault message appears Burner operation cannot be recommenced until afteraneworiginalscaleinhibitorbottlehasbeen inserted An already empty bu...

Страница 29: ...from the high frequency field of the read write electronics 2 The data is transferred due to changes in the field intensity The read write electronics 2 queries the type of care product and stores the...

Страница 30: ...pump with water It also serves as a partition between the water inlet 1 and pump and prevents cleaning agent from getting into the water supply line in the event of damage Float valve Water flows thro...

Страница 31: ...ith suction hose connection cleaning agent tank 1 4 Level sensor cleaning agent tank 1 optional 3 4 Cleaning agent tank 1 The cleaning agent tank 1 1 is located in the rear part of the chassis Suction...

Страница 32: ...of the chassis Suction hose The retaining plug with suction hose 3 connection is located above the right hand transportwheel Acleaningagentfilter 4 isfitted onto the end of the suction hose Level sen...

Страница 33: ...3 Fuel pump 4 Solenoid valve fuel pump 5 Fan motor cooling 6 Motor retainer LH 2x 7 Motor retainer RH 2x 8 Pump head 9 Oil level sensor 10 Oil refill container 11 Handle pressure and flow control valv...

Страница 34: ...ing motor 11 Piston seals 19 17 18 20 21 8 Shaft seal motor shaft 9 Motor bearing front A bearing 10 Swash plate with thrust ball bearing 11 Retaining screw swash plate 12 Oil drain plug 13 Cleaning a...

Страница 35: ...using 4 Motor contactor K1 5 Interference suppression filter 6 Printed circuit board motor distributor 7 Connection ON pressure switch 8 Connection OFF pressure switch 9 Connection oil level sensor 10...

Страница 36: ...ooling coil motor cooler 4 Fuel pump 5 Solenoid valve fuel pump 6 Motor retainer LH 2x 7 Motor retainer RH 2x 8 Pump head 9 Oil level sensor 10 Oil refill container 11 Handle pressure and flow control...

Страница 37: ...t 6 Rotor 7 Housing motor 12 Piston seals 18 20 21 22 19 8 Shaft seal motor shaft 9 Motor bearing front A bearing 10 Retaining screw swash plate 11 Swash plate 12 Guide shoe 13 Oil drain plug 14 Clean...

Страница 38: ...Motor contactor K1 4 Interference suppression filter 5 Printed circuit board motor distributor 6 Connection ON pressure switch 7 Connection OFF pressure switch 8 Connection oil level sensor 9 Connect...

Страница 39: ...and flow control valve 2 Screw plug pressure side 3x 3 Pump head screw 4x 4 Pump head 5 Suction bridge with water connection 6 Screw plug suction side 4x 7 Water hose suction side 8 12 8 Locking clam...

Страница 40: ...n 3 Clamp holder reed switch 4 Reed switch low water protection 5 High pressure pipe to the continuous flow heater 6 Connection hose pressure gauge 7 Safety block with water strainer 8 SDS hose from t...

Страница 41: ...p holder reed switch 5 Reed switch low water protection 6 Magnetic piston 7 Drillhole high pressure outlet 8 Water inlet from the high pressure pump 9 High pressure pipe to the continuous flow heater...

Страница 42: ...ow is sufficient the magnetic piston 6 is pressed against the spring 3 The magnetic piston 6 causesthecontactofthereedswitch 5 toclose Thisopensthefuelsolenoidvalveandtheburner ignites The strainer in...

Страница 43: ...section 5 Fuel line inlet from the fuel tank 6 Adjustment fuel pressure 7 Fuel pump 8 Continuous flow heater 9 Connection cable fuel pump solenoid valve 10 Intake opening burner fan 11 Solenoid valve...

Страница 44: ...r where it is ignited The fuel pressure is adjusted using the central adjusting screw 3 The fuel pump is blocked by dry running The coupling acts as a pressure relief joint Burner fan The fan supplies...

Страница 45: ...Screw burner 3x 5 Latch unit cover 6 Inspection glass flame monitoring system optional 7 Burner 1 2 3 7 8 5 9 10 11 12 13 14 15 8 Ignition cable 9 Connection cable ignition transformer 10 Ignition tra...

Страница 46: ...Unit Function HDS Middle Range HDS Premium Range Page 46 127 Service Manual 04 2008 2 19 Continuous flow heater 1 2 8 9 5 4 7 6 3...

Страница 47: ...ater volume is approx 60 65 C If the water volume is reduced by the pressure and flow control valve the water can be heated to approx 100 C if the steam nozzle is used it can be heated up to 155 C Opt...

Страница 48: ...rner Burner view from above Burner removed view from below Fuel nozzle and ignition electrodes 1 Connection pressure line for fuel 2 Inspection glass flame monitoring system 3 Connection ignition elec...

Страница 49: ...reliably ignited The necessary ignition voltage is generated by the ignition transformer Exactcompliancewiththereferencedimensions is the basic requirement for proper burner function good emission val...

Страница 50: ...4 7 6 8 1 Baseplate 2 Outlet continuous flow heater 3 Temperature sensor hot water outlet 4 Clamp holder 5 Chassis 6 Connection cable temperature sensor 7 Inlet continuous flow heater 8 Bottom contin...

Страница 51: ...ling handgun hose 8 O ring hose handgun seal 9 Spring 10 Valve ball 11 Valve piston 12 Connection for spray lance When the trigger lever 3 is pressed the valve piston 11 pressesthevalveball 10 downwar...

Страница 52: ...in the ceramic discs 1 2 are staggered this enables the flow rate and pressure to be varied when the discs are rotated The diagram shows the two superimposed ceramic discs 1 2 and the water flow blue...

Страница 53: ...HDS Middle Range HDS Premium Range Unit Function Service Manual 04 2008 Page 53 127 2 24 Functional diagram pressure operation...

Страница 54: ...or fuel tank 22 Fuel suction line 23 Fuel return line 24 Fuel pump 25 Solenoid valve fuel pump 26 Continuous flow heater 27 Fuel pressure line 28 Ignition electrodes 29 Fuel nozzle 30 Exhaust connecti...

Страница 55: ...HDS Middle Range HDS Premium Range Unit Function Service Manual 04 2008 Page 55 127 2 25 Functional diagram suction feed operation...

Страница 56: ...onnecting sleeve 31 Exhaust temperature sensor 32 Adjustment water temperature 33 Printed circuit board 34 Temperature sensor 35 Heating coil continuous flow heater 36 Air flap air volume adjustment 3...

Страница 57: ...stment 2 Lock nut threaded stud 3 Spindle half load 4 Stop sleeve half load 5 Spring 6 Overflow piston 7 High pressure valve 3x 8 Pump piston 3x 9 Suction valve 3x 10 Cleaning agent supply with non re...

Страница 58: ...w control valve with rotary control on the handgun should be used for occasional part load operation only If the pressure is reduced via the rotary control the manual pressure and flow control valve a...

Страница 59: ...osed 2 27 1 Unit is switched off When the unit is switched off and the handgun is open the system is unpressurised and off load Both pressure switches 7 and 11 as well as the overflow valve 5 and the...

Страница 60: ...acts K1 closed 10 Pump is running 11 Pressure switch ON open 2 27 2 The unit is switched on and the handgun opened Afterswitchingontheunitwiththehandgunopen the motor contactor tightens and closes the...

Страница 61: ...o the suction chamber of the pump As soon as the overflow valve 5 opens the non return valve 3 closes and the switch off pressure is enclosed between the handgun and non return valve 3 The enclosed sw...

Страница 62: ...r inlet 9 Motor protection contacts K1 closed 10 Pump starts up 11 Pressure switch ON closed 2 27 4 Handgun is reopened with unit switched on As soon as the handgun is opened the pressure enclosed bet...

Страница 63: ...5 C SET on switching on Changing the settings The current setting is displayed via the 10 indicator LEDs on the control panel The settings can be changed with the help of the Service switch s Inching...

Страница 64: ...n manufacture settings Unit switches off after 30 minutes standby operation 35 C OFF30MIN Behaviour of the unit after 30 minutes continuous standby operation Setting is saved Unit does not switch off...

Страница 65: ...eby each LED stands for a numerical value from 0 9 according to its number Numerical value 0 Measured value The display is repeated after a pause Example A brightness value of 1016 is measured The LED...

Страница 66: ...5Testing the temperature sensor Function 50 C LED display Meaning NTCTEST Display of the water temperature measured by the temperature sensor The value is displayed bytheLEDsdigitfordigit see Chapter...

Страница 67: ...can be usedtotesttheprogram switch and the regulator for the water temperature setting All 10 LEDs light up on switching on The test is started by actuating the Inching function of the Ser vice switc...

Страница 68: ...S Premium Range Page 68 127 Service Manual 04 2008 Function LED display Meaning Setting 80 C 85 C 90 C 95 C 3 1 6Testing the water temperature setting and program switch 100 C 112 C 125 C 140 C 155 C...

Страница 69: ...eco position Program switch Hot position 3 1 6Testing the water temperature setting and program switch 55 C ENCPROGTEST ThetestfortheProgram switch is started by actuating the Inching function of the...

Страница 70: ...tion LED display Meaning Service switch OFF position Setting 3 1 7Testing the Service switch 60 C ENCDGTTEST Display of the Service switch position Service switch 1 position Service switch 2 position...

Страница 71: ...ning agent tank 1 reed switch open float at top Low water protection reed switch closed water flow available OFF pressure switch open pressure switch pressed Exhaust thermostat closed Scale inhibitor...

Страница 72: ...s of the LEDs see Chapter 3 1 3 Example Overvoltage detected in Trans former 1 Fault types Undervoltage detected in Trans former 1 Overcurrent detected Current asymmetry detected Motor thermal contact...

Страница 73: ...D display Meaning Temperature sensor fault Short circuit or cable break Fault types Flame sensor detects no or too little light Flame sensor detects light RFID read write electronics are defective End...

Страница 74: ...ue is displayed by the LEDs digit for digit wherebyeachLED stands for a numerical value from 0 to 9 accordingtoitsnumber Numerical value 0 Value The display is repeated after a pause Example Theunitha...

Страница 75: ...n was serviced Thevalueisdisplayedby the LEDs digit for digit whereby each LED stands for a numerical value from 0 to 9 according to its number Numerical value 0 Value The display is repeated after a...

Страница 76: ...ue 0 Value The display is repeated after a pause Example The handgun has been serviced 11 times since initial operation of the unit started The LEDs light up in the following order PAUSE Numerical val...

Страница 77: ...value is displayed by the LEDs digit for digit wherebyeachLED stands for a numerical value from 0 to 9 accordingtoitsnumber Numerical value 0 Value The display is repeated after a pause Example The ha...

Страница 78: ...e value is displayed by the LEDs digit for digit wherebyeachLED stands for a numerical value from 0 to 9 accordingtoitsnumber Numerical value 0 Value The display is repeated after a pause Example The...

Страница 79: ...lue 0 Value The display is repeated after a pause Example The burner has been serviced 4 times since theinitialoperationofthe unit The LEDs light up in the following order PAUSE Numerical value 1 Nume...

Страница 80: ...The value is displayed by the LEDs digit for digit wherebyeachLED stands for a numerical value from 0 to 9 accordingtoitsnumber Numerical value 0 Value The display is repeated after a pause Example Th...

Страница 81: ...e value is displayed by the LEDs digit for digit wherebyeachLED stands for a numerical value from 0 to 9 accordingtoitsnumber Numerical value 0 Value The display is repeated after a pause Example The...

Страница 82: ...value 0 Value The display is repeated after a pause Example The pump has been serviced 7 times since theinitialoperationofthe unit The LEDs light up in the following order PAUSE Numerical value 1 Num...

Страница 83: ...it wherebyeachLED stands for a numerical value from 0 to 9 accordingtoitsnumber Numerical value 0 Value The display is repeated after a pause Example The pump has been in operation for 32 hours since...

Страница 84: ...on function For several functions the functional selection must already be set when the unit is switched on and the Service switch must be held in the SET position Example RFID Detection is accessed w...

Страница 85: ...tings Display Note Explanation 40 C Menu access Select 45 C Switch off unit Hold SET Switch on unit Release SET Select with SET setting Shut off after 10 short start ups is not activated Switchover wi...

Страница 86: ...h Initial image for temperature selector switch test Display Note Explanation 55 C When you have finished with the temperature selector switch test you must select 55 C again Use SET to access the mas...

Страница 87: ...s Scale inhibitor tank empty ON pressure switch pressed OFF pressure switch pressed Cleaning agent 2 sensor level Level 2 of 4 levels Note Explanation 65 C Description from left to right Fuel sensor l...

Страница 88: ...or current too high Motor sluggish or phase has failed Check mains connection Motor current is asymmetrical Phase has failed Check mains connection Motor thermal contact open Motor is overheated Motor...

Страница 89: ...off External incident light at the flame sensor Scale in combustion chamber Solenoid valve does not close RFID read write electronics are defective Check RFID read write electro nics replace Cable br...

Страница 90: ...2 12 Handgun services Number of times handgun serviced Display Note Explanation 85 C 4 Count up maintenance Switch off unit Hold SET switch ON Important Fault memory is also deleted 3 2 13 Handgun ser...

Страница 91: ...91 127 3 2 15 Burner services Number of times burner serviced Display Note Explanation 100 C 1 Count up maintenance Switch off unit Hold SET switch ON Important Fault memory is also deleted 3 2 16 Bur...

Страница 92: ...erating time since the last maintenance service Display Note Explanation 125 C 11h 3 2 18 Pump services Number of times pump serviced Display Note Explanation 140 C 2 Count up maintenance Switch off u...

Страница 93: ...reached Determine increase in water temperature water outlet temperature minus water inlet temperature For nominal value see Technical Specifications Measure smoke number CO2 level and exhaust temper...

Страница 94: ...e unit the air circuit rubber collar canfallofftheouterjacket Thismakesinstallation more difficult An additional clamping ring will be introduced as an installation aid probably from the summer 2008 P...

Страница 95: ...e limit stop direction Turn rotary control to position for lowest pressure at the nozzle direction open handgun and let unit run Then pull off the rotating handle Undo the lock nut 2 for high pressure...

Страница 96: ...e pressure and flow control valve at the pump up to the limit stop direction Then pull off the rotating handle Loosen the lock nut 5 Twist the low pressure adjusting screw 4 and spindle 3 together unt...

Страница 97: ...new high pressure nozzle Open standard handgun and let the unit run Twist in the rotating handle of the pressure and flow control valve at the pump up to the limit stop direction Then pull off the ro...

Страница 98: ...un and let the unit run Unscrew the rotating handle of the pressure and flow control valve at the pump up to the limit stop direction Then pull off the rotating handle Loosen the lock nut 5 Twist the...

Страница 99: ...ws 2 and remove loosened half shell 1 Leverouttheretainingclipforthehigh pressure hose 3 and pull out the hose Insert new hose through the hose guide provided and the deflection pulley on the undersid...

Страница 100: ...see Chapter 3 7 1 Remove countersunk screw 1 Turn hose reel 2 until the half shell points upwardsandremoveanothertwocountersunk screws 3 Remove four screws 4 2 x long and 2 x short on the front bearin...

Страница 101: ...part of the hose reel 4 Renewseals 9 andgreasewithPFAEgrease 6 288 088 Check axle 5 and connection piece 8 for traces of wear in the area of the seals 1 2 3 7 8 5 4 5 1 Half shell hose reel 2 Bearing...

Страница 102: ...nk 7 and ensure it is correctly positioned Install the two countersunk screws 8 Turn hose reel 6 through 180 and install another countersunk screw see page 100 Item 1 Install front bearing block with...

Страница 103: ...retaining screws and open control panel Push in the left hand retaining clip 3 behind the pressure gauge 1 by hand Push in the right hand retaining clip 4 with a screwdriver 2 and remove the pressure...

Страница 104: ...irectly attheunitoutletoronthehandguninunitswith hose reel Slowly turn the shut off valve until it is shut and watch the pressure gauge to check the pressure at which water drips out of the outlet oft...

Страница 105: ...HDS Middle Range HDS Premium Range Circuit Diagram Service Manual 04 2008 Page 105 127 4 1 Circuit diagram 0 088 021 HDS 7 12...

Страница 106: ...Circuit Diagram HDS Middle Range HDS Premium Range Page 106 127 Service Manual 04 2008 4 1 Circuit diagram 0 088 021 HDS 7 12...

Страница 107: ...HDS Middle Range HDS Premium Range Circuit Diagram Service Manual 04 2008 Page 107 127 4 1 Circuit diagram 0 088 021 HDS 7 12...

Страница 108: ...Circuit Diagram HDS Middle Range HDS Premium Range Page 108 127 Service Manual 04 2008 4 2 Circuit diagram 0 088 025 HDS 8 17 HDS 9 18...

Страница 109: ...HDS Middle Range HDS Premium Range Circuit Diagram Service Manual 04 2008 Page 109 127 4 2 Circuit diagram 0 088 025 HDS 8 17 HDS 9 18...

Страница 110: ...Circuit Diagram HDS Middle Range HDS Premium Range Page 110 127 Service Manual 04 2008 4 2 Circuit diagram 0 088 025 HDS 8 17 HDS 9 18...

Страница 111: ...HDS Middle Range HDS Premium Range Circuit Diagram Service Manual 04 2008 Page 111 127 4 3 Circuit diagram 0 088 052 HDS 10 20 HDS 12 18...

Страница 112: ...Circuit Diagram HDS Middle Range HDS Premium Range Page 112 127 Service Manual 04 2008 4 3 Circuit diagram 0 088 052 HDS 10 20 HDS 12 18...

Страница 113: ...HDS Middle Range HDS Premium Range Circuit Diagram Service Manual 04 2008 Page 113 127 4 3 Circuit diagram 0 088 052 HDS 10 20 HDS 12 18...

Страница 114: ...Circuit Diagram HDS Middle Range HDS Premium Range Page 114 127 Service Manual 04 2008 4 4 Circuit diagram 0 088 026 HDS 13 20...

Страница 115: ...HDS Middle Range HDS Premium Range Circuit Diagram Service Manual 04 2008 Page 115 127 4 4 Circuit diagram 0 088 026 HDS 13 20...

Страница 116: ...Circuit Diagram HDS Middle Range HDS Premium Range Page 116 127 Service Manual 04 2008 4 4 Circuit diagram 0 088 026 HDS 13 20...

Страница 117: ...lace safety valve Water is not heated Check correct temperature setting Ensure adequate water supply when low water protection is switched off repair low water protection Check top up fuel level in th...

Страница 118: ...leak between cylinder head and piston housing Leak of 1 drip per minute and piston is allowable Check replace high pressure and low pressure seals Fault Oil leak between cylinder head and piston hous...

Страница 119: ...ue of the spare parts CD ROM DISIS and are available in kaercher inside https kaercher inside com If required the operating instructions and the spare parts lists can be ordered as a paper copy from t...

Страница 120: ...50 60 Nm Piston housing 5 7 Nm Handgun pressure control 40 Nm High pressure outlet 6 8 Nm Pressure valves threaded connection 40 45 Nm Pressure switch threaded connection 30 35 Nm Suction valves threa...

Страница 121: ...cale inhibitor bottle or cleaning agent bottle 22 Bottle holder for two RFID scale inhibitor bottles 22 Bottle opener insert 28 Bottom continuous flow heater 50 Burner cover 48 49 Burner fan with fuel...

Страница 122: ...onal 16 Connection solenoid valve cleaning agent 2 optional 16 Connection temperature sensor 16 Connection water temperature adjustment 16 Contents 4 Continuous flow heater 24 43 45 46 47 54 56 Contro...

Страница 123: ...e continuous flow heater 40 41 High pressure seal 37 High pressure valve 57 Hinge unit cover 23 Hose from float tank to the pump head 56 Hose from the motor cooler to the fine water filter 56 Hose ree...

Страница 124: ...t ball guide 41 N Needle bearing on high pressure hose 51 Non return valve closed 59 61 62 Non return valve open 60 Non return valve 57 O Oil drain plug 24 33 34 36 37 Oil level sensor 33 34 36 37 Oil...

Страница 125: ...screw ignition electrodes 49 Retaining screw impeller fan wheel 44 Retaining screw rear bearing block 101 Retaining screw swash plate 34 37 Retaining screw top storage compartment 22 Retaining screws...

Страница 126: ...pare nozzles 22 Suction bridge with water connection 39 57 Suction hose with filter and non return valve optional 56 Suction hose 31 32 Suction hose fuel 93 Suction side pump 34 37 Suction valve 34 37...

Страница 127: ...x W Washer 34 37 Water connection with fine water filter 8 9 Water connection 54 Water hose suction side 39 Water hose to the pump 24 Water inlet from the high pressure pump 41 Water inlet hose 54 Wat...

Отзывы: