-
9
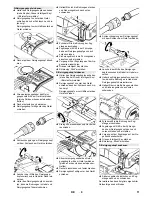
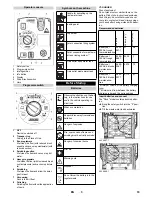
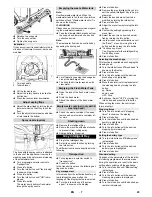
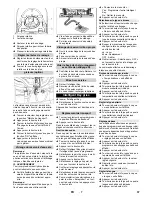
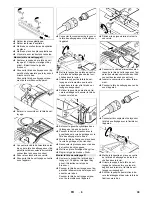
Turn the protective turbine strainer in a
counter-clockwise direction.
Remove protective turbine strainer.
Rinse dirt off the protective turbine
strainer with water.
Reattach protective turbine strainer.
Attach float.
Remove the vacuum bar.
Unscrew the star grips.
Remove the plastic parts.
Remove the vacuum lips.
Insert new vacuum lips.
Insert the plastic parts.
Screw in and tighten the star grips.
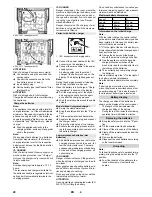
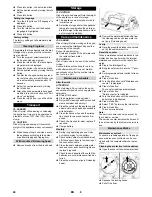
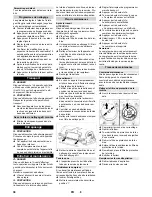
Lift the holder of the cleaning head (see
Chapter "Grey intelligent key/.../clean-
ing head replacement".
Slide the cleaning head under the appli-
ance so that the hose points toward the
rear.
Only slide the cleaning head halfway
under the appliance.
Remove the lid of the cleaning head.
Connect the power cord of the cleaning
head to the appliance (same colours
must meet).
Replace the lid and lock it.
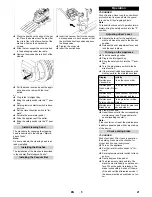
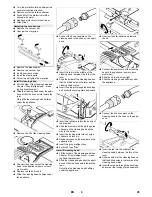
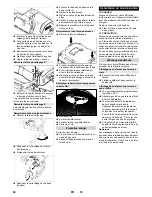
Slide the cleaning head halfway under
the appliance.
Connect the hose couplers on the
cleaning head to the hose on the appli-
ance.
Insert the tab into the middle of the
cleaning head, between the fork of the
lever.
Align the holder of the cleaning head so
that the drilled holes in the lever and the
cleaning head match.
Insert the stop pin through the bushings
and swivel the locking plate downward.
Insert the cylinder pin into the boring of
the drawbar.
Slide the drawbar with the pin the guide
channel on the cleaning head all the
way to the bottom.
Insert the locking plate into the guide
channel and lock it in.
Repeat process on the drawbar on the
opposite side.
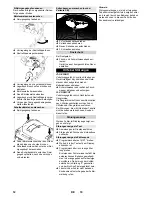
Insert the grey intelligent key.
Set brush type "Disc".
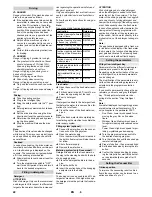
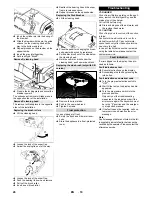
Lift the holder of the cleaning head (see
Chapter "Grey intelligent key/.../clean-
ing head replacement".
Slide the cleaning head under the appli-
ance so that the hose points toward the
rear.
Only slide the cleaning head halfway
under the appliance.
Unscrew the star handle and remove
the lid.
Connect the power cord of the cleaning
head to the appliance (same colours
must meet).
Slide the lid in and screw tight.
Slide the cleaning head halfway under
the appliance.
Connect the hose couplers on the
cleaning head to the hose on the appli-
ance.
Insert the tab into the middle of the
cleaning head, between the fork of the
lever.
Align the holder of the cleaning head so
that the drilled holes in the lever and the
cleaning head match.
Insert the stop pin through the bushings
and swivel the locking plate downward.
Replacing the vacuum lips
Install D cleaning head
Install R cleaning head
25
EN
Содержание B 150 R
Страница 2: ...2...
Страница 161: ...5 30 0 0 Intelligent Key 1 0 0 Intelligent Key 1 2 0 161 EL...
Страница 164: ...8 up down OFF OFF Intelligent Key 10 10 Adv 15 Intelligent Key R D 164 EL...
Страница 165: ...9 R R Intelligent Key 1 YES K rcher Intelligent Key D 165 EL...
Страница 166: ...10 Intelligent Key Disk Intelligent Key Intelligent Key Brush D D D 166 EL...
Страница 167: ...11 3 3 Intelligent Key OFF 0 SB 167 EL...
Страница 168: ...12 Timeout 0 15 A4 0 5 168 EL...
Страница 169: ...13 1 OFF 10 D OFF 10 Dose Dose 169 EL...
Страница 190: ...5 V 30 0 0 1 0 0 1 190 RU...
Страница 191: ...6 2 0 10 Adv 15 1 15 OFF 60 C 15 RM 746 RM 780 RM 755 es RM 69 ASF RM 753 RM 751 RM 732 PVC RM 752 RM 754 Dose 191 RU...
Страница 192: ...7 3 Dose 0 FACT Fine Clean Whisper Clean Power Clean 10 5 1 2 1 ON 192 RU...
Страница 193: ...8 Yes No up down OFF OFF 10 10 Adv 15 R D 193 RU...
Страница 194: ...9 R R R 1 K rcher D 194 RU...
Страница 195: ...10 Disk Brush R D R 195 RU...
Страница 196: ...11 3 3 OFF 0 SB 196 RU...
Страница 197: ...12 0 15 A4 0 5 197 RU...
Страница 198: ...13 1 OFF 10 R OFF 10 Dose Dose 198 RU...
Страница 317: ...5 30 0 0 1 0 0 1 317 BG...
Страница 319: ...7 FACT Fine Clean Whisper Clean Power Clean 10 5 1 2 ON R 319 BG...
Страница 320: ...8 up down OFF OFF 10 10 Adv 15 R D 320 BG...
Страница 321: ...9 R R 1 YES K rcher D 321 BG...
Страница 322: ...10 Disk Brush R D R 322 BG...
Страница 323: ...11 3 3 OFF 0 SB 323 BG...
Страница 324: ...12 0 15 A4 0 5 324 BG...
Страница 325: ...13 1 OFF 10 R OFF 10 Dose Dose 325 BG...
Страница 374: ...5 V 30 0 0 1 0 0 1 374 UK...
Страница 376: ...7 FACT Fine Clean Whisper Clean Power Clean 10 5 1 2 1 ON R 376 UK...
Страница 377: ...8 Yes No up down OFF OFF 10 10 Adv 15 R D 377 UK...
Страница 378: ...9 R R 1 K rcher D 378 UK...
Страница 379: ...10 Disk Brush R D R 379 UK...
Страница 380: ...11 3 3 OFF 0 SB 380 UK...
Страница 381: ...12 0 15 A4 0 5 381 UK...
Страница 382: ...13 1 OFF 10 R OFF 10 Dose Dose 382 UK...
Страница 385: ...eee PeDraaDr ass 385 AR...
Страница 387: ...9 FOO 95 R FOO 95 esoD esoD 387 AR...
Страница 388: ...FOO 5 5 95 A0 5 5 388 AR...
Страница 389: ...xrpoa e R Bx 389 AR...
Страница 390: ...eaoP R 390 AR...
Страница 391: ...R R 9 SEB RARA ER e 391 AR...
Страница 392: ...95 95 95 e R 392 AR...
Страница 393: ...FO R pC nseF FOO FOO 393 AR...
Страница 394: ...esoD 3 esoD 5 OAAF OaFD AeDeF naaoCDr AeDeF kseDr AeDeF 95 5 1 2 394 AR...
Страница 395: ...6 5 95 95 9 95 FOO R4 402 R4 435 R4 455 Do R4 21 ABO R4 453 R4 459 R4 436 R4 456 R4 450 25 95 395 AR...
Страница 396: ...9 5 5 9 396 AR...
Страница 397: ...1 5 EN 50272 T3 A x 600 ss 396 ss 915 ss 936 ss 645 ss 325 ss V V 5 5 397 AR...
Страница 399: ...1 2 3 4 5 6 7 1 2 3 4 5 6 7 8 399 AR...
Страница 401: ...5 152659 5 5 5 05 9 401 AR...
Страница 402: ......
Страница 403: ......
Страница 404: ...http www kaercher com dealersearch...

