background image

9


2.4  LED Indicator

STATUS EXPLANATION

LED INDICATOR COLOUR

Power off, battery charging

Red

Power off, battery fully charged

LED light off

Power on, battery charging

Red

Power on, battery fully charged

Green

Standby / Standby with screen off 

Green

Recording / Recording with screen off

Flashing red


  2.5  Powering the Device On / Off


2.5.1 Auto Power On/Off


 Once the vehicle engine is started, the device will automatically power up and start recording (unless the Automatic Record 
function is disabled (2.6.1)).


2.5.2 Manual Power On/Off and Reset

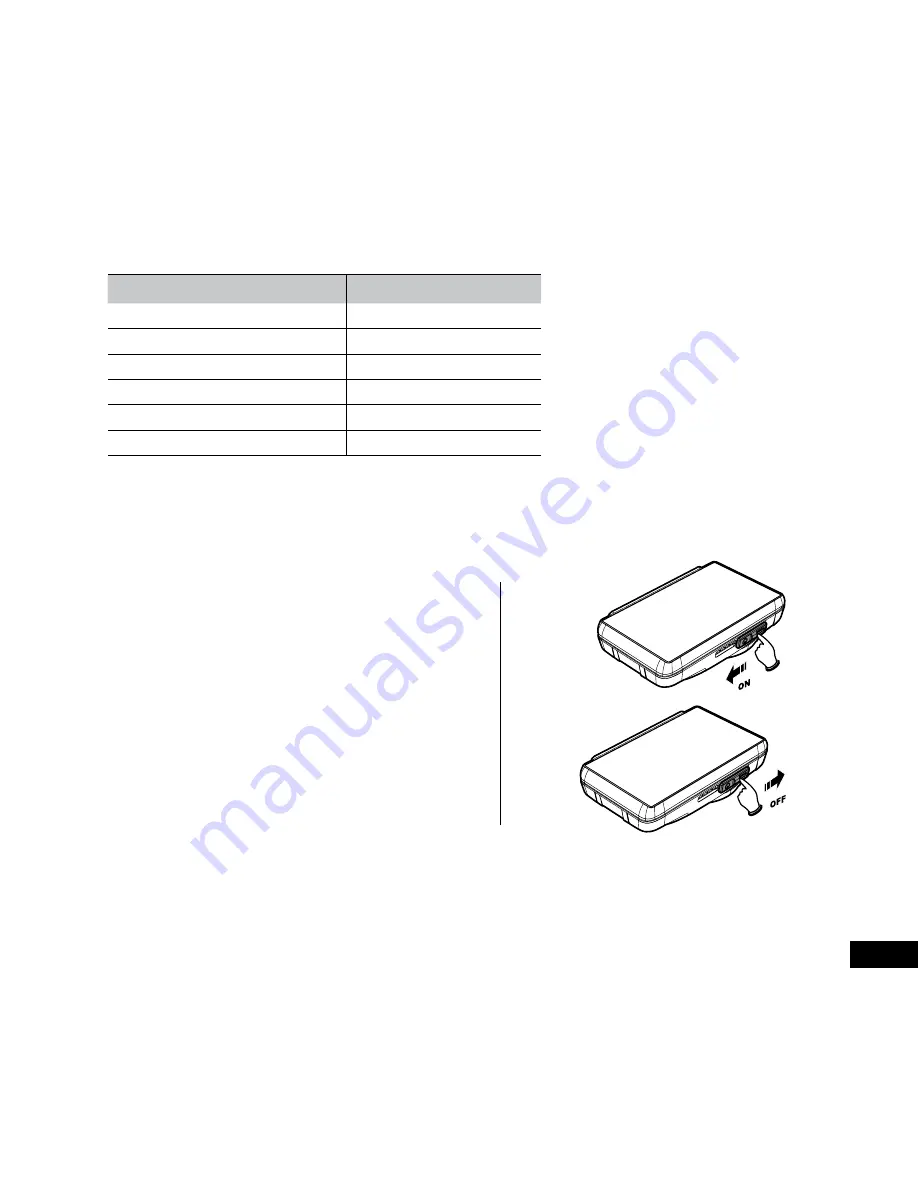
2.5.2.1 Manual Power On

Slide the 

power switch


making sure that the 

power switch locks over the memory card slot.

2.5.2.2 Power Off

 Slide  the 

power switch 

making sure that the 

memory slot is open. The device will start the 
power down sequence. Do not power on the 
device during the power down sequence, as the 
recorded data may be corrupted.


2.5.2.3 Reset the Device


 If the device does not function normally, try restarting the Car DVR. To restart your Car DVR, slide the 

power switch 

into the off position and verify the Micro SD Card is in the removable state; wait for 7 seconds and slide the power 
switch back to the on position to restart the device.

Содержание KPT-920

Страница 1: ...KPT 920 User Manual with GPS Wi Fi ADAS IN CAR DASH CAM YOUR WITNESS ON THE ROAD...

Страница 2: ......

Страница 3: ...o Windshield 7 2 2 2 Adjust the device position 7 2 3 Connecting to Power 8 2 4 LED Indicator 9 2 5 Powering the Device On Off 9 2 5 1 Auto Power On Off 9 2 5 2 Manual Power On Off and Reset 9 2 5 2 1...

Страница 4: ...ront Car Movement Detection FMCD 17 3 2 4 Headlight Warning 18 3 2 5 Speed Cam Alert 19 3 2 6 Speed Limit Alert 19 3 2 7 Driver Fatigue Alert 20 3 2 8 Parking Mode 20 3 2 9 Collision Detection 21 3 2...

Страница 5: ...evices that emit radio interference eg Microwave Ovens Please note that other devices is using 2 4GHz band may interfere with the Wi Fi signal of the Car DVR and result in the connection speed of both...

Страница 6: ...s Advanced Driver Assistance Systems ADAS Automatic Emergency recording for collision detection Supports MicroSD memory cards Class 6 and above up to 32GB GPS Wi Fi 1 2 Package Contents Car DVR Bracke...

Страница 7: ...the memory card Ensuring the power switch is in the off position 2 5 2 2 push The Micro SD Card to eject the unit from the slot 2 2 Installing in Vehicles 2 2 1 Mount to Windshield 1 Push the bracket...

Страница 8: ...ections during their installation for improved accuracy 2 The built in battery is designed for short use only to run parking mode when your vehicle is parked and the Car DVR is not receiving power The...

Страница 9: ...2 6 1 2 5 2 Manual Power On Off and Reset 2 5 2 1 Manual Power On Slide the power switch making sure that the power switch locks over the memory card slot 2 5 2 2 Power Off Slide the power switch mak...

Страница 10: ...ble In case Automatic Record is disabled enable it with the following steps 1 Touch to enter Main Menu 2 Touch to switch to Record Main Menu 3 Touch to select and enter the Automatic Record function m...

Страница 11: ...smartphone or tablet 2 7 1 Application Installation 1 Search Google Play or App Store for Life Cam application 2 Install the App using your phones on screen instructions Note The App layout and featu...

Страница 12: ...Car DVR Automatic Record function is enabled the Car DVR will automatically turn on and start recording During the Car DVR s start up sequence the built in touch screen will be unresponsive Recording...

Страница 13: ...g file is created 3 1 3 The Recording Screen No ICON ITEM DESCRIPTION 1 Recording Indicator Indicates the recording status 2 Date Time Indicates the recording date and time 3 Add speed point Touch to...

Страница 14: ...activating this option 3 1 5 Taking Snapshots You can also use your Car DVR to take snapshots 1 Press in recording mode to take a snapshot 2 A snapshot is taken when this icon appears at centre of scr...

Страница 15: ...n screen alerts when your car leaves or changes lanes at speeds over 50 km h To set the LDWS please follow the instructions below 1 Touch to enter Main Menu 2 Touch to switch over to Driving Safety Ma...

Страница 16: ...when you drive at speeds over 60 km h and are less than 20m away from the car in front of you To set the FCWS please follow the instructions below 1 Touch to enter Main Menu 2 Touch to switch over to...

Страница 17: ...your car remains motionless for 20 seconds it produces voice and on screen alerts when the car in front of you moves forward To set the FCMD do the following 1 Touch to enter Main Menu 2 Touch to swi...

Страница 18: ...initial alert if the FCMD function has been activated 3 2 4 Headlight Warning The Headlight Warning function produces voice and screen message alerts when the Car DVR detects poor lighting conditions...

Страница 19: ...e positioning is available Make sure GPS settings on your Car DVR is activated 2 The Driving Safety functions such as LDWS FCWS Headlight Warning Speed Cam Alert and Driver Fatigue Alert will be disab...

Страница 20: ...h over to Driving Safety Main Menu 3 Touch to select to enter the Driver Fatigue Alert menu then touch On to activate Driver Fatigue Alert 4 Touch to return to the record menu Note The Driving Safety...

Страница 21: ...l be active after the screen turns off 3 2 9 Collision Detection G Sensor The sensitivity of the Collision Detection function is set to medium by default The Car DVR will start an emergency recording...

Страница 22: ...duct produces voice and on screen alerts once your car s location is determined by GPS and abruptly accelerates or decelerates Note 1 ACC DEC Alert is only active when satellite positioning is availab...

Страница 23: ...e file 2 Current Duration Video Duration Indicates time code and duration of current video file 3 Menu Touch to enter File Deletion menu 4 Fast Rewind Previous File Touch when video or picture is not...

Страница 24: ...ered Please ensure you have backed up your files before deleting them Delete One Delete the current file Delete All Delete all files 4 Touch to return to the Record screen 4 Adjusting the Settings 4 1...

Страница 25: ...ty before the Car DVR screen goes into sleep mode Recording is not affected when screen is off On Off After 30 sec Off After 3 min Wi Fi Set Wi Fi linkage of a mobile device Satellite System Select sa...

Страница 26: ...roaches a recorded speed camera saved location the Car DVR produces voice and on screen alerts Speed camera data is plotted manually by the user On Off Speed Limit Alert If the Speed Limit Alert funct...

Страница 27: ...ord Setting for enabling Automatic Record after device power on On Off Video Duration Set the length of video loop recording 3 min 5 min Voice Record Setting for activating or muting audio recorded vi...

Страница 28: ...the product page 2 The SuperCar software is only applicable to Windows operating systems however a Mac version is in development please check the product page at www kapturecam com au periodically fo...

Страница 29: ...tions FUNCTION LIST DESCRIPTION Image sensor 1 2 7 CMOS sensor Effective pixels 1920 H x 1080 V Storage media Supports Micro SDHC Class 6 max up to 32GB LCD display 2 7 LCD colour TFT touch screen Len...

Страница 30: ...Hz Channel List Ch1 Ch11 Contains FCC ID 2ACFIWM7911B About this Guide The content in this document is for information purpose and is subject to change without prior notice We made every effort to ens...

Страница 31: ...where you have used the product in accordance with any recommendations or instructions provided by Directed Electronics This warranty excludes defects resulting from alterations of the product acciden...

Страница 32: ...www directed com au www directed co nz www kapturecam com au www kapturecam co nz Parkmate 2015...

Отзывы: