background image


13

NC

series


6

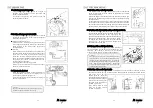
FRONT AND REAR NEEDLE GUARDS   

6-1 Position of the needle guard (rear) 

Align line a with the center of needle’s hole when the needle is at the bottom of the stroke. 

Following the 5-6section, when the point of the looper has reached the center of the right 
needle(R), the clearance between the needle and the looper should be 0~0.05mm. Loosen 
screw B and move the needle guard (A) slightly to the front. Then the clearance between 
the left needle(S) and the needle guard (A) should be 0~0.1mm. 

To adjust the needle guard (A) front to back, loosen screws C. The vertical adjustment, and 
angle adjustment, by loosen screw B correctly. 


6-2 Position of the needle guard (front) 


When looper has reached at the center of left needle. The position of needle guard (front)’s 

height should be 1.5~2mm from the tip of left needle Y to the line of needle guard X. 


When  looper  has  reached  at  the  center  of  the  right  needle.    The  clearance  between  the 

needle guard and needles should be 0.1~0.3mm. Also, when looper has reached at the center 
of the left needle.    The clearance between the needle guard and needles should be 0.1~0.3mm. 


To  adjust  the  needle  guard  front  to  back,  loosen  screws  B.  The  vertical  adjustment,  and 

angle adjustment by loosen screw A correctly. 


14

NC

series


7

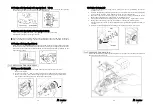
SPREADER   

7-1 Timing of the spreader 

Adjust according to the thread to be used or other 
conditions.    To  make  this  adjustment,remove  the 
top  arm  cover  and  loosen  two  screws  for  looper 
eccentric  A  on  the  upper  shaft.    Then  shift 
alignment mark C front or back while referring to 
alignment mark B. 
To advance the timing of the spreader to the needle, 
shift mark C in the direction of D. 
To delay the timing of the  spreader to the needle, 
shift mark C in the direction of E. 


7-2 Position of the spreader 

Height 

The distance from the point of the left needle to the bottom surface of the spreader should 
be 1mm. 

Left-to-right position 
When the spreader is at the extreme left end of its travel, the distance from the center of 
the left needle to the point of the thread carrying notch should be 4.5~5.5mm. 

When  the  spreader  passes  the  left  needle,  the  clearance  between  the  point  of  the  thread 

carrying notch and the left needle should be 0.5~0.8mm.    To make the above adjustment, 
loosen screws A and B. 


Adjust the amount of the 

spreader 

movement 

according to the number of spreader threads and/or the 
fabric weight. To make this adjustment, remove the arm 
top cover, loosen nut C and then move the adjusting lever 
pin in direction (a) or (b).    To decrease the amount, move 
the pin in the direction of (a).    To increase the amount, 
move the pin in the direction of (b). 


Содержание NC Series

Страница 1: ...PARTS LIST INSTRUCTION Industrial Sewing Machines No 180071 NC1103 4G NC1001GJ NC1001GSJ NC1001GSJF 4th published September 2018 ...

Страница 2: ......

Страница 3: ......

Страница 4: ......

Страница 5: ......

Страница 6: ......

Страница 7: ......

Страница 8: ......

Страница 9: ......

Страница 10: ......

Страница 11: ......

Страница 12: ......

Страница 13: ......

Страница 14: ......

Страница 15: ......

Страница 16: ......

Страница 17: ......

Страница 18: ......

Страница 19: ......

Страница 20: ......

Страница 21: ......

Страница 22: ......

Страница 23: ......

Страница 24: ......

Страница 25: ......

Страница 26: ......

Страница 27: ......

Страница 28: ......

Страница 29: ......

Страница 30: ......

Страница 31: ......

Страница 32: ......

Страница 33: ......

Страница 34: ......

Страница 35: ......

Страница 36: ......

Страница 37: ......

Страница 38: ......

Страница 39: ......

Страница 40: ......

Страница 41: ......

Страница 42: ......

Страница 43: ......

Страница 44: ......

Страница 45: ......

Страница 46: ......

Страница 47: ......

Страница 48: ......

Страница 49: ...7 03 18 109 01 10 23 501 03 14 27 119 16 17 31 546 21 36 41 117 11 12 47 102 37 10 60 8120 37 05 02 589 23 03 05 272 18 25 05 894 24 04 06 493 30 13 09 585 07 04 18 121 02 09 23 501 29 08 27 119 16 18 31 547 11 04 41 155 11 13 47 118 12 07 60 8490 38 03 02 590 22 03 05 273 25 06 05 897 24 05 06 494 30 14 09 586 32 27 18 122 39 10 23 501 02 17 27 120W 16 19 31 548 13 02 41 155 18 28 47 118 12 45 60...

Страница 50: ... 176 39 45 87 253 18 39 87 414 39 54 88 012 06 25 94 231 09 21 71 133 15 13 75 332 27 06 75 527 13 23 79 534 30 21 84 361 36 16 87 024 09 33 87 113 09 39 87 177 07 41 87 254 03 29 87 415 17 53 88 136 36 24 94 502 09 22 71 134 39 18 75 332 37 21 75 527 19 31 79 540 21 38 84 364 32 35 87 034 13 29 87 113 10 38 87 177 12 34 87 254 18 40 87 415 17 54 88 137 06 26 94 503 09 23 71 135 37 18 75 384 27 14...

Страница 51: ...NC Series Instruction Manual NC1103 4 G series ...

Страница 52: ...ING MACHINE INSTALLATION 4 1 Cutting the machine table 5 4 2 Installing the machine 7 5 TIMING OF THE LOOPER TO THE NEEDLES 5 1 Changing the needle bar stroke 8 5 2 Adjusting the needle height 9 5 3 Angle and height for installing the looper 9 5 4 Looper setting distance 10 5 5 Needle looper front to back relationship 10 5 6 Adjusting the needle looper setting distance 11 5 7 Changing the amount o...

Страница 53: ...hat the scarf is turned to the rear of the machine see the illustration Then install the needle correctly 1 3 Threading to the looper thread support plate Press lever A and support plate B will spring up Return it to the original position by pressing B Organ UY128GAS 09 10 11 12 14 Schmetz UY128GAS Nm65 Nm70 Nm75 Nm80 Nm90 Groz UY128GAS Nm65 Nm70 Nm75 Nm80 Nm90 2 NCseries 1 4 Threading Thread the ...

Страница 54: ...ement drips Be careful 3 LUBRICATION 3 1 Oil Use Kansai Special s genuine oil Part No 28 618 700cc 3 2 Oiling To fill the machine with oil Remove rubber plug A from the oil hole Fill the machine with oil until the oil level is at the top line see H in the illustration on oil gauge C After the first lubrication add oil so that the oil level will be between H and L To check for proper oil flow After...

Страница 55: ...5 NCseries 4 SEWING MACHINE INSTALLATION 4 1 Cutting the machine table Hole A shown below is for installing the electric presser foot lift 6 NCseries For the Direct Drive machine ...

Страница 56: ... rubber cushions onto the screws Then mount the machine properly onto the rubber cushions 8 NCseries Note Before changing the needle bar stroke be sure to turn off the power After the needle bar stroke adjustment make sure that retighten the two screws A securely And when the needle bar stroke changing check to make sure the timing of the needle and looper See chapter 5 5 TIMING OF THE LOOPER TO T...

Страница 57: ...ance is the fundamental distance from the point of the looper to the center of the needle should be 6mm Also setting distance X varies according to the needle stroke or gauge size for further adjustment See the table below The point of the looper should pass the center of the left needle and 1 3 1 6mm above the top of its needle s eye when the looper moves to left on the back side of the left need...

Страница 58: ... point of the looper and the left needle when the looper moves to the left increases Cause of occur needle loop skip stitch and easy to break the tip of the needle 12 NCseries 5 7 Changing the amount of the looper front to back movement The clearance between the point of the left needle and the back side of the looper when the looper moves to the right from the extreme left end of its travel shoul...

Страница 59: ...ngle adjustment by loosen screw A correctly 14 NCseries 7 SPREADER 7 1 Timing of the spreader Adjust according to the thread to be used or other conditions To make this adjustment remove the top arm cover and loosen two screws for looper eccentric A on the upper shaft Then shift alignment mark C front or back while referring to alignment mark B To advance the timing of the spreader to the needle s...

Страница 60: ... D To tilt up the front feed dog at its rear end the shaft of front side toward the front side of the machine To tilt down the front feed dog at its front end turn the shaft of front side toward the back side of the machine 16 NCseries 8 2 Stitch length The stitch length can be adjusted from 1 4 to 4 2mm with no step The following table shows the stitch length with the number of stitches within 1 ...

Страница 61: ...ight of the thread guides by loosening screws A and moving each thread guide up or down refer to the mark shown in the illustration If the stitch formation cannot be changed extremely by adjusting the height of the thread guides because of the thread to be used unravel the thread after test sewing and adjust the height of the thread guides while checking the tension of the needle thread 10 2 Posit...

Страница 62: ...crews and the four oil reservoir set screws Remove each part 2 Loosen two screws A Remove the handwheel to the right while turning it slowly 3 Remove the pulley plates and bearing in sequence by referring to the illustration Then remove the timing belt from the hole for the bearing 20 NCseries 11 2 To place the timing belt 1 Install the timing belt bearing plates pulley and cover by performing the...

Страница 63: ...NC J SJ Series Instruction Manual NC1001GSJ NC1001GSJF NC1001GJ ...

Страница 64: ...ine table 3 4 TIMING OF THE LOOPER TO THE NEEDLES 4 1 Angle and height for installing the looper 4 4 2 Looper left to right movement 4 4 3 Looper setting distance 4 4 4 Needle height 5 4 5 Needle looper front to back relationship 5 4 6 Changing the looper orbit 6 4 7 Changing the amount of the looper front to back movement 6 5 FRONT AND REAR NEEDLE GUARDS 5 1 Position of the needle guard rear 7 5 ...

Страница 65: ...hapter 11 for Stitch formation A Needle thread B Looper thread 2 NC Jseries 2 MACHINE SPEED 2 1 Machine speed operating direction Refer to the table below for maximum and standard speeds of the Series To extend machine life run the machine approximately 15 20 below the maximum speed for the first 200 hours of operation approx 1 month Then run the machine at the standard speed The machine pulley tu...

Страница 66: ...on the back side of the needles Also the point of the looper should be 0 0 3mm above the top of the needle s eye when the looper moves to the right on the front side of the needles see the illustration below To adjust the timing of the looper to the needles remove the machine cover loosen screws A on the timing pulley upper and shift the timing pulley upper by turning the handwheel while holding t...

Страница 67: ...C Jseries 4 6 Changing the looper orbit When the looper moves around the needles the clearance between the point of the looper and the back side of the needle should be 0 0 05mm To change the looper s orbit loosen screw B on eccentric A and shift the timing mark by moving eccentric A front or back The timing mark is factory set for standard Do not change the orbit extremely 4 7 Changing the amount...

Страница 68: ...e needle guard rear will not move left to right 8 NC Jseries 5 2 Position of the needle guard front The clearance between the needle guard front and the needle when the point of the looper has reached the center of the needle should be 0 1 0 3mm To adjust the needle guard front front to back loosen screws A and B and set the clearance To adjust the height of the needle guard front loosen screw A a...

Страница 69: ...rn the shaft of front side toward the back side of the machine 10 NC Jseries 6 2 Stitch length The stitch length can be adjusted from 1 4 to 4 2mm with no step The following table shows the stitch length with the number of stitches within 1 inch 25 4mm and 30mm Stitch Length mm No of stitches within 1 No of stitches within 30mm 4 2 6 0 7 5 3 6 7 0 8 0 2 4 10 5 12 5 1 4 18 0 21 0 To change the stit...

Страница 70: ... Position of the presser foot foot lift NC SJ series Fit the presser foot onto the presser bar so that the needle can drop correctly to the center of the presser foot needle drop hole Position of the presser foot Loosen screw A Adjust by moving the presser foot left or right while checking to make sure the needle drops correctly to the center of the presser foot needle drop hole Foot lift The pres...

Страница 71: ...n nut H to move it up or down To decrease the amount move upward To increase the amount move downward Note Between the feeding amount of the feed dog and the side roller are not synchronized so that it may need re adjust the feeding amount of the feed dog once when adjusted side roller feeding amount 14 NC Jseries 8 5 Adjusting the roller lift The highest position of the side roller should be 12mm...

Страница 72: ...mely by adjusting the height of the thread guides because of the thread to be used unravel the thread after test sewing and adjust the height of the thread guides while checking the tension of the needle thread 10 2 Position of the thread guide on the needle thread take up When the needle bar is at the bottom of its stroke needle thread take up bracket A should be level and the distance from the c...

Страница 73: ...er thread take up 11 HEMMING FOLDER ADJUSTMENT 11 1 Hemming width Finished size can be adjusted within the range of the right figure 11 2 Fixed rolled hemming folder The fixed rolled hemming folder is equipped as standard on the NC J series and NC SJ series as shown below NC1001GJ NC1001GSJ 18 NC Jseries 11 3 Openable rolled hemming folder The openable rolled hemming folder is equipped as standard...

Страница 74: ...NC UT Series Instruction Manual NC1103 4 G series UTA UTE NC1001GSJ CD UTAB NC1001GSJF CD UTAB NC1001GJ CD UTAB ...

Страница 75: ...ife front to back 4 5 7 Adjusting the movable knife up and down 5 5 8 Relationship between the movable knife needle thread and looper thread 5 5 9 Looper thread clamp spring pressure 5 6 ADJUSTING THE THREAD RELEASER 6 1 Thread releaser block 6 6 2 Thread releaser connection plate 6 6 3 Thread releaser lever 6 6 4 Thread releaser plate 7 6 5 Thread releaser hook 7 7 SAFETY DETECTOR 7 8 ADJUSTING T...

Страница 76: ...op of its stroke Tighten screws B to secure the position detector Check to see if the needle bar stops at the top of its stroke by pressing and then releasing the pedal Note Do not use this thread trimmer with no fabric under the presser foot Note Remove the connector for the thread trimmer cylinder Make sure the knife is retracted all the way 2 NC UTseries 3 ADJUSTING THE THREAD TRIMMER AIR CYLIN...

Страница 77: ...73 5mm NC J series UTAB 74 5mm MODEL U V W NC UTA UTE 2 5mm 2mm 6 2mm NC J series UTAB 1 5mm 3 3mm 7 5mm 4 NC UTseries 5 4 Adjusting the stationary knife holder stopper The stationary knife holder I slides to the left and stops by stationary knife holder stopper J Never slide the stationary knife holder I to the left too much because the looper thread clamp spring touches the looper The adjustment...

Страница 78: ... looper thread after it is cut To adjust the pressure of thread clamp spring H turn adjusting screw G To increase the pressure turn it clockwise To decrease the pressure turn it counterclockwise The machine is supplied with a spun thread 60 The pressure of the thread clamp spring is factory set at approximately 90g Adjust the pressure for other threads 6 NC UTseries 6 ADJUSTING THE THREAD RELEASER...

Страница 79: ...oving brackets C and D 8 NC UTseries 8 ADJUSTING THE SPEED CONTROLLER AND AIR PRESSURE UTA UTAB Speed controller F controls the speed when the thread trimmer knife holder protrudes Speed controller G controls the speed when the thread trimmer knife holder retracts If screw F is too loosened the holder will protrude too fast and then the position of the movable knife will be unstable causing cuttin...

Страница 80: ... 3mm clearance between bracket C and stopper ring D Position thread wiper K with screw H The distance between the left end of the thread wiper and the center of the needle bar should be approximately 15mm when the thread wiper is all the way to the left and clearance between the needle center and point P of the thread wiper should be approximately 1mm The distance between the left needle and threa...

Страница 81: ...allel and set to approximately 4mm from end G of the stationary knife Loosen screws I and adjust spring J 12 4 Adjusting the thread clamp pressure The spring H holds the top cover thread after it is cut To adjust the pressure of the spring turn adjusting screw K To increase the pressure turn it clockwise To decrease the pressure turn it counterclockwise 12 5 Adjusting the movable knife left to rig...

Страница 82: ...SED STITCH MECHANISM NC CD series 13 1 Adjusting the air cylinder position Condense stitch device is available with UTAB In the case of GJ series when the condense stitch device adjusting it work at same time with air cylinder A for condensed of the side roller and air cylinder F for feed mechanism When the air cylinder A just works the side roller D slightly move up to make up to make a gap E bet...

Страница 83: ...de MORIMOTO SINGAPORE PTE LTD NO 51 PENJURU ROAD 02 02 SINGAPORE 609143 TEL 65 6334 1305 FAX 65 6334 1365 E MAIL info kansaispecial com sg MORIMOTO INDIA LIAISON OFFICE NO 11 SENTHILL NAGAR PERRIYAR COLONY AVINASHI ROAD TIRUPUR INDIA 641601 TEL 91 421 4248229 FAX 91 421 4286600 Tech Support TEL 91 770 8300100 E MAIL india kansaispecial com sg MORIMOTO BANGLADESH LIAISON OFFICE HOUSE 09 FLAT 1 A 1 ...

Отзывы: