background image

DOC09028A

 19

ENGLISH 

ES

PAÑOL 

DEUT

SCH 

FRAN

ÇAIS 

ITAL

IANO 

NEDER

L

AND

LANG7 

L

ANG8 

L

ANG9 

LA

NG1

0


LAN

G

11 

L

ANG12 

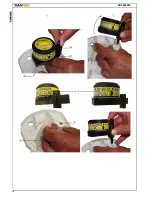
2.2. Beacon description

(1)

Tamper proof seal

-

to prove the beacon has been intentionally activated.

(2)

Locking system

-

to avoid unintentional activation of the beacon.

(3)

TEST pushbutton:

-

to perform a self-test;

-

to stop the beacon transmission if manually actived by ON button if required by authorities.

(4)

ON button:

-

to activate manually the beacon.

(5)

Strobe lights:

-

to improve or help visual localization of the beacon by the SAR operations.

(6)

Beacon control lamps (red and green):

-

to check good operation when activating the beacon;

-

to check good operation when performing a self-test;

(7)

Programming led:

-

to program the beacon (by manufacturer or authorized programming stations).

(8)

Water switch contact:

-

to activate automatically the beacon when submerged in water.

(9)

Retroreflective tape

(10)

Tether line:

-

to secure the beacon to a liferaft, life jacket, boat, etc.


Important: The tether line is used to moor the EPIRB when floating in the water. Do not tie lanyard 
to ship when installing beacon inside bracket.

(11)

406 / 121.5 MHz antenna.

Содержание Safelink

Страница 1: ...mins 56520 GUIDEL FRANCE Telephone 33 0 2 97 02 49 49 Fax 33 0 2 97 65 00 20 Web http www kannad com E mail contact kannad com Support support sar kannad com Tel 33 0 2 97 02 49 00 SAFELINK KANNAD CAT 1 CAT 2 Classe 2 Class 2 Manuel Utilisateur User Manual ...

Страница 2: ...SafeLink Auto Categorie 1 Category 1 ...

Страница 3: ...SafeLink Manual Categorie 2 Category 2 ...

Страница 4: ... dehors de toute situation de détresse Avant toute utilisation cette balise doit être enregistrée auprès des autorités locales WARNING Distress beacon Use only in situations of grave and imminent danger Register beacon with national authority before use ...

Страница 5: ...FAUSSES ALARMES 7 5 1 Prévention des fausses alarmes 7 5 2 Désactivation de la balise 7 6 INSTALLATION DE LA BALISE 8 6 1 Montage de la plaquette d instructions 8 6 2 SafeLink Auto Catégorie 1 Pont 9 6 3 SafeLink Manual catégorie 2 Survie 11 7 SPECIFICATIONS TECHNIQUES 13 8 DECLARATION D ENREGISTREMENT 13 8 1 Général 13 8 2 Enregistrement au Canada 13 8 3 Licence radio au Canada 14 9 MAINTENANCE 1...

Страница 6: ...23 5 1 False alarms prevention 23 5 2 Beacon de activation 23 6 BEACON INSTALLATION 24 6 1 Mounting instructions plate 24 6 2 SafeLink Auto Category 1 Float Free 25 6 3 SafeLink Manual category 2 27 7 TECHNICAL SPECIFICATIONS 29 8 REGISTRATION 29 8 1 Importance of accurate registration 29 8 2 Registering in USA 30 8 3 Radio License in USA 30 8 4 Registering in Canada 30 8 5 Radio License in Canada...

Страница 7: ... 406 MHz un message de détresse contenant un numéro unique permettant d identifier le type de détresse et le propriétaire de la balise ainsi que la position GPS Ce message est intercepté par les satellites COSPAS SARSAT qui le stockent et le retransmettent en permanence aux stations terrestres LUTs Grâce aux satellites géostationnaires GEOSAR l alerte est lancée dans les minutes qui suivent et tra...

Страница 8: ...eneur A est destiné à protéger la balise et assurer son largage automatique en cas de naufrage grâce à un largueur type HAMMAR H20 1A Ce conteneur est également équipé d une goupille de verrouillage 2A Il est également équipé d un aimant pour empêcher toute activation de la balise lorsqu elle est dans son conteneur Il peut être fixé soit en position horizontale sur le pont du navire soit en positi...

Страница 9: ...ent la balise 5 Flash pour une localisation visuelle de la balise par les opérations de SAR 6 Témoins de bon fonctionnement leds rouge et verte pour vérifier le bon fonctionnement lors de la mise en MARCHE pour vérifier le bon fonctionnement lors d un auto test 7 Led de programmation pour programmer la balise par le constructeur ou les stations agréées 8 Contacts eau de mer pour activer automatiqu...

Страница 10: ...DOC09028A 4 ENGLISH ESPAÑOL DEUTSCH FRANÇAIS ITALIANO NEDERLANDS LANG7 LANG8 LANG9 LANG10 LANG11 LANG12 ...

Страница 11: ... de fonctionnement défectueux 4 UTILISATION ATTENTION L utilisation de cette balise est prohibée en dehors de toute condition réelle de détresse Ne pas utiliser à l intérieur d un radeau ou de toute embarcation couverte Afin d optimiser les performances en localisation éviter de masquer l antenne GPS ne pas placer les mains sur le dôme transparent et faire en sorte qu il n y ait aucun obstacle ent...

Страница 12: ...errouillage 2 Extraire la goupille de verrouillage en tirant vers soi pour déverrouiller le support 3 Extraire la balise de son support 4 2 2 Activation par contact eau de mer Mettre la balise à l eau en ayant pris soin auparavant de l attacher au bateau ou à un radeau de survie à l aide de l orin La balise commencera à émettre dès qu elle sera immergée activation par contact eau de mer ARRÊT sort...

Страница 13: ...quée de 1 contacter immédiatement les autorités S A R les plus proches garde côtes CROSS sémaphores etc afin de les prévenir qu il s agit d une fausse alarme ceci afin d éviter la mise en oeuvre des opérations de secours Dans ce cas les éléments suivants doivent être fournis numéro unique de la balise code hexadécimal 15 chiffres sur l étiquette de la balise heure et durée de l alarme position au ...

Страница 14: ...e plaquette rigide donnant des instructions visuelles de base permettant d utiliser la balise en cas d urgence La plaquette d instructions doit être fixée à côté de la balise de façon à ce qu elle soit clairement visible en cas d urgence Elle doit être fixée à l aide de quatre vis non fournies Les dimensions pour le montage et le perçage sont indiquées dans le schéma ci dessus Important ne pas pei...

Страница 15: ...ts position horizontale ou verticale lieu dégagé permettant la remontée à la surface de la balise en cas de naufrage Attention prendre garde aux obstacles que peuvent constituer cordages antennes ou haubans être accessible à l équipage pour une utilisation manuelle être solidement fixé au bateau au moyen de 4 vis selon le gabarit de perçage indiqué ci dessous Note dimensions en millimètres pouces ...

Страница 16: ...is extraire la goupille du capot supérieur afin d ôter le capot supérieur 2 Placer la balise dans le conteneur en glissant l antenne sous le largueur HAMMAR 3 Mettre en place le capot supérieur en veillant à placer les encoches arrière a du capot dans les languettes arrières b du support 4 Insérer la goupille dans le capot supérieur et le trou de la vis de fixation du largueur HAMMAR 5 Abaisser la...

Страница 17: ...stallée sur son support 6 3 1 Installation du support Le support doit être fixé dans un endroit aussi dégagé que possible connu de tous et accessible à l équipage pour une utilisation d urgence Il doit être solidement fixé sur une paroi verticale au moyen de 3 vis selon le gabarit de perçage indiqué ci dessous Note dimensions en millimètres pouces entre parenthèses Rappel la plaquette d instructio...

Страница 18: ...NG8 LANG9 LANG10 LANG11 LANG12 6 3 2 Installation de la balise dans le support 1 Insérer la balise dans son support 2 Insérer la goupille dans le manchon de verrouillage du support 3 Verrouiller la goupille en la rabattant vers le bas jusqu à entendre le click de verrouillage ...

Страница 19: ...fin d accéder à toutes les informations concernant votre balise prochain remplacement des piles date du prochain entretien numéro unique d identification etc 8 2 Enregistrement au Canada Pour être effective l enregistrement d une balise de détresse maritime doit se faire par l intermédiaire du Registre Canadien des Balises de Détresse Les informations d enregistrement son disponibles à l adresse s...

Страница 20: ...quement les piles d origine P N TBD fournies par KANNAD ou son réseau agréé http www kannad com fr securite index php id 78 g_p 41 KANNAD décline toute responsabilité si un autre type de piles était installé Remplacement largueur tous les 2 ans Contrôles périodiques Bâtiments SOLAS par stations agréées KANNAD Maintenance en atelier tous les 5 ans selon circulaire IMO MSC Circ 1039 ou selon régleme...

Страница 21: ...atique HAMMAR A et d une vis sectionnable B équipée d une rondelle caoutchouc C 11 2 Remplacement Voir schéma détaillé page suivante Ouvrir le conteneur et extraire la balise Voir 6 2 2 Installation de la balise dans le conteneur 1 Dévisser la vis sectionnable B tout en maintenant appuyée la plaque d éjection D de la balise et sa pièce de blocage E 2 Enlever l ensemble largueur hydrostatique 3 Sur...

Страница 22: ...DOC09028A 16 ENGLISH ESPAÑOL DEUTSCH FRANÇAIS ITALIANO NEDERLANDS LANG7 LANG8 LANG9 LANG10 LANG11 LANG12 ...

Страница 23: ...ssage with a unique number to identify the distress and the beacon s owner and the GPS position This message is picked up by the COSPAS SARSAT satellites which store it and continuously retransmit it to the Local User Terminals L U T Thanks to the geostationary satellites GEOSAR the distress is received within minutes and transmitted anywhere in the world Thanks to the orbital satellites LEOSAR th...

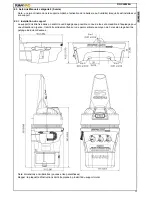
Страница 24: ...egory The container A is designed to protect the beacon and to ensure its automatic release in the event of a ship wreck thanks to the HAMMAR H20 release system 1A This container is also fitted with a locking pin 2A It is mounted either in horizontal position on the wheel house or deck of the vessel or in vertical position against a bulkhead or any vertical and flat surface 6 2 1 Installation of c...

Страница 25: ...hts to improve or help visual localization of the beacon by the SAR operations 6 Beacon control lamps red and green to check good operation when activating the beacon to check good operation when performing a self test 7 Programming led to program the beacon by manufacturer or authorized programming stations 8 Water switch contact to activate automatically the beacon when submerged in water 9 Retr...

Страница 26: ...DOC09028A 20 ENGLISH ESPAÑOL DEUTSCH FRANÇAIS ITALIANO NEDERLANDS LANG7 LANG8 LANG9 LANG10 LANG11 LANG12 ...

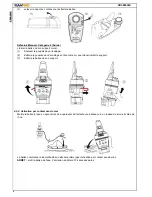
Страница 27: ... confuse the red programming led 7 and the default red led 6b 4 INSTRUCTIONS FOR USE WARNING It is unlawful to transmit a distress signal unless an emergency exists Do not operate inside life raft or under any similar cover of canopy Do not obstruct GPS antenna s view of sky to maximize self locating performance do not place the hands over the transparent dome of the beacon 4 1 Automatic activatio...

Страница 28: ... beacon will start to transmit as soon as submerged water switch sensor activation TO STOP BEACON remove the beacon from water Transmission will stop 10 seconds after 4 2 3 Manual Activation by ON pushbutton 1 Break the seal by pushing the locking system up 2 Press ON pushbutton for 1 at least second 3 The buzzer transmits an audible signal every second 4 The beacon performs a self test 5 After th...

Страница 29: ...ion of alarm location when activated 2 According to instructions of authorities manually de activate the beacon see 5 2 5 2 Beacon de activation If the beacon has been activated by mistake de activate as indicated below according to instructions of authorities 5 2 1 Beacon overboard Remove the beacon from water wait a few seconds for the water switch sensor to de activate if the beacon still trans...

Страница 30: ...cons are supplied with an instructions plate This is a rigid plate with basic visual instructions for how to operate the beacon in an emergency The instruction plate should be mounted next to the beacon so that it is easily visible in an emergency Use four screws not supplied to mount the plate Important do not paint the plate do not use strong degreasing solvent to clean it ...

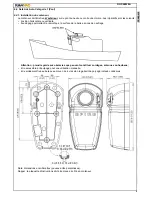
Страница 31: ...l and flat surface and comply with the following instructions horizontal or vertical position clear area to allow the beacon to rise the surface should the vessel sink Caution watch rigging antenna or shroud that could build obstacles easy access to the crew for manual operation strongly fix to the vessel with 4 screws according to drilling mask hereunder Note dimensions are in millimeters inches ...

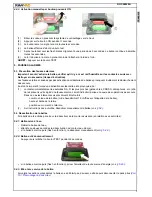
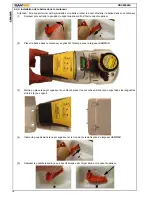
Страница 32: ...emove the cover lift the locking pin then extract it from the cover 2 Put the beacon into the container by sliding the antenna below the HAMMAR release system 3 Fold the cover onto the support making sure the slots a of the cover are inserted into the lugs b of the support 4 Slide the locking pin into the hole of the cover and the hole of the fastening screw of HAMMAR release system 5 Lock the pin...

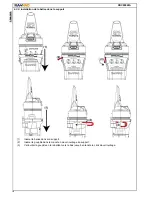
Страница 33: ...nstalled in its mounting bracket 6 3 1 Mounting bracket installation The mounting bracket should be installed in a clear area well known and identified so that it can be reached easily for emergency used It should be strongly fixed onto a vertical surface with 3 screws according to drilling mask hereunder Note dimensions are in millimeters inches in bracket Reminder The instructions plate must be ...

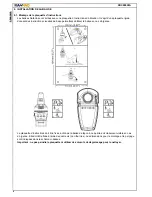
Страница 34: ...NG9 LANG10 LANG11 LANG12 6 3 2 Installation of beacon into its mounting bracket 1 Insert the beacon into its mounting bracket 2 Insert the locking pin in the locking sleeve of the mounting bracket 3 Turn downwards the locking pin up to hear a click that proves the bracket is locked ...

Страница 35: ...n When you activate your EPIRB in an emergency the nearest maritime search and rescue coordination center MRCC will receive the message and decode the country code They will then access the registration database for that country and expect to find details of your vessel its radio equipment and who to contact If they fail to find this information this may slow down any rescue Operating temperature ...

Страница 36: ...gistration information is available at http www nss gc ca site cospas sarsat emergencyBeacon_e asp 8 5 Radio License in Canada Industry Canada has exempted Canadian vessels that are not operated in the territorial waters of another country from the requirement for a station licence For more information please refer to http strategis ic gc ca epic internet insmt gst nsf en h_sf01775e html 9 MAINTEN...

Страница 37: ...tery pack removal 1 Using a standard cross head screwdriver fully unscrew the housing of battery pack located at the lower part of the beacon 2 Remove the housing 3 Disconnect the battery pack by lifting up the locking strap of the connector 10 2 Battery pack reassembly 1 Replace the O ring of the housing then connect the new battery pack to the connector located in the bottom of the housing 2 Ins...

Страница 38: ...B while maintaining pressed down the ejection plate D of the beacon and its blocking piece E 2 Remove the automatic release system assembly 3 On the new HAMMAR release system tick the new replacement date actual month year 2 years Example on drawing next page release system replaced on Nov 2008 valid until Nov 2010 4 Press down the ejection plate D and maintain it pressed with its blocking piece E...

Страница 39: ...DOC09028A 33 ENGLISH ESPAÑOL DEUTSCH FRANÇAIS ITALIANO NEDERLANDS LANG7 LANG8 LANG9 LANG10 LANG11 LANG12 ...

Страница 40: ...DOC09028A 34 ENGLISH ESPAÑOL DEUTSCH FRANÇAIS ITALIANO NEDERLANDS LANG7 LANG8 LANG9 LANG10 LANG11 LANG12 CARNET D INTERVENTIONS LOG BOOK ...

Страница 41: ...iétaire Owner s name Code ID HEX ID Code HEX Nom du bateau Vessel name MMSI Code radio Radio code Code sérialisé Serialised code Nom propriétaire Owner s name Code ID HEX ID Code HEX Nom du bateau Vessel name MMSI Code radio Radio code Code sérialisé Serialised code Nom propriétaire Owner s name Code ID HEX ID Code HEX Nom du bateau Vessel name MMSI Code radio Radio code Code sérialisé Serialised ...

Страница 42: ...G7 LANG8 LANG9 LANG10 LANG11 LANG12 SBM REMPLACEMENT PILES SBM BATTERY REPLACEMENT Date Signature Prochain remplacement SBM Next replacement SBM Piles Battery SBM Piles Battery SBM Piles Battery SBM Piles Battery SBM Piles Battery SBM Piles Battery SBM Piles Battery SBM ...

Страница 43: ...9028A 37 ENGLISH ESPAÑOL DEUTSCH FRANÇAIS ITALIANO NEDERLANDS LANG7 LANG8 LANG9 LANG10 LANG11 LANG12 REMPLACEMENT LARGUEUR RELEASE SYSTEM REPLACEMENT Date Signature Prochain remplacement Next replacementing ...

Страница 44: ...DOC09028A 38 ENGLISH ESPAÑOL DEUTSCH FRANÇAIS ITALIANO NEDERLANDS LANG7 LANG8 LANG9 LANG10 LANG11 LANG12 GARANTIE WARRANTY ...

Страница 45: ...éro de série ou un certificat d installation devra être fourni à KANNAD ou à son réparateur agréé à la date de demande de mise en œuvre de la garantie Les heures supplémentaires de main d œuvre ne sont pas couvertes par la présente garantie Les coûts de transport sont exclus de la garantie et notamment taxis expédition par voie maritime ou aérienne frais de subsistance douanes frais de communicati...

Страница 46: ...time of request of warranty service Overtime premium labor portion of service outside of normal working hours is not covered by this warranty Travel cost allowance of this product is specifically excluded from this warranty and is not authorized Travel cost which are excluded from this warranty include but are not limited to taxi launch fees aircraft rental subsistence customs shipping communicati...

Страница 47: ...egory Categoria Kategorie CSN Nom du bateau Vessel name MMSI NMSI Code radio Radio code Code sérialisé Serialised code Nom propriétaire Owner s name Code ID HEX ID Code HEX Prochain remplacement largueur Release system replacement Prochain entretien à terre SBM Next inspection on shore SBM Remplacement piles Battery replacement Cachet Stamp Date ...

Страница 48: ...46130A Fabriqué par Manufactured by Département SARSAT Maritime Z I des Cinq Chemins BP 23 56520 GUIDEL FRANCE www kannad com Customer Support support sar kannad com Tél Phone 33 0 2 97 02 49 49 Fax 33 0 2 97 65 00 20 ...

Отзывы: