background image

HDMX42-18G


4.2


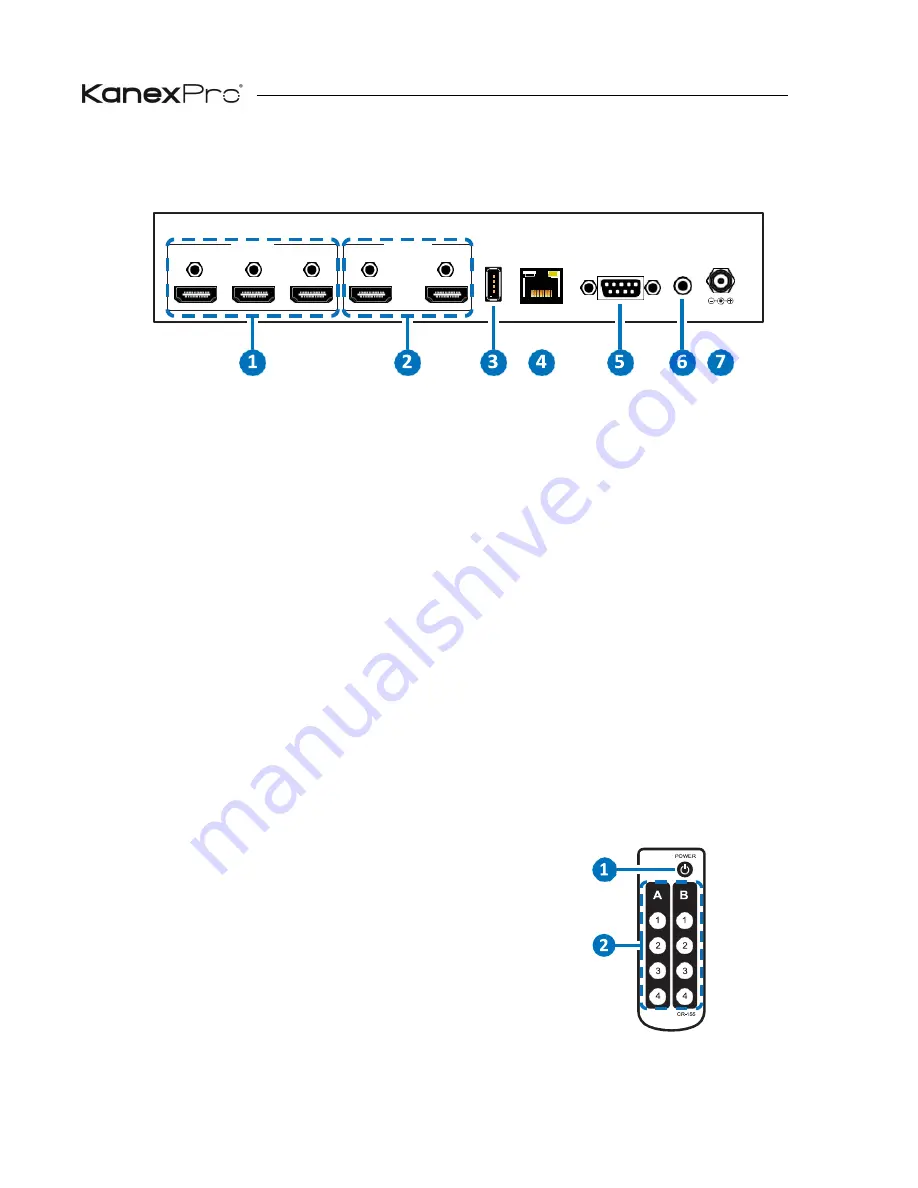
Rear Panel 


HDMI IN 2~4 : 

Connect to HDMI source equipment such as a 

media player, game console or set-top box. DVI sources are 
also supported with the use of an HDMI to DVI adapter. 


HDMI OUT A~B: 

Connect to HDMI TVs, monitors or amplifiers 

for digital video and audio output. DVI displays are also 
supported with the use of an HDMI to DVI adapter. 


ERVICE: 

This slot (USB 2.0) is reserved for firmware update use 

only.


ONTROL: 

Connect directly, or through a network switch, to 

your PC/laptop to control the unit via Telnet/WebGUI. 


RS-232: 

Connect directly to your PC/laptop to send RS-

232 commands to control the unit. 


IR IN: 

Connect to the provided IR Extender to extend the IR control 

range of the unit. Ensure that the remote being used is within direct 
line-of-sight of the IR Extender. 


DC 5V: 

Plug the 5V DC power adapter into the unit and connect 

it to an AC wall outlet for power. 


4.3


Remote Control 


POWER: 

Press this button to power on the unit or 

place it into stand-by mode. 


A1~A4 & B1~B4: 

Press these buttons to change 

the routing of outputs A & B. 

HDMI IN 

HDMI OUT 

SERVICE     CONTROL 

RS-232 

IR IN        DC 5V 


Содержание HDMX42-18G

Страница 1: ...HDMX42 18G 4K UHD 4 2 HDMI Matrix 4K 60Hz 4x2 HDMI 2 0 Matrix Switcher All Rights Reserved MPN HDMX42 18G ...

Страница 2: ......

Страница 3: ...ter Never spill liquid of any kind on or into this product Never push an object of any kind into this product through any openings or empty slots in the unit as you may damage parts inside the unit Do not attach the power supply cabling to buildingsurfaces Use only the supplied power supply unit PSU Do not use the PSU if it is damaged Do not allow anything to rest on the power cabling or allow any...

Страница 4: ...Panel 3 6 2 Rear Panel 4 6 3 Remote Control 4 6 4 IR Cable Pin Assignments 5 6 5 RS 232 Protocol 5 6 6 RS 232 and Telnet Commands 6 6 7 Telnet Control 10 6 8 WebGUI Control 11 6 8 1 Device Discovery APP 11 6 8 2 WebGUI Control Page 12 7 Connection Diagram 17 8 Specifications 18 8 1 Technical Specifications 18 8 2 Video Specifications 19 9 Acronyms 20 ...

Страница 5: ...ts 4K 60Hz 4 2 0 video it can be controlled via front panel buttons IR remote and RS232 commands EDID Management Control Five pre defined internal EDIDs and two external EDID options are available for EDID management The unit provides intuitive front panel controls as well as RS 232 Telnet WebGUI and IR remote control options Applications Ideal for classrooms corporate offices retail stores and ho...

Страница 6: ...HDMX42 18G 1 ...

Страница 7: ...UIREMENTS HDMI source equipment such as media players video game consoles or set top boxes HDMI receiving equipment such as HDTVs monitors or audio amplifiers The use of Premium High Speed HDMI cables is highly recommended 2 ...

Страница 8: ...it is on and receiving power When the unit is in stand by mode the LED will illuminate RED HDMI OUT A B Press either of these buttons to sequentially switch through the available inputs for the associated output HDMI OUT LEDs 1 4 The LED in each column will illuminate GREEN to indicate which source is currently selected for each output HDMI IN 1 Connect to HDMI source equipment such as a media pla...

Страница 9: ...gh a network switch to your PC laptop to control the unit via Telnet WebGUI RS 232 Connect directly to your PC laptop to send RS 232 commands to control the unit IR IN Connect to the provided IR Extender to extend the IR control range of the unit Ensure that the remote being used is within direct line of sight of the IR Extender DC 5V Plug the 5V DC power adapter into the unit and connect it to an...

Страница 10: ...und 4 5 RS 232 Protocol Baud Rates 115200bps Data Bits 8 Parity Bits None Stop Bit 1 Flow Control None 5 IR Extender UNIT Pin Definition 1 NC 2 TxD 3 RxD 4 NC 5 GND 6 NC 7 NC 8 NC 9 NC REMOTE SYSTEM Pin Definition 1 NC 2 RxD 3 TxD 4 NC 5 GND 6 NC 7 NC 8 NC 9 NC ...

Страница 11: ...4 Input number INNAME Show the names of all inputs OUTNAME N1 N2 Set the name of output N1 to N2 N1 A B Output letter N2 name 8 characters max OUTNAME N1 Show the name of output N1 N1 A B Output letter OUTNAME Show the names of all outputs A N1 Set the input to be routed to output A N1 1 4 Input number A Show the current input routing for output A B N1 Set the input to be routed to output B N1 1 4...

Страница 12: ...e values for N2 0 Standard 1 Apple Mode HDCPIN N1 Show the HDCP settings for input N1 N1 1 4 Input number HDCPIN Show all current HDCP input settings EDIDMODE N1 Set the EDID mode Available values for N1 0 Appoint 1 All EDIDMODE Show the current EDID mode setting EDIDALL N1 Set the EDID to use in All mode Available values for N1 0 SINK A 1 SINK B 2 720P 3 1080P 4 4K_3G 5 4K_Y420 6 4K_6G EDIDALL Sh...

Страница 13: ...how the current EDID selections for all inputs in Appoint mode FADEFAULT Reset the unit to the factory defaults REBOOT Reboot the unit VER Show the unit s current firmware version IPCONFIG Show the current IP configuration SIPADDR N1 Set the static IP Address N1 X X X X X 0 255 SNETMASK N1 Set the Ethernet netmask N1 X X X X X 0 255 SGATEWAY N1 Set the Ethernet gateway N1 X X X X X 0 255 HTTPPORT ...

Страница 14: ...PMODE N1 Set the current IP address mode Available values for N1 0 Static IP 1 DHCP READMAC Show the unit s MAC address UPDATE Update firmware Note Commands will not be executed unless followed by a carriage return Commands are not case sensitive 9 ...

Страница 15: ...ype cmd then press Enter Under Mac OS X go to Go Applications Utilities Terminal See below for reference Once in the CLI Command Line Interface type Telnet followed by the IP address of the unit and 23 then hit Enter This will connect us to the unit we wish to control Type help to list the available commands Notes Commands will not be executed unless followed by a carriage return Commands are not ...

Страница 16: ...default IP address is 192 168 1 50 By clicking on one of the listed devices you will be presented with the network details of that particular device IP Mode If you choose you can alter the static IP network settings for the device or switch the unit into DHCP mode to automatically obtain proper network settings from a local DHCP server To switch to DHCP mode please select DHCP from the IP mode dro...

Страница 17: ...ons are presented on a single web page to allow for intuitive operation The individual functions will be introduced in the following sections 1 Power The unit can be powered on or off stand by mode from this tab 2 Routing This tab allows for the selection of the input source for each output Four HDMI inputs and two HDMI outputs are available for selection 12 ...

Страница 18: ...lecting the APPOINT mode allows for each input to have a different EDID assigned to it The available EDID options are SINK A EDID is passed from the currently connected display SINK B EDID is passed from the currently connected display 8 2D PCM 720p 720p 60Hz 8 bit LPCM2 0 8 2D PCM 1080p 1080p 60Hz 8 bit LPCM2 0 8 2D PCM2 4K 3G 4K 30Hz 8 bit LPCM2 0 8 2D PCM2 4K Y420 4K 60Hz 4 2 0 8 bit LPCM 2 0 8...

Страница 19: ... allows for the renaming of the four HDMI input ports and the two HDMI output ports Please click the SAVE button to store the changes 6 Network Setting This tab provides control over the unit s network settings The IP mode can be set to DHCP for automatic IP configuration if your local network supports it or it can be placed into STATIC mode When in STATIC mode the IP address netmask and gateway c...

Страница 20: ...each output and the unit s firmware version It also provides a way to reset or reboot the unit RESET To perform a factory reset on the unit please click the RESET button REBOOT To reboot the unit please click the REBOOT button 9 Firmware Update This tab provides a way to update the firmware of the unit BROWSE Click the BROWSE button to select the firmware update bin file which is located on your l...

Страница 21: ... A Info HDMI Out B Info These tabs present the information detected from displays connected to HDMI outputs A B including type manufacturer name native resolution color depth 3D support 4K support and audio format support 16 ...

Страница 22: ...x Satellite Receiver HDMI Inputs Power Supply HDMI IN OUT A B HDMI OUT SERVICE CONTROL RS 232 IRIN DC 5V POWER A B 2 2 1 1 A B 2 2 3 3 4 4 HDMI Outputs RS 232 RS 232 Control System IR Input LAN Connection 60 3m 7m 3m Internet Connected Router POWER 1 2 3 4 INPUT UHDTV UHDTV CR 72 Remote Control 17 ...

Страница 23: ...ble Length 10m 1080p 60Hz 12 bit 3m 4K 60Hz 4 4 4 8 bit IR Frequency 30 50kHz 30 60kHz under ideal conditions Baud Rate 115200bps Power Supply 5V 2 6A DC US EU standards CE FCC UL certified ESD Protection Human Body Model 12kV Air Discharge 8kV Contact Discharge Dimensions 240mm 43mm 104mm W H D Case Only 240mm 48mm 112 2mm W H D All Inclusive Weight 796g Chassis Material Metal Silkscreen Color Bl...

Страница 24: ... Output 640 480 60 72 75 85 800 600 56 60 72 75 85 1024 768 60 70 75 85 1280 1024 60 1366 768 60 1600 1200 60 1920 1200 60 RB Supported TV Resolutions Hz Input Output 480i 60 576i 50 480p 60 576p 50 720p 50 60 1080i 50 60 1080p 24 25 30 50 60 3840 2160p 50 60 4 2 0 4096 2160p 50 60 4 2 0 3840 2160p 24 25 30 50 60 4096 2160p 24 50 60 19 ...

Страница 25: ...igh bandwidth Digital Content Protection HDMI High Definition Multimedia Interface HDR High Dynamic Range HTTP HyperText Transfer Protocol IP Internet Protocol IR Infrared LAN Local Area Network LPCM Linear Pulse Code Modulation PC Personal Computer UHD Ultra High Definition USB Universal Serial Bus VGA Video Graphics Array 640 480 60Hz WUXGA Wide Ultra Extended Graphics Array 1920 1200 60Hz 20 ...

Страница 26: ... supplies or parts not meeting our specifications No certificate or invoice as the proof of warranty The product model showed on the warranty card does not match with the model of the product for repairing or had been altered Damage caused by force majeure Servicing not authorized by distributor Any other causes which does not relate to a product defect Shipping fees installation or labor charges ...

Страница 27: ...HDMX42 18G Brea California www kanexpro com ...

Отзывы: