background image

Katherm HK

Assembly instructions

6

3

Transport, storage and packaging

3.1

General transport instructions

Check on delivery for completeness and transport damage.

Proceed as follows in the event of visible damage:

Do not accept delivery or only accept with reservations.
Record any transport damage on the transportation documents or on the transport company's
delivery note.
Submit a complaint to the freight forwarder.

IMPORTANT NOTE!

Warranty claims can only be made within the applicable period for complaints.
(More information is available in the 

T&Cs

 on the Kampmann website)

IMPORTANT NOTE!

2 people are needed to transport the unit. Wear personal protective clothing
when transporting the unit. Only lift the unit on both sides and not by the pipes /
valves.

IMPORTANT NOTE!
Material damage caused by incorrect transport!

Units being transported can drop or topple over if transported wrongly. This can
cause serious material damage.

Proceed carefully when unloading the equipment on delivery and when
transporting it on site and note the symbols and instructions on the pack-
aging.
Only use the holding points provided.
Only remove packaging shortly before assembling the unit.

4

Installation and wiring

4.1

Requirements governing the installation site

Only install and assemble the unit if the following conditions are met:

Make sure that the unit is securely suspended/standing.
Ensure that the airflow can circulate freely.
Provide for adequate space for floor and return water connections on site.
There is a power supply on site.
If need be, provide a condensation connection with a sufficient gradient on site.

4.2

Minimum clearances

4.3

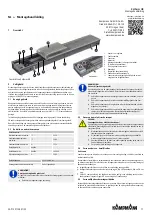
Installation

2 people are needed to install the unit.

CAUTION!
Risk of injury from sharp metal housing!

The inner metal of the casing can have sharp edges.

Wear suitable protective gloves.

IMPORTANT NOTE!
Horizontal installation of units!

When installing the units, ensure that they are completely horizontal to ensure
proper operation.

IMPORTANT NOTE!
Avoid draughts!

Consider the occupied zone when installing/suspending the units. Do not expose
people to the direct air flow. Position the unit accordingly and adjust the air out-
let if required.

IMPORTANT NOTE!
Install connections in the de-energised state!

Connections must be installed without tension!

Use a suitable tool to protect terminal nuts from being sheared off and
twisted.

29

Содержание Katherm HK

Страница 1: ...NWEIS Gefahr bei Fehlgebrauch Bei Fehlgebrauch in untenstehenden Einsatzbereichen besteht die Gefahr der ein geschr nkten bzw ausfallenden Funktion des Ger ts Der Luftstrom muss unge hindert zirkulier...

Страница 2: ...nschlagpunkte verwenden Verpackungen erst kurz vor der Montage entfernen 4 Montage und Anschluss 4 1 Voraussetzungen an den Aufstellort Das Ger t nur montieren wenn folgende Bedingungen erf llt sind D...

Страница 3: ...frei arbeiten zul ssige Einbaulage beachten Kondensatwasseranschluss Pr fen ob die Kondensatwanne frei von Bauschmutz ist Kondensatabfuhr und Verarbeitung der Alarmmeldung bei Kondensatpumpe pr fen Pr...

Страница 4: ...se beachten Beim Montieren des seitlichen Niederhalters f r die Kondensatwanne darauf achten dass der Niederhalter die Kondensatwanne gegen Hochdr cken und seitlich gegen Verschieben si chert Beim Wie...

Страница 5: ...ct the unit from frost IMPORTANT NOTE Warning of misuse In the event of misuse as itemised below there is a danger of limited or failing operation of the unit Ensure that the airflow can circulate fre...

Страница 6: ...use the holding points provided Only remove packaging shortly before assembling the unit 4 Installation and wiring 4 1 Requirements governing the installation site Only install and assemble the unit...

Страница 7: ...pos ition Condensation water connection Check whether the condensation tray is free of building rubble Check the condensation drain and operation of the alarm signal on the condensation pump Check wh...

Страница 8: ...tray once it has been cleaned When inserting the side retainer for the condensate tray make sure that the retainer prevents the condensate try from pushing up and moving sidewards When reinserting th...

Страница 9: ...l AVERTISSEMENT Danger en cas d utilisation incorrecte En cas d utilisation incorrecte dans les secteurs d utilisation mentionn s ci des sous l appareil risque de fonctionner moins bien voire de ne pl...

Страница 10: ...igurant sur l emballage Utiliser uniquement les points de fixation pr vus cet effet Attendre le moment du montage pour retirer l emballage 4 Montage et raccordement 4 1 Conditions sur le site d instal...

Страница 11: ...tement respecter la position de montage autoris e Raccord d eau de condensation V rifier que le collecteur d eau de condensation n a pas t sali pendant les travaux V rifier l vacuation de l eau de con...

Страница 12: ...e du bac condensat Lors du montage du dispositif de retenue lat ral pour le bac de condensat veiller ce que le serre flan emp che le bac de condensat de se soulever et de se d placer lat ralement Lors...

Страница 13: ...A Pericolo di utilizzo errato In caso di utilizzo errato negli ambiti indicati sotto sussiste il pericolo di funziona mento limitato o malfunzionamento dell apparecchio Il flusso d aria deve poter cir...

Страница 14: ...i punti di aggancio previsti Rimuovere gli imballaggi solo poco prima del montaggio 4 Montaggio e collegamento 4 1 Requisiti per il luogo di installazione Montare l apparecchio solo se le condizioni s...

Страница 15: ...gio ammessa Attacco acqua di condensa Verificare se la vaschetta di raccolta della condensa priva di sporcizia da montaggio Verificare lo scarico della condensa e l elaborazione del messaggio di allar...

Страница 16: ...lta condensa Durante il montaggio del premilamiera laterale per la vaschetta di raccolta condensa accer tarsi che il premilamiera impedisca alla vaschetta di sollevarsi e spostarsi lateralmente Durant...

Страница 17: ...vaar bij verkeerd gebruik Bij verkeerd gebruik in de onderstaande situaties bestaat het gevaar dat het ap paraat slechts beperkt werkt of uitvalt De luchtstroom moet onbelemmerd kun nen circuleren Geb...

Страница 18: ...Gebruik alleen de daarvoor bestemde aanslagpunten Verwijder verpakkingen pas kort v r de montage 4 Montage en aansluiting 4 1 Voorwaarden voor de opstelplaats Monteer het apparaat alleen wanneer aan...

Страница 19: ...jvingen goed werken let op de toegestane inbouwpositie Condensaataansluiting Controleer of de condensaatbak geen bouwafval bevat Controleer de condensaatafvoer en verwerking van de alarmmelding bij de...

Страница 20: ...let Bij het monteren van de aandrukker aan de zijkant voor de condensaatbak moet men erop letten dat de aandrukker de condensaatbak tegen omhoog drukken en zijwaarts tegen ver schuiven beveiligt Bij h...

Страница 21: ...WSKAZ WKA Zagro enie na skutek nieprawid owego u ytkowania W przypadku nieprawid owego u ytkowania w podanych poni ej zakresach za stosowania zachodzi ryzyko ograniczenia dzia ania lub awarii urz dze...

Страница 22: ...osowa wy cznie punkty mocowania przeznaczone do tego celu Opakowanie zdj dopiero bezpo rednio przed monta em 4 Monta i pod czenie 4 1 Wymagania wzgl dem miejsca monta u Urz dzenie montowa wy cznie wte...

Страница 23: ...d owo pod czo ny sprawdzi czy wszystkie zawory i si owniki pracuj prawid owo zwr ci uwag na dopusz czaln pozycj monta ow Przy cze kondensatu sprawdzi czy wanna kondensatu jest wolna od zanieczyszcze b...

Страница 24: ...ny kondensatu Podczas monta u bocznego elementu dociskowego wanny kondensatu nale y zwr ci uwag na to aby element dociskowy zabezpiecza wann kondensatu przed wypchni ciem do g ry i przesuni ciem w bok...

Страница 25: ...m HK E Katherm HK 1 2 3 4 5 6 EC 7 8 9 10 11 2 QR EN 60335 1 2 1 2 2 25 2 2 C 5 120 C 15 40 15 75 10 1000 25 50 230 50 60 2 3 2 4 VDE DIN EN VDI 6022 B C Kampmann GmbH Co KG Friedrich Ebert Str 128 13...

Страница 26: ...Katherm HK 26 2 5 3 3 1 Kampmann 2 4 4 1 4 2 4 3 29...

Страница 27: ...Katherm HK 27 5 DIP 6 1 2 2 4 4 4 5 5 6 7 3 1 2 3 4 5 6 6 7 7...

Страница 28: ...Katherm HK 28...

Страница 29: ...29...

Страница 30: ...30 Katherm HK 290 160 mm Katherm HK 360 210 mm Katherm HK 320 130 mm Katherm HK 320 E 130 mm Katherm HK 245 160 mm...

Страница 31: ...31 bauseits Dehnfuge bauseits...

Страница 32: ...32...

Отзывы: