background image

Luftreiniger KA-520

Assembly instructions

5

3

Transport, storage and packaging

3.1

General transport instructions

Check on delivery for completeness and transport damage.

Proceed as follows in the event of visible damage:

Do not accept delivery or only accept with reservations.
Record any transport damage on the transportation documents or on the transport company's
delivery note.
Submit a complaint to the freight forwarder.

IMPORTANT NOTE!

Warranty claims can only be made within the applicable period for complaints.
(More information is available in the 

T&Cs

 on the Kampmann website)

4

Installation and wiring

IMPORTANT NOTE!
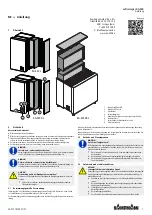
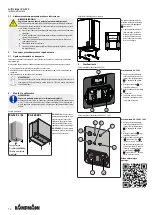
Ensure that the unit is horizontal and maintain minimum clearances!

Only position the unit on a horizontal, stable base surface with a minimum clear-
ance of 15 cm to the rear and to the wall at the side! Leave 50 cm clear in front
of the air inlet and outlet to guarantee optimum operation of the unit.

Position of the unit

Position standing

KA-520 L / XL

KA-520 XXL

Bond the felt glider
on site!

KA-520 L / XL:

 The air purifier

can be used standing upright or
lying horizontally. Attach the
felt gliders supplied to the un-
derside of the unit to prevent
damage to the floor!

KA-520 XXL:

 The adjustment

feet supplied must be screwed
into the underside of the unit!

Adhering floor castors to the underside of the unit

max.

1

Attach floor castors pre-as-
sembled on metal plates 

1

(accessory) to the underside of
the unit.

Remove the protective film
from the adhesive strips and
press the plates onto the un-
derside of the unit as shown
in the figure.

5

Commissioning

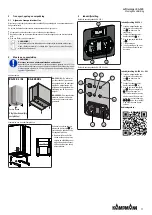
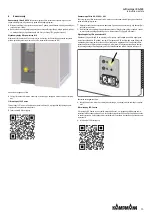
Electrical connection area of KA-520 L

1

2

3

Commissioning the KA-520

 L

Insert the connection cable
supplied into the mains
socket 

3

, then into the

power socket.
Use the main switch 

2

 to

switch on the unit.
Select the required operating
level 

1

:

I: low power
II: high power, e.g. for tem-
porary flushing of the room

Electrical connection area of KA-520 

XL + XXL

6

8

7

5

3

4

2

1

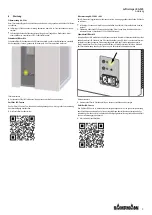
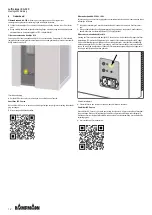
Commissioning the KA-520

 XL + XXL

Insert the connection cable
supplied into the mains
socket 

1

, then into the

power socket.
Use the main switch 

2

 to

switch on the unit.
Select the required operating
stage I 

4

 (low power) or II

3

 (high power, e.g. for

temporary flushing of the
room): Refer to the adhesive
label on the back for further
information on the status
lights 

5


6


7

 and timer

operation


8

.

Operation video:

Содержание KA-520 L

Страница 1: ...g kleinste Partikel z B Bakterien Viren Pollen etc mithilfe eines Schwebstofffilters Hepa Filter aus der Luft Zur bestimmungsgem en Verwendung geh rt auch die Einhaltung aller Angaben in dieser An lei...

Страница 2: ...oder liegend ver wendet werden Auf die Unter seite m ssen die mitgelieferten Filzgleiter geklebt werden um Besch digungen am Boden zu vermeiden KA 520 XXL In die Ger teun terseite m ssen die beiliege...

Страница 3: ...Einfl ssen zu sch tzen Luftreiniger 5 Stunden vor der Wartung abschalten damit die im Filter enthaltenen Viren ab sterben Vollst ndig bedeckende Schutzausr stung lange rmel lange Hose Handschuhe Atem...

Страница 4: ...t use The air purifier KA 520 uses air circulation to filter the smallest particles e g bacteria viruses pollen etc out of the air using a particulate filter Hepa filter Intended use of the unit also...

Страница 5: ...t or lying horizontally Attach the felt gliders supplied to the un derside of the unit to prevent damage to the floor KA 520 XXL The adjustment feet supplied must be screwed into the underside of the...

Страница 6: ...ions to protect against harmful influences when changing the filter Turn off the air purifier 5 hours before maintenance so that the viruses contained in the filter can die off Wear full protective cl...

Страница 7: ...r que des liquides ou des produits de nettoyage inflammables ne s infiltrent dans l appareil Ne pas utiliser d eau de produits de nettoyage inflammables ou d autres li quides pour nettoyer l appareil...

Страница 8: ...acer l appareil uniquement sur un support horizontal stable le dos parall le ment au mur une distance de 15 cm Un p rim tre de 50 cm autour de la sor tie de l aspiration d air doit toujours tre d gag...

Страница 9: ...les in fluences n fastes teindre l purateur d air 5 heures avant la maintenance pour laisser mourir les virus pr sents dans le filtre Porter un quipement de protection recouvrant tout le corps manche...

Страница 10: ...met behulp van een filter voor zwevende deeltjes HEPA filter uit de lucht Tot het beoogde gebruik behoort ook het opvolgen van alle gegevens in deze handleiding Elk ander verdergaand of ander gebruik...

Страница 11: ...of liggend wor den gebruikt Aan de onderkant moeten de meegeleverde vilt glijders worden geplakt om be schadiging van de vloer te ver mijden KA 520 XXL De meegeleverde stelpoten moeten in de onder kan...

Страница 12: ...tegen schadelijke invloeden Schakel de luchtreiniger 5 uur v r het onderhoud uit zodat de virussen in het filter afster ven Draag volledig dekkende veiligheidsuitrusting lange mouwen lange broek hand...

Страница 13: ...apobiega pora eniu pr dem i przeciwdzia a zagro eniu po arem Zapobiega wnikaniu do urz dzenia cieczy lub palnych rodk w czyszcz cych Nie czy ci urz dzenia wod palnymi rodkami czyszcz cymi lub innymi c...

Страница 14: ...poziomym i stabilnym pod o u w odleg o ci co naj mniej 15 cm do ty u i z boku do ciany Obszar co najmniej 50 cm wok wlotu i wylotu powietrza musi pozosta wolny aby zapewni optymalne dzia anie urz dze...

Страница 15: ...e higieny aby chroni si przed szkodliwym wp ywem Wy czy urz dzenie do czyszczenia powietrza 5 godzin przed konserwacj aby obumar y wi rusy zawarte w filtrze Nosi ca kowicie zakrywaj ce wyposa enie och...

Страница 16: ...16...

Отзывы: