


27
1.
Shut the engine off and remove the
key.
2.
BLOCK ALL wheels front and rear to
prevent the vehicle from rolling forward
and backwards.
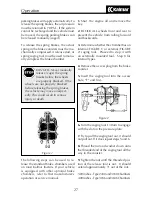
3.
Determine whether the chamber has an
internal (FIGURE 1) or external (FIGURE
2) caging tool. Proceed to step 4 with
an externally mounted tool. Step 8 for
internal types.
4.
Remove the access plug from the brake
canister.
5.
Insert the caging tool into the access
hole, “T” end first.
Figure 2
6.
Turn the caging tool 1/4 turn to engage
with the slot on the pressure plate.
7.
Try to pull the caging tool out, it should
not pull out. If it does repeat steps 5 and 6.
8.
Thread the nut and washer down onto
the threaded end of the caging tool all the
way to the canister.
9.
Tighten the nut until the threaded por-
tion of the release tool is out. It should
extend approximately 3” out of the nut.
3.00 inches - Type 2430 and 3030 Chambers
4.00 inches - Type 3036 and 3636 Chambers
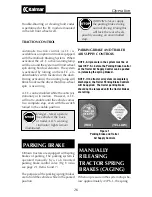
parking brakes will apply automatically. To
release the spring brakes, the air pressure
must be returned to 70 P.S.I.. If the system
cannot be recharged and the vehicle must
be moved, the spring parking brakes can
be released manually (caged).
To release the spring brakes, the actual
spring in the brake canisters must be me-
chanically compressed. A release stud, or
spring caging tool, must be used to manu-
ally compress the brake chamber.
DANGER - Never manually
release (cage) the spring
breaks before the wheels
are properly blocked. If the
wheels are not properly blocked
before releasing the spring brakes,
the vehicle may move unexpect-
edly. This could result in serious
injury or death.
Figure 1
The following steps can be used to re-
lease the standard brake chambers used
on most Kalmar tractors. If your vehicle
is equipped with other optional brake
chambers, refer to that manufacturer’s
operation or service manual.
Operation
Содержание Ottawa
Страница 1: ......
Страница 17: ...16 Operation...
Страница 40: ...39 Figure 1a Standard fuse con guration Figure 1b QSB fuse con guration Figure 2 Relay Location Operation...


