manualshive.com logo in svg
background image

7

The gas fire and accompanying remote 
control may only be used in accordance 
with the reason it was designed and 
after review of the Installation Manual 
and user instructions.

Modifications of whatever nature can 
also affect the safety of the gas fire. 
Alterations can nullify the warranty and 
the periodic inspection of the gas fire 
will come to lapse.

If the gas fire is not installed correctly, 
all warranty and/or damage claims 
against Kalfire will be declared null and 
void.

This gas fire has been tested and 
approved according to CE standard 
EN-613. Every gas fire that leaves the 
factory has been tested for technical 
and functional adherence to relevant 
quality standards in force.

This user instruction is available in va-
rious languages on www.kalfire.com, 
or through your installation bureau. 
All translated instructions have been 
translated from a Dutch instruction,  
which is the original document. 

Disclaimer
All rights reserved. No part of this 
manual may be copied, distributed or 
translated into other languages, in full 
or in part, without the prior written per-
mission of Kalfire. Kalfire reserves the 
right to make changes to the manual. 
Kalfire, however, cannot provide any 
warranty, implicitly or explicitly, for this 

1. General information

The following sections provide general 
information about the gas fire:
-   Foreword 
-   Pictograms 
-   Warranty 
-   iMatch interface compatibility 
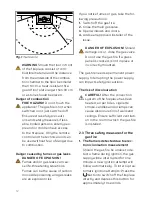
 
1.1  Foreword

About this manual
This user instruction has been written 
for the users of the gas fire. A seperate 
Installation Manual accompanies this 
User Instructions. The user instructions 
should remain in the vicinity of the gas 
fire so that they are readily available for 
fireplace users.

The gas fire may only be installed by 
qualified technicians complying with all 
relevant national or local regulations. 
The current technology status, the 
provisions of the Building & Housing 
Inspectorate and the national and Eu-
ropean regulations should be taken into 
account with regard to the installation 
work and the operation of the gas fire 
once fully connected. 

Maintenance and repair work may only 
be carried out by authorised technical 
fitters.

Effective use
This gas fire has been designed as am-
biance heating and has not been desig-
ned to be used as the principal heating 
unit for part of a house or throughout 
the house.

Содержание G Series

Страница 1: ...User instructions BALANCED FLUE GAS FIRES DON T COMPROMISE EN...

Страница 2: ......

Страница 3: ...0 37S G160 41F G165 37C G170 37S for gas type G20 G25 and G30 Balanced flue gas fires Kalfire GP GP60 59F GP65 55C GP70 55S GP60 79F GP65 75C GP70 75S GP75 59F GP80 55C GP85 55S GP80 54T GP85 50R GP10...

Страница 4: ......

Страница 5: ...A Appendices 34 A 1 Product card 35 A 2 Wiring diagram 36 A 3 Certificate of compliance 37 Contents 1 General information 7 1 1 Foreword 7 1 2 Pictograms 8 1 3 Warranty 8 1 4 Compatibility iMatch int...

Страница 6: ...6...

Страница 7: ...the prior written per mission of Kalfire Kalfire reserves the right to make changes to the manual Kalfire however cannot provide any warranty implicitly or explicitly for this 1 General information Th...

Страница 8: ...uring transport storage or installation fall outside the scope of the warranty 7 Should disruption occur within the warranty period caused by a manu facturing error or material defect Kalfire will del...

Страница 9: ...one another including telephone tablet or router are incompatible The iMatch interface and your external sembly 8 Renewing or replacing components that fall under the scope of the gua rantee do not e...

Страница 10: ...equired With regard to the huge diversity of appliances their compati bility can regrettably not be confirmed beforehand Only after installation of the interface can compatibility be confirmed Kalfire...

Страница 11: ...e materials such as curtains and furniture are at least 100 cm from the fireplace If a fireguard is used this distance must be at least 40 cm 2 Safety The following sections provide safety information...

Страница 12: ...l be interrupted for one minute A new ignition attempt will follow automatically To interrupt au tomatic ignition attempts Press the button to switch off the fireplace directly and depress this button...

Страница 13: ...k can twice be unlocked manually with the remote control If no flame is detected after two manual releases the appliance will remain blocked for 24 hours a lock out code 08F In that case you may not u...

Страница 14: ...reduces gas use considerably If the house is equipped with a home automation system then operation of the appliance can be integrated 3 Description The following sections describe the gas fire Descrip...

Страница 15: ...that system The gas fire can also be controlled by the iMatch App on a smartphone or tablet This is only pos sible if the gas fire is equipped with the optional iMatch interface that serves as the re...

Страница 16: ...LED lighting 3 RF signal a flashing icon indicating that the appliance is beyond the re ach of the remote control 4 flame intensity indicator hybrid fire 4 Operation The upcoming sections provide inf...

Страница 17: ...ssing the centre button 5 To exit the parameters menu press P 6 Wait for 30 seconds while the infor mation is transmitted 4 4 Checking transmission strength Carry out the following steps in order to m...

Страница 18: ...thermostat or manual mode begin to flash 2 Press P again to selec the icon of your choice 3 Briefly press to exit the menu 3 Walk around the appliance at a dis tance of 3 to 4 metres to measure the R...

Страница 19: ...ments in this way should you not require all time segments these other segments should be set 4 8 Setting the flame intensity by thermostat The remote control measures the temperature and the flame in...

Страница 20: ...control indicate that the time seg ments have been programmed 4 10 Programme choice for the hybrid LED lighting If the gas fire is equipped with a hybrid LED lighting function it is possible to vary...

Страница 21: ...ore sparks there are The gas fire must be alight for some time before the Natural Spark Genera tor can produce sparks This is why the appliance only activates the Natural Spark Generator after it has...

Страница 22: ...erface 8 Click on the grey area to assign a name living room for example 9 Provide your local Wi Fi network s name and password Careful name and password are case sensitive 10 The iMatch interface mus...

Страница 23: ...onnected to your local Wi Fi network First install the iMatch app on your smartphone or tablet See Configure the iMatch app on page 21 Accessing home screen 1 Click on the iMatch app icon to open it 2...

Страница 24: ...ial causes can be Smoking materials in the fireplace especially in the beginning air conta mination quality of the type of gas etc Conditions Filth and stains on the glass must be removed immediately...

Страница 25: ...e avoid pressure and rub the substance from top to bot tom to prevent cleaning detergent to remain on the glass Continuously dry the glass comple tely using the cloth When using a vacuum lifter to rem...

Страница 26: ...door To put the door back in place follow the steps explained in step 3 in reverse order Lock the door by moving the handles down Twist the metal cover strips step 1 back into its original position by...

Страница 27: ...ock the door by moving the handles down Twist the metal cover strips step 3 back in its original posi tion by using the overlapping edge on the upper side of the strip and fold the metal cover strip d...

Страница 28: ...he waiting time must be respected also after a power interruption 5 2 Malfunctions Malfunctions can be organised in five categories 1 Permanent malfunctions indicated as F This malfunction cannot be f...

Страница 29: ...l stimulate the synchronisation speed Supply power back to the cable The entire light will start flashing once per second Should the gas fire is provided with a hybrid function and or NSG detach the H...

Страница 30: ...chnical unit does not flash 1 Check power supply on the mains 230VAC 2 If this is correct check replace the VDC transformer and or automatic burner relay In case the light on the automatic burner rela...

Страница 31: ...ply up to the technical box measure pre pressure 4 In the presence of pre pressure check whether the cables running from the automatic burner relay to the gas valve unit are damaged and or disconnecte...

Страница 32: ...cient voltage 1 Measure mains voltage 220VAC 2 Measure outgoing transformer voltage 24 VDC and 12 VDC 3 If the outgoing voltage is lower than 20 VDC or 10 VDC replace the transformer 4 If the outgoing...

Страница 33: ...erface technical unit or place a Wi Fi repeater You have not entered the Wi Fi settings orrectly in the app Check the Wi Fi settings Erase the added room from the app Reset the iMatch interface and tr...

Страница 34: ...34 A Appendices The following sections contain appendices attached to the gas fire Product card Wiring diagram Certificate of compliance...

Страница 35: ...C 10 8 kW n a 81 81 8 77 8 Kalfire G160 41F Kalfire G165 37C Kalfire G170 37S G30 30 mbar C 11 0 kW n a 79 83 8 77 0 Kalfire G160 41F Kalfire G165 37C Kalfire G170 37S G30 50 mbar C 11 3 kW n a 79 82...

Страница 36: ...36 A 2 Wiring diagram Wiring diagram Natural Spark Generator in the technical unit Fig 14 Wiring diagram HCB only applicable in hybrid mode and or Natural Spark Generator...

Страница 37: ...105 59F GP110 55C GP115 55S Kalfire GP105 79F GP110 75C GP115 75S Kalfire G60 48F G65 44C G70 44S G80 48F G85 55C G90 55S G100 41F Kalfire G105 37C G11037S G120 41F G125 37C G130 37S G160 41F G165 55C...

Страница 38: ...38...

Страница 39: ...39...

Страница 40: ...Gelo rveldweg 21 5951 DH Belfeld info kal fire nl KALFIRE COM DON T COMPROMISE REF V01 2019 EN...

Отзывы: