11
I-7
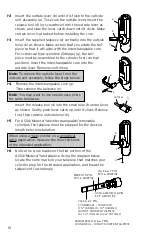
Using two pairs of pliers, break the tailpiece to the desired length of the
intended application by holding one pair of pliers on the good side of the
score mark and a second pair on the other side of the score mark. Slowly
move the 2nd pair of pliers up and down until the unneeded portion of
the tailpiece breaks free.
I-8
Insert the Medeco tailpiece (e) vertically into the outside lever as shown.
Make certain that you rotate the tailpiece slightly so that it will align with
the interchangeable/removable cylinder. Insert the
interchangeable/removable cylinder into the outside lever.
Note
: To remove the outside lever from the outside unit assembly, follow
steps below.
I-9
Remove the interchangeable/removable cylinder. Then remove the tail-
piece (e).
Note
: You may want to use needle nose pliers for some tailpieces.
I-10
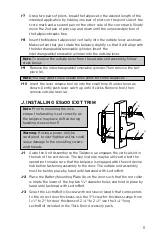
Insert the lever release tool (d) into the small hole (f) under lever as
shown. Gently push lever catch up until it clicks. Remove tool, then
remove outside lever (a).
J. INSTALLING E5x00 EXIT TRIM
Note
: Prior to mounting the lock,
ensure the handing is set correctly as
the tailpiece may have shifted during
handling (see section F).
Warning:
If using a power drill, be
careful not to over-tighten as this could
cause damage to the mounting screws
and threads.
J-1
Guide the Unit Assembly so the Tailpiece (a) engages the vertical slot in
the hub of the exit device. The key override may be utilized to test the
operation to make sure that the tailpiece is engaged with the exit device
hub before fastening assembly to the door. The outside unit assembly
must be held in place by hand until fastened with LectroBolt.
J-2
Place the Battery Mounting Plate (b) on the door such that the red collar
is inside the lower of the top two
3
⁄
8
" diameter holes and hold in place by
hand until fastened with LectroBolt.
J-3
Select the LectroBolt (c)(screw with red sleeve) length that corresponds
to the correct door thickness: use the 3" screw for thickness range from
1
3
⁄
4
" to 2", for door thickness of 2
1
⁄
8
" to 2
1
⁄
4
" use the 3
1
⁄
8
" long
LectroBolt included in the Thick Door Accessory pack.
d
e
a
f
g
h
b
c
Содержание E-Plex 5X10
Страница 1: ...5X10 EXIT TRIM MODELS INSTALLATION INSTRUCTIONS...
Страница 11: ...Notes...
Страница 19: ...15 Notes...


