background image

PORTABLE DVD PLAYER                                                                 V10M10_IM_EN_09182006 


19

BASIC OPERATION 


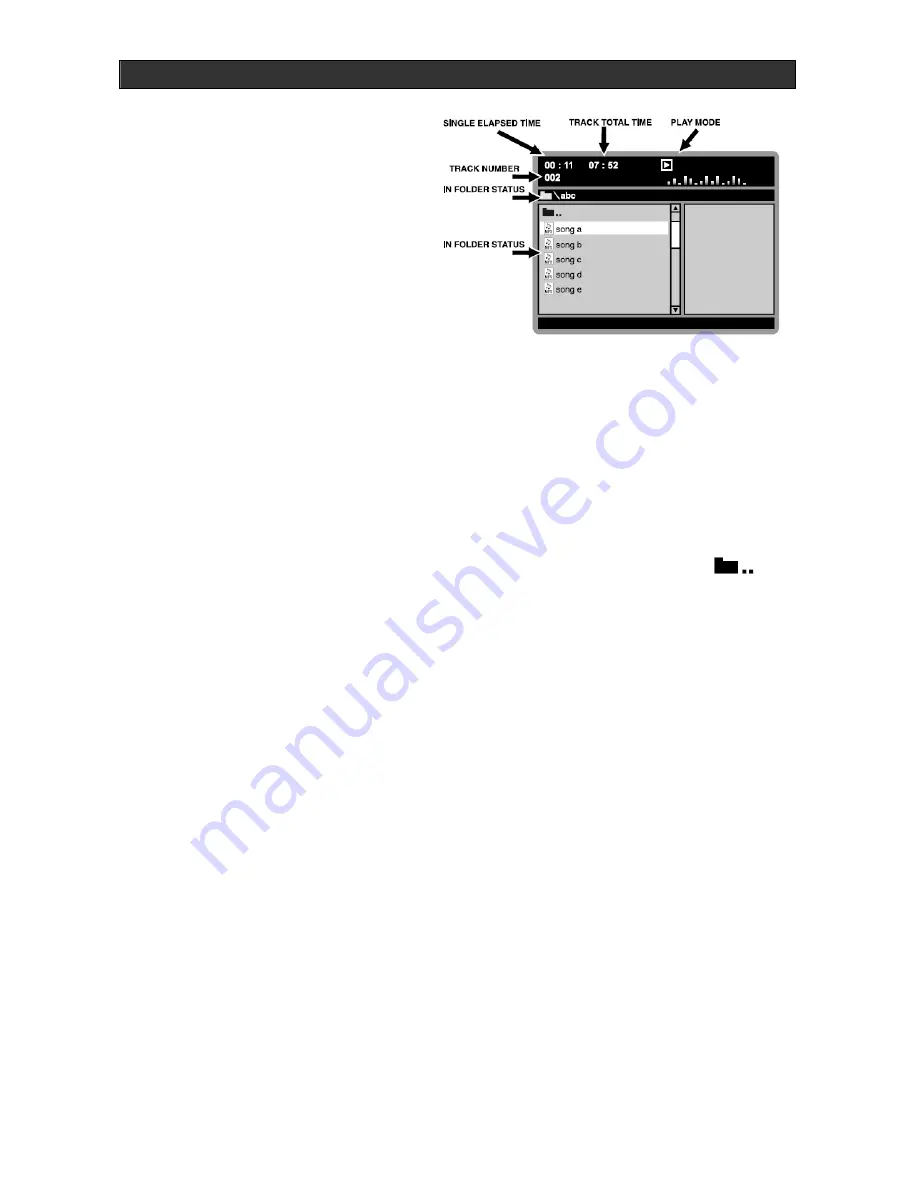
Playing an MP3 File in a folder 

Press the 

NAVIGATION

 (

S

 / 

T

) buttons 

to select a folder, and then press the 

NAVIGATION

 (

X

) button or 

ENTER


button to enter the folder. Press the 

NAVIGATION

 (

S

 / 

T

) buttons to select 

your desired MP3 file in the folder, and 
then press the 

PLAY

 (

X

) button or 

ENTER

 button to start playing the MP3 

file. The 

PLAY

 “

X

” indication will appear 

on the screen. It will continuously play all MP3 files in the folder and will stop automatically after 
playing all MP3 files.  
 

Selecting the MP3 File Using Numeric Buttons 

During the playback, press the corresponding 

NUMERIC

 buttons to the MP3 file number to 

select your desired MP3 file. It will jump to the selected MP3 file. Then press the 

ENTER

 button 

or the 

PLAY

 (

X

) button to play the selected MP3 file. 


Going Back to the Previous MP3 Folder 

When in a folder, use the 

NAVIGATION

 (

S

 / 

T

) buttons to select the folder symbol (

and press the 

ENTER 

button to go to the previous folder, or press the 

NAVIGATION 

(

W

) button  

to go to the previous folder. 
 

Repeat Play of MP3 Files 

To repeat a MP3 file, simply select and play a MP3 file. And then, press the 

REPEAT

 button 

once. The indication “

REPEAT ONE

” will appear on the LCD screen, and it will repeat the 

selected file continuously until the 

STOP

 (

„

) button is pressed. To repeat all MP3 files, press 

the 

REPEAT

 button once more. The indication “

REPEAT FOLDER

” will appear on the LCD 

screen, and it will repeat all MP3 files until the 

STOP

 (

„

) button is pressed. To exit the repeat 

mode, press the 

REPEAT

 button until the indication “

FOLDER

” appears on the screen.  


Содержание Z1055

Страница 1: ...edia Tablet Style DVD Player with 7 Active Matrix TFT LCD Screen Z1055 INSTRUCTION MANUAL Please read this manual carefully before operating and save it for future reference Have a question Please visit www i Luv com ...

Страница 2: ...PORTABLE DVD PLAYER V10M10_IM_EN_09182006 1 ...

Страница 3: ...To prevent fire or shock hazard do not expose this appliance to rain or moisture CLEANING Always disconnect unit from power supply before attempting to clean it Use soft cloth moistened with soapy water and wipe gently Do not use solvents or abrasive materials LASER SAFETY This unit uses laser technology Only a qualified professional should remove the cover or attempt to service this device due to...

Страница 4: ...future reference 3 HEED WARNINGS All warnings on the appliance and in the operating instructions should be adhered to 4 FOLLOW INSTRUCTIONS All operating and use instructions should be followed 5 WATER AND MOISTURE The appliance should not be used near water For example near a bathtub kitchen sink laundry tub and or swimming pool 6 VENTILATION The appliance should be situated so that its location ...

Страница 5: ... does not appear to operate normally or exhibits a change in performance 15 SERVICING The user should not attempt to service the appliance beyond what is described in the user s operating instructions All other servicing should be referred to qualified service professional 16 BATTERY USAGE To prevent battery leakage which may result in bodily injury property damage or damage to the unit follow the...

Страница 6: ...dphones 14 Connecting the DVD player to a TV set by AV cable 14 Connecting the DVD player to a TV set by S Video cable 14 Connecting other media to the DVD player 14 BASIC OPERATION Watching your iPod videos on the 7 LCD screen 15 Playing a DVD VCD Audio CD MP3 Disc 17 MP3 file browser 18 Loading an MP3 CD 18 Playing an MP3 file in the root folder 18 Playing an MP3 File in a folder 19 Selecting th...

Страница 7: ...ction 23 A B repeat function 24 Viewing from a different camera angle multi angle 24 Programmed playback 24 Display feature 25 Bookmark feature 25 Digest function 26 SETTING UP YOUR DVD PLAYER Navigating the setup pages 27 General setup pages 28 Speaker setup pages 28 Video Setup Page 29 Preference Setup Page 29 CARE AND MAINTENANCE GUIDE Cleaning the unit 30 TROUBLESHOOTING GUIDE Q A about the pr...

Страница 8: ...uter Inc DISC ERROR This compact disc player has built in error compensation circuits to correct for minor defects in a disc There are limits however to the amount of correction available In some cases the DVD player may skip some tracks or parts of tracks on a disc during disc play This problem may be caused by defects such as scratches in the disc being played which are too large for the error c...

Страница 9: ...most listeners This product incorporates copyright protection technology that is protected by method claims of certain U S patents and other intellectual property rights owned by Macrovision Corporation and other rights owners Use of this copyright protection technology must be authorized by Macrovision Corporation and is intended for home and other limited viewing uses only unless otherwise autho...

Страница 10: ...our iPod with video 30GB 60GB Features for DVD Player Play back DVD video through the 7 widescreen 16 9 aspect ratio TFT LCD Watch your favorite video on TV through S Video output Enhanced user interface with detailed controls Convenient OSD On Screen Display Multiple subtitle angle and audio functions Slow or fast motion playback and zoom operation Supports 3 way power sources o AC Power Adapter ...

Страница 11: ...0 SLOW REVERSE BUTTON 11 PAUSE STEP BUTTON 12 RANDOM BUTTON 13 MUTE BUTTON 14 REPEAT REPEAT A B BUTTON 15 SEARCH FORWARD BUTTON 16 SEARCH REVERSE BUTTON 17 SKIP FORWARD BUTTON 18 SKIP REVERSE BUTTON 19 SLOW FORWARD BUTTON 20 STOP BUTTON 21 PROGRAM BUTTON 22 SEARCH BUTTON 23 ENTER BUTTON 24 PLAY BUTTON 25 SETUP BUTTON 26 3D BUTTON 27 ANGLE BUTTON 28 SUBTITLE MENU BUTTON 29 AUDIO MENU BUTTON 30 AUDI...

Страница 12: ...tion Buttons 13 Pause Button 14 Skip Forward Button 15 Skip Reverse Button 16 Remote Control Sensor 17 Standby Indicator 18 Charge Indicator 19 Full Indicator 20 7 TFT LCD Screen 21 Disc Compartment Cover 22 Setup Button 23 Title Menu Button 24 DVD Menu Button 25 Display Button 26 Play Button 27 Stop Button Bottom View 28 Open Button for Disc Compartment Cover Back View 29 Desktop Stand 30 Integra...

Страница 13: ...gets weaker the battery might weaken In that case please replace the battery 1 Pull out the battery holder as shown right 2 Place one battery CR 2025 as shown right Make sure that the polarity of battery matches the marks inside the unit 3 Insert the battery holder into its compartment as shown right Note Do not attempt to recharge short circuit disassemble heat or throw the batteries into a fire ...

Страница 14: ...t when charging is complete or not necessary Battery Low Indication When using the rechargeable battery to play and the battery is nearly exhausted the STANDBY indicator in the front of the player will begin blinking After some time the power will turn OFF automatically Refer to the instructions in the section Charging the Battery to recharge the battery Using the Cigarette Lighter Adapter Plug th...

Страница 15: ... colored plug is for Audio L and the red colored plug for Audio R Connecting the DVD Player to a TV Set by S Video Cable S Video Cable NOT Included Use the S Video cable 3 5mm to DIN to connect the DVD player and TV set Connecting Other Media to the DVD Player Use the AV cable 3 5mm to RCA to connect from other media to the DVD player The yellow colored plug is used for Video The white colored plu...

Страница 16: ... follow the instructions below 1 On the menu screen of your iPod select the Videos option 2 On the next menu screen select the Video Settings option 3 On the next menu screen select the TV Out option and set it on 4 Open the dock cover on the back of the main unit and install the correct dock adapter for your iPod if you haven t installed the dock adapter yet ...

Страница 17: ...the main unit to the iPod position 7 Connect the AC adapter to the main unit and set the POWER switch on the top of the main unit to the ON position 8 Navigate the menu screen of your iPod to your favorite video file 9 Play the video file and watch it on the 7 LCD screen Please note that the DVD player and remote control don t have any control on your iPod due to the limited navigation system of i...

Страница 18: ...ns to select the PLAY option Press the ENTER button to play the disc b If playing a VCD disc or Audio CD it will automatically play the video or audio track If not automatically played press the PLAY X button to start playing c For a MP3 disc the disc reading time may exceed a little bit longer due to the large number of songs compiled onto one disc Select the song and press the ENTER or PLAY X bu...

Страница 19: ...ndication will appear Playing an MP3 File in the Root Folder Press the NAVIGATION S T buttons to select your desired MP3 file in the root folder and then press the PLAY X button or ENTER to start playing The PLAY X indication will appear on the screen and the player will continuously play all MP3 files in the root folder It will stop automatically after playing all MP3 files ...

Страница 20: ... file It will jump to the selected MP3 file Then press the ENTER button or the PLAY X button to play the selected MP3 file Going Back to the Previous MP3 Folder When in a folder use the NAVIGATION S T buttons to select the folder symbol and press the ENTER button to go to the previous folder or press the NAVIGATION W button to go to the previous folder Repeat Play of MP3 Files To repeat a MP3 file...

Страница 21: ...tomatically until all the pictures in the CD have been shown on the screen once 3 Press the PAUSE button to hold the current picture on the screen To continue the slide show press the PLAY X button again 4 Use the SKIP WW XX buttons to move to the previous or next picture 5 Press the STOP button to stop the slide show and return to the menu folder 6 If you press the REPEAT button once the current ...

Страница 22: ...ption and then press the ENTER button to confirm Some discs may not support this feature DVD Menu Feature Press the DVD MENU button to go to the main menu of the disc Use the NAVIGATION W X S T buttons to select the desired option on the main menu and then press the ENTER button to confirm Some discs may not support this feature Subtitle Feature Press the SUBTITLE button to select a subtitle langu...

Страница 23: ... LCD screen 2 Press the PLAY X button The unit will play all the tracks in the random order After all tracks have been randomly played the unit will automatically stop playing and enter into the STOP mode 3 To cancel the random function press the RANDOM button a second time The indication OFF will appear on the LCD screen Skip and Search Functions 1 SKIP REVERSE WW and SKIP FORWARD XX buttons Use ...

Страница 24: ...VD the indication INPUT INVALID will appear on the LCD screen When playing a VCD the numeric buttons can only be used to select the desired track or time in the search mode Repeat Function 1 DVD Disc a While in the PLAY mode press the REPEAT button once and the indication CHAPTER will appear briefly on the LCD screen Then the current playing chapter will repeat continuously b While in the PLAY mod...

Страница 25: ...ch press of the ANGLE button will show the movie with a different angle 4 To return the normal angle view press the ANGLE button until the camera icon disappears Programmed Playback This unit has the programmable memory that allows you to program up to 20 tracks or chapters on any disc for playback in any desired order You can also program certain tracks or chapters to play more than once This fea...

Страница 26: ...e in the play mode b Use the NAVIGATION W X buttons to go to the empty bookmark space c Press the PLAY X button to mark the desired position d Press the BOOKMARK button to exit the bookmark mode e Press the SKIP WW XX or SEARCH WW XX buttons to go to the desired position in another chapter or title f Repeat step a through step e to program the remaining bookmarks 2 To Play Programmed Bookmarks a P...

Страница 27: ...it the Track Digest screen iv Choose the MENU option to return to the Select Digest Type menu c Disc Interval Title Interval Chapter Interval i The screen shows the starting picture of 10 minute intervals on the screen simultaneously Enter your desired interval by using the NUMERIC buttons and then press the ENTER button to confirm it It will play from that interval onwards ii The screen will only...

Страница 28: ...tup Page Speaker Setup Page Video Setup Page Preference Page Exit Setup 3 Move to one of the options available in the selected setup page using the NAVIGATION S T buttons 4 Press the NAVIGATION X button to access the sub menu of the selected option 5 Use the NAVIGATION S T buttons to select an option in the sub menu 6 Press the ENTER button to confirm your selection 7 Press the NAVIGATION button t...

Страница 29: ...TSC When connected to a NTSC TV system this option must be selected to display an image correctly b PAL When connected to a PAL TV system this option must be selected to display an image correctly 3 ANGLE MARK ON OFF a ON If selected it will show the angle mark on the screen when playing a DVD recorded with the multi angle view This only works when there is an angle mark on the disc b OFF If selec...

Страница 30: ...lor To increase or decrease color intensity 5 Tint To increase or decrease the phases of color a Use the NAVIGATION S T buttons to increase or decrease the level of tint b Press the ENTER button to confirm Preference Setup Page 1 Audio To change the audio language choose the language using the NAVIGATION S T buttons and press the ENTER button to confirm 2 Subtitle To change the subtitle language c...

Страница 31: ...fully by the edges Fingerprints and dust should be carefully wiped off the disc s recorded surface with a soft cloth Unlike conventional records compact disc have no groove to collect dust and microscopic debris so gently wiping with a soft cloth should remove most particles Cleaning the Unit To prevent fire or shock hazard disconnect your unit from the AC power source when cleaning The finish on ...

Страница 32: ...mote control and control buttons on the main unit doesn t work on iPod It is normal This unit doesn t have a control on your iPod due to the limited navigation system of iPod with video 30GB 60GB No power on the unit Insert the AC power plug securely into the power outlet It fails to start playing even when the PLAY X button is pressed It will start playing but then stop immediately Condensation h...

Страница 33: ...er to the standby mode disconnect the power plug and then reconnect it No menu play This function works only for Video CDs with playback control Audio and or subtitle language are not shown on the disc or not in the setup menu If the audio and or subtitle language does not exist on the language selected in the setup menu it will not be seen or heard No subtitles Subtitles appear only with discs wh...

Страница 34: ...Range 5 C to 35 C 41 F to 95 F Operating Humidity Range 5 to 90 no condensation Battery Charging Time Approximately 4 5 hours Battery Life Fully charged 2 5 hours Video Output Level 1Vpp Audio Output Level 1Vrms 1 kHz 0dB Frequency Responses o DVD Linear Audio 20Hz 20kHz 48kHz Sampling 20Hz 20kHz 96kHz Sampling o CD Audio 20Hz 20kHz S N Ratio 70dB Wow and flutter below measurable level Pickup o Wa...

Страница 35: ...PORTABLE DVD PLAYER V10M10_IM_EN_09182006 34 ...

Страница 36: ...out prior notification 2006 jWIN Electronics Corp All rights reserved No portion of this printing material or product enclosed herewith including design shape and graphics may be not reproduced or transmitted in any form without the expressed written consent of jWIN Electronics Corp by any means electronics or mechanical including photocopy recording or information storage and retrieval system Any...

Отзывы: