(No.XA001)1-17
3.4
All-initialization method
Please perform all-initialization according to the following procedures in the following case:
• Just after you exchange the pick-up.
• Just after you exchange the spindle motor.
• Just after you exchange the traverse mechanism base.
NOTE:
Please perform all-initialization when you exchange the parts above and also when you remove the parts above.
• Just after the flap adjustment of the pick-up guide shaft
(1) Set the main body at test mode.
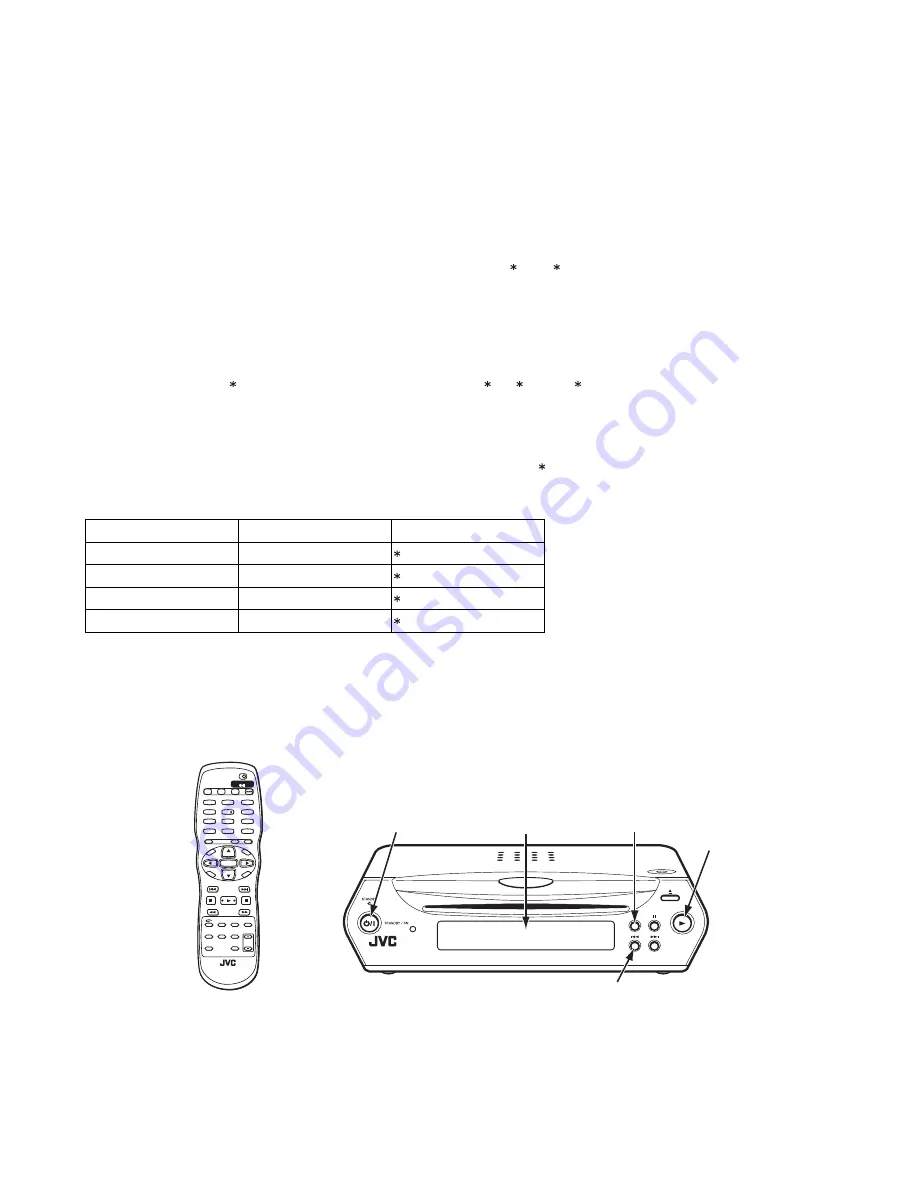
(2) Press and hold "BACKWARD SKIP" key of the main body for more than 2 seconds.
(3) When all-initialization is completed, the FL display changes from " 0" to " 33".
NOTE:
After all-initialization, be sure to perform optimization adjustment of Front End parameter.
3.5
Optimization adjustment of Front End parameter
Adjustment to optimize Front End parameter must be performed in each mechanism assembly of this model for high-speed start-
ing.Please perform optimization according to the following procedures just after all-initialization is completed and when FL display
shows anything except " 0" (For example when FL display shows " 1", " 2", and " 3") at test mode.
(1) Press "POWER" key of the main body to turn the main body ON (not to set the main body at test mode).
(2) Insert the test disc VT-501 or commercial dual-layer DVD software.
(3) Remove the disc when the FL display changes from "READING" to disc information.
(4) Perform the same procedures as in (2) and (3) above by using the test disc CTS-1000 or commercial CD-DA software.
(5) Set the main body at test mode, and check that the FL display shows " 0".
NOTE:
Status of this adjustment can be judged by the number displayed at test mode as follows:
NOTE:
As for a disc used for adjustment,
• Disc should be mounted. ("Mounting" means to display "READING" after the disc is inserted and then display the disc infor-
mation.) Disc need not be played.
• If you do not have test disc either VT-501 (DVD) or CTS-1000 (CD-DA), use a commercial disc (for DVD, dual-layer soft-
ware) after seeing and checking that the disc is neither curved nor foreseen that it may shake at the time of playback.If you
use a disc with bad features, starting time may be slow or disc may not be read.
DVD adjustment
CD adjustment
FL display at test mode
Adjusted
Adjusted
0
Not adjusted
Adjusted
1
Adjusted
Not adjusted
2
Not adjusted
Not adjusted
3
TV2
2
TV1
1
TV3
3
TV5
5
TV4
4
TV6
6
TV8
8
TV7
7
TV9
9
TV0
0
TV-/-
10
MUTING
+10
VFP
ZOOM
AUDIO
DIMMER
SUB TITLE
REPEAT
ANGLE
3D
PHONIC
AMP VOL
EJECT DISPLAY
TV
DVD
NEXT
PREVIOUS
SELECT
CLEAR
SLOW –
SLOW +
CH
+
CH
–
ENTER
STANDBY/ON
TV
DVD
RETURN
VOL
–
VOL
+
TITLE/
GROUP
TV/VIDEO
CANCEL
TO
P
ME
NU
ME
NU
ON
SC
RE
EN
CH
OIC
E
POWER key
STOP key
(for test mode)
PLAY key
(for test mode)
BACKWARD SKIP key
(for all-initialize : It pushes 2 seconds or more.)
FL Display
Содержание XV-C5SL
Страница 59: ...XV C5SL 2 7 MEMO 2 15 ...


