background image

-- 73 --

JVC VR-616

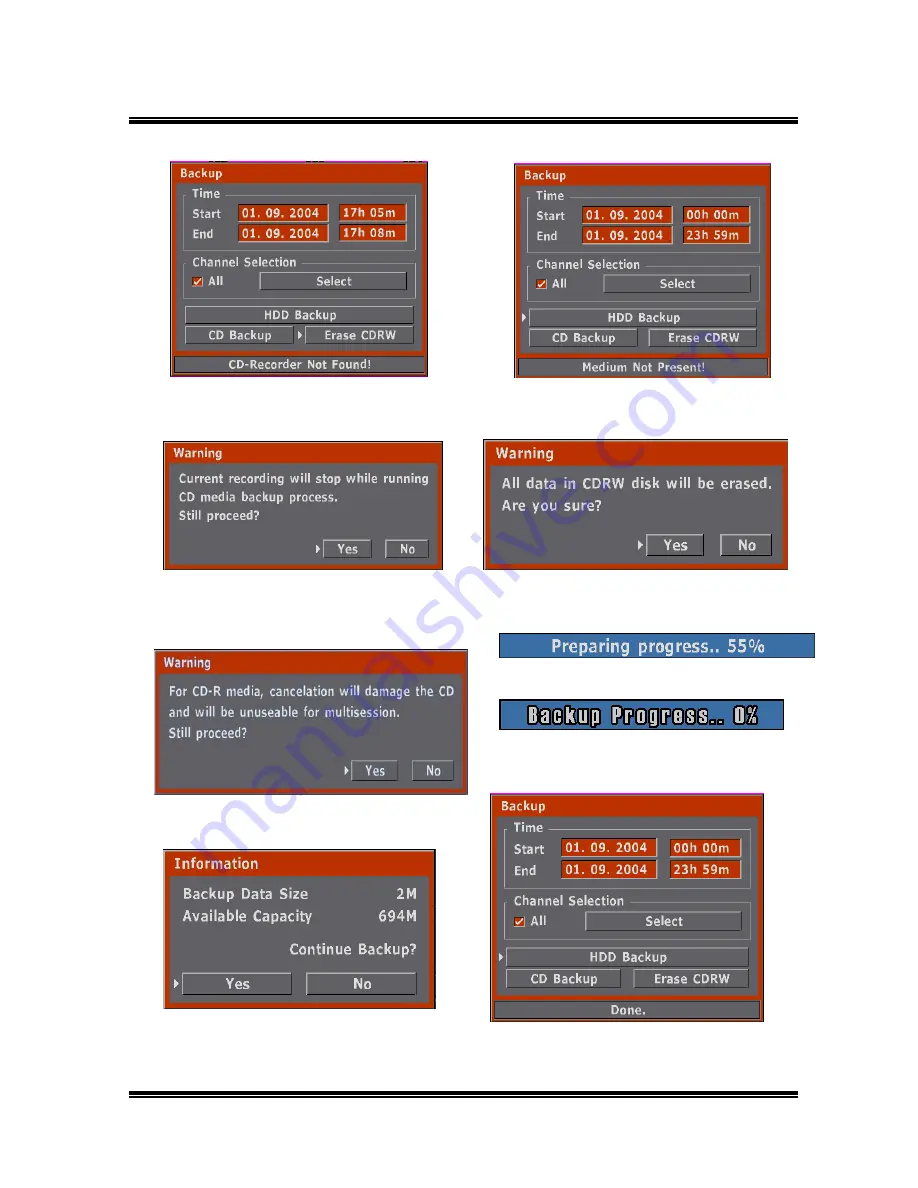
● This is warning message cancellation will 

damage the CD while it is being backed up.

● This message is displayed if there is  

no CD for backup when backup at CD.

●This message is displayed if there is 

no CD-recorder when backup at CD.

● This message is for warning the data of 

CD could be lost while erase CD.

● This message warns that recording is 

stopped while data is being backed 
up to a CD-RW.

● Decide whether you back up or not after check.

● It means Backup is being progressed

● This message is indicated amount of date   

and space of CD to use when you back up 
CD.

● This message is displayed when Backup is 

done.

Содержание VR-616

Страница 1: ...oduct Before operating this unit please read the instructions carefully to ensure the best possible performance For Customer Use Enter below the serial No which is located on the bottom of cabinet Retain this information for future reference Model No VR 616 Serial No LLT0063 001A ...

Страница 2: ......

Страница 3: ...l Product Connections and Applications 28 3 4 1 External Product Connection of ALARM INPUT and Application 28 3 4 2 External Product Connection of ALARM OUTPUT and Application 29 3 5 Installation and Application for Network Interface 30 3 5 1 Connection and Installation for Remote Control 30 3 5 2 How to Setup Static IP 30 3 5 3 Network Setup 31 3 6 Application of Remote Control Software 32 3 6 1 ...

Страница 4: ...up 47 5 2 1 Manual Recording 47 5 2 1 1 Recording Events 48 5 2 1 2 Quality 48 5 2 2 Schedule 49 5 2 2 1 Explanation of Recording Schedule 49 5 2 2 2 How to Setup 51 5 2 2 3 Audio Recording 53 5 2 2 4 Setup Days of the Week 54 5 2 2 5 Copy Schedule 54 5 2 2 6 Specific Day Schedule 55 5 2 3 Alarm Recording 57 5 2 4 Recording Duration 59 5 3 Alarm Setup 60 5 3 1 Alarm Name 60 5 3 2 Alarm Link Setup ...

Страница 5: ... 7 Lock Front Button 85 5 7 7 8 Lock Remote Control 85 5 7 8 About System 85 5 7 9 Default in Setup Menu 86 5 8 Monitor Display 87 5 9 Playback 88 5 10 Power Off 90 6 External Backup 91 6 1 External USB Port 91 6 1 1 Connect with External USB Port 91 6 1 2 How to Backup 91 6 2 External IEEE 1394 Port 92 6 2 1 Connect with IEEE 1394 Port 92 6 2 2 How to Connect with IEEE 1394 Port 92 7 Remote Contr...

Страница 6: ...in damage and will often require extensive work by a qualified technician to restore the appliance to normal operation e If the appliance has been dropped or the cabinet has been damaged f When the appliance exhibits a distinct change in performance this indicates a need for service 18 When replacement parts are required be sure the service technician has used replacement parts specified by the ma...

Страница 7: ...me à la norme NMB 003 du Canada CAUTION CHANGES OR MODIFICATIONS NOT APPROVED BY JVC COULD VOID USER S AUTHORITY TO OPERATE THE EQUIPMENT SAFETY PRECAUTIONS VR 616U The lightening flash with arrowhead symbol within an equilateral triangle is intended to alert the user to the presence of uninsulated dangerous voltage within the product s enclosure that may be of sufficient magnitude to constitute a...

Страница 8: ...l which is marked with the letter L or coloured RED POWER SYSTEM Connection to the mains supply This unit operates on voltage of 220 V to 240 V AC 50 Hz 60 Hz Note The rating plate and the safety caution are on the top of the unit WARNING This is a Class A product In a domestic environment this product may cause radio interference in which case the user may be required to take adequate measures Wa...

Страница 9: ...en Sie ausschließlich ein in Ihrem Land zulässiges Netzkabel SYSTEME D ALIMENTATION Raccordement à la principale source d alimentation Cet appareil fonctionne sur une tension courant alternatif de 220 240 V 50 Hz 60 Hz Remarque La plaque d identification et les précautions de sécurité se trouvent sur le dessus de l appareil PRECAUTIONS DE SECURITE VR 616E AVERTISSEMENT Ce produit est un produit de...

Страница 10: ...ocasionar perturbaciones radioeléctricas en cuyo caso puede que el utilizador necesite tomar las medidas adecuadas SISTEMA DI ALIMENTAZIONE Connessione all alimentazione principale L unità funziona con un voltaggio da 220 V a 240 V con una frequenza di 50 Hz 60 Hz NOTA La potenza e le norme di sicurezza sono riportate sulla parte superiore dell apparecchio NORME DI SICUREZZA VR 616E AVVERTENZA Que...

Страница 11: ...t to prevent temperature within from rising Do not stand this equipment vertically during use Handle this equipment with care Do not subject it to physical shock Do not insert foreign object into this unit as this may cause malfunction or electric shock Please keep the mobile rack into the compartment As injury may result from fingers getting clamped SAFETY PRECAUTIONS VR 616U E Maintaining the un...

Страница 12: ...ehrere Geräte übereinander um eine Überhitzung zu vermeiden Stellen Sie das Gerät im Betrieb nicht senkrecht auf Behandeln Sie das Gerät mit Sorgfalt Setzen Sie es keinerlei Erschütterungen aus Achten Sie darauf dass keine Fremdgegenstände in das Gerät gelangen Dies kann zu Fehlfunktionen führen ferner besteht die Gefahr eines elektrischen Schlags Lassen Sie den Transportrahmen immer im Fach Ander...

Страница 13: ...ccu mulation de la chaleur Ne pas utiliser cet équipement à la verticale Manipuler l équipement avec soin Ne pas l exposer à des chocs N insérez pas d objet étranger dans cette unité Vous risquez de provoquer un mauvais fonctionnement ou u n choc électrique Veuillez maintenir le tiroir amovible dans le compartiment les doigts risquant de se faire coincer et de provoquer des blessures PRECAUTIONS D...

Страница 14: ...ación Evite choques violentos a la unidad No deje caer la unidad No amontone el equipo para evitar una subida de temperatura Durante la utilización no coloque el equipo en la vertical Maneje este equipo con cuidado No le someta a choques físicos No introduzca objetos extraños en esta unidad Esto puede provocar malfuncionamiento o choque eléctrico Por favor mantenga la ranura móvil en el compartimi...

Страница 15: ...i Non mantenere l apparecchiatura in posizione verticale durante l utilizzo Maneggiare l apparecchiatura con cura Non sottoporla a urti Non inserire oggetti estranei nell unità altrimenti potrebbero verificarsi malfunzionamenti o scosse elettriche Non estrarre il rack mobile dal suo comparto altrimenti potrebbero rimanervi impigliate le dita e ci si potrebbe far male NORME DI SICUREZZA VR 616U E P...

Страница 16: ... seconds after OPERATE OFF It may cause a failure of the Hard disk Do not expose the equipment to physical shock during transport In particular do not move the equipment during recording or playback Please note that we will not provide compensation for any failure during recording or playback due to defects in this equipment or the hard disk drive TV broadcast or other video audio recordings are f...

Страница 17: ...wer Cord Rubber Foot 2 2 Part Names and Features 2 1 Basic Organization of DVR System In this Instructions Digital Video Recorder is written as DVR Contents and shape can be different RS 485 Alarm Out Alarm In Lock Key Hard Rack Screw Remote Control Unit Battery CD ROM ...

Страница 18: ...without any special software If the HDD set to Backup you will not be able to use playback P B remote security function Live monitoring is possible through a web browser 8 Audio Recording and Playback One channel of audio may be selected for recording and playback with a video channel 9 Diverse image backup function Massive amounts of video can be stored in an internal HDD removable HDD or externa...

Страница 19: ...t free operation with built in self monitoring functions that monitor each component of the system and will automatically restart into the previous mode if a system failure is encountered 16 Camera control of popular dome models Able to control a multitude of external cameras through the RS 485 port ...

Страница 20: ...semble 2 brackets in the same procedure 2 Remove 8 screws Remove the 8 screws at the right and left side surface of the equipment M4 x 12mm 3 Mount the rack mounting bracket to the equipment Fasten 2 rack mounting bracket Assembled in the procedure 1 to the equipment using 8 screws Removed in the procedure 2 4 Mount the equipment to the Rack For rack mounting handle M4 x 10mm 4 EA For rubber feet ...

Страница 21: ... Please wait a moment Waiting to detect 1394 HDD Please wait for a while to starting Channel Selection Buttons CH1 CH16 These buttons are used to select the screen monitors and to change the channel settings at the menu AUTO Button The input channel is automatically switched in proportion to the speed setting at the menu ALARM RESET Button This button is to stop the alarm out left Button Menu Navi...

Страница 22: ...creen display options available USER Button This is for user s screen mode You can select one split display out of 8 screen then you can organize the screen to your personal preference MENU Button The menu button allows scrolling through the available on screen menu REC STOP Reverse Playback EXIT PLAY Button ENTER REC This is for recording STOP This is for stop PB Reverse Playback EXIT This is for...

Страница 23: ...ng SPOT OUT Composite Outputs video which is set up from the menu MODE PAL NTSC Selects input video signal mode If you change PAL NTSC once it carries out operate off Operate on is carried out and a message Video mode was changed is displayed and it shows a subsequent message Select O K changes video signal mode When PAL NTSC is changed former record data is deleted An administrator password is re...

Страница 24: ...d up to 16 composite video signals Ability to check multiple screens during playback by using monitors VGA units It supports screen search monitor and remote control through the Network 3 1 1 Basic Schematic Video signal of the input channel is 1 0 Vp p on a 75Ω load THROUGH OUT is changed to Hi Z Automatically NETWORK ...

Страница 25: ...tor Alarm IN Connector VGA OUT Connector Y C OUT Connector MONITOR OUT 1 2 Connector SPOT OUT Connector RS 485 Connector IEEE 1394 Connector VIDEO IN Connector AUDIO OUT Connector AUDIO IN Connector Alarm OUT Connector 3 2 Basic Connections ...

Страница 26: ...C676 or TK C655 Camera power connection Control terminal connection RS 485 Please use a twisted pair cable Connect a terminal TX terminal TX to the RX RX terminal of a Pan Tilt camera The camera connected at the end should set up a terminus 110 Ω Video signal connection Composite Checks video mode NTSC PAL and inputs video signals at each input terminal Coaxial cable Control signal cable AC 24 V p...

Страница 27: ...uipment is set to ON Other equipments are set to OFF Switch 8 ON Switch 5 Install ID value independently ID ON Switch 4 Value Item RX RX RX RX RX RX GND When you install in a place with many noises please use a twisted pair cable with a shield A shield cable should be connected to a GND terminal D C D C D C The functions can be used by this equipment are PAN TILTE ZOOM FOCUS AUTO FOCUS A setup of ...

Страница 28: ...larm jacks for external devices Able to set up REC ON OFF and Digital out motion according to ALARM IN signals DC GND Circuit Diagram Each External device which is connected with ALARM IN should be connected with GND and Alarm In Common GND GND 1 2 3 4 5 6 7 8 GND 9 10 11 12 13 14 15 16 Internal Circuit Connection Diagram SW 1 3 5V ALARM IN 5V ...

Страница 29: ...it Common GND Circuit Diagram OUTPUT EVENTS Digital inputs to alarm 1 16 Disk Full Video Loss Power Off Admin PW Chang ed Motion Detect Alarm out outputs and open collector state continuously until the alarm is reset When connecting to an external device it is better to connect with the interface circuit Maximum output current is 0 1A Damage may occur if output is higher Connection Diagram GND 1 2...

Страница 30: ...e control and remote file transfer due to 10 100mega Ethernet I F Organization of Remote Control 1 Connect Network line which has a fixed IP by using the hub 2 set up system network at the Setup Menu Main Menu System Administration Network Setup 3 Link web browser which supports JAVA Applets MS Internet Explorer 6 0 etc 3 5 2 How to Setup Static IP ...

Страница 31: ... need an Global IP address to avoid conflict Subnet Mask It is 32 Bit in length Address Mask Gateway This is used for connecting to the Network which has a different structure and Protocol DNS It is a link system for easy connection to the Internet For example you can use an alphabetic address e g www company com instead of a number address We highly recommend you consult the Network Manager 3 5 3...

Страница 32: ...er in the homepage address Use Domain name 3 6 2 Web Browser This is for wire internet by using computer Web Browser If the icons are not displayed as change the screen please check the menu bar on the web site as followings Tools Internet Options General Temporary Internet Files Settings Check for newer versions of stored pages Automatically If Record Web Select is not selected on the menu live m...

Страница 33: ... It is possible to control the Pan Tilt camera which allows to set up the position of the Pan Tilt camera from a remote location Pan Tilt control Possible to PAN TILT and ZOOM by clicking the button on the web screen 3 6 4 Playback Screen Search This is for searching playback screens It is possible to check date and time ...

Страница 34: ...SW Manual English pdf Instructions of this software English Operating Environment System Requirements Note Remote monitoring is limited to 6 persons for assurance of the reliability of the system Only one person is allowed to see the web playback screen Possible to restrict remote user by password Possible to delay because of system status The reliability of remote monitoring is subject to the rel...

Страница 35: ...n select a screen form by using the DISPLAY USER button and INPUT button It displays the selected channel on the monitor by pressing the INPUT button during live or playback It is used for selecting INPUT_CH at the MENU Selected monitor configuration is displayed on the monitor USER button is for screen configuration which is set up from the menu 1 4 9 16 6 7 10 screen is displayed as pressing the...

Страница 36: ...ayback screen is displayed with time slice on 4 9 16 divided screen ZOOM It can be X2 zoomed at any mode Possible to zoom status by using X axis Y axis and it is possible to move by using direction button in zoom status DISPLAY It displays multi screen when its monitoring or playback As pressing this button repeatedly when its monitoring divided screen is displayed 1 4 9 16 6 7 10 and as pressing ...

Страница 37: ... menu mode the buttons have the functions indicated below EXIT ENTER 4 1 5 Menu Setup You can easily change the Camera Setup Recording Setup and Audio Setup by the graphical user interface screen If you press the menu button you can see the next menu screen It can be moved up and down by using Jog The Menu is selected by clicking the ENTER button Setup value symbols Alphabet Upper case Capital let...

Страница 38: ...e of display division Image Sequence Playback Screen of 16 Channel TRIPLEX Playback Screen TRIPLEX This is an overlay picture in picture screen You can monitor live screen and playback screen at the same time It is returned to playback screen as pressing the PLAY button ENTER button after setup monitoring channel you want to see If you want to change playback screen press the Channel Selection but...

Страница 39: ...ayed when you press the User button set up Manual Recording Schedule Alarm Recording set up Main Menu System Log Alarm Log HDD Management Backup Auto Select Video Output Administration About System Possible to change setting value by using Jog and direction buttons According to cursor position cursor should move right left when press up down buttons ...

Страница 40: ... same protocol 5 1 1 Camera Control 1 RS 485 enables long distance transfer 2 Possible to connect in parallel 5 1 1 1 Pan Tilt Camera Camera Camera ID Setup Pan Tilt Camera Examples of Camera Rotation Pan Tilt It is possible to set up image which will connect at input port and able to set up Pan Tilt camera which will connect with RS 485 ...

Страница 41: ...s shuttle left or right Checks whether camera ID and Pan Tilt camera ID are the same installation if the Pan Tilt camera does not activate Also checks whether the control line of the Pan Tilt camera is in the correct location 5 Press the EXIT button to return to the Camera Setup Menu If you use multiple Pan Tilt cameras make sure all of the Pan Tilt cameras are the same manufacturer ...

Страница 42: ...n The channel number can be changed by pressing the INPUT button 2 Selects contents which you want to change by jog 3 Possible to change setup status by using the buttons as follows ENTER button Change and complete selected contents EXIT button Make cancellation button Move to left at the Name button Move to right at the Name Jog Can change character and number by jog rotation 4 To return to the p...

Страница 43: ...amera Setup Camera Setting Camera ID Reverse Pan Reverse Tilt Control Test Character Mark 1 Camera ID For controlling the Pan Tilt camera Setting ID is for distinguish the Pan Tilt camera which is connected in parallel Camera ID uses 1 255 number Be sure to check the specifications of the Pan Tilt cameras 2 Reverse Pan Reverse Tilt It reverses a Pan Tilt Camera direction Usually the Pan Tilt direc...

Страница 44: ... to Setup 1 Move to the desired position by using Jog or up down buttons 2 If you press the ENTER button the next image is displayed with video input 3 Jog left or right or press up down buttons for changing the number 4 If you press either the ENTER or EXIT button setup is finished After finishing setup the previous screen is displayed Brightness Controls brightness Contrast Controls contrast Sat...

Страница 45: ...o the RS 485 port 2 Select the same drive which is selected from the Pan Tilt Model Select menu 3 Set up the Camera ID at Camera Setting 4 Test it by using Camera Control Selects one of Camera driver None JVC Camera Pelco Camera If you connect with TK C676 TK C655 please select JVC CAMERA ...

Страница 46: ... 46 JVC VR 616 Selects baud rate for each camera Factory default is 9600 bps If you connect with TK C676 TK C655 please select 9600 bps ...

Страница 47: ...ressing REC button when it is not recorded according to schedule Possible to control recording for each channel as pressing REC buttons As pressing Enter button after moving cursor to channel by using Jog channel for setup will be changed blue bar as blow In case Schedule Recording Box is checked Manual Recording is not working ...

Страница 48: ...d block possible to set up Recording Events of block like above picture Always Records always if it is in Recording Time Motion Recording is started if motion is detected which is in set up screen of Channel Alarm Records when the selected alarm is received As press the ENTER button on the left side of the QA line possible to set up Recording Quality like above picture Setup range 1 7 Default sett...

Страница 49: ...for specific day If it changes from a menu a clock mark is displayed on the screen lower right and it will be in the state of TIMER STANDBY or TIMER RECORD VR 616 does not have a power saving mode 5 2 2 1 Explanation of Recording Schedule The above numbers indicate the hour in the day 00 23 1 Time ...

Страница 50: ...ording Motion Recording The left numbers indicate the input channel 1 16 QL indicates quality level as recording AR indicates whether Audio Recording or not 2 Channel 3 Quality Level Alarm Recording 4 Recording Events The left picture indicates it is being Always Recording with recording 3fps The left picture indicates it is being Alarm Motion Recording with recording 4fps Ex ...

Страница 51: ...block Appears yellow bar at the right of block Disappears yellow bar at the block 3 As pressing the left button in case yellow bar is at the left of the block The block extends for an hour and extended time is set up as Recording Schedule of present block When the yellow bar is located in the left side of the block and you press the right arrow button then the source configuration in the block wil...

Страница 52: ...ng JOG or up down button Press the display button and a yellow bar is displayed on the position at 00 00 3 Press right button and move it to the position of 09 4 Press display button and a yellow bar is displayed on the right hand side of 23 23 59 5 Press left button and move it to the position of 12 Press display button and a yellow bar will disappear 6 Press right button and move the specific bl...

Страница 53: ... chosen with a right left button and an ENTER button is pressed at it a record setup of each block can be set up freely However mind that a boundary line will disappear if an adjacent block is set to the same setup 1 1 If press the ENTER button as block is selected the below picture Recording Events will be displayed then possible to set up recording option for selected channel The way of setup is...

Страница 54: ...will be able to select Audio Recording On and Audio Recording off as below Audio Recording On Audio Recording Off You can select a day to configure the recording schedule using Enter button and Jog dial You can copy the recording schedule configuration of a specific day of the week to other days of the week After set up the day of copy press the Copy button ...

Страница 55: ... and configure new Specific Day Schedule up to 16 Using the up down arrow buttons and the Enter and Jog dial and selecting the Disable Enable you can decide if you will record it according to the configuration of recording schedule or not Using the up down arrow buttons and the Enter and Jog dial and selecting the Delete you can delete the configured recording schedule You can set the start and th...

Страница 56: ... channel is selected the maximum recording Field Sec is changed as in the below table Only for PAL 15CH 3F S 11CH 4F S 7CH 6F S 3CH 12F S 12CH 4F S 10CH 5F S 9CH 5F S 16CH 3F S 14CH 3F S 13CH 3F S 8CH 6F S 6CH 8F S 5CH 8F S 4CH 12F S 2CH 25F S 1CH 25F S It is NOT possible to be 60 field according to input channel number Ex 16CH 16 3 48 Field 5CH 5 10 50 Field 1CH 1 30 30 Field It is NOT possible t...

Страница 57: ...ecord time set up Alarm Input 1 16 Motion Setup Full Recording REC is started when motion is detected on the full screen Area REC is started when motion is detected on the selected grid this grid can be selected by the user set up area as pressing the ENTER button at Area Define menu If the record is started by alarm motion detection from the stop mode the sensor record mode audio does not record ...

Страница 58: ...vity Sensitivity refers to the sensitivity to motion Sensing Speed is the speed of motion Possible to set up a range from 1 to 10 1 Low Slow 10 High Fast How to Setup ⓐ Move to Sensitivity or Sensing Speed by using Jog then press the enter button for setup value ⓑ After setup is finished move to the previous menu by clicking EXIT Sensitivity is detected sensitive changing in proportion to value Se...

Страница 59: ... 655 436 218 109 72 2 2995 1497 1123 936 748 561 374 187 93 62 3 2496 1248 936 780 624 468 312 156 78 52 4 2496 1248 936 780 624 468 312 156 78 52 5 1997 998 748 624 499 374 249 124 62 41 6 1497 748 561 468 374 280 187 93 46 31 7 Record Condition HDD 240 Gbyte Audio Sampling Rate 8KHz 1F 16S 1F 8S 1F 6S 1F 5S 1F 4S 1F 3S 1F 2S 1F 1S 2F 1S 3F 1S Quality Field Rate MODE NTSC PAL Maximum Field Rate 6...

Страница 60: ...xternal devices such as alarm or buzzer 5 3 1 Alarm Name How to Setup a Select alarm channel by using Jog b Selects name by using play right left and jog c As jog is rotated from right to left characters change Possible to write up to 16 alphanumeric and symbolic characters ...

Страница 61: ... to select repeatedly 3 Alarm Off below of right How to off alarm when alarm occurred There are Manual and Auto 4 Alarm Output Number The part for selecting output port when signal is in according to alarm and event setup Output ports are in rear of product and able to select one of them 5 Alarm in out ports are in rear of product there are 16pcs of input ports and 4pcs of output ports Move to pre...

Страница 62: ...detected Possible to select channel number or ALL How to off Alarm when alarm has occurred Auto Alarm is turned off automatically after setting time Manual As press the Alarm button on the front alarm is turned off Time Sec This is for selecting Auto Unit Sec 5 3 2 3 Alarm Off 5 3 2 4 Alarm Output Number Select Alarm Output Number by using channel button 1 4 buttons Alarm Output Number is changed ...

Страница 63: ...ing left right buttons or Jog NTSC 8 Screen PAL 8 Screen 2 As color is changed to blue change the screen by using Button ⓐ Change the screen which color is blue by selecting the Channel Selection button ⓑ Move to another screen by using Jog up down button ⓒ After finishing select either ENTER or EXIT 3 After setting end finish the menu and then press the USER button of screen button User Screen wi...

Страница 64: ... time Recording Quality is set to 7 How to Setup 1 Selecting Audio Setup from the menu displays the above picture 2 Select Bypass Audio 3 Select Bypass Audio You can hear sound from Audio Out 4 For audio recording Select Manual Recording from the Recording Setup Check whether Audio is set up or not Select Channel of Related Video Channel from the Audio Setup Check whether Channel of Related Video ...

Страница 65: ...o Setup 1 Selecting Menu Setup from the menu displays the above picture 2 Move to the place you want to set up by Jog 3 For changing language press the ENTER button at Language and select the language 4 If you change the value by jog after moving to Status and pressing the Enter button it controls transparency of present status channel name recording status indicator clock indicator of HDD recordi...

Страница 66: ...ord Update Program Check system version Select Main Backup HDD set up motion contents of Auto button set up Spot Output and VGA Output 5 7 1 System Log Log records all actions which occurred on the system while operating Easy to use by using Date or Filter You can check all of the product motion Checks Alarm Log ...

Страница 67: ...m Log displays alarm recording which detects on system such as motion On the alarm log display screen if you chose a log line by the vertical button or JOG Dial and then press the ENTER button playback the recorded image starts from the time when the log was recorded As pressing a stop button it will return to an alarm log screen On the system log display screen if you chose a log line by the vert...

Страница 68: ...ite mode Log clear function set up HDD using percent The state of the 1st Built in HDD Capacity is 120GB and Free Space is 120GB The state of the 2nd Built in HDD The state of the removable HDD Clear All Previous Log If you check here and press EXIT button Do you want to Update Disk is displayed As pressing Yes button Log information will be deleted ...

Страница 69: ... IEEE1394 or USB device and then turn on the power If you reset DVR you have to power off the IEEE 1394 or USB device Initialize If you press Initialize button at Main HDD Data stored in HDDs numbered larger than x will be lost Are you sure is displayed As pressing Yes button HDD will be initialized Please note all HDD for main after specified HDD is initialized If you press Initialize button at b...

Страница 70: ...HDD is only one It is better to clear the data when an HDD is registered for the first time IDE1 Master Internal HDD IDE1 Slave Internal HDD IDE2 Slave Removable HDD MAIN MAIN BACKUP Notice If you make a mistake during HDD installation or removal HDD contents can be erased Ex When changing Main HDD to Backup HDD or changing Backup HDD to Main HDD ...

Страница 71: ...off On Main HDD is full it starts to overwrite old DATA Off When Main HDD is full 100 recording is stopped 3 Clear All Previous Log It is the place for initial Log content It is better to initiate Log when HDD or DATA is changed To make back up with CD RW etc should be strongly recommended if the important data seems to be recorded ...

Страница 72: ...backup will start It is possible for this to take a long time depending upon the motion contents of the system 3 If there is no data to backup Out of backup range message will display 4 If there is no HDD to backup Backup HDD not found message will display 5 For CD R media cancellation will damage the CD while it is being backup Please press the EXIT button as power off forcibly This message is di...

Страница 73: ...e is no CD recorder when backup at CD This message is for warning the data of CD could be lost while erase CD This message warns that recording is stopped while data is being backed up to a CD RW Decide whether you back up or not after check It means Backup is being progressed This message is indicated amount of date and space of CD to use when you back up CD This message is displayed when Backup ...

Страница 74: ...e place Monitoring is possible Separate inside rack from hard rack Open inside rack and push top cover Connect data cable of the inside rack with the power line exactly Close the cover of the inside rack Notice If the product is being HDD backed up you will not be able to use the playback P B via the Internet Live monitoring is possible When add HDD or take HDD please turn off the power HDD is pos...

Страница 75: ...er of the Monitor screen 2 Delay of the Auto Switch range is 1 300sec 3 All Channels are On when the system starts for the first time 4 When select Skip Video Loss Channel no signal channel is not displayed in case of sequence which is displayed only one channel 5 Auto Select of User Define is automatically switching by mode switching ...

Страница 76: ...AY button at the front button for about 3sec then VGA output will be on automatically How to Setup 1 Select what you want to change by using up down buttons or Jog 2 When you select Monitor Out the Spot Out port is the same as the Monitor Out 3 If you select Input Channel the selected channel is displayed beside Input Channel 4 If you check VGA Output Enable the image is displayed to VGA port 5 Fi...

Страница 77: ...t Channel allows Administrator to select channels that only they can view This is for locking front button DVR will send an Email upon events selected during set up This is for locking remote controller 5 7 7 1 Network Setup You should install the following items for remote search and control by LAN Refer to the Internet setup value you want to install ...

Страница 78: ...is problem consult the network manager for setup values 5 Setup contents are automatically applied if you press the Apply button and move to a higher menu How to Setup 1 Move to the place you want to change the setup by using Jog 2 Select contents to change by using the ENTER button 3 Select place to change by using the right left button If Port Number is set up besides 80 monitoring through web b...

Страница 79: ...tton 4 Select the number you want by using Jog Date year month day ______ ______ ______ Time hour minute second ______ ______ ______ 5 Select the type of display y m d m d y d m y Default setting is m d y VR 616U or d m y VR 616E 6 Setup contents are automatically applied if you move to a previous menu When the system time is changed and then the same time image was recorded The Playback image is ...

Страница 80: ...ll be displayed Each user may have their own unique ID Each user may have their own unique password Each user have a different permission to use Even user have setup right some menu can not access ex Administration For input User ID using right left buttons and up down buttons or JOG Enter New Password and Confirm through Channel Selection buttons Please use the each 1 9 Channel Selection button W...

Страница 81: ...ed when using Admin Password for the first time It shows for one time when set up password after initializing system It is important to remember the Master Password and write down in a secure place Enter Master Password on Password As use Master Password possible to enter to the menu It is displayed if there is no User ID It is displayed if there is User ID Please input a password after choosing a...

Страница 82: ...e the each 1 9 Channel Selection button 5 As Setting select password is changed Notice If you forget the password you can not operate the system Please be sure to remember the password or write it down in a secure place 5 7 7 4 Web Password This is for remote control by using Network A user ID containing 8 numeric characters is possible After selecting by jog press the ENTER button for setup Pleas...

Страница 83: ... to see playback screen you must use Administrator Password The selected channel from the Web is not able to see live or playback screen through the Web It is not reflected in SPOT OUT 5 7 7 6 Mail Notification Events selected at setup can automatically send email notification to event The email address list remains active for all events A list of SMTP and Email address may be set up initially and...

Страница 84: ...event occurs an email will be sent regardless of time 4 For sending email it must to be checked both Every except follow condition 5 Every Events are limited to 100 units so if you set up Every Events at 100 it sends email as 100 events are happened regardless of time intervals Every Time Both Every Time and Every Events are checked As events are happened as Every Events during Every Time send ema...

Страница 85: ...ked for a moment This is Software and Bios version of the System An 8 character ID may be selected to identify a recipient Email address are entered into the menu and can include up to 128 characters 5 7 7 8 Lock Remote Control Lock Remote Control This selection will lock out use of the IP remote control to prevent unauthorized operation When you press the LOCKED button the message is displayed on...

Страница 86: ...F Disk Full Message 95 Language English Transparency Status 0 Transparency Menu 0 Master Gain 0 Bypass ON Related Video Channel 1 HDD Management Menu Setup Audio Setting Alarm Name Not installed Alarm Input 1 16 All OFF Events All OFF Video Loss All Motion All Alarm Off Manual Auto 5sec Manual Recording ON Schedule Recording OFF Recording Schedule 00 00 23 59 Specific Days Not installed Always ON ...

Страница 87: ...era is Recording Always recording 2 RED It means it is being Event recording by motion detection or alarm input 3 BLUE It means DVR is on monitoring No recording just for monitoring 4 WHITE No input signal status Recording Status According to color ...

Страница 88: ...t Log screen is displayed which records activity triggered by alarm or Motion Possible to check recording contents according to Event Note If you press the PLAY and MENU button together Play is begun If you press the PLAY button twice it replays like Continuously condition If you press the STOP button during the play mode play is stopped The playback speed may not be the consistent with the record...

Страница 89: ...and Mode button Image Sequence Triplex during the play mode the screen format is displayed with Multi Image Sequence Triplex Jog Shuttle motion 1 It is more convenient to search by using Stop Pause Replay Play Jog Shuttle 2 Possible to reproduce each frame by using Jog from the pause screen 3 Enable quick search by using Shuttle Backup HDD Search Recording Event List 1 Recorded contents of the Bac...

Страница 90: ...10 Power Off If system is to not be used for long periods of time turn off the rear panel power switch If the rear power switch is in the on position DVR will reboot after a power failure You must wait at least 15 seconds after shut down before removing the removable HDD ...

Страница 91: ...e is power on please turn off the power then connect with USB device 1 Pause the full screen after playback you want to backup 2 Press the direction button then FDD backup menu will display 3 Press the ENTER button for setup 4 Recorded still image could be checked from private Client Program How to Setup Format FDD 6 1 External USB Port If you reset DVR you have to power off the IEEE 1394 or USB d...

Страница 92: ...4 device As selecting system HDD Management at Setup Menu the above picture is displayed After confirmation that status is correct select HDD and set up for normal operation IEEE1394 HDD is able to use Main or Backup and possible to playback as well Note IEEE1394 enables direct connection up to 4 device The left picture will appear on HDD Management as connecting HDD with external IEEE 1394 If you...

Страница 93: ...ess INPUT button 1 9 on remote controller for 3 seconds then remote LED on front panel of DVR will be flickered 3 This DVR has ID by pressed button number Make sure there is no same ID as using several DVR For control DVR by remote controller press the number buttons 1 9 which are the same with DVR ID for about 3 seconds If you do not designate DVR ID you can not control remote controller so you m...

Страница 94: ...ors and to change the channel settings at the menu If you want to change channel press 01 02 03 10 11 16 AUTO Button The Input channel is automatically switched in proportion to the speed setting at the menu ZOOM Button This is used to zoom a freeze frame in playback mode Power is X2 PLAY This button is for playback STOP To stop playback EXIT To exit the menu after completing setup FREEZE For paus...

Страница 95: ...on For moving Menu to Menu REVERSE PLAY PAUSE FORWARD PLAY These buttons are used for controlling the playback At the Menu mode Reverse Play Button is used for Cancel and Forward Play Button is used for Enter SCREEN Button This button changes display mode to the various configurations available PTZ Button This button is for Camera control Button Choose the item Button For control CAUTION Risk of e...

Страница 96: ... have become exhausted Please replace to new batteries AAA a Manganese dry battery Guide for replacement Approx 10 months based on average usage of 2000 times a day Loading the batteries Battery compartment cover Lift up the cover of the battery compartment Close the cover Do not leave any material near the signal receiver between remote controller and DVR Remote controller could not be controlled...

Страница 97: ...k Select audio recording when set up recording set up audio volume properly when set up audio recording Is the audio recording selected when recording setup Is audio volume properly setup when audio recording Unable to play back audio sound Connect the monitor properly Is the monitor properly connected Playback image is not displayed on the monitor Plug the supplied power cable to the outlet Is th...

Страница 98: ...ip Function Auto Select Time Live REC Simultaneous PB Triplex Full 4 9 16 Sequence Zoom Playback 4 6 7 9 10 13 PIP User Live Full 4 6 7 9 10 16 Zoom Live Output Display Mode 1EA Composite 1 0Vp_p 75 Ohm BNC Q ty Type SPOT Output 1EA 15Pin D SUB Jack Q ty Type VGA Output 0 3 0 286 C Level Vp_p 1 0 1 0 Y Level Vp_p 1 Q ty EA Monitor Output Y C 0 3 0 286 Burst Level Vp_p 1 0 1 0 Video Level Vp_p 2 Q ...

Страница 99: ...oot 2 2 Rack Mount Bracket 2 2 Lock Key 1 1 CD ROM 2 2 Battery 1 1 Remote Control Unit 1 1 User Manual 2 1 Power Cord Accessory 9 Kg 19 8 lbs w o Packing Weight 432 x 88 x 431 17 x 3 46 x 17 W H D mm Inch Size 5 C 40 C 41 F 104 F C F Operating Temperature 30 RH 80 RH RH Operating Humidity 120V 50Hz 60Hz VR 616U 220V 240V 50Hz 60Hz VR 616E AC Input V Hz Power Supply Max 16EA Special Day 7EA Sun Mon...

Страница 100: ... 100 JVC VR 616 Specifications and appearance of this unit are subject to change for improvement without prior notice unit mm Appearance 10 432 88 431 14 11 5 ...

Страница 101: ......

Страница 102: ...Printed in Korea LLT0063 001A VR 616 DIGITAL VIDEO RECORDER is a registered trademark owned by VICTOR COMPANY OF JAPAN LTD is a registered trademark in Japan the U S A the U K and many other countries ...

Отзывы: