background image

12

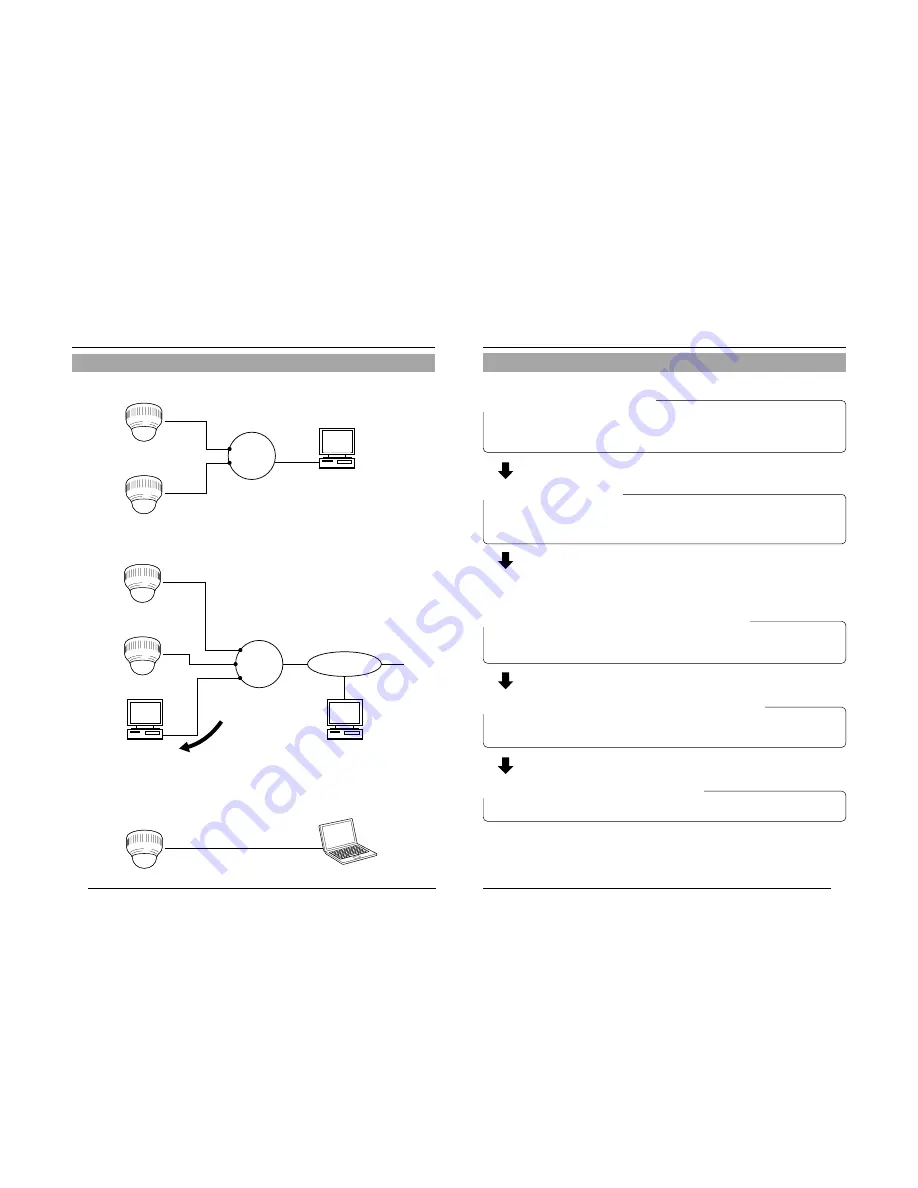
Connection Examples

Preparation

Internet Connection

Peer-to-Peer Connection

LAN

INTERNET

VN-C205

VN-C205

LAN Connection

LAN

VN-C205

VN-C205

VN-C205

Updated images are automatically
uploaded at a regular interval

PC

FTP Server

PC

Crossover Cable

PC

PC

13

Set the camera in the following procedure.

Preparation Procedure

Step 1 Connection/Installation

Firstly, make a hole in the ceiling, followed by connecting the input power cable,
LAN cable or alarm signal cable to the terminal of this camera.
Next, attach the camera to the ceiling. Do not forget to attach the safety wire.

Step 2 Network Settings

Install the software, set the network for this camera as well as using the "VN-
C205U Setup Tool", and register the connected camera with the "V.Networks
Controller".

Step 3 Setting Using the V.Networks Controller

Perform settings for  Image Quality and Alarm  using the "V. Networks Controller"
software that has been installed.

Step 4 Operating Using the V.Networks Controller

The "V. Networks Controller" can also be used to perform recording/playback
operations.

Page 14

Page 27

Page 56

Page 66

In a system where more than 1 VN-C205 is used, turn on the power for a VN-C205
first, followed by setting the camera until "2-3 Setting IP Address for this Camera
Using the 'VN-C205U Setup Tool' " is completed. Upon doing so, turn on a second
camera and perform setting in the same way. Perform the same procedure for
subsequent cameras.
(

Page 22)

Step 5 Operating Using a Web Browser

Operation is possible via a web browser.

Page 72

Содержание VN-C205U - Network Camera

Страница 1: ...205 LWT0280 001A For Customer Use Enter below the Serial No which is located on the body Retain this information for future reference Model No VN C205 Serial No LWT0280 001A 2005 Victor Company of Japan Limited VN C205 FIXED DOME NETWORK CAMERA ...

Страница 2: ...us injury to a child or adult and serious damage to the appliance Use only with a cart or stand recommended by the manufacturer or sold with the appliance Wall or shelf mounting should follow the manufacturer s instructions and should use a mounting kit approved by the manufacturer An appliance and cart combination should be moved with care Quick stops excessive force and uneven surfaces may cause...

Страница 3: ...ons are for VN C205U Before beginning to operate this unit please read the instruction manual carefully in order to make sure that the best possible performance is obtained 5 8 FTP Client Setting 50 9 Time Setting 52 10 Memory Information 53 2 5 Registering Connected Camera Using the V Networks Controller 54 Step 3 Setting Using the V Networks Controller 3 1 Starting Up the V Networks Controller 5...

Страница 4: ...erefore edges of the hemisphere may enter the angle of view hence causing the upper end of the screen to appear dark and the image to go out of focus When shooting an object that is near a light source eg lightings or with a large difference in brightness ghosting may occur on the screen This phenomenon is due to the characteristics of the dome cover and built in lens and is not a malfunction Ensu...

Страница 5: ...ion to during operation Note Details for reference such as functions or constraints during use Pages or items to refer to JVC shall not be held liable for any loss or damage to the customer or any claim from a third party arising from the use of this software Specifications of this software are subject to alteration for improvement without prior notice All product names that appear in this documen...

Страница 6: ...ally chang ing brightness day night set this switch to ON The camera automatically captures the image in color when the subject is bright and in black and white mode when it is dark Default setting OFF Caution The Easy Day Night feature on this camera uses a sensitized black and white mode unlike other black and white surveillance cameras that use infra red lighting FOCUS ADJ ON OFF focus adjustme...

Страница 7: ...a as well as using the VN C205U Setup Tool and register the connected camera with the V Networks Controller Step 3 Setting Using the V Networks Controller Perform settings for Image Quality and Alarm using the V Networks Controller software that has been installed Step 4 Operating Using the V Networks Controller The V Networks Controller can also be used to perform recording playback operations Pa...

Страница 8: ...at the end of the alarm cable Page 17 Insert the CF card Page 17 Pass the supplied cable under the plate for depressing cables Page 26 15 2 Installation Mount to the ceiling Page 16 Mount the electric box to the ceiling Page 25 Pull out the cables aside and mount Page 26 Mount the safety wire to place which is firm such as ceiling Page 20 Connect the input power cable Page 20 Connect the video sig...

Страница 9: ...tion of the embedded cover recess bracket For more detail please contact the JVC Embedded Cover in Ceiling recess bracket Ceiling Open hole in ceiling connect cables and mount camera to ceiling Cautions To avoid unforeseen accidents attach the safety cable Select a suitable safety cable based on length strength location material insulation property etc Always use the M2 6 x 6 screws mounted on the...

Страница 10: ...alent Caution Due to external noise the cable may not function properly even when the cable length is less than 50 m In this case use a shielded cable or take measures such as keeping the cable away from the noise source Alarm Signal Cable Flathead Screwdriver Flathead Screwdriver 4 mm 1 8 inches 1 2 3 1 Connection to Alarm Input Output Terminal 1 Preparations Continued 19 Alarm Output Terminal Co...

Страница 11: ...ble Connect the cable protruding from the ceiling to the input power cable Page 22 3 Connect the LAN cable Pass the LAN cable coming out from the ceiling under the plate for depressing cables connect it to the 10BASE T 100BASE TX Terminal of the camera unit Note The input power cable uses materials similar to those of machinery wiring so wrap the cable with insulation tape to prevent it from becom...

Страница 12: ...es In some cases the power for all network devices under the same LAN environment may have to be turned off and on again to enable access to VN C205 Cautions If thin cables are used i e with a high resistance a significant voltage drop will occur when the unit is at its maximum power consumption Either use a thick cable to restrict the voltage drop at the camera side to below 10 or place the power...

Страница 13: ... cover to the unit by aligning the 3 marks on the camera and dome cover I II and III Be sure a click is heard 3 Settings related to video Perform the settings using Video setting switch page 11 if necessary 3 Adjustment of the camera s angle of view Continued Rotation levers Focus ring Focal length adjustment ring IRIS LEVEL 3 4 25 1 3 When installing the Camera to the electrical box The camera ca...

Страница 14: ...onds White spot correction will start Correction may take several seconds for completion Notes Maximum correction less than 16 to 32 spots The white spot correction feature of this unit does not guarantee the correction of all white spots Depending on the characteristic of white spots correction may not be possible When performing white spot correction accurate data may not be achieved in case of ...

Страница 15: ... perform 2 2 Setting PC s IP Address as the PC s IP address is automatically acquired from the DHCP server Note Select Install N if Client for Microsoft Networks or Internet Protocol TCP IP is not displayed 29 3 Select Internet Protocol TCP IP and click Properties 4 Select Use the following IP address set the IP address and Subnet mask and click 1 Select Internet Protocol TCP IP 1 Select Use the f...

Страница 16: ...0 set according to the following procedure 1 Click Select Settings and click Properties 2 Double click Network and Dial up Connection 3 Double click Local Area Connection 1 Click 2 Select Internet Protocol TCP IP 3 Click 31 4 Click 4 Select Use the following IP address 5 Set IP address to 192 168 0 3 6 Set Subnet mask to an appropriate value Ask the network administrator if necessary ...

Страница 17: ...er 60 seconds Cautions Upon turning on the power of this camera it may take about 60 seconds before it can be connected to the PC At the factory DHCP is enabled for VN C205 Using DHCP JVC does not recommend operating VN C205 with the DHCP function enabled because a different IP address may be assigned upon the renewal of the leasing contract The DHCP function of VN C205 is included with the aim to...

Страница 18: ...ord setting 1 Enter a password to set password protection or to change a password Characters entered are displayed as Enter the same password in both the upper and lower boxes Password must be alphanumeric and not longer than 8 characters Click 2 Click Authorization Level Allowed Access User Viewing of motion images only Operator All operations using the V Networks Controller Administrator All of ...

Страница 19: ... router When there are multiple cameras on the same subnet that are set to the multicast mode set up a network using a Hub that supports the IGMP snooping feature 1 Select Multicast Mode Transmission Mode MTU Size Bytes Normal 1430 Bytes High Speed 1500 Bytes 2 Select the mode for acquiring images Normal Set to Normal when using a narrow bandwidth network High Speed A maximum transmission rate of ...

Страница 20: ...on area To cancel the detection area displayed in yellow right click and drag the mouse Area for which motion is detected will be displayed in red 2 For setting the sensitivity level of motion detection Drag towards the right to increase and left to decrease the sensitivity level Notes The area display position only serves as a guide Ensure to perform operation check Each screen is divided into 30...

Страница 21: ...ng mount Page 19 Alarm Output Terminal Alarm packets are sent to the PC Page 42 Message Packet Images are uploaded to the FTP server Page 50 FTP Client Setting Quits all operations Page 42 Shutdown 1 Start up the VN C205U Setup Tool and select Alarm This section describes procedures for alarm setting Settings Step 2 Network Settings 2 3 1 4 41 2 Click the Other Triggers tab on the Alarm Setting sc...

Страница 22: ...abled this function will not be activated even if alarm output is selected in the alarm input settings Page 44 Note When this is set to Available all alarm input except alarm output and message packets will be disabled 43 2 Relay Alarm Alarm Output Message Packet Alarm FTP Shutdown 3 Retry 1 to 3 Item Function Set Value Set here to enable the relay alarm function which is activated when 2 alarms a...

Страница 23: ...Other Settings Using the VN C205U Setup Tool 4 Alarm Setting Continued Settings Step 2 Network Settings Other Triggers Item Function Set Value For setting alarm operations when motion is detected within the area specified in the motion detection settings Please refer to the Alarm 1 2 item for details on the set val ues InitialValue Please refer to the Alarm 1 2 item for the initial values 5 Motion...

Страница 24: ... C205U Setup Tool 5 Recordung Setting Continued 2 3 4 47 Setting the Advance screen 1 Select Refer to Local Rec 2 Select the file to load 3 Right click on the selected file and select Download to PC To obtain information on whether local recording has started check the Trigger box on the Recording screen followed by setting Message in Alarm Setting of the V Networks Controller Page 63 5 For settin...

Страница 25: ...Default page refers to the page displayed upon specifying the IP address such as http 192 168 0 2 at the web browser Even when this feature is set to Enabled an error message indicating 404 Not Found will be displayed when http 192 168 0 2 is entered if the html file specified here does not exist Be sure to enter correctly Displaying still images uploaded to the user folder Still images in the use...

Страница 26: ...d destination This is normally set to 21 7 FTP Folder Enter the folder name on the FTP server at the upload destination Images will be uploaded to the default folder when this is left blank 8 Upload Interval Specify the upload interval at which images are uploaded to the FTP server Set value 0 to 65535 If Disconnect every time is selected connection with the FTP server will be cut off upon uploadi...

Страница 27: ...again when the power is turned on if the NTP server cannot be used The NTP server function is enabled by default upon standard installation of Windows XP Home Edition and Windows XP Professional For Windows 2000 perform the following setting to enable the NTP server function 1 Set the following registry value to 1 Default 0 HKEY_LOCAL_MACHINE SYSTEM CurrentControlSet Services W32Time Parameters Lo...

Страница 28: ...80 images When sending out images to multiple clients at the same time however transmission at a rate of 30 fps for 640 x 480 images will not be possible Transmission Mode MTU Size Bytes Normal 1430 Bytes High Speed 1500 Bytes Note In a DHCP environment enter the IP address that is assigned to this camera by the DHCP server Notes Images are divided into IP fragments when set to High Speed Images w...

Страница 29: ...V Networks Controller can be used to perform settings for image size and alarm 1 2 4 3 1File New Creates a new file if the camera is connected for the first time Delete Deletes a file Motion Detection Standby Select the camera for which the Motion Detection Standby function is to be enabled Exit Exits the controller 2View Image Size Sets the image display size JPEG 640 x 480 320 x 240 Upside Down ...

Страница 30: ...the size of the motion image window as well as to invert an image 1 Select View 2 Specify Image Size and Upside Down settings 3 4 Image Size and Inversion Click Right click on the motion image window to change the settings Set the image size VN C205 does not support the 160 x 120 setting When is checked a grid for the motion detection area will appear and the detection area will be displayed in re...

Страница 31: ...el and white balance 1 Select Setting and Quality 2 Change the set values 3 5 Image Quality Setting When the Distribution control ON is selected the left screen will be displayed When setting is complete click 61 3 6 Frame Rate Set the maximum number of images per second that are sent from VN C205 Factory Setting 15 Set value 30 15 10 8 6 5 4 3 2 1 1 2 1 3 1 5 1 10 1 15 1 20 1 30 The V Networks Co...

Страница 32: ...ying wave file Plays back a designated Wave file when there is an alarm input Click the Browse button to specify a file 4 Execute application file Executes a designated program when there is an alarm input Click the Browse button to specify a program Notes The 1 minute mode is used for conserving hard disk space In this mode recording stops after 1 minute even if recording has already started befo...

Страница 33: ...ound color 4 Set the Text Color Note Left click on the motion image or playback window while holding down the Shift key at the same time The time stamp will appear where the mouse was clicked 1 Select Visible 65 3 9 Changing Registered Information The V Networks Controller can be used to change information such as the preset connection method for a camera 1 Select Setting and Property 2 Perform se...

Страница 34: ...dicator will appear in 1 and on the displayed image respectively 5 Snap Shot For registering and saving only 1 frame of the displayed image 6 Size For reducing the display size of the V Networks Controller screen See diagram below 2 3 4 5 1 6 Reduced Screen Enlarge Display Screen CAMERA Compression Mode 1 67 The V Networks Controller can be used to save camera images to a file 1 Click the REC butt...

Страница 35: ...o Local Rec The file name is represented by the time that recording started and ended 1 Click the PLAY button PLAY button Click 2 Select the file to play back on the Playback File screen followed by clicking To play back local recording files click Refer to Local Rec to select a file 69 3 Click Slidebar Moves towards the right as playback time progresses It can be dragged using the mouse 4 The Pla...

Страница 36: ...At frame rate of 5 fps 71 The V Networks Controller can be used to save video images currently displayed or playback images as still image files 4 5 Snapshot 1 Click the Snap Shot button Snap Shot button 1 Specify a folder for saving the file 2 The Snap screen will be displayed 3 The Save As screen is displayed 2 Enter a File name 1 Select File and Save Note Only JPEG files can be saved as snapsho...

Страница 37: ...age browsing display function of the browser As such the format of web pages and fonts displayed may vary according to the type of browser and settings In the event that items on the screen are not fully displayed hence causing problems during use display all items such as by resizing the window Description in this manual is based on the web page browsing display screen of Internet Explorer Passwo...

Страница 38: ...e terms Top Page and Home Page are defined as follows in this manual Top Page Refers to index e html Home Page Refers to the specified html page when the default page feature is enabled index e html will be used when the default page is disabled Link buttons to various web pages Click once to jump to these pages Still Image Page 84 Live Image Page 85 Settings Page 75 75 2 The Settings page will be...

Страница 39: ...product Alteration is not possible This is the firmware version of the VN C205 camera Alteration is not possible Enter password for VN C205 up to 8 single byte alphanumeric characters Enter the User level password Enter the Operator level password Enter the Administrator level password There may exist a small number of proxy servers that cache cgi In this case check Disable cache Specify whether t...

Страница 40: ...e or HTTP port settings are changed a confirmation screen indicating Are you sure to reset to enable the changes will appear Upon clicking OK on this confirmation screen VN C205 will be reset internally and settings such as the IP address will be changed The IP address before change factory setting will be disabled and connection to VN C205 will be cut off upon the reset operation When the web bro...

Страница 41: ...e Not Available OUT1 OUT2 Message Packet Set value Available Not Available FTP Set value Available Not Available Shutdown Set value Available Not Available Off Do not use Alarm 1 and Alarm 2 2 Relay Alarm On Alarm Out Set value Not Available OUT1 OUT2 Message Packet Set value Available Not Available FTP Set value Available Not Available Shutdown Set value Available Not Available Off Do not use Rel...

Страница 42: ...ading images after an alarm input 0 to 60 seconds after trigger Specify the time interval for uploading images to the FTP server when in the Alarm FTP mode 0 to 60 seconds Specify the name of the image file to upload File will be uploaded using the file name specified here Only 1 image file remains in the FTP server as images are uploaded as the same file name The old image will be overwritten by ...

Страница 43: ...ve As on the web browser 5 5 Viewing Still Images Hyperlink to Home Page 85 Live Image Page http java e html represents the URL of VN C205 This page can only be used to view motion images Camera images are automatically updated and displayed as a motion image 5 6 Viewing Live Images Hyperlink to Home Page Note Do not use the Save As function as this page is not created to support the Save As funct...

Страница 44: ...erform camera control or settings acquired are incorrect for a span of about 60 seconds after turning on the power Others Symptom Causes Remedial Actions Use the Search function in the VN C205U Setup Tool to view the list of IP addresses for cameras connected to the network Page 32 Has the folder for saving images been deleted Check to ensure that the folder exists Page 65 Is the hard disk of your...

Страница 45: ... 300 K to 10000 K Backlight compensation ON OFF Switchable Easy Day Night ON OFF Switchable Video Output Color System NTSC S N 48 dB AGC OFF Typ Horizontal resolution 540 TV lines Typ Minimum object illumination Color mode 3 0 lx 50 output AGC ON Wide end 1 5 lx 25 output AGC ON Wide end Black White mode 2 0 lx 50 output AGC ON Wide end 0 9 lx 25 output AGC ON Wide end Lens Focal length 2 6 mm to ...

Страница 46: ...hooting range Front Template Hole for cables Screw Screw Screw テンプレート ケーブル孔 ネジ取り付け穴 Screw ネジ取り付け穴 ネジ取り付け穴 ネジ取り付け穴 LWT0215 001B H 85 5 85 5 32 23 20 1 2 0 4 5 23以下 2 5 Unit mm 単 位 mm 156 160 VN C205 Series Camera Body カメラ本体外径 TK C205 Series Camera Body カメラ本体外径 ...

Отзывы: