background image

UX-N5 Compact Component system consists of the

main unit (CA-UXN5) and the speaker system (SP-

UXN5).

Auto Power Save function (APS)

0

When no operation is done in certain situations for

15 minutes, the unit turns off automatically.

(p. 11)

In this manual

0

The remote control buttons are used for

explaining the operations unless mentioned

otherwise. However, if the unit has buttons with

the same or similar names, they can also be used

for the operations.

0

In this manual, “file” and “track”, “folder” and

“group” are used interchangeablly when

explaining operations for MP3/WMA.

IMPORTANT FOR LASER PRODUCT

1

CLASS 1 LASER PRODUCT

2

CAUTION: Do not open the top cover or

cabinet. There are no user serviceable

parts inside the unit; leave all servicing to

qualified service personnel.

3

CAUTION: Visible and/or invisible class

1M laser radiation when open. Do not view

directly with optical instruments.

4

REPRODUCTION OF LABEL: CAUTION

LABEL, PLACED INSIDE THE UNIT.

.

A copy of the Declaration of Conformity with regard

to the R&TTE Directive 1999/5/EC can be

downloaded from the following Web sites (http://

www.jvc.co.jp/ecdoc/).

.

0682

Hereby, JVC declares that this System [CA-UXN5]

is in compliance with the essential requirements and

other relevant provision of Directive 1999/5/EC.

Precautions

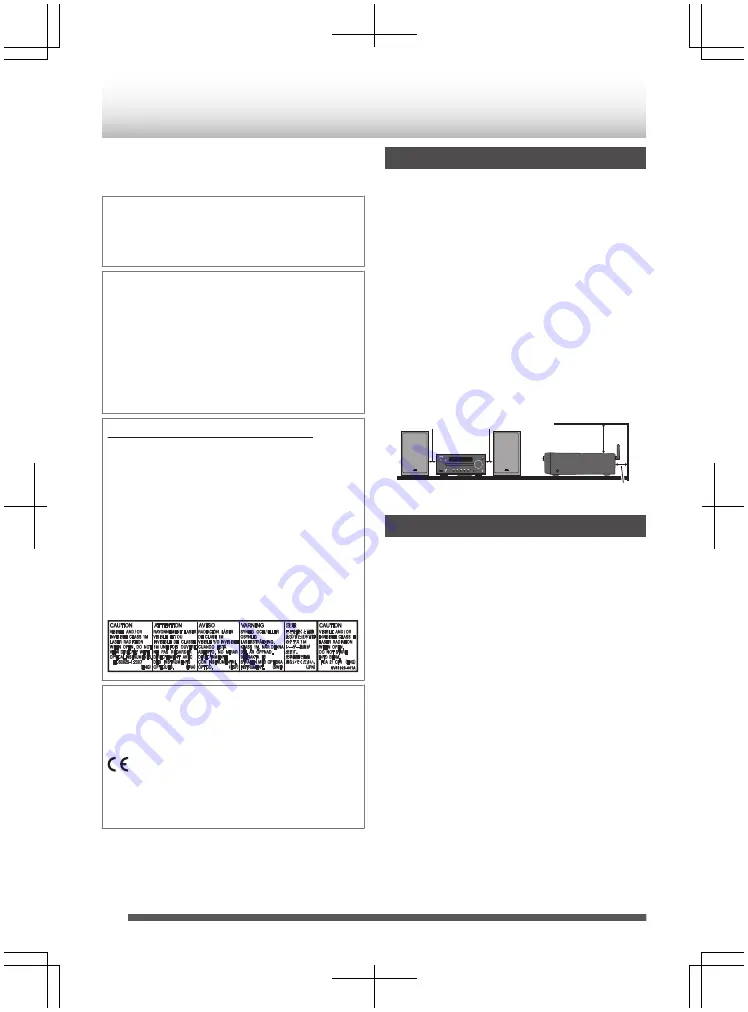
Do not cover the ventilation openings. Doing so keep

the heat to remain inside of the unit, which may cause

fire. Use extra cautions about the following:

0

Do not place the unit on its side, upside down, or the

front side facing upward.

0

Do not place the unit in a place such as bookshelves,

closet, etc without adequate ventilation.

0

Do not cover the ventilation openings with items,

such as newspapers, tablecloths, curtains, etc.

0

Do not place the unit on books or magazines.

0

Do not place the unit directly on carpet.

0

Ensure that the equipment is positioned in a well

ventilated area and ensure that there is at least 10

cm of free space along the sides, top and back of

the equipment.

.

10cm

10cm

10cm

10cm

Accessories

The following accessories are included.

0

Remote control x 1

RM-SUXN5R

0

“AA” size battery

(UM/SUM-3, R6, HP-7 or similar) x 1

0

FM aerial x 1

0

Speaker wires

(2m x 2)

0

Stand for iPad x 1

2

Introduction

Содержание UX-N5

Страница 1: ... Compact Component System UX N5 INSTRUCTIONS LVT2389 001B E ...

Страница 2: ...y with regard to the R TTE Directive 1999 5 EC can be downloaded from the following Web sites http www jvc co jp ecdoc 0682 Hereby JVC declares that this System CA UXN5 is in compliance with the essential requirements and other relevant provision of Directive 1999 5 EC Precautions Do not cover the ventilation openings Doing so keep the heat to remain inside of the unit which may cause fire Use ext...

Страница 3: ... IP Address Mac ID SSID 18 Listening to iPod iPhone iPad 19 Connecting iPod iPhone iPad 19 Playing back iPod iPhone iPad 21 Listening to CD MP3 WMA discs 23 Disc Playback 23 Useful Functions for Disc Playback 25 About the Files 27 MP3 WMA Folder Mode Only for MP3 WMA Files 27 Listening to the USB Mass Storage Device 29 Playing back the USB Mass Storage Device 29 Advanced USB Playback 31 Listening ...

Страница 4: ...23 E Dock for iPod iPhone p 20 F M Button p 23 27 44 G Volume Control p 10 18 22 H USB iPad Terminal p 20 29 30 I AUDIO IN Terminal p 41 J SOURCE Function Button p 8 11 21 29 41 K S Button p 12 18 22 24 27 29 30 32 39 L T Button p 12 18 22 24 27 29 30 32 38 39 M o Button p 24 27 29 30 N I W Button p 10 18 21 26 29 30 O Remote sensor p 9 P PHONES Terminal p 41 4 Controls and Indicators ...

Страница 5: ... IRH Indicator p 32 33 K FM ST Indicator p 32 33 L R Indicator p 32 33 M PTY Indicator p 34 N TP Indicator p 34 O TA Indicator p 34 P MUTING Indicator p 10 Q TITLE Indicator p 28 R ARTIST Indicator p 28 S FOLD Indicator p 27 T ALBUM Indicator p 28 U FILE Indicator p 28 V TRACK Indicator p 25 W DAILY Indicator p 38 39 X M Indicator p 38 Y DISC Indicator p 23 Z TOTAL Indicator p 27 a SLEEP Indicator...

Страница 6: ...on p 24 26 30 P CD USB DISPLAY Button p 22 28 29 Q iPod DISPLAY TV OUT Button p 21 22 R OPEN CLOSEM Button p 23 27 44 S SLEEP Button p 40 T CLOCK TIMER Button p 12 38 39 U REPEAT Button p 22 25 V RANDOM Button p 22 26 W CANCEL Button p 26 43 X FOLDER Button p 27 Y PROGRAM MEMORY Button p 26 Z DIMMER NETWORK STANDBY Button p 10 12 a T Button p 12 18 22 24 27 29 30 32 32 38 39 b ENTER Button p 12 14...

Страница 7: ...er of the FM areal terminal firmly Extend the FM aerial when connecting so that you can obtain the best reception External FM aerial commercially available If the included FM aerial is unable to receive well use an external FM aerial When an external FM aerial is used disconnect the included FM aerial wire Note Placing the aerial on the unit near the AC power or electronic devices lead may cause n...

Страница 8: ... output sockets TV To select AUX 0 On main unit press h SOURCE button repeatedly until AUX is displayed 0 On the remote control press h AUDIO IN AUX button repeatedly until AUX is displayed Connecting iPod iPhone to TV Video files from iPod iPhone can be viewed by connecting the unit to TV monitor Place the iPod iPhone to the dock and then connect the Video input terminal of the TV or monitor and ...

Страница 9: ...iodically clean the transmitter on the remote control and the sensor on the unit with a soft cloth 0 Exposing the sensor on the unit to strong light may interferewithoperations Changethedirectionofthe unit if this occurs 0 Keep the remote control away from moisture heat shock and vibrations 0 Read through the attached Safety Precaution to ensure the safe usage of the batteries Operating range of t...

Страница 10: ...l again 0 When iPod or iPhone is connected to the iPod iPhone dock battery charge starts and Charge Mode is displayed NETWORK STANDBY is invalid during charge mode Volume up down 1 Turn the volume knob on main unit or press VOLUME on remote control to increase or decrease the volume Volume auto fade in If you turn off and on the main unit with the volume set to 27 or higher the volume starts at 16...

Страница 11: ... dock battery charge starts Charge Mode will be displayed 0 If the sound source is USB and iPod iPhone is connected to the iPod iPhone dock when iPod Dock Charge Mode is displayed A P S function is not active Auto Power On function During Network Standby if UX N5 is selected by AirPlay DLNA device and playback is started this unit turns on the power automatically and the music is output from the s...

Страница 12: ...on and then press the ENTER button 0 Press the S T button once to advance the time by 1 minute Hold it down to advance the time by 5 minutes interval To confirm the time display 1 Press the CLOCK TIMER button The time is displayed for 5 seconds Note When power supply is restored after unit is plugged in again or after a power failure time indicator will flash Reset the clock again To readjust the ...

Страница 13: ...to external speakers AirPlay usage requires 0 iTunes version 10 2 or later Mac Windows PC 0 Following devices with the latest iOS update iPod touch 4th and 3rd generation iPhone 4S iPhone 4 iPhone 3GS iPhone 3G cannot support AirPlay iPad 3rd generation iPad 2 iPad About DLNA With DLNA technology this unit can play back music which is stored on your PC and or mobile devices via wireless connection...

Страница 14: ...f network 0 xxxxxx is a model specific number 8 On iPod touch iPhone iPad start a Music application to display the Now Playing screen 0 On PC start iTunes or Windows Media Player 12 Start DLNA compatible application on other DLNA compatible devices 0 Refer to the instruction manual of your device for further detail 9 Tap or click the AirPlay icon M to select the speaker UX N5 xxxxxx 0 When using D...

Страница 15: ...Phone iPad start a Music application to display the Now Playing screen 0 On PC start iTunes or Windows Media Player 12 Start DLNA compatible application on other DLNA compatible devices 0 Refer to the help page of your device for further detail 8 Tap or click the AirPlay icon M to select the speaker UX N5 xxxxxx 0 When using DLNA application specify the files to play back and select UX N5 as the a...

Страница 16: ...xxxx is a model specific number 8 On iPod touch iPhone iPad start a web browser Safari 0 Perform the same operation for the Android device PC 9 Type 192 168 1 1 at the address bar and press the GO button The UX N5 configuration page is displayed UX N5 Network Configuration 192 168 1 1 10 Select Network Configuration Network Configuration tab 11 From the Service Set ID SSID pull down list select SS...

Страница 17: ...n from the beginning if connection cannot be made Adding AirPlay DLNA Devices to the Same Wi Fi Network as the Main Unit You can add other AirPlay DLNA devices to join the same Wi Fi network as the unit 1 On the iPod touch iPhone iPad select Wi Fi from Settings and then set to ON 0 On the Android device select Wireless networks in Settings and then select Wi Fi settings 0 On PC open the screen for...

Страница 18: ... select Preferences 2 Under Devices tab check the OAllow iTunes audio control from remote speakers box Setting iTunes on Windows PC 1 On the menu bar click Edit and select Settings 2 Under Devices tab check the OAllow iTunes audio control from remote speakers box Playing by via Windows Media Player 12 1 Start Windows Media Player 12 2 Select the files for playback Drag the files to the right side ...

Страница 19: ...g so may cause malfunctions Note 0 iPod iPhone iPad is charged in the following conditions Condition Connection via iPod iPhone dock Connection via USB iPad Terminal When USB is selected as a source when iPod iPhone is not connected to iPod iPhone dock When other sources are selected CD TUNER iPod AUDIO IN AUX NETWORK On standby 0 Perform operations on iPod iPhone iPad itself during menu screen op...

Страница 20: ... the power of the main unit 2 Remove iPod iPhone iPad from the USB iPad terminal Connecting iPod iPhone to the dock for iPod iPhone Caution 0 Do not connect or disconnect iPod iPhone when the unit is turned on 0 Remove all the accessories before connecting iPod iPhone to the dock for iPod iPhone 0 Connect iPod iPhone firmly 0 Keep iPod iPhone in a straight position while connecting disconnecting i...

Страница 21: ...k iPod iPhone iPad 0 Display content can be changed by pressing the iPod DISPLAY TV OUT button About iPhone 0 Incoming calls will pause the playback 0 Conversations on the phone is only output from the iPhone speaker Start talking on the phone after turning on the iPhone speaker or removing iPhone from the dock for iPod iPhone 0 You may also experience brief audio interference during incoming call...

Страница 22: ... menu Operation cannot be performed on iPad Cursor Up Down PRESET PRESET PRESET PRESET Press to select the iPod iPhone menu Operation cannot be performed on iPad Enter Press to confirm the iPod iPhone menu Operation cannot be performed on iPad Note 0 Display content can be changed by pressing the iPod DISPLAY TV OUT button 0 Operations described here depend on the generation iPod iPhone iPad you a...

Страница 23: ... select CD function 3 To open the disc tray press the OPEN CLOSEM button on the remote control or M on main unit 4 Place the disc on the disc tray label side up 5 To close the disc tray press the OPEN CLOSEM button on the remote control or M on main unit 6 Press the CD USBI W button on the remote control or I W on main unit Playback will start 0 After the last track is played the unit will stop au...

Страница 24: ... CD R or CD RW may not be played back Note 0 MP3 indicator or WMA indicator flashes when this unit reads information on MP3 WMA disc 0 When the end of the last track on CD is reached during fast forward END will appear on the display and CD operation will be paused 0 Multi session discs can also be played back on this unit Various disc functions Function Main unit Remote control Note Play Press in...

Страница 25: ...elected 0 During random play direct search is not possible Selected track number Repeat play Repeat play can play one track all tracks or a programmed sequence continuously To repeat one track 1 Press the REPEAT button repeatedly until Repeat One appears 2 Press CD USB I W button on the remote control or I W on main unit To repeat all tracks 1 Press the REPEAT button repeatedly until Repeat All ap...

Страница 26: ...utton on the remote control during the stop mode MEM indicator flashes 2 Press the numeric buttons from 0 to 9 and Q10 to select a desired track Selected track number 3 Repeat step 2 for other tracks 0 Press the PROGRAM MEMORY button repeatedly to check the programmed tracks 0 Programme can be cancelled by pressing the CANCEL button 4 Press the CD USB I W button on the remote control or I W on mai...

Страница 27: ...erioration in sound quality 0 During VBR file playback time counter in the display may differ from its actual playback time WMA WMA files are advanced system format files that include audio files which are compressed with Windows Media Audio codec WMA is developed by Microsoft as an audio format file for Windows Media Player MP3 WMA Folder Mode Only for MP3 WMA Files You can select the folder that...

Страница 28: ...older mode is set to the on position may differ from those played back when folder mode is turned off About folder playback order When playing back MP3 WMA files tracks in the Root folder are played back The following figure illustrates the order of audio files selected by this unit 1 mp3 2 mp3 3 mp3 Root F1 F4 F2 F3 F5 1 mp3 2 mp3 1 mp3 2 mp3 1 mp3 1 mp3 2 mp3 1 mp3 2 mp3 3 mp3 Root File Folder C...

Страница 29: ...om the dock to play music via USB connection To pause playback 1 Press the CD USB I W button on the remote control or I W on main unit To stop playback 1 Press the CD USB o button on the remote control or o on main unit Playing back USB audio player with folder mode on 1 Press the A button to turn on the power 2 Press the USB iPad button on the remote control or SOURCE button repeatedly on main un...

Страница 30: ...remote control or o on main unit 2 Disconnect the USB device from the USB iPad terminal Note If USB memory device is not connected USB No Media will be shown on the display Caution 0 You cannot send any data from the unit to the USB device 0 It is recommended to use USB mass storage class devices with 4 GB or less storage capacity 0 Disable security function of the USB device 0 When the source is ...

Страница 31: ...ollowing features operation methods are the same as these for the disc 0 Direct track search p 25 0 Repeat play p 25 0 Shuffle p 26 0 Programmed play MP3 WMA p 26 Note 0 The ID3TAG information supported is title artist and album only only alphanumeric characters 0 The WMA tags supported are title artist and album only only alphanumeric characters 0 This unit can display Folder Name or File Name up...

Страница 32: ...ntrol for more than 0 5 seconds Scanningwillstartautomaticallyandthetunerwill stop at the first receivable broadcast station Note 0 In case of poor reception of radio wave auto tuning may stop 0 Auto scan tuning will skip stations remitting weak signal 0 To stop the auto tuning press the S T button again 0 When an Radio Data System station is tuned in the frequency is displayed first followed by t...

Страница 33: ... memory the station previously memorised for that preset channel number will be erased Note Backup function protects the memorised stations for a few hours should there be a power failure or the AC power lead become disconnected To recall stations in memory 1 Press the PRESET PRESET button to select the desired station To scan the preset stations Stations saved in the memory can be scanned automat...

Страница 34: ...r than an Radio Data System station or to an Radio Data System station which sends weak signal the display will change in the following order No PS No PTY FM 98 80 MHz No RT Using the Auto Preset Memory While in the Auto Preset Memory mode the tuner will automatically search for new Radio Data System stations Up to 40 stations can be stored If you have already stored some stations in memory the nu...

Страница 35: ...PS No PTY or No RT will flash for about 5 seconds and then the frequency will be displayed Notes for radio text 0 The first 14 characters of the radio text will appear for 4 seconds and then they will scroll across the display 0 If you tune in to an Radio Data System station which is not broadcasting any radio text No RT will be displayed when you switch to the radio text position 0 While radio te...

Страница 36: ...rily to educate of which the formal element is fundamental DRAMA All radio plays and serials CULTURE Programmes concerned with any aspect of national or regional culture including language theatre etc SCIENCE Programmes about the natural sciences and technology VARIED Used for mainly speech based programmes usually of light entertainment nature not covered by other categories Examples include quiz...

Страница 37: ...lecting Cooking Food Wine etc JAZZ Polyphonic syncopated music characterised by improvisation COUNTRY Songs which originate from or continue the musical tradition of the American Southern States Characterised by a straightforward melody and narrative story line NATION M Current Popular Music of the Nation or Region in that country s language as opposed to International Pop which is usually US or U...

Страница 38: ...e S T repeatedly to select the preset broadcasting channel and then press the ENTER button 0 No Preset indicator is displayed if the broadcasting is not preset and the timer setting is cancelled 6 Press the S T buttons to set the date and then press the ENTER button 0 If Once is selected in step 3 select the date 0 If Daily isselectedinstep3 selectthestarting and ending dates Example To set from M...

Страница 39: ...T button to select Timer Call and then press the ENTER button To cancel the timer setting 1 Press the A button and then press and hold the CLOCK TIMER button 2 Within 10 seconds press the S T button to select Once Timer or Daily Timer and then press the ENTER button 3 Within 10 seconds press the S T button to select Timer Off and then press the ENTER button The timer will be cancelled Setting will...

Страница 40: ...ress the SLEEP button To cancel the sleep operation 1 While SLEEP is indicated press the A button to enter the standby mode To cancel the sleep operation without setting the unit to the standby mode proceed as follows 1 While SLEEP is indicated press the SLEEP button 2 Within 5 seconds press the 0 button twice SLEEP 00 will be displayed Using the Timer and the Sleep Operation Together Sleep and ti...

Страница 41: ... power 3 Press the AUDIO IN AUX button on the remote control or SOURCE button repeatedly on main unit to select AUDIO IN function 4 Play back the connected devices 0 If volume level of the connected device is too high sound distortion may occur Should this happen lower the volume of the connected device If volume level is too low increase the volume of the connected device To listen by using headp...

Страница 42: ...set iPod iPhone iPad when disconnected from the main unit and unplug the power of the main unit and plug in again Please visit the Apple homepage for further information about resetting iPod iPhone iPad iPod iPhone iPad won t be charged BiPod iPhone iPad is not making full contact with the connector BYour iPod may not be supported by the main unit This accessory is not supported by iPhone appears ...

Страница 43: ...he Wi Fi router if available BOther home routers must be turned off Wi Fi Connection Wi Fi network connection failed BIs your router Wi Fi certified BWPS Pin and WPS PBC routers is not supported by this unit BDo not use special characters like to rename your router or the AirPlay device in the setting menu BIs the unit placed near a potential source of interference such as microwave ovens Unable t...

Страница 44: ...larly the non label side from which signals are read Do not mark this surface 0 Do not play discs of special shapes heart flower etc It may cause malfunctions 0 Do not wipe it with thinner or benzine 0 If a CD is dusty clean it with a soft dry cloth and remove dirt or fingerprints Consecutive scratches can cause noise or mistracking Straight out from the centre along the radius Precautions on wate...

Страница 45: ...wireless performance 0 AirPlay AirPlay logo iPhone iPod iPod classic iPod nano iPod touch are registered trademarks of Apple Inc in the United States and or other countries iPad is a registered trademark of Apple Inc 0 DLNA DLNA logo and DLNA CERTIFIED are trademarks service marks or certification mark of Digital Living Network Alliance 0 Wi Fi CERTIFIED logo is a certification mark of Wi Fi Allia...

Страница 46: ...Input terminals Audio In Audio signal 500 mV 47 k ohms AUX Analogue input 500 mV 47 k ohms CD player Type Music CD CD R RW Signal readout Non contact 3 beam semiconductor laser pickup D A converter Multi bit D A converter Support file CD DA MPEG 1 Layer 3 MP3 WMA Non DRM Bitrate support MP3 32 320 kbps WMA 64 160 kbps Other Maximum numbers of MP3 WMA files including the folder numbers 999 Maximum ...

Страница 47: ...ITLE ARTIST and ALBUM only Supports ID3TAG version 1 and version 2 File system support Support USB devices with Microsoft Windows DOS FAT 12 FAT 16 FAT 32 2 kbyte block length per each sector Tuner Frequency range FM 87 50 108 00 MHz Preset 40 Wi Fi Wireless LAN standard IEEE 802 11b g Frequency range 2 4 GHz range Speaker SP UXN5 Type 2 way Bass Reflex type 2 cm Tweeter 12 cm Woofer Power handlin...

Страница 48: ... V EN 2012 JVC KENWOOD Corporation 0912KMYSANSHA ...

Отзывы: