background image

15

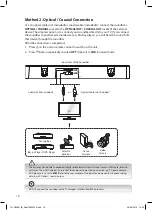
Use this method to connect all your devices into your TV.
1.  Connect an HDMI cable from your soundbar’s HDMI ARC socket to the HDMI (ARC) 

socket on your ARC-compliant TV.

2.  After connection, press 


button on the unit or on the remote control to switch the unit 

on.

3.  Press   button on the unit or on the remote control repeatedly to select HDMI to play 

audio from your input device.

TV

Rear View of the Soundbar

Blu-ray Player / 

DVD Player 

Set-top Box

Satellite 

Receiver

Game 

Console

Video 

Camera

HDMI cable (not included)

The unit may not be able to decode all digital audio formats from the input source. In this case, the unit 

will mute. This is NOT a defect. Ensure that the audio setting of the input source (e.g. TV, game console, 

DVD player, etc.) is set to PCM (Refer to the user manual of the input source device for its audio setting 

details) with HDMI output.

An HDMI cable with good quality can ensure the ideal performance on digital signal transfer for this 

connection.

TH-D329B_IB_Final190625V2.indd   15

26/06/2019   14:25

Содержание TH-D329B

Страница 1: ...Instruction Manual Compact Soundbar TH D329B TH D329B_IB_Final190625V2 indd 1 26 06 2019 14 25 ...

Страница 2: ...TH D329B_IB_Final190625V2 indd 2 26 06 2019 14 25 ...

Страница 3: ...DMI Hub Connection 14 Method 2 Optical Coaxial Connection 16 Connecting to the Mains Supply 17 General Operation 18 Standby ON 18 Automatic Power Off Function 18 Selecting Modes 18 Adjusting the Speaker Level Settings and Effects 18 OPTICAL COAXIAL HDMI ARC IN Operation 19 Bluetooth Operation 20 Maintenance 20 Hints and Tips 21 Product Fiche and Specifications 22 Other Information and Licences 23 ...

Страница 4: ...angerous Keep loose batteries away from young children and make sure that the battery holder tray is secure in the remote control Read all the instructions carefully before using the unit and keep them for future reference Retain the manual If you pass the unit onto a third party make sure to include this manual Check that the voltage marked on the rating label matches your mains voltage Damage Pl...

Страница 5: ...intended to alert the user to the presence of important operating and maintenance servicing instructions in the manual accompanying the unit Service To reduce the risk of electric shock do not remove screws The unit does not contain any user serviceable parts Please leave all maintenance work to qualified personnel Do not open any fixed covers as this may expose dangerous voltages Maintenance Ensu...

Страница 6: ...ional features it offers You will also find some hints and tips to help you resolve any issues Read all the safety instructions carefully before use and keep this instruction manual for future reference Screw 2 Dowel 2 To get the most from this product you may need to buy an Optical and an HDMI cable If items are missing or damaged please contact Partmaster UK only Tel 0344 800 3456 for assistance...

Страница 7: ... Standby mode 2 SOURCE Button Select the input source 3 EQ Button Select between preset sound effects MUSIC MOVIE NEWS 1 POWER Indicator In Standby mode Light up Red 2 Display 4 VOL VOL Button Adjust the volume 1 2 1 2 3 4 Top View TH D329B_IB_Final190625V2 indd 7 26 06 2019 14 25 ...

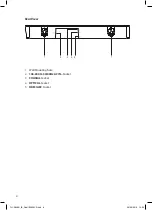
Страница 8: ...8 1 Wall Mounting hole 2 100 240V 50 60Hz AC IN Socket 3 COAXIAL Socket 4 OPTICAL Socket 5 HDMI ARC Socket Rear View 2 1 1 3 4 5 TH D329B_IB_Final190625V2 indd 8 26 06 2019 14 25 ...

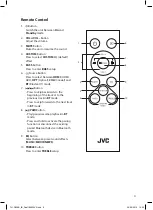
Страница 9: ...tooth mode 7 Button Press to skip backwards to the beginning of the track or to the previous track in BT mode Press to skip forwards to the next track in BT mode 8 PAIR Button Play pause resume playback in BT mode Press and hold to activate the pairing function or disconnect the existing paired Bluetooth device in Bluetooth mode 9 EQ Button Select between preset sound effects MUSIC MOVIE NEWS 10 T...

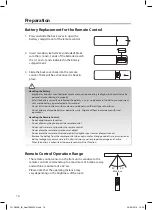
Страница 10: ...he Remote Control Do not drop the remote control Do not allow anything to impact the remote control Do not spill water or any liquid on the remote control Do not place the remote control on a wet object Do not place the remote control under direct sunlight or near sources of excessive heat Remove the battery from the remote control when not in use for a long period of time as corrosion or battery ...

Страница 11: ...t is the installer s responsibility to verify that the wall will safely support the total load of the soundbar Additional tools not included are required for the installation Do not overtighten screws Keep this instruction manual for future reference Use an electronic stud finder to check the wall type before drilling and mounting 1 Drill 2 parallel holes Ø 6 mm each according to wall type in the ...

Страница 12: ...ey are securely installed ø2 5 3mm ø 6mm Ensure mounting screws are in the centre of the timber stud 3 Lift the unit onto the wall mount brackets and slot into place Wall mounting with dowels and screws Wall mounting with screws only To mount the soundbar the screw head must be aligned with the mounting hole of the unit TH D329B_IB_Final190625V2 indd 12 26 06 2019 14 25 ...

Страница 13: ...and effects If your TV is placed on a table you can place the soundbar on the table directly in front of the TV stand centred with the TV screen If your TV is attached to a wall you can mount the soundbar on the wall directly below the TV screen TH D329B_IB_Final190625V2 indd 13 26 06 2019 14 25 ...

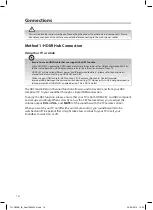
Страница 14: ... cable for ARC function CEC Consumer Electronics Control provides interoperability between the unit and various devices e g TV However this unit is not guaranteed to fully operate with all HDMI CEC enabled devices This is NOT a defect The ARC Audio Return Channel function allows sound to travel to and from your ARC compliant TV to your soundbar through a single HDMI connection To enjoy the ARC fun...

Страница 15: ... Blu ray Player DVD Player Set top Box Satellite Receiver Game Console Video Camera HDMI cable not included The unit may not be able to decode all digital audio formats from the input source In this case the unit will mute This is NOT a defect Ensure that the audio setting of the input source e g TV game console DVD player etc is set to PCM Refer to the user manual of the input source device for i...

Страница 16: ...it 2 Press button repeatedly to select OPT Optical or COA Coaxial mode The unit may not be able to decode all digital audio formats from the input source In this case the unit will mute This is NOT a defect Ensure that the audio setting of the input source e g TV game console DVD player etc is set to PCM Refer to the user manual of the input source device for its audio setting details with Optical...

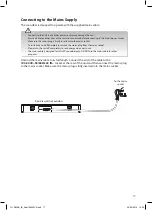
Страница 17: ...the mains socket To switch the unit off completely remove the mains plug from the mains socket Please turn the unit off completely to save energy when not in use The mains cable is designed for this JVC soundbar only DO NOT use the mains cable for other purposes Unwind the mains cable to its full length Connect the end of the cable to the 100 240V 50 60Hz AC IN Socket at the rear of the unit and t...

Страница 18: ... 15 minutes if the TV or the external unit is disconnected switched off or the volume is too close to mute To switch the unit off completely remove the mains plug from the mains socket Please turn the unit off completely to save energy when not in use Selecting Modes Press button on the unit or remote control repeatedly to select between BT Bluetooth HDMI HDMI ARC OPT Optical and COA Coaxial mode ...

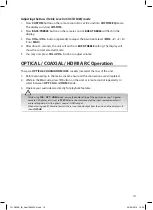
Страница 19: ...on There are OPTICAL COAXIAL HDMI ARC sockets located at the rear of the unit 1 Before connecting to the mains socket ensure all the connections are completed 2 While in the On mode press button on the unit or remote control repeatedly to select between OPT COA and HDMI mode 3 Operate your audio device directly for playback features While using COA OPT HDMI mode ensure the audio setting of the inp...

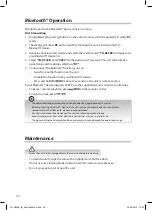
Страница 20: ...pt a signal tone and the display will show BT 5 To disconnect the Bluetooth function you can Switch to another function on the unit Disable the function from your Bluetooth device Press and hold PAIR for about 3 seconds on the unit or remote control If your Bluetooth device supports AVRCP use the supplied remote control to control play To pause resume playback press PAIR on the remote control To s...

Страница 21: ...ormal listening Press on the unit or on the remote control to switch the soundbar to standby mode Then press the button again to switch the soundbar on Unplug the soundbar from the mains socket then plug it in again Switch on the soundbar Ensure the audio setting of the input source e g TV game console DVD player etc is set to PCM mode while using digital e g OPTICAL connection The unit may not be...

Страница 22: ...uetooth Version Bluetooth 4 2 Maximum power transmitted 10 dBm Frequency bands 2402 MHz 2480 MHz Ecodesign Information Soundbar Information on Power Consumption Power Consumption in standby mode 0 5 W Net Weight 1 65 kg Dimension 550 mm W 90 mm D 72 mm H Features and specifications are subject to change without prior notice TH D329B_IB_Final190625V2 indd 22 26 06 2019 14 25 ...

Страница 23: ...r more information please contact the local authority or your retailer where you purchased the product The terms HDMI and HDMI High Definition Multimedia Interface and the HDMI Logo are trademarks or registered trademarks of HDMI Licensing Administrator Inc in the United States and other countries The Bluetooth word mark and logos are registered trademarks owned by the Bluetooth SIG Inc and any us...

Страница 24: ...il Ltd under license IB TH D329B 190625V2 For Help and Support Call UK 0344 561 1234 Ireland 1890 818 575 DSG Retail Ltd co no 504877 1 Portal Way London W3 6RS UK EU Representative DSG Retail Ireland Ltd 259460 3rd Floor Office Suite Omni Park SC Santry Dublin 9 Republic of Ireland TH D329B_IB_Final190625V2 indd 24 26 06 2019 14 25 ...

Отзывы: