background image

49

OPERATIONS:

To use this remote control system, you need to connect the TV to the
MONITOR OUT jack (see page 12), and set the TV’s input mode to
the proper position to which the receiver is connected.
Make sure you have connected the CD player or MD recorder
equipped with the TEXT COMPU LINK remote control system.
If not, you cannot use the following functions.

IMPORTANT:

• When using the remote control:

Check the indication shown on the remote’s display when you press
a button—this indicates the remote control operation mode for a
while (10 or 5 seconds).
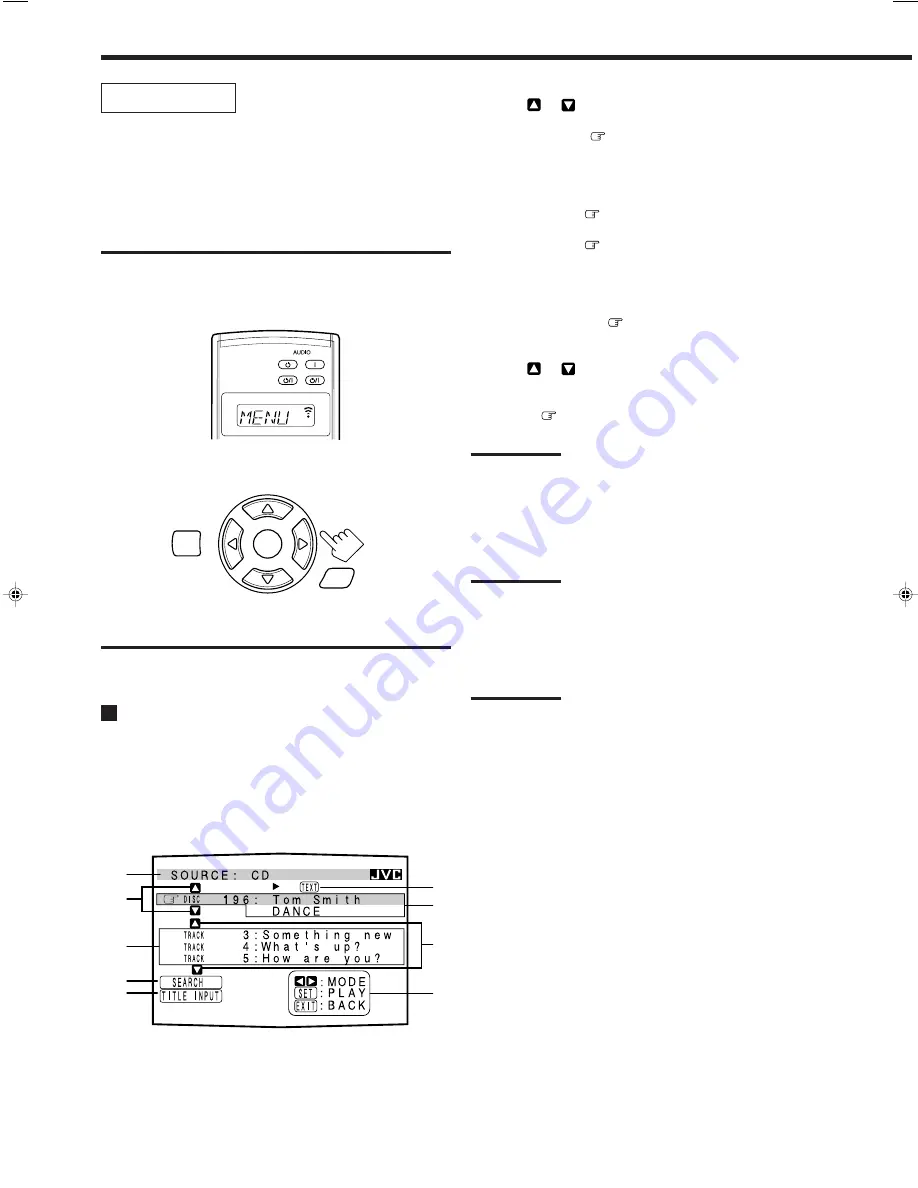
1

Source name: CD or MD

2

Select 

 or 

, then press SET to change the disc.

3

Track numbers and track titles.
• When you move


to a track number, you can change the

track information by pressing 

@

 / 

#

. Each time you press the

button, track information alternates between its track title and
its performer. (You can also start playing the track by pressing
SET.)

4

Select this (move


in front), then press SET to go to the

DISC SEARCH screen (see page 50).

5

Select this (move


in front), then press SET to go to the

TITLE INPUT screen (see page 51).

6

This appears only when a CD Text is selected.

7

Disc information such as the disc title, performer, music genre,
etc.
When this is selected (

in front), you can change the disc

information by pressing 

@

 / 

#

. Each time you press the button,

disc information (see “Note on 

7

”) changes.

8

Select 

 or 

, then press SET to change the track.

9

Usable buttons and their functions for the current selection.
Indication here will be changed according to what is currently
selected (

in front) on the screen. See “Note on 

9

.”

Note on 

7

:

The following information will appear on the display:
• For CD Texts — Disc title, Performer, Genre, Song writer,

Composer, Arranger, Message
Only recorded information will be shown. If there is no data, “NO
DATA” will appear.

• For MDs — Disc title

If there is no data, “NO DATA” will appear.

Note on 

9

:

For example, the SET button will be used to start play (PLAY), to go to
the next screen (ENTER), and to determine the selection (ENTER).

To exit from the Disc information screen:

Press EXIT.

Notes:

• The on-screen display will disappear in the following cases:

– if no operation is done for about 10 minutes.
– if you do any operation other than explained in this section.

• To control the MD recorder using the TEXT COMPU LINK remote

control system, you have to change the source name shown on the
display from “TAPE” to “MD.” (See page 22.)

• Some special characters and marks cannot be displayed correctly.

 Showing the Disc Information on the TV

Screen

Press TEXT DISPLAY while “CD” or “MD” is
selected as the source.

The Disc Information screen appears on the TV.

1

2

3

4
5

7

6

8

9

Disc Information screen

Ex. When you press TEXT DISPLAY.

STANDBY/ON

STANDBY/ON

STANDBY

TV/CATV/DBS

VCR 1

ON

Text display operation buttons

SET

EXIT

TEXT

DISPLAY

EN47-52_RX-DP9VBK[J]_f

01.6.18, 7:11 PM

49

Содержание RX-DP9VBK

Страница 1: ...V D I G I T A L D I G I T A L S U R R O U N D CHANNEL TV VIDEO MUTING DVD DVD MULTI CD CDR PHONO TAPE MD AM ANALOG DIGITAL EFFECT ROOM SIZE SOUND TEST LINE DIRECT CC CONVERTER SLEEP DIMMER FM MODE DSP THX SURROUND RETURN 100 ON OFF ON OFF MODE WALL INPUT LIVENESS SET SETUP MENU ADJUST MENU DVD MENU EXIT TEXT DISPLAY 1 2 3 4 5 6 7 P 8 9 10 10 0 TV VOL VOLUME TUNING STOP PAUSE FF REW REC PLAY DOWN U...

Страница 2: ...ock to persons The exclamation point within an equilateral triangle is intended to alert the user to the presence of important operating and maintenance servicing instructions in the literature accompanying the appliance CAUTION WARNING TO REDUCE THE RISK OF FIRE OR ELECTRIC SHOCK DO NOT EXPOSE THIS APPLIANCE TO RAIN OR MOISTURE Caution SPEAKER LOAD SELECTOR switch Match the position of SPEAKER LO...

Страница 3: ...pment off and on the user is encouraged to try to correct the interference by one or more of the following measures Reorient or relocate the receiving antenna Increase the separation between the equipment and receiver Connect the equipment into an outlet on a circuit different from that to which the receiver is connected Consult the dealer or an experienced radio TV technician for help Changes or ...

Страница 4: ...EAKER 31 7 Setting the Digital Input Terminals DIGITAL IN 32 7 Preparing for the Component Video Input COMPONENT IN 32 7 Turning On and Off the Video Output VIDEO POWER 33 7 Showing the Text Information on the Display FL DISPLAY 33 7 Memorizing the Volume Level for Each Source ONE TOUCH OPE ration 33 Sound Adjustments 34 Adjustment Menu Configuration 34 Operation through On Screen Display Menus 35...

Страница 5: ...eable parts inside If anything goes wrong unplug the AC power cord and consult your JVC dealer Features THX Surround EX DTS ES compatible By adding surround back speakers through an amplifier separately purchased connected to the PREOUT SURR BACK jacks you can enjoy THX Surround EX It is a format that has additional left and right surround back channels on the basis of Dolby Digital 5 1 channels I...

Страница 6: ...EO L AUDIO R VIDEO DVD DVD MULTI VCR 1 VCR 2 TV DBS CD VIDEO PHONO TAPE MD CDR FM AM DOOR DOWN 1 2 3 4 5 6 7 8 9 i u y t r e w q p SPEAKERS 1 DSP MODE SURROUND ON OFF THX ON OFF SOUND SELECTOR LINE DIRECT FM MODE ADJUST MENU SETUP MENU DOWN LEFT UP RIGHT SET EXIT k g SPEAKERS 2 INPUT ATT INPUT MODE To open the front door press DOOR DOWN For more details see page 16 L DIGITAL AUTO ANALOG STEREO TUN...

Страница 7: ...icators 20 Indicates the digital signal format of incoming signals Main display Shows the source name station frequency Surround DSP mode etc INPUT ATT indicator 21 Lights up when Input Attenuator is in use VOLUME level indicator Indicates the volume level Goes off while muting sounds Refer to the pages in parentheses for details Front Panel 1 SPEAKERS 1 button 16 19 2 INPUT MODE button 20 3 SURRO...

Страница 8: ...On screen operation buttons 27 35 49 SETUP MENU ADJUST MENU SET EXIT UP fi DOWN LEFT RIGHT e TEXT DISPLAY button 49 r DVD MENU button 57 60 t TV CATV DBS STANDBY ON button 57 59 VCR 1 STANDBY ON 57 59 60 y 10 keys for selecting preset channels 25 10 keys for adjusting sound 42 10 keys for adjusting DSP parameters 45 10 keys for operating audio video components 55 60 u THX ON OFF button 41 55 i DSP...

Страница 9: ...ure your hands are dry Turn the power off on all components Read the manuals supplied with the components you are going to connect Location Install the receiver in a location that is level well ventilated and free from moisture The temperature around the receiver must be between 5 C and 35 C 23 F and 95 F Make sure there is good ventilation around the receiver Poor ventilation could overheat and d...

Страница 10: ...peakers with the SPEAKER IMPEDANCE indicated by the speaker terminals Notes If the AM loop antenna wire is covered with vinyl remove the vinyl by twisting it as shown in the diagram Make sure the antenna conductors do not touch any other terminals connecting cords and power cord This could cause poor reception If reception is poor connect an outdoor single vinyl covered wire to the AM EXT terminal...

Страница 11: ...E RIGHT LEFT CENTER SPEAKER RIGHT LEFT Front speakers 1 Front speakers 2 Surround speakers Center speaker CAUTION Use only the speakers of the SPEAKER IMPEDANCE indicated by the speaker terminals IMPORTANT for the FRONT 1 SPEAKERS connection To obtain the best possible output power from the receiver and to prevent the receiver from being overheated the receiver has the SPEAKER LOAD SELECTOR which ...

Страница 12: ...nts and this receiver the sound output through this receiver may be distorted Enhance your audio system You can use this receiver as the pre amplifier control amplifier when you connect power amplifiers to the PREOUT jacks on the rear panel using cables with RCA pin plugs not supplied Connect the white plug to the audio left jack and the red plug to the audio right jack Turntable If a ground cable...

Страница 13: ...NTER L R IN PLAY SUB WOOFER SURR REAR Cassette deck or MD recorder RIGHT LEFT AUDIO PHONO CD CDR DVD TAPE MD OUT REC IN PLAY OUT REC FRONT CENTER L R IN PLAY SUB WOOFER SURR REAR If your audio components have a COMPU LINK or TEXT COMPU LINK jack See page 47 for detailed information about the connection and the COMPU LINK remote control system See page 48 for detailed information about the connecti...

Страница 14: ...r through the video jacks of the different type you cannot view the playback picture on the TV Video camera The VIDEO input jacks on the front panel are convenient when connecting and disconnecting the component frequently DVD IN PLAY CENTER VCR2 MONITOR OUT PR CR Y PB CB PR CR 2 Y PB CB P C SURR SUB WOOFER SURR FRONT IN PLAY OUT REC A B D E C F Å To audio output ı To audio input Ç To composite vi...

Страница 15: ...VIDEO Y PB CB PR CR 1 DVD Y PB CB PR CR 2 Y PB CB PR CR MONITOROUT PREOUT SURR BACK SUB WOOFER SURR FRONT IN PLAY OUT REC COMPONENT AUDIO A B C D DBS DBS tuner Å To audio output ı To composite video output Ç To S video output Î To component video output VIDEO RIGHT LEFT DVD TV SOUND DBS OUT REC IN PLAY VCR1 CENTER L R VCR2 MONITOR OUT S VIDEO VIDEO Y PB CB PR CR 1 DVD Y PB CB PR CR 2 Y PB CB PR CR...

Страница 16: ...nnect it to either the COMPONENT 1 DVD or the COMPONENT 2 jacks When connecting the DVD player to either one of the component input jacks make the component input COMPONENT terminal setting correctly For details see Preparing for the Component Video Input COMPONENT IN on page 32 VIDEO RIGHT LEFT DVD TV SOUND DBS OUT REC IN PLAY VCR1 CENTER L R VCR2 MONITOR OUT S VIDEO VIDEO Y PB CB PR CR 1 DVD Y P...

Страница 17: ...ribed in Analog connections see page 10 When you want to operate the VCR or DVD player using the AV COMPU LINK remote control system connect the target component also as described in Analog connections see pages 11 13 Digital input terminals You can connect any digital component as follows PCM DOLBYDIGITAL DTS DIGITALOUT Digital output terminal Note The digital signal format of the signals output ...

Страница 18: ... or cracking cells Place batteries in the remote control so they match the polarity to and to Use the correct type of batteries Batteries that look similar may differ in voltage Always replace both batteries at the same time Do not expose batteries to heat or flame R6 SUM3 AA 15F Connecting the Power Cord Before plugging the receiver into an AC outlet make sure that all connections have been made ...

Страница 19: ...oes off and the front door moves down so that the source selecting buttons appear For more details see Turning the Power On and Off Standby on page 17 The sound comes out of the speakers 2 Select and play a source L ANALOG SPEAKERS VOLUME 1 SUBWFR R dB The last surround DSP mode or other information appears The volume level appears The last source is activated STANDBY ON STANDBY S VID EO VIDE O VI...

Страница 20: ...M DVD DVD MULTI CD CDR PHONO TAPE MD AM VCR 1 VCR 2 FM VIDEO TV DBS STANDBY ON STANDBY Selected source name The current Surround DSP mode appears DVD Selects the DVD player DVD MULTI Selects the DVD player for viewing the digital video disc using the analog discrete output mode 5 1CH reproduction To enjoy the DVD MULTI playback see page 46 VCR 1 Selects the video component connected to the VCR 1 j...

Страница 21: ...ators on the display carefully and set the speakers correctly SUBWFR L C R LS RS SB SB LFE L C R S LS SB SB RS Signal indicators Speaker indicators LFE SUBWFR L C R LS RS SB SB Ex No sound comes out of the center speaker and surround back speakers though center channel and surround back signals are coming into this receiver Selecting different sources for picture and sound While watching pictures ...

Страница 22: ...und speaker s Listening only with headphones Sounds through the front speakers and the subwoofer shut off when connecting a pair of headphones to the PHONES jack HEADPHONE appears on the unit s display You can enjoy the following sounds through the headphones If the Surround mode is activated you can enjoy surround effect For details see 3D HEADPHONE Mode on page 40 If a DSP mode is activated you ...

Страница 23: ...s are canceled and the digital input mode is automatically reset to DIGITAL AUTO L DIGITAL AUTO ANALOG DIGITAL SPEAKERS VOLUME 1 SUBWFR R LFE RS LS dB DIGITAL AUTO DOLBY DIGITAL DTS DVD DVD MULTI VCR 1 VCR 2 TV DBS CD VIDEO PHONO TAPE MD CDR FM AM On the unit On the remote control DVD DVD MULTI CD CDR PHONO TAPE MD AM VCR 1 VCR 2 FM VIDEO TV DBS INPUT MODE On the remote control On the unit inside ...

Страница 24: ...justments such as Midnight mode see page 31 speaker output level adjustments see page 37 and Parametric Equalizer see page 37 You can only adjust the volume level while Line Direct is in use You have to make this setting for each source Press LINE DIRECT Each time you press the button Line Direct turns on and off When Line Direct turns on LINE DIRECT appears in the main display Notes If you turn o...

Страница 25: ...ng Sounds Natural JVC s CC Compensative Compression Converter eliminates jitter and ripples achieving a drastic reduction in digital distortion by processing the digital music data in 24 bit quantization and by expanding the sampling frequency to 176 4 kHz for fs 44 1 kHz signals 192 kHz for fs 48 kHz signals By using the CC Converter you can obtain a natural sound field from any source Press CC C...

Страница 26: ...nalog digital input mode see page 20 Input attenuator mode see page 21 Line Direct see page 21 Midnight mode see page 31 Speaker channel output levels see page 37 Parametric Equalizer setting see page 37 DSP Parameters see page 38 THX Surround On Off setting see page 41 Surround mode On Off setting see page 41 DSP mode selection see page 44 Notes If the source is FM or AM you can assign a differen...

Страница 27: ...Pressing TUNING UP increases the frequencies Pressing TUNING DOWN decreases the frequencies Notes When a station of sufficient signal strength is tuned in the TUNED indicator lights up on the display When an FM stereo program is received the STEREO indicator also lights up When you hold the button and release it in step 2 the frequency keeps changing until a station is tuned in FM AM STANDBY ON ST...

Страница 28: ...number From the remote control 1 Press FM or AM The last received station is tuned in 2 Press the 10 keys to select a preset channel number For channel number 5 press 5 For channel number 15 press 10 then 5 For channel number 20 press 10 then 10 For channel number 30 press 10 10 then 10 Selecting the FM Reception Mode When an FM stereo broadcast is hard to receive or noisy You can change the FM re...

Страница 29: ...G See page 29 3 SUBWOOFER See page 30 2 SPEAKER DISTANCE See page 29 4 DYNAMIC RANGE See page 31 5 THX See page 31 6 SURROUND SPEAKER See page 31 OPERATE BACK SPEAKER DISTANCE UNIT meter SUBWOOFER 3 00m FRONT L SP 3 00m FRONT R SP 3 00m CENTER SP 3 00m SURR L SP 3 00m SURR R SP 3 00m SBACK L SP 3 00m SBACK R SP 3 00m SUBWOOFER CROSSOVER 80Hz LFE LEVEL 0dB PHASE NORMAL BASS PEAK LIMIT ON BASS TEST ...

Страница 30: ...ve to the selected submenu screen select the desired setting on a submenu exit from menu operations or return to the previous menu Ex When you press SETUP MENU STANDBY ON STANDBY ON STANDBY TV CATV DBS VCR 1 ON DOOR DOWN S VID EO VIDE O VIDE O AUD IO L R SPEA KERS 1 INPU T MOD E SPEA KERS 2 DSP MOD E SURR OUND ON OFF HTX ON OFF SOUN D SELE CTOR REC SELE CTOR INPU T ATT LINE DIRE CT ADJU ST MEN U S...

Страница 31: ...RONT R SP 3 00m CENTER SP 3 00m SURR L SP 3 00m SURR R SP 3 00m SBACK L SP 3 00m SBACK R SP 3 00m SPEAKERS VOLUME 1 dB One item on the selected submenu appears with the current setting shown on the lower line of the main display SPEAKERS VOLUME 1 dB OPERATE BACK SPEAKER DISTANCE UNIT feet SUBWOOFER 10 0ft FRONT L SP 10 0ft FRONT R SP 10 0ft CENTER SP 10 0ft SURR L SP 10 0ft SURR R SP 10 0ft SBACK ...

Страница 32: ...r size is relatively large SMALL Select this when the speaker size is relatively small NONE Select this when you have not connected a speaker Not selectable for the front speakers Notes Keep the following comment in mind as reference when adjusting If the size of the cone speaker unit built in your speaker is greater than 12 cm 4 3 4 inches select LARGE and if it is smaller than 12 cm 4 3 4 inches...

Страница 33: ... will give you a different result Select one of the following NORMAL Normally select this REVERSE Select this to reverse the phase Note If SUBWOOFER is set to NO on the SPEAKER SETTING submenu this function is not available 7 Using the Bass Peak Limiter When this setting is ON Bass Peak Limiter functions so that sounds exceeding the preset peak level see below will be cut off When this setting is ...

Страница 34: ...isc THX CINEMA is selected except for the above case ON This unit automatically selects either THX SURR EX or THX CINEMA according to the playback software when you press THX ON OFF THX SURR EX is selected for mulitchannel digital software THX CINEMA is selected except for the above case OFF When you press THX ON OFF THX CINEMA is always selected for any software Note When SURR BK SP is set to NON...

Страница 35: ... OPTICAL INPUT 2CD 3TV 4CDR OPERATE BACK COMPONENT IN COMPONENT INPUT 1DVD 2 OPERATE BACK When COAXIAL INPUT is set to MD 2 CD 3 TV or DBS 4 CDR 2 CD 3 TV or DBS 4 DVD 2 CD 3 DVD 4 CDR 2 DVD 3 TV or DBS 4 CDR back to the beginning If you have changed the source name from TV to DBS DBS appears see page 22 If you have connected an MD recorder to the digital input terminal change the source name to M...

Страница 36: ...en you can turn on or off the power supply to the video output circuit built in this unit 7 Turning on or off the power supply to the video circuit Select one of the following ON Normally select this Power is supplied to the built in video output circuit OFF Select this not to supply power to the built in video output circuit while playing an audio source With this setting noise will be reduced wh...

Страница 37: ...ed For details see the respective explanation in this section PARAMETRIC EQ FRONT CENTER SURROUND SURROUND BACK ENTER BACK ENTER EXIT ADJUST MENU LEVEL PARAMETRIC EQ DSP PARAMETER CENTER CHANNEL ADJUST MENU 1 LEVEL See page 37 3 DSP PARAMETER See page 38 PEQ FRONT See page 38 PEQ CENTER See page 38 PEQ SURROUND See page 38 PEQ SURR ound BACK See page 38 2 PARAMETRIC EQ See page 37 4 CENTER CHANNEL...

Страница 38: ...n you press ADJUST MENU STANDBY ON STANDBY ON STANDBY TV CATV DBS VCR 1 ON DOOR DOWN S VID EO VIDE O VIDE O AUD IO L R SPEA KERS 1 INPU T MOD E SPEA KERS 2 DSP MOD E SURR OUND ON OFF HTX ON OFF SOUN D SELE CTOR REC SELE CTOR INPU T ATT LINE DIRE CT ADJU ST MEN U SETU P MEN U DOW N LEFT UP RIGH T SET EXIT STAN DBY ON STAN DBY PHO NES DIM MER CC CON VER TER DOO R UP DOO R DOW N MAS TER VOL UME D I G...

Страница 39: ...e main display OPERATE BACK DSP PARAMETER EFFECT LEVEL 3 ROOM SIZE 3 LIVENESS 3 WALL TYPE 3 SEAT POSITION 1 When adjusting the parametric equalizer Repeat steps 2 and 3 to select the items on the submenu and to go to its adjustment screen OPERATE BACK DSP PARAMETER EFFECT LEVEL 3 ROOM SIZE 5 LIVENESS 3 WALL TYPE 3 SEAT POSITION 1 SPEAKERS VOLUME 1 dB To erase the menu to return to the regular scre...

Страница 40: ...only the speaker you select To select the speaker see the right column OFF Select this to stop the test tone Notes TEST TONE is not available if both speakers 1 and 2 are deactivated or if Surround mode is turned off If NO or NONE is selected for a speaker on the SPEAKER SETTING submenu page 29 test tone does not come out of the speaker 7 Adjusting the speaker channel output levels Select and adju...

Страница 41: ...fect level As the number increases the DSP effect becomes stronger Normally select 3 Adjustable range 1 to 5 ROOM SIZE Adjust the virtual room size As the number increases the interval between reflections increases so that you will feel as if you were in a larger room Normally select 3 Adjustable range 1 to 5 LIVENESS Adjust the liveness effect As the number increases the attenuation level of refl...

Страница 42: ...roduce the sound through all activated speakers except the surround back speakers Dolby Digital 5 1CH Used to reproduce multichannel sound tracks of the software encoded with Dolby Digital D I G I T A L To enjoy the software encoded with Dolby Digital connect the source component using the digital terminal on the rear of this receiver See page 14 Dolby Digital 5 1CH encoding method so called discr...

Страница 43: ...UND OFF Linear PCM THX CINEMA PRO LOGIC SURROUND OFF Dolby Digital THX SURR EX or THX CINEMA 1 DOLBY DIGITAL or PRO LOGIC 2 SURROUND OFF DTS THX SURR EX or THX CINEMA 1 DTS SURROUND or PRO LOGIC 3 SURROUND OFF Surround modes available for input signals 1 Depending on the THX setting see page 31 2 When 2 channel signal comes in DOLBY PRO LOGIC will be selected When other signals come in DOLBY DIGIT...

Страница 44: ...owing sound sources Digital software encoded with 5 1 channel signals Dolby Digital or DTS Surround Analog software encoded with Dolby Surround 2 Press SURROUND ON OFF to activate the conventional Surround mode An appropriate Surround mode DOLBY DIGITAL DTS SURROUND or PRO LOGIC is activated Notes Each time you press the button the Surround mode turns on and off alternately While listening with th...

Страница 45: ...d speaker name appears on the remote s display for a while To select the left front speaker press FRONT L To select the center speaker press CENTER To select the right front speaker press FRONT R To select the right surround speaker press SURR R To select the right surround back speaker press SURR BK R To select the left surround back speaker press SURR BK L To select the left surround speaker pre...

Страница 46: ...MONO FILM 3D THEATER SURROUND OFF DSP off Back to the beginning Suitable for audio sources Suitable for video sources DAP modes You can use the following DAP modes in order to reproduce a more acoustic sound field in your listening room LARGE HALL 1 Reproduces the spatial feeling of a large shoebox shaped hall designated primarily for classical concerts Its seating capacity is about 2000 LARGE HAL...

Страница 47: ...SP Modes Perform the basic settings and adjustments using the Setup and Adjustment Menus first see pages 26 to 38 Activating one of the DSP modes for a source automatically recalls the memorized settings and adjustments done on the above menus IMPORTANT When using the remote control Check the indication shown on the remote s display when you press a button this indicates the remote control operati...

Страница 48: ... you press the button the effect level changes as follows As the number increases the selected DSP effect becomes stronger Normally set it to EFFECT 3 3 Press ROOM SIZE to adjust the room size sense of spaciousness Each time you press the button the display changes to show the following As the number increases the interval between reflections increases so that you will feel as if you were in a lar...

Страница 49: ...ut 5 1 CH reproduction jacks on the rear see page 13 1 Press DVD MULTI so that DVD MULTI appears on the display Note When you select DVD MULTI as the source to play the THX ON OFF SURROUND ON OFF and DSP MODE buttons do not work 2 Select the analog discrete output mode on the DVD player and start playing a DVD Refer to the manual supplied with the DVD player If you want to modify the stored sound ...

Страница 50: ...ure will not operate 3 Press the play 3 button on the CD player The source changes on the receiver and as soon as play starts the cassette deck or MD recorder starts recording When the play ends the cassette deck or MD recorder enters recording pause and stops about 4 seconds later Notes During synchronized recording the selected source cannot be changed If the power of any component is shut off d...

Страница 51: ...fter you turn on the connected equipment This is not a malfunction of the units Refer also to the manuals supplied with your CD player or MD recorder IMPORTANT If you turn on the receiver before turning on the other components after connecting the components the TEXT COMPU LINK remote control system does not work correctly If this happens 1 Turn off all the components including this receiver 2 Tur...

Страница 52: ...u press the button disc information see Note on 7 changes 8 Select or then press SET to change the track 9 Usable buttons and their functions for the current selection Indication here will be changed according to what is currently selected in front on the screen See Note on 9 Note on 7 The following information will appear on the display For CD Texts Disc title Performer Genre Song writer Composer...

Страница 53: ...rch Press fi until they appear Going back to the DISC TITLE SEARCH screen Press EXIT Searching for a Disc Only for the CD player Search for a disc by its performer 1 Press TEXT DISPLAY while CD is selected as the source The Disc Information screen appears on the TV 2 Press fi to move to SEARCH then press SET The DISC SEARCH screen appears 3 Press fi to move to PERFORMER then press SET The PERFORME...

Страница 54: ...enter the character If the current CD is a CD Text go to step 5 without entering the performer To use the lower case letters press fi to move to then press SET To use the upper case letters again press fi to move to then press SET Search for a disc by its genre 1 Press TEXT DISPLAY while CD is selected as the source The Disc Information screen appears on the TV 2 Press fi to move to SEARCH then pr...

Страница 55: ...ng appears You can enter a song title for the song currently selected 5 Enter the song title referring to steps 3 and 4 of For the CD Player with the disc memory function on pages 51 and 52 You can enter up to 32 characters for the song title 6 Press fi to move to the song title you have just entered then press SET The song title is stored into the memory and the Disc Information screen appears ag...

Страница 56: ...mponent Video Input COMPONENT IN on page 32 otherwise the correct input for this receiver will not be selected on the TV CONNECTIONS 1 AV COMPU LINK Connection AV COMPU LINK VHS AV COMPU LINK AV COMPU LINK EX DVD AV COMPU LINK III RX DP9VBK IMPORTANT The AV COMPU LINK remote control system cannot control the DBS tuner connected to the TV SOUND DBS and DBS component video terminals and video compon...

Страница 57: ...BS DBS DIGITAL only the TV will turn on automatically If the previously selected source is DVD DVD DIGITAL or DVD MULTI the TV and DVD player will turn on automatically When you turn off the receiver the TV VCR 1 and the DVD player will turn off Note If you turn off the receiver while recording on the VCR 1 the VCR 1 will not turn off but continue recording 1 If you have already plugged your VCR 1...

Страница 58: ...round back speaker channel output level SURR BK R then LEVEL Adjusts the right surround back channel speaker output level EFFECT Selects the effect level ROOM SIZE Selects the room size LIVENESS Selects the liveness WALL Selects the wall type LINE DIRECT Turns on or off Line Direct CC CONVERTER Turns on or off CC Converter Notes After adjusting sounds press the corresponding source selecting butto...

Страница 59: ...fter pressing CDR or selecting CDR by pressing CONTROL repeatedly you can perform the following operations on a CD recorder PLAY Starts playing 4 Returns to the beginning of the current or previous track Skips to the beginning of the next track STOP Stops playing PAUSE Pauses playing To release it press PLAY 1 10 10 Selects a track number directly For track number 5 press 5 For track number 15 pre...

Страница 60: ...0 Selects the TV channels on a VCR PLAY Starts playing REW Rewinds a tape FF Fast winds a tape STOP Stops operations PAUSE Pauses playing To release it press PLAY REC Press this button together with the PLAY button to start recording Press this button together with the PAUSE button to enter recording pause CHANNEL Changes the TV channels on a VCR Note You can use either the VCR 1 button or the CON...

Страница 61: ...gnals for operating another manufacturer s TV 1 Set the TV operation mode selector to TV 2 Press and hold TV CATV DBS STANDBY ON TV CATV DBS STANDBY ON TV CATV DBS 3 Press TV DBS 4 Enter manufacturer s code using buttons 1 9 and 0 See page 61 to find the code 5 Release TV CATV DBS STANDBY ON After setting the TV operation mode selector to TV you can perform the following operations on the TV TV CA...

Страница 62: ... converter and DBS tuner at the same time VCR 1 STANDBY ON To change the transmittable signals for operating another manufacturer s VCR 1 Press and hold VCR 1 STANDBY ON 2 Press VCR 1 3 Enter manufacturer s code using buttons 1 9 and 0 See page 61 to find the code 4 Release VCR 1 STANDBY ON The following button can be used for operating the VCR VCR 1 STANDBY ON Turns on or off the VCR After pressi...

Страница 63: ...ese buttons can be used for the DVD menu operations Note Refer also to the manual supplied for your DVD player and the instruction supplied for the discs 5 Try to operate your DVD player by pressing one of the above buttons DO NOT forget to turn on the DVD player before pressing one of the above buttons If there are more than one code listed for your brand of DVD player try each one until the corr...

Страница 64: ... CD player Manufacturer Codes JVC 00 06 DENON 01 03 FISHER 04 KENWOOD 10 11 12 MAGNAVOX 15 16 MARANTZ 17 ONKYO 18 20 21 PANASONIC 22 24 PHILIPS 25 26 29 PIONEER 30 RCA 32 33 34 SANYO 35 SHARP 36 SONY 53 TEAC 37 38 39 TECHNICS 40 41 42 45 YAMAHA 46 47 48 This figure is set to the remote control as the initial JVC code This figure is set to the remote control as the initial JVC code Manufacturer Cod...

Страница 65: ... Press STANDBY ON on the front panel to turn off the receiver 2 Stop the playback source 3 Turn on the receiver again and adjust the volume Press STANDBY ON on the front panel to turn off the receiver check the speaker wiring then press it again to turn on the receiver again If OVERLOAD does not disappear despite speaker wiring is not short circuited consult your dealer Press STANDBY ON on the fro...

Страница 66: ... Digital and DTS Digital Surround with sampling frequency 32 kHz 44 1 kHz 48 kHz Audio Output Level PREOUT 1 V Recording Output Level TAPE MD CDR VCR 1 VCR 2 200 mV Digital output Optical DIGITAL OUTPUT Signal wave length 660 nm Output level 21 dBm to 15 dBm Signal to Noise Ratio 66 IHF 78 IHF PHONO 70 dB 78 dB at REC OUT CD CDR TAPE MD DVD VCR 1 VCR 2 VIDEO TV SOUND DBS 92 dB 80 dB Line Direct On...

Страница 67: ...t 1 kHz Stereo Separation at REC OUT 40 dB at 1 kHz Alternate Channel Selectivity 60 dB 400 kHz Frequency Response 30 Hz to 15 kHz 0 5 dB 3 dB AM tuner Tuning Range 530 kHz to 1 710 kHz Usable Sensitivity Loop antenna 400 µV m Signal to Noise Ratio 50 dB 100 mV m General Power Requirements AC 120V 60 Hz Power Consumption 485 W 615 VA at operation 2 6 watts in standby mode Dimensions W x H x D 445 ...

Страница 68: ...rized servicer or visit our website at www JVC com Remember to retain your Bill of Sale for Warranty Service Do not service the television yourself Caution To prevent electrical shock do not open the cabinet There are no user serviceable parts inside Please refer to qualified service personnel for repairs Accessories To purchase accessories for your JVC product please call toll free 1 800 882 2345...

Страница 69: ...cleaning 4 Damage that occurs in shipment due to act of God and cosmetic damage 5 Signal reception problems and failures due to line power surge 6 Video Pick up Tubes CCD Image Sensor Cartridge Stylus Needle are covered for 90 days from the date of purchase 7 Batteries except that Rechargeable Batteries are covered for 90 days from the date of purchase There are no express warranties except as lis...

Страница 70: ...VICTOR COMPANY OF JAPAN LIMITED EN 0701NHMMDWJEIN J VC ...

Отзывы: