background image

42

English

Notes:

• To enjoy the software encoded

with Dolby Digital, you must
connect the source
component using the digital
terminal on the rear of this
receiver.

• When the signals come into

this receiver through the
analog connection from the
source component, “PRO
LOGIC” is automatically
selected.

• The Surround mode is not

used with the other DSP
modes such as the DAP mode
and 3D-PHONIC mode. When
the Surround mode is turned
on, the other DSP mode, if
used, will be turned off.

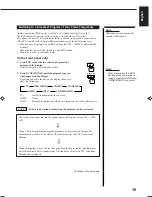
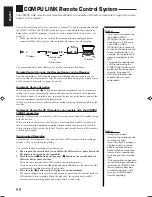
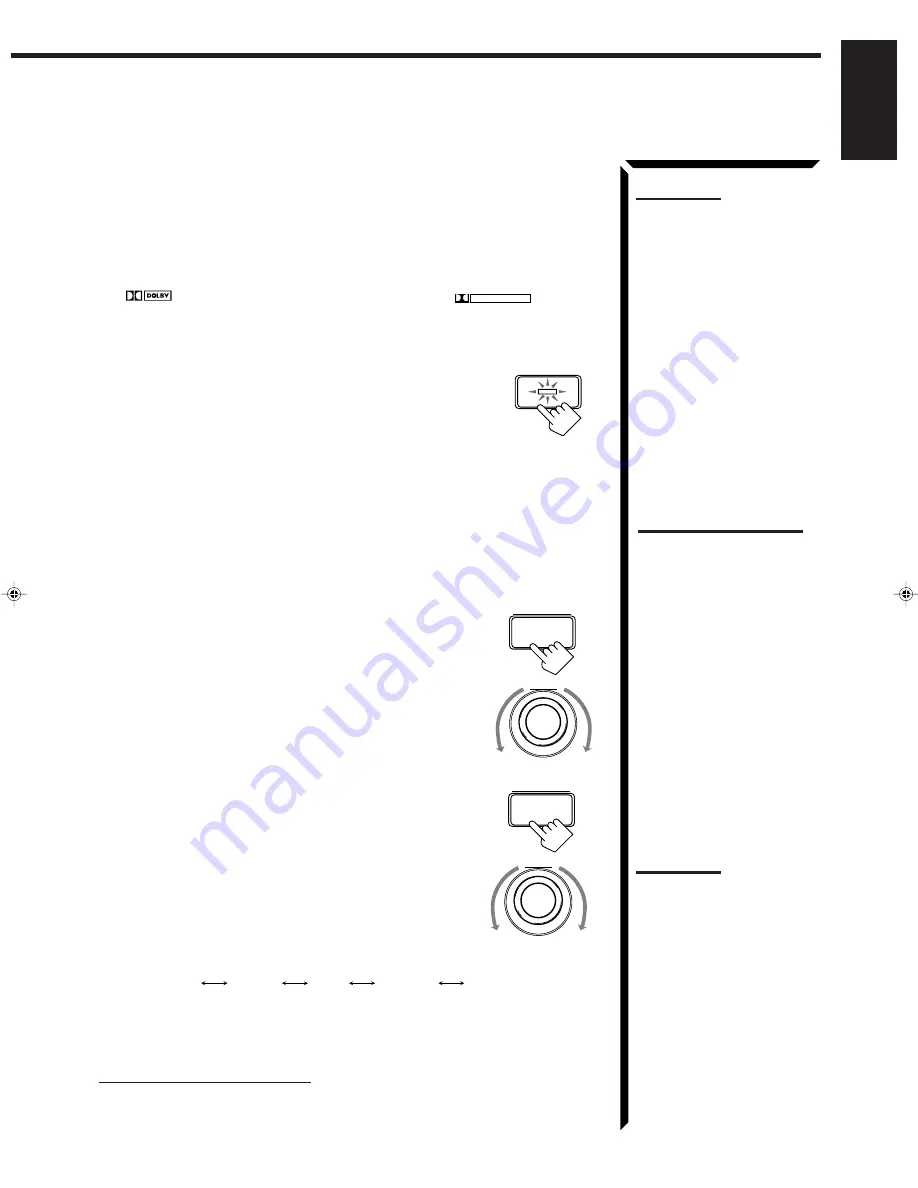
On the front panel:

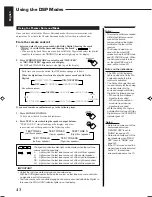
You can also use the buttons on the front panel to adjust the Dolby Digital and Dolby
Pro Logic modes. However, no test tone is available when using the buttons on the front
panel. So, make adjustments while listening to the sound of the source played back.

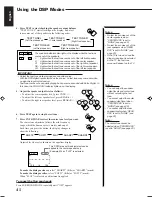
1. Select and play the source encoded with Dolby Digital (bearing the mark

D I G I T A L

) or with Dolby Surround (bearing the mark 

DOLBY SURROUND

).

• When you play back the source encoded with Dolby Digital and select the digital

input for that source, the 

Ÿ

 DIGITAL indicator lights up on the display.

2. Press DOLBY SURROUND so that the lamp on the button

lights up.
“SURROUND ON” appears on the display.
Dolby Digital or Dolby Pro Logic is automatically selected
according to the source being played back.

When Dolby Pro Logic is selected, the lamp on the DOLBY SURROUND button
lights red.

When Dolby Digital is selected, the lamp on the DOLBY SURROUND button lights
green.

If you need to make any adjustment, go to the following steps.

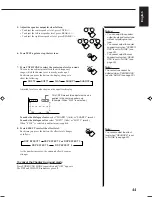
3. Adjust the speaker output levels as follows.

1) Press BALANCE/SURROUND ADJUST repeatedly

until one of the indications appears on the display.
“CENTER LEVEL”: To adjust the center speaker level.
“REAR L LEVEL”:

To adjust the left speaker level.

“REAR R LEVEL”:

To adjust the right speaker level.

2) Turn MULTI JOG to adjust the selected speaker output

level (from –10 dB to +10 dB), while the indicator of the
previous step is still on the display.

3) Repeat 1) and 2) to adjust the other speaker output

levels.

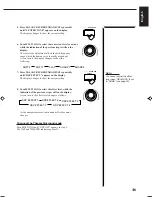
4. Press BALANCE/SURROUND ADJUST repeatedly until

“CENTER TONE” appears on the display.
The display changes to show the current setting.

5. Turn MULTI JOG to select the center tone level you want,

while the indication of the previous step is still on the
display.
The center tone adjustment affects the mid-frequency
range, which the human voice is mostly made up of.
As you turn it, the display changes to show the
following:

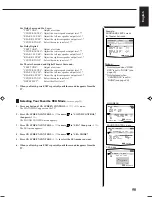
To make the dialogue clearer, select “SHARP1” (little) or “SHARP2” (much).
To make the dialogue softer, select “SOFT1” (little) or “SOFT2” (much).
When “FLAT” is selected, no adjustment is applied.

To cancel the Surround mode

Press DOLBY SURROUND again so that “SURROUND OFF” appears.

MULTI  JOG

BALANCE/

SURROUND

ADJUST

DOLBY  SURROUND

BALANCE/

SURROUND

ADJUST

MULTI  JOG

Notes:

• You cannot adjust the center

speaker level when “CENTER
SPK” is set to “NONE” (see
page 20).

• You cannot adjust the rear

speaker levels when “REAR
SPK” is set to “NONE” (see
page 20).

SHARP1

SHARP2

FLAT

SOFT2

SOFT1

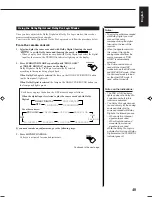
Notes on the indications:

• The PRO LOGIC indicator

lights up when the Dolby Pro
Logic decoder built in this
receiver is activated.

• The Dolby Pro Logic decoder

is used not only for the analog
sources but also for the
sources encoded with Dolby
Digital in the following cases:
– When only front channel

signals are encoded.

– When front channel and

monaural rear channel
signals are encoded.

While the Dolby Pro Logic is
activated for this type of Dolby
Digital source, the 

Ÿ

 DIGITAL

indicator goes off.

EN34_46.RX-884R[E]/1.PM5

98.3.26, 0:59 PM

42

Содержание RX-884PBK

Страница 1: ... MODE SUBWOOFER TAPE MD FM AM PHONO 5 4 6 2 1 3 8 7 P 9 0 10 10 AUDIO TV VCR VCR1 TAPE CONTROL VOLUME CHANNEL MU TE FF PLAY STOP REC TV VIDEO TV VOLUM E PAUSE 4 REW TV CATV CNTR CNTR TONE ENTER MENU EFFECT CATV DBS FM MODE MUTE 100 RETURN SURROUND MODE O N SCREEN CONTRO L SET EXIT PTY PTY PTY SEA RCH DISPLAY MODE DBS D I G I T A L RX 884R AUDIO VIDEO CONTROL RECEIVER VIDEO SPEAKERS 1 2 PHONES DOLB...

Страница 2: ...f this product is not supplied fitted with a mains plug then follow the instructions given below IMPORTANT DO NOT make any connection to the terminal which is marked with the letter E or by the safety earth symbol or coloured green or green and yellow The wires in the mains lead on this product are coloured in accordance with the following code Blue Neutral Brown Live As these colours may not corr...

Страница 3: ...ischen Schlägen Brandgefahr usw 1 Keine Schrauben lösen oder Abdeckungen enternen und nicht das Gehäuse öffnen 2 Dieses Gerät weder Regen noch Feuchtigkeit aussetzen CAUTION To reduce the risk of electrical shocks fire etc 1 Do not remove screws covers or cabinet 2 Do not expose this appliance to rain or moisture PRECAUCIÓN Para reducir riesgos de choques eléctricos incendio etc 1 No extraiga los ...

Страница 4: ...hakelaar om het apparaatgebruiksklaartezetten maartezorgendathetstroomverbruik minimaal blijft Neem in verband hiermee het volgende in acht 1 Bij de eerste ingebruikneming zorgt u eerst dat alle aansluitingen in orde zijn dan steekt u de stekker in het stopkontakt en dan zet u de POWER schakelaar in de ON stand Daarna kunt u het apparaat aan en uitschakelen met de STANDBY ON schakelaar 2 Wanneer u...

Страница 5: ... Voldoende ruimte vrij houden Zijkanten Minstens 10 cm aan weerszijden vrij houden Bovenkant Niets bovenop plaatsen 10 cm speling geven Achterkant Minstens 15 cm ruimte achteraan vrij houden Onderkant Opstellen op een egaal horizontaal oppervlak Bovendien moet er rondom voldoende luchtdoorstroming zijn zoals in de afbeelding aangegeven Precaución Ventilación Adecuada Para evitar el riesgo de choqu...

Страница 6: ...r Output Level 17 Basic Settings 18 Changing the Source Name 18 Selecting the Input Mode 18 Adjusting the Front Speaker Output Balance 19 Setting the Subwoofer Information 19 Listening at Low Volume Loudness 19 Digital Input DIGITAL IN Terminal Setting 20 Setting the Speakers for the DSP Modes 20 One Touch Operation 23 About the One Touch Operation 23 Using the One Touch Operation 23 Receiving Rad...

Страница 7: ... the Input Signal 48 Adjusting the Subwoofer Output Level 49 Adjusting the DSP Modes 49 Selecting Your Favorite SEA Mode 50 Creating Your Own SEA Mode 51 Basic Settings 51 Operating the Tuner 52 Storing the Preset Stations 52 Assigning Names to the Preset Stations 53 Checking the RDS Information 54 COMPU LINK Remote Control System 55 TEXT COMPU LINK Remote Control System 56 Showing the Disc Inform...

Страница 8: ...6 TA NEWS INFO button 30 7 DISPLAY MODE button 27 8 SEA MODE button 32 9 DIGITAL INPUT button 18 0 FM AM TUNING button 24 FM MODE button 25 Display 14 Source lamps 14 MASTER VOLUME control 15 POWER switch 13 PHONES jack 16 SPEAKERS 1 2 buttons and lamps 16 DSP MODE button 35 BALANCE SURROUND ADJUST button 19 36 SEA ADJUST button 33 SETTING button 19 TUNER SEAMEMORYbutton 24 26 33 SOUND SELECT INPU...

Страница 9: ...ween 5 and 35 C 23 and 95 F Make sure there is good ventilation around the receiver Poor ventilation could cause overheating and damage the receiver Handling the receiver Do not insert any metal object into the receiver Do not disassemble the receiver or remove screws covers or cabinet Do not expose the receiver to rain or moisture Checking the Supplied Accessories Check to be sure you have all of...

Страница 10: ...tenna Connections Turn the loop until you have the best reception Snap the tabs on the loop into the slots of the base to assemble the AM MW LW loop Outdoor single vinyl covered wire Getting Started Extend the FM wire antenna horizontally FM Antenna GND ANTENNA AM EXT AM LOOP GND FM 75 COAXIAL AM LOOP ANTENNA AM EXT FM 75 COAXIAL AM LOOP ANTENNA AM EXT GND FM 75 COAXIAL Outside FM Antenna Cable A ...

Страница 11: ...bwoofer connect the and terminals on the rear panel to the and terminals marked on the speakers For connecting a subwoofer see page 7 1 Cut twist and remove the insulation at the end of each speaker signal cable 2 Turn the knob counterclockwise 3 Insert the speaker signal cable 4 Turn the knob clockwise Connecting the front speakers Connect the front speakers to the FRONT SPEAKERS terminals You ca...

Страница 12: ...ng the subwoofer speaker Connect the input jack of a powered subwoofer to the SUBWOOFER OUT jack on the rear panel using a cable with RCA pin plugs Center speaker Left rear speaker Right rear speaker Getting Started CAUTION Use speakers with the SPEAKER IMPEDANCE indicated by the speaker terminals Powered subwoofer RIGHT LEFT REAR SPEAKERS CENTER SPEAKER SUBWOOFER OUT ...

Страница 13: ...m is used CAUTION When connecting speakers use speakers with the same SPEAKER IMPEDANCE indicated by the speaker terminals CASE 1 When you connect only one set of front speakers CASE 2 When you connect two sets of front speakers Use front speakers with 4 16 ohm impedance Front Speaker 1 Front Speaker 1 Front Speaker 1 Front Speaker 1 Front Speaker 2 Front Speaker 2 Use front speakers with 8 16 ohm...

Страница 14: ...ther a cassette deck or an MD recorder to the TAPE MD jacks When connecting an MD recorder to the TAPE MD jacks change the source name which will be shown on the display when selected as the source to MD See page 18 for details Audio Components Video Components Turntable DVD player CD player TV Cassette deck or MD recorder DBS tuner VCRs Video camera You can connect these components using the meth...

Страница 15: ...ent In addition if the TV and a playing video component are connected to the receiver through the different video terminals you cannot view the playback picture from the playing component on the TV To view and record the playback picture from the video component connected to the VCR2 jacks you must connect the TV and the recording video component through the composite video terminals Connecting th...

Страница 16: ...VCR VIDEO S VIDEO VIDEO AUDIO L R RX 884R AUDIO VIDEO CONTROL RECEIVER VIDEO SPEAKERS 1 2 PHONES DOLBY SURROUND DSP MODE BALANCE SURROUND ADJUST SEA MODE SEA ADJUST SETTING MULTI JOG MASTER VOLUME SOURCE SELECTOR S VIDEO VIDEO AUDIO L R DIGITAL INPUT FM AM TUNNING TUNER PRESET TUNER SEA MEMORY FM MODE DVD TV SOUND DBS PHONO TAPE MD VCR 1 VCR 2 FM AM VIDEO CD SOUND SELECT INPUT ATT LOUDNESS ONETOUC...

Страница 17: ...a digital optical cable unplug the protective plug IMPORTANT When connecting the DVD player or the DBS tuner using the digital terminal you also need to connect it to the video jack either composite video terminal or S video terminal on the rear Without connecting it to the video jack you can view no playback picture After connecting the above components using the DIGITAL IN terminals set the foll...

Страница 18: ...trol Putting Batteries in the Remote Control Before using the remote control put two supplied batteries first When using the remote control aim the remote control directly at the remote sensor on the receiver 1 On the back of the remote control remove the battery cover as illustrated 2 Insert batteries Make sure to observe the proper polarity to and to 3 Replace the cover If the range or effective...

Страница 19: ...s 100 1k 10k VOLUME Current volume level is shown here Source lamps on the front panel DVD TV SOUND DBS PHONO TAPE MD VCR 1 VCR 2 FM AM VIDEO CD STANDBY STANDBY ON FM TV SOUND DBS VIDEO PHONO CD TAPE MD AM DVD VCR1 VCR2 Note When connecting an MD recorder to the TAPE MD jacks and a DBS tuner to the TV SOUND DBS jacks change the source name appears on the display For details see page 18 Selected so...

Страница 20: ...R or DVD player etc SOUND SELECT appears on the display 2 Turn SOURCE SELECTOR to select the sound except the TV sound while the indication of the above step is still on the display From the remote control Press one of the audio source selecting buttons CD TAPE MD PHONO FM AM while viewing the picture from a video component such as the VCR or DVD player etc Adjusting the Volume On the front panel ...

Страница 21: ...level indicator also goes off To restore the sound press MUTE again so that OFF appears on the display Turning MASTER VOLUME or pressing VOLUME also restores the sound at the previous volume level Recording a Source You can record any source playing through the receiver to the cassette deck or the MD recorder connected to the TAPE MD jacks and the VCRs connected to the VCR1 and VCR2 jacks at the s...

Страница 22: ...level if you have selected YES for the SUBWOOFER see page 19 Once it has been adjusted the receiver memorizes the adjustment On the front panel 1 Press BALANCE SURROUND ADJUST repeatedly until SUBWFR LEVEL appears on the display The display changes to show the current setting 2 Turn MULTI JOG to adjust the subwoofer output level 10 dB to 10 dB while the indication of the previous step is still on ...

Страница 23: ... tuner using digital terminals see page 12 you need to change the input mode for these components to the digital input On the front panel 1 Turn SOURCE SELECTOR until the source CD MD DBS or DVD for which you want to change the input mode from analog input to digital input 2 Press DIGITAL INPUT to change the input mode Each time you press the button the input mode alternates between the digital in...

Страница 24: ...he current setting 2 Turn MULTI JOG to register whether you have connected a subwoofer or not while the indication of the previous step is still on the display As you turn it the subwoofer setting alternates between YES and NO YES Select this when you use a subwoofer NO Select this when you do not use a subwoofer Listening at Low Volume Loudness Human ears are not sensitive to bass at low volume T...

Страница 25: ...ker CENTER SPK Center Speaker or REAR SPK Rear Speaker appears on the display The display changes to show the current setting 2 Turn MULTI JOG to select the appropriate item about your front center and rear speakers while the indication of the previous step is still on the display As you turn it the display changes to show the following LARGE Select this when the speaker size is relatively large S...

Страница 26: ...elay time of the rear speaker output while the indication of the previous step is still on the display Turn it clockwise to increase the delay time from 0 msec R DELAY 0ms to 15 msec R DELAY 15ms Turn it counterclockwise to decrease the delay time from 15 msec R DELAY 15ms to 0 msec R DELAY 0ms Crossover Frequency Setting Small speaker cannot reproduce the bass sound very well So if you have used ...

Страница 27: ...display changes to show the current setting 2 Turn MULTI JOG to select the low frequency effect attenuator level while the indication of the previous step is still on the display As you turn it the display changes to show the following LFE ATT 0dB Normally select this LFE ATT 10dB Select this when the bass sound is distorted Dynamic Range Compression Setting You can compress the dynamic range diff...

Страница 28: ...D PHONIC mode settings see page 35 DAP mode settings see page 38 Surround mode settings see page 40 and 43 Using the One Touch Operation On the front panel only To store the sound settings 1 Press ONE TOUCH OPERATION The ONE TOUCH OPERATION lamp lights up then the previously memorized settings are recalled 2 Adjust the sound using the functions listed above The newly adjusted settings are memorize...

Страница 29: ...preset see above If you want to store the FM reception mode for this station select the FM reception mode you want See page 25 for details 2 Press TUNER SEA MEMORY CH appears and the channel number position starts flashing on the display for about 5 seconds 3 Turn MULTI JOG to select a channel number while the channel number position is flashing 4 Press TUNER SEA MEMORY again while the selected ch...

Страница 30: ... panel or FM MODE MUTE on the remote control Each time you press the button the FM reception mode alternates between AUTO and MONO AUTO When a program is broadcasted in stereo you will hear stereo sound when in monaural you will hear monaural sounds This mode is also useful to suppress static noise between stations The MUTE AUTO indicator lights up on the display MONO Reception will be improved al...

Страница 31: ...ESET while a character you want is flashing The next or previous character position starts flashing 6 Repeat steps 4 and 5 to enter up to four characters 7 Press TUNER SEA MEMORY while the last selected character is flashing after you have assigned a name To erase the input characters Insert spaces using the same procedure described above CH Available characters Space C B A D E G F H I J K L M N O...

Страница 32: ...of broadcast programs RT Radio Text shows text messages the station sends EON Enhanced Other Network see page 31 What Information Can RDS Signals Provide You can see the RDS signals the station sends on the display To show the RDS signals On the front panel Press DISPLAY MODE while listening to an FM station Each time you press the button the display changes to show you the following information P...

Страница 33: ...y gives you the PTY codes described on page 29 3 Press PTY SEARCH again while the PTY code selected in the previous step is still on the display While searching SEARCH and the selected PTY code alternate on the display The receiver searches 40 preset channels stops when it finds the one you have selected and tunes in that station To continue searching after the first stop Press PTY SEARCH again wh...

Страница 34: ...rching When an emergency broadcast ALARM signal is sent from an FM station The receiver automatically tunes in the station except in the following cases When you are listening to non RDS stations all AM MW LW and some FM stations When the receiver is in standby mode While receiving an emergency broadcast ALARM appears on the display The TEST signal is used for equipment test whether it can receive...

Страница 35: ...e appears on the display The receiver enters EON standby mode 2 Press TA NEWS INFO until the program type you want appears on the display Each time you press the button the display changes to show the following TA Traffic Announcement in your area NEWS News INFO Program the purpose of which is to impart advice in the widest sense CASE 1 If there is no station broadcasting the program you have sele...

Страница 36: ...nters EON off mode and goes back to the previously selected source Each time you press EON the EON mode alternates between standby mode and off mode Notes EON data sent from some stations may not be compatible with this receiver In EON standby mode if you change the source to AM MW LW or if you carry out synchronized recording see page 55 EON standby mode is canceled temporarily The receiver goes ...

Страница 37: ...f a live atmosphere Good for acoustic music SEA USERMODE Your original SEA adjustment see page 33 SEA OFF No SEA mode is applied see below To cancel the SEA mode Turn MULTI JOG until SEA OFF appears in step 2 above The SEA indicator goes off from the display From the remote control 1 Press SOUND CONTROL 10 keys are activated for sound adjustments 2 Press SEA MODE repeatedly until the SEA mode you ...

Страница 38: ...still on the display Turning it clockwise increases the level Turning it counterclockwise decreases the level 3 Repeat step 1 and 2 to adjust other frequency ranges if necessary 4 Press TUNER SEA MEMORY while the indication of the previous step is still on the display Your adjustment is stored into the SEA USERMODE To recall your own SEA adjustment See page 32 To erase a stored adjustment Storing ...

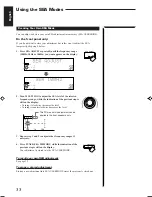
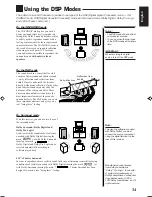
Страница 39: ...ents and gives you a real being there feeling On Surround mode With this receiver you can use two types of the surround mode Dolby Surround Dolby Digital and Dolby Pro Logic Used to watch the soundtracks of software encoded with Dolby Digital bearing the mark D I G I T A L or with Dolby Surround bearing the mark DOLBY SURROUND Dolby Digital and Dolby Pro Logic can be selected automatically accordi...

Страница 40: ...ner as the source Using the 3D PHONIC Modes When using the 3D PHONIC modes you need only two front speakers to reproduce the soundtracks of software encoded with Dolby Digital bearing the mark D I G I T A L or with Dolby Surround bearing the mark DOLBY SURROUND On the front panel 1 Select and play the source encoded with Dolby Digital bearing the mark D I G I T A L or with Dolby Surround bearing t...

Страница 41: ...isplay As you turn it the effect level changes as follows As the number increases the selected 3D PHONIC mode becomes stronger To cancel the 3D PHONIC mode Turn MULTI JOG until DSP OFF appears in step 3 The 3D PHONIC and DSP indicators go off from the display Note Once you have adjusted the 3D PHONIC modes it is memorized for each 3D PHONIC mode BALANCE SURROUND ADJUST MULTI JOG DSP EFFECT 1 DSP E...

Страница 42: ...OFF appears The 3D PHONIC and DSP indicators go off from the display Note The 3D PHONIC mode is not used with the other DSP modes such as the DAP mode and the Surround mode When the 3D PHONIC mode is turned on the other DSP mode if used will be turned off SURROUND MODE HALL DANCE CLUB LIVE CLUB THEATER PRO LOGIC 3D ACTION HEADPHONE 3D DRAMA PAVILION 3D THEATER OFF SOUND CONTROL 7 P EFFECT DSP EFFE...

Страница 43: ... when listening with headphones DSP OFF No DSP mode is applied For the other modes see pages 35 and 43 If you need to make any adjustment go to the following steps 3 Adjust the speaker output levels as follows 1 Press BALANCE SURROUND ADJUST repeatedly until one of the indications appears on the display REAR L LEVEL To adjust the left speaker level REAR R LEVEL To adjust the right speaker level 2 ...

Страница 44: ...ar speaker level press REAR R 4 Press EFFECT to select the effect level Each time you press the button the effect level changes as follows As the number increases the selected DAP mode becomes stronger To cancel the DAP mode Press SURROUND MODE repeatedly until OFF appears The DSP indicator goes off from the display BALANCE SURROUND ADJUST Note Once you have adjusted the DAP modes the adjustment i...

Страница 45: ... Digital For other sources If you need to make any adjustment go to the following steps 3 Press SOUND CONTROL 10 keys are activated for sound adjustments Notes To enjoy the software encoded with Dolby Digital you must connect the source component using the digital terminal on the rear of this receiver When the signals come into this receiver through the analog connection from the source component ...

Страница 46: ...ears Using the DSP Modes Left front speaker Center speaker Right front speaker Left rear speaker Right rear speaker TEST TONE L TEST TONE C TEST TONE R TEST TONE RS TEST TONE LS TEST 4 The speaker indicators also light on the display while the test tone comes out of the speakers L Lights when the test tone comes out of the left front speaker C Lights when the test tone comes out of the center spea...

Страница 47: ...ay CENTER LEVEL To adjust the center speaker level REAR L LEVEL To adjust the left speaker level REAR R LEVEL To adjust the right speaker level 2 Turn MULTI JOG to adjust the selected speaker output level from 10 dB to 10 dB while the indicator of the previous step is still on the display 3 Repeat 1 and 2 to adjust the other speaker output levels 4 Press BALANCE SURROUND ADJUST repeatedly until CE...

Страница 48: ... built in this receiver is activated The Dolby Pro Logic decoder is used not only for the analog sources but also for the sources encoded with Dolby Digital in the following cases When only front channel signals are encoded When front channel and monaural rear channel signals are encoded While the Dolby Pro Logic is activated for this type of Dolby Digital source the Ÿ DIGITAL indicator goes off D...

Страница 49: ...you press the button the effect level changes as follows As the number increases the surround effect becomes stronger To cancel the Theater Surround mode Press SURROUND MODE repeatedly until OFF appears The DSP and THEATER indicators goes off Notes You can adjust the speaker output levels and center tone without outputting the test tone You cannot adjust the center speaker level when CENTER SPK is...

Страница 50: ...th Dolby Digital For other sources If you need to make any adjustment go to the following steps 4 Adjust the speaker output levels as follows 1 Press BALANCE SURROUND ADJUST repeatedly until one of the indications appears on the display CENTER LEVEL To adjust the center speaker level REAR L LEVEL To adjust the left speaker level REAR R LEVEL To adjust the right speaker level 2 Turn MULTI JOG to ad...

Страница 51: ...il DSP EFFECT appears on the display The display changes to show the current setting 8 Turn MULTI JOG to select the effect level while the indication of the previous step is still on the display As you turn it the effect level changes as follows As the number increases the surround effect becomes stronger To cancel the Theater Surround mode Turn MULTI JOG until DSP OFF appears in step 3 The DSP an...

Страница 52: ...ROL to select a different video source When you select OSD see page 56 4 When you finish press EXIT The menu disappears from the TV Using the DSP Modes Also see pages 35 38 40 and 43 1 Press any button of ON SCREEN CONTROL fi once The MAIN MENU appears on the TV 2 Press ON SCREEN CONTROL fi to move to MODE 3 Press ON SCREEN CONTROL to select the DSP mode you want to use 4 When you finish press EXI...

Страница 53: ... TV Attenuating the Input Signal Also see page 17 This function is available only for the sources connected using the analog terminals and takes effect only when the DSP mode is in use 1 Press any button of ON SCREEN CONTROL fi once The MAIN MENU appears on the TV 2 Press ON SCREEN CONTROL fi to move to SOUND CONTROL then press The SOUND CONTROL menu appears on the TV 3 Press ON SCREEN CONTROL fi ...

Страница 54: ... 1 Press any button of ON SCREEN CONTROL fi once The MAIN MENU appears on the TV 2 Press ON SCREEN CONTROL fi to move to MODE 3 Press ON SCREEN CONTROL to select the DSP mode you want to adjust 4 Press ON SCREEN CONTROL fi to move to SOUND CONTROL then press The SOUND CONTROL menu appears 5 Press ON SCREEN CONTROL fi to move to SURROUND LEVEL then press The SURROUND LEVEL menu appears If you selec...

Страница 55: ...he menu disappears from the TV Selecting Your Favorite SEA Mode Also see page 32 1 Press any button of ON SCREEN CONTROL fi once The MAIN MENU appears on the TV 2 Press ON SCREEN CONTROL fi to move to SOUND CONTROL then press The SOUND CONTROL menu appears 3 Press ON SCREEN CONTROL fi to move to SEA then press The SEA menu appears 4 Press ON SCREEN CONTROL fi to move to SEA MODE 5 Press ON SCREEN ...

Страница 56: ...the SEA menu The adjustment you have made is active but not stored 7 When you finish press EXIT repeatedly until the menu disappears from the TV Basic Settings 1 Press any button of ON SCREEN CONTROL fi once The MAIN MENU appears on the TV 2 Press ON SCREEN CONTROL fi to move to SETTING then press The SETTING 1 or SETTING 2 menu appears 3 Press ON SCREEN CONTROL fi to the setting item you want to ...

Страница 57: ...til the menu disappears from the TV Storing the Preset Stations Also see page 24 1 Press any button of ON SCREEN CONTROL fi once The MAIN MENU appears on the TV 2 Press ON SCREEN CONTROL fi to move to TUNER CONTROL then press The TUNER CONTROL menu appears 3 Tune into a station on the TUNER CONTROL menu referring to Operating the Tuner above 4 Press ON SCREEN CONTROL fi to move to PRESET MEMORY th...

Страница 58: ...ress SET to enter the selected character 9 Repeat steps 7 and 8 to enter up to four characters 10 Press ON SCREEN CONTROL fi to move to PRESET NAME then press SET to store the setting The TUNER CONTROL menu appears again 11 When you finish press EXIT repeatedly until the menu disappears from the TV MAIN MENU PRESET MEMORY menu Character entry screen TUNER CONTROL menu PRESET MEMORY menu MAIN MENU ...

Страница 59: ...ONTROL fi once The MAIN MENU appears on the TV 2 Press ON SCREEN CONTROL fi to move to TUNER CONTROL then press The TUNER CONTROL menu appears 3 Press ON SCREEN CONTROL fi to move to RDS INFORMATION then press The RDS INFORMATION menu appears 4 When you finish press EXIT repeatedly until the menu disappears from the TV RDS INFORMATION RETURN CH29 FM107 90MHz STATION FM TOKYO PROG TYPE TRAFFIC RADI...

Страница 60: ...and cassette deck or MD recorder will turn off standby Synchronized Recording Synchronized recording means the cassette deck or MD recorder starts recording as soon as a CD or a record begins playing To use synchronized recording follow these steps 1 Put a tape in the cassette deck or an MD in the MD recorder and a disc in the CD player or a record on the turntable 2 Press the record button and th...

Страница 61: ...tereo mini plugs not supplied with this receiver IMPORTANT Set the Master Slave Selector on the rear to 1 MASTER UNIT 2 SLAVE UNIT is just for the serviceman s use The TEXT COMPU LINK remote control system does not function with the selector set to 2 SLAVE UNIT 3 Connect your CD player MD recorder and this receiver using the cables with RCA pin plugs see page 9 and a digital cable if you want see ...

Страница 62: ...usic genre When this is selected in front you can change the disc information by pressing Each time you press the button disc information see the note changes 8 Select or then press SET to change the track 9 Usable buttons and their functions for the current selection Indication here will be changed what is currently selected in front on the screen 6 When you finish press EXIT repeatedly until the...

Страница 63: ...on alternates between its performer and its disc title Going to the Disc Information screen see page 57 Press ON SCREEN CONTROL fi to move to a searched disc then press SET Showing unseen disc information if more than 5 discs are listed as a result of the search Press ON SCREEN CONTROL fi to move to or then press SET Going back to the PERFORMER SEARCH screen Press EXIT Search a disc by its disc ti...

Страница 64: ...n appears on the TV 3 Press ON SCREEN CONTROL fi to move to GENRE then press SET The GENRE SEARCH screen appears 4 Press ON SCREEN CONTROL fi to move to the genre you want to search then press SET To show the unseen genres press ON SCREEN CONTROL fi until they appear Disc search starts then the SEARCH RESULT screen showing the disc titles appears 5 On the SEARCH RESULT screen you can do the follow...

Страница 65: ...you want then press SET The selected User File screen appears on the TV The disc information shown will be the disc title If no disc title information is recorded for the discs only the disc numbers will be shown 4 On this selected User File screen you can do the following Changing the indication of the disc information Press ON SCREEN CONTROL fi to move to a disc then press Each time you press th...

Страница 66: ...ON SCREEN CONTROL fi to move in front of a character you want then press SET to enter the character If the current CD is a CD Text go to step 5 without entering the performer To use the lower case letters press ON SCREEN CONTROL fi to move to SHIFT then press SET To use the upper case letters again press ON SCREEN CONTROL fi to move to SHIFT then press SET 4 Repeat step 3 until you finish putting ...

Страница 67: ... following the procedure on page 57 2 Press ON SCREEN CONTROL fi to move to TITLE INPUT then press SET The DISC TITLE INPUT screen appears on the TV 3 Enter the disc title referring to steps 3 and 4 on page 61 You can enter up to 32 character for the disc title 4 Press ON SCREEN CONTROL fi to move to the disc title you have just entered then press SET The disc title is stored into the memory and t...

Страница 68: ...t to AUDIO TV VCR you can perform the following operations on a CD player PLAY Starts playing 4 4 4 4 4 Returns to the beginning of the current or previous track Skips to the beginning of the next track STOP Stops playing PAUSE Pauses playing To release it press PLAY 1 10 10 Selects a track number directly For track number 5 press 5 For track number 15 press 10 then 5 For track number 20 press 10 ...

Страница 69: ... temporarily To release it press the PLAY button REC Press this button with the PLAY button to start recording Press this button with the PAUSE button to enter recording pause MD recorder After pressing TAPE MD or TAPE CONTROL with the remote control mode selector set to AUDIO TV VCR you can perform the following operations on the MD recorder PLAY Starts playing 4 4 4 4 4 Returns to the beginning ...

Страница 70: ...ious track Skips to the beginning of the next track STOP Stops playing PAUSE Stops playing temporarily To release it press the PLAY button RM SR884RU REMOTE CONTROL SOUND CONTROL CD DISC VCR1 ANALOG DIGITAL AUDIO DVD VCR1 VIDEO VCR2 CD TV DBS TEST REAR R REAR L SEA MODE SUBWOOFER TAPE MD FM AM PHONO 5 4 6 2 1 3 8 7 P 9 0 10 10 AUDIO TV VCR VCR1 TAPE CONTROL VOLUME CHANNEL MUTE FF PLAY STOP REC TV ...

Страница 71: ...anges the channels 1 9 0 100 Selects the channels RETURN Alternates between the previously selected channel and the current channel RM SR884RU REMOTE CONTROL SOUND CONTROL CD DISC VCR1 ANALOG DIGITAL AUDIO DVD VCR1 VIDEO VCR2 CD TV DBS TEST REAR R REAR L SEA MODE SUBWOOFER TAPE MD FM AM PHONO 5 4 6 2 1 3 8 7 P 9 0 10 10 AUDIO TV VCR VCR1 TAPE CONTROL VOLUME CHANNEL MUTE FF PLAY STOP REC TV VIDEO T...

Страница 72: ... The following buttons can be used for operating the TV with the remote control mode selector set to AUDIO TV VCR TV CATV DBS Turns on and off TV TV VOLUME Adjusts the volume TV VIDEO Sets the input mode either TV or VIDEO After pressing TV DBS with the remote control mode selector set to AUDIO TV VCR you can perform the following operations on the TV CHANNEL Changes the channels 1 10 0 100 10 Sel...

Страница 73: ... requires pressing ENTER after selecting a channel number 6 Try to operate your CATV converter or DBS tuner by pressing TV CATV DBS When your CATV converter or DBS tuner turns on or off you have entered the correct code 7 If there are more than one code listed for your brand of CATV converter or DBS tuner try each one until the correct one is entered Note Refer also to the manual supplied with you...

Страница 74: ...inds a tape FF Fast winds a tape REC Starts recording or enters recording pause 6 Try to operate your VCR by pressing VCR1 When your VCR turns on or off you have entered the correct code 7 If there are more than one code listed for your brand of VCR try each one until the correct one is entered Notes You can use either the VCR1 button or the VCR1 CONTROL button to activate the buttons listed to th...

Страница 75: ...t 070 087 Elin 037 Elite 218 Elta 009 Emerson 087 Erres 037 Ferguson 005 037 073 190 335 Fidelity 372 Finlandia 208 346 Finlux 037 070 072 087 179 346 Firstline 009 217 247 321 Fisher 208 217 Formenti 037 087 Frontech 163 247 448 Fujitsu 072 Funai 179 GEC 037 043 072 217 Geloso 009 Genexxa 163 218 Goldstar 037 217 290 Goodmans 036 037 072 179 217 235 257 317 GPM 218 Graetz 163 Granada 037 072 146 ...

Страница 76: ...63 RFT 087 Roadstar 009 218 SBR 037 043 SEG 036 217 SEI 087 177 Saba 087 163 335 Saikou 257 Saisho 009 011 177 211 235 354 Salora 163 Samsung 009 037 217 290 Sanyo 011 036 072 146 157 208 339 Schneider 037 218 247 Sei Sinudyne 010 Seleco 163 362 Sentra 035 Sharp 036 093 Siarem 087 Siemens 037 157 195 Silver 036 Singer 087 Sinudyne 087 177 235 Solavox 032 163 Sonitron 208 Sonoko 009 037 Sonolor 163...

Страница 77: ...00 Manufacturers codes for VCR Aiwa 000 Akai 106 Alba 209 278 Amstrad 000 278 ASA 037 081 Asuka 037 Baird 000 104 Basic Line 278 Blaupunkt 034 226 Brandt 320 Bush 209 278 CGE 000 Crown 278 Daewoo 278 De Graaf 042 166 Decca 000 081 Dumont 000 081 104 ESC 278 Ferguson 320 Fidelity 000 Finlandia 081 104 Finlux 000 042 081 104 Firstline 037 043 045 209 Fisher 104 Funai 000 GEC 081 GoldStar 037 Goodman...

Страница 78: ... Sanyo 104 Schaub Lorenz 000 104 Schneider 000 081 Sharp 048 Shintom 104 Siemens 037 081 104 Silva 037 Singer 045 Sinudyne 081 Sontec 037 Sony 032 033 034 Sunstar 000 Suntronic 000 Tashiko 000 Tatung 000 081 Technics 226 Telefunken 320 Tensai 000 Thomson 320 Thorn 104 Toshiba 043 045 081 Universum 000 037 081 106 Manufacturers codes listed on page 70 to 73 are subject to change without notice If t...

Страница 79: ...rclockwise three or four times then press STANDBY ON on the front panel If OVERLOAD does not disappear unplug the AC power cord then plug it back again Press STANDBY ON on the front panel then check the speaker wiring If OVERLOAD does not disappear unplug the AC power cord then plug it back again If speaker wiring is not short circuited contact your dealer Set the selector correctly either to AUDI...

Страница 80: ...re than 0 8 total harmonic distortion Total Harmonic Distortion 8 ohms 1 kHz 0 02 at 50 watts output Measured by JVC Audio Analysis System Audio Input Sensitivity Impedance 1 kHz PHONO MM 2 5 mV 47 k ohms CD TAPE MD TV SOUND DBS VCR1 VCR2 VIDEO DVD 200 mV 47 k ohms Audio Input DIGITAL IN Coaxial DIGITAL 1 DBS 0 5 Vp p 75 ohms Optical DIGITAL 2 DVD DIGITAL 3 CD 21 dBm to 15 dBm 660 nm 30 nm Audio O...

Страница 81: ... Monaural 16 3 dBf 1 8 µV 75 ohms Stereo 38 3 dBf 22 5 µV 75 ohms Signal to Noise Ratio IHF A weighted Monaural 80 dB at 85 dBf Stereo 73 dB at 85 dBf Total Harmonic Distortion Monaural 0 15 at 1 kHz Stereo 0 2 at 1 kHz Stereo Separation at REC OUT 40 dB at 1 kHz Capture Ratio 1 5 dB at 85 dBf Alternate Channel Selectivity 60 dB 400 kHz Frequency Response 30 Hz to 15 kHz 0 5 dB 3 dB AM MW LW tuner...

Страница 82: ...VICTOR COMPANY OF JAPAN LIMITED 0498OFMMDWJEM EN GE FR NL SP IT J VC ...

Отзывы: