background image

4

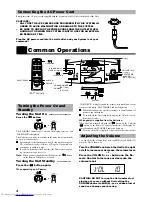
For private listening

Connect  a  pair  of  headphones  to  the  PHONES  jack.  No  sound
comes out of the speakers.
Be sure to turn down the volume before connecting or putting on
headphones.

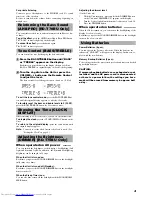
You can reinforce the bass sound to maintain rich, full bass at low
volume:

To get the effect,

 press the AHB (Active Hyper Bass) PRO button.

The “BASS” indicator lights up on the display.

To cancel the effect,

 press the button again.

The “BASS” indicator goes out.

You can control the tone by changing the bass and treble.

1. Press the BASS/TREBLE button until “BASS” 

or “TREBLE” appears on the display.

Each time you press the button, the display changes as follows:
BASS 

=

 TREBLE 

=

 original display 

=

 (back to the beginning)

2. Turn the Jog dial on the Unit or press the 

/– button on the Remote Control 
to adjust the level.

The bass or treble level changes between –6 and +6. (0: Flat)

To exit the tone control mode,

 press the BASS/TREBLE but-

ton until the original display appears, or wait for 15 seconds.

To forcibly reset the bass and treble levels to 0 (FLAT),

press the BASS/TREBLE button for 2 seconds or more.

While listening to a CD or the radio, you can see the current time.

To display the clock,

 press the CLOCK/DISPLAY button on the

Unit.

To return to the original display, 

press the same button until

the original display appears.

Note:

You need to set the clock first in order for it to work. (See 
“Setting the Clock” on page 9.)

When operated on AC power

———

You  can  switch  the  brightness  of  the  display’s  backlighting  (full
light  and  dimmed  light).  In  addition,  the  dimmed  backlighting
brightness can be changed in 16 steps.

When the Unit is turned on:

Each time you press the SNOOZE/DIMMER button, the backlight
fully turns on or dims.

When the Unit is turned off (Standby):

Each time you press the SNOOZE/DIMMER button, the backlight
dims or turns off.

When the Sleep Timer is on:

You can also dim or turn off the backlight with the SNOOZE/DIM-
MER button.

Adjusting the dimmer level:

(On the Unit only)
1.

With the Unit turned on, press and hold the DIMMER button 
on the Unit until “DIMMER:XX” appears on the display.

2.

Turn the Jog dial and adjust the dimmer level between 1 and 16.

3.

Press the DIMMER button.

When operated on batteries ————

When the Unit is turned on, you can turn on the backlighting of the
display for a few seconds.
Each time you press the SNOOZE/DIMMER button, the backlight
turns on for a few seconds.

Power Batteries (6 pcs.):

You can operate the System on batteries. When the batteries are 
exhausted, “NO BATT” will appear on the display. In this case, re-
place with the new batteries.

Memory Backup Batteries (3 pcs.):

Your settings such as the preset stations, clock and timer are backed
up with this batteries.

CAUTION: 
If memory backup batteries are exhausted or not 
installed, and the AC power cord is disconnected 
or there is a power failure, the settings you have 
made will be erased from memory in approx. half 
a day. 

Reinforcing the Bass Sound 
(AHB PRO) [RD-T70BU Only]

Tone Control (BASS/TREBLE)

Showing the Time (CLOCK/
DISPLAY)

Adjusting the Brightness 
(DIMMER) [RD-T70BU Only]

Using Batteries

Содержание RD-T50LB

Страница 1: ... or side of the cabinet Retain this information for future reference Model No Serial No LVT0931 001A J CD PORTABLE SYSTEM RD T70BU RD T50LB REMOTE CONTROL RM SRDT7A VOLUME BASS TREBLE BAND FM MODE TUNER CD SLEEP AHB PRO REPEAT 4 5 6 1 2 3 10 10 7 8 9 STANDBY ON SNOOZE DIMMER RD T70BU Only INSTRUCTIONS ...

Страница 2: ...URE INFORMATION This equipment has been tested and found to com ply with the limits for a Class B digital device pursu ant to Part 15 of the FCC Rules These limits are designed to provide reasonable protection against harmful interference in a residential installation This equipment generates uses and can radiate radio frequency energy and if not installed and used in accordance with the instructi...

Страница 3: ...tainers filled with water or liquids such as cosmetics or medi cines flower vases potted plants cups etc on top of this apparatus Attention Commutateur POWER Déconnecter la fiche de secteur poru couper complète ment le courant Le commutateur POWER ne coupe jamais complètement la ligne de secteur quelle que soit sa position Le courant peut être télécommandé ATTENTION 1 Ne bloquez pas les orifices o...

Страница 4: ... The names of buttons controls are written in all capital letters e g TUNER BAND If the button names on the Unit and the Remote Control are the same the description on which the button is used will be omitted System functions are written with an initial capital letter only e g Normal Play Use the table of contents to look up specific information you require We ve enjoyed making this manual for you...

Страница 5: ...nly Match the polarity and on the batteries with the and markings in the battery compartment CAUTION Handle batteries properly To avoid battery leakage or explosion Remove batteries when the Unit or the Remote Control will not be used for a long time When you need to replace the batteries replace batteries at the same time with new ones Do not use an old battery with new ones Do not use different ...

Страница 6: ...nit completely unplug the AC power cord from the AC outlet When power is supplied from the batteries When the Unit is turned off with the button on the Unit the button on the Remote Control is ineffective the display be comes blank and the STANDBY indicator lights up To switch off the Unit completely remove the batteries from the Unit You can adjust the volume level between MIN 0 and MAX 32 when t...

Страница 7: ... can switch the brightness of the display s backlighting full light and dimmed light In addition the dimmed backlighting brightness can be changed in 16 steps When the Unit is turned on Each time you press the SNOOZE DIMMER button the backlight fully turns on or dims When the Unit is turned off Standby Each time you press the SNOOZE DIMMER button the backlight dims or turns off When the Sleep Time...

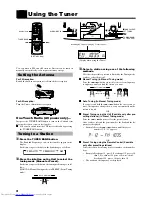
Страница 8: ... 4 or button for one second or more the frequency changes down or up automatically until a station is found OR Preset Tuning using the Unit Possible only after pre setting stations In Preset Tuning mode Press the 4 or button to select the preset station After you have selected the preset number the band and the fre quency are displayed Example Press the 4 or button until the preset number 12 P 12 ...

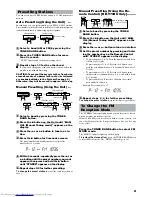
Страница 9: ...essing the TUNER BAND button 2 Press the 7 button on the Unit until MAN UAL Manual Tuning mode appears on the display 3 Press the 4 or button to tune in a station 4 Set the preset number by pressing and hold ing the number key on the Remote Control until STORED appears on the display To preset numbers 1 to 10 Press the number key and hold it down for 2 seconds To preset numbers 11 to 19 Press the ...

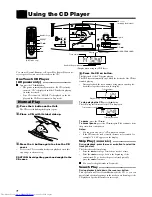
Страница 10: ...used Notes You can place an 8 cm 3 CD without an adaptor If the CD cannot be read correctly because it is scratched for example 0 0 00 appears on the display Skip Play 4 or During playback press the 4 or button to select the track you want The selected track starts playing Press the button to go forward one track at a time Press the 4 button to go back to the beginning of the current track To go b...

Страница 11: ...on Pressing the 0 button to open the CD cover will also cancel Random Play mode One track or all the tracks on a CD will play repeatedly when you use this mode On the Unit 1 In Stop mode press the RANDOM REPEAT button Each time you press the button the Random Repeat indicator changes as follows P P ALL P RANDOM RANDOM blank display back to the beginning P Will repeat one track P ALL Will repeat al...

Страница 12: ...ears for 2 seconds The selected time is set and the seconds start counting from 0 The Timer 1 or Timer 2 is turned on at the set time and the System turns on The selected source is played and the volume fades in The System will automatically turn off in 1 hour The setting procedure for the Timer 1 and Timer 2 is identical Notes Perform each setting step within 30 seconds Otherwise setting is clear...

Страница 13: ...ER1 2 button to turn off the Timer 1 2 indicator TIMER1 2 To reactivate the timer repeatedly press the TIMER1 2 button until the Timer 1 2 indicator TIMER1 2 remains lit again To confirm the timer settings repeatedly press the TIMER1 2 button To change the timer settings repeat the setting procedure from the beginning Tip The timer works even if the Unit is turned on So while listening to a CD or ...

Страница 14: ...y CD may not play correctly If a CD is dirty wipe it with a soft cloth in a straight line from center to edge CAUTION Do not use any solvent for example conventional record cleaner spray thinner ben zine etc to clean a CD Moisture Condensation Moisture may condense on the lens inside the Unit in the following cases After turning on heating in the room In a damp room If the Unit is brought directly...

Страница 15: ...splayed Manual tuning is not possible with the 4 key Preset Tuning mode is selected Press the button on the Unit until MANUAL is displayed Unable to operate the Remote Control The path between the Remote Control and the sensor on the Unit is blocked The batteries have lost their charge Remove the obstruction Replace the batteries Operations are disabled The built in microprocessor has malfunc tion...

Страница 16: ...st authorized servicer or visit our website at www JVC com Remember to retain your Bill of Sale for Warranty Service Do not service the television yourself Caution To prevent electrical shock do not open the cabinet There are no user serviceable parts inside Please refer to qualified service personnel for repairs Accessories To purchase accessories for your JVC product please call toll free 1 800 ...

Страница 17: ...shipment due to act of God and cosmetic damage 5 Signal reception problems and failures due to line power surge 6 Video Pick up Tubes CCD Image Sensor Cartridge Stylus Needle are covered for 90 days from the date of purchase 7 Batteries except that Rechargeable Batteries are covered for 90 days from the date of purchase There are no express warranties except as listed above THE DURATION OF ANY IMP...

Страница 18: ...VICTOR COMPANY OF JAPAN LIMITED EN 0302HMOCREHIT RC BZ6BU CD PORTABLE SYSTEM ...

Отзывы: