9
■■
Using the Timers
You can enjoy timer settings with the unique dual timer, consisting
of the Timer 1 and Timer 2. These Timers can independently select
a playback source from the CD player (Normal Play or Random
Play), Tuner, or 8 melodies. For example, you can make up to a mel-
ody every morning with the Timer 1, and without changing the Tim-
er 1 setting, you can listen to the favorite program by reserving it
with the Timer 2. Also, you can use the Sleep Timer to fall asleep
to music. Your System automatically turns off after a certain length
of time.
CAUTION: If memory backup batteries are ex-
hausted or not installed, and the AC power cord is
disconnected or there is a power failure, time set-
tings will be erased from memory in approx. half
a day. Then, the display blinks “AM 12:00”. If this
happens, set the current time (clock) and perform
the timer setting again.
When the Unit is operated on AC power or batteries for the first
time, the time indication “AM 12:00” will blink on the display and
you need to set the clock.
You can set the clock whether the Unit is turned on or off (Standby)
if the AC power is supplied to the Unit.
Notes:
•
The clock must be correctly set for the timer to work.
•
The clock may gain or lose 1 to 2 minutes per month.
•
Perform each setting step within 30 seconds. Otherwise, setting is
cleared and the procedure must be repeated from the beginning.
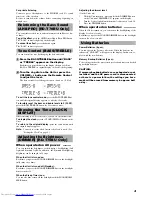
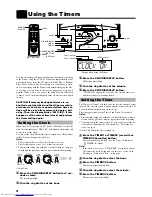
(On the Unit)
■
1. Press the CLOCK/DISPLAY button for 3 sec-
onds or more.
The hour digits blink.
■
2. Turn the Jog dial to set the hour.
■
3. Press the CLOCK/DISPLAY button.
The minute digits blink.
■
4. Turn the Jog dial to set the minute.
■
5. Press the CLOCK/DISPLAY button.
“CLOCK OK” appears for 2 seconds. The selected time is set
and the seconds start counting from 0.
The Timer 1 or Timer 2 is turned on at the set time and the System
turns on. The selected source is played and the volume fades in. The
System will automatically turn off in 1 hour.
The setting procedure for the Timer 1 and Timer 2 is identical.
Notes:
•
Perform each setting step within 30 seconds. Otherwise, setting is
cleared and the procedure must be repeated from the beginning.
•
Tuner timer uses the preset station. So, you need to preset the sta-
tions in Preset Tuning mode beforehand. See, “Presetting Sta-
tions” on page 6.
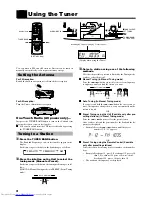
(On the Unit: While the Unit is turned on)
■
1. Press the TIMER1 or TIMER2 (we write as
TIMER1/2 hereafter) button.
The current hour digits blink. Also, the Timer 1/2 indicator
(
TIMER1/2) blinks.
Note:
•
If the clock is not set yet, “CLOCK SET” is displayed and the
Unit enters the clock setting mode. In this case, set the clock
referring to “Setting the Clock” on this page.
■
2. Turn the Jog dial to select the hour.
■
3. Press the TIMER1/2 button.
The current minute digits blink.
■
4. Turn the Jog dial to select the minute.
■
5. Press the TIMER1/2 button.
The current source name blinks.
REMOTE CONTROL RM-SRDT7A
VOLUME
BASS/TREBLE
BAND
FM MODE
TUNER
CD
SLEEP
AHB PRO
REPEAT
4
5
6
1
2
3
10
+10
7
8
9
STANDBY/ON
SNOOZE
/DIMMER
MULTI CONTROL
MANUAL/
PRESET TUNING
AUTO PRESET
TUNER BAND
CD
RANDOM/
REPEAT
BASS/
TREBLE
MULTIJOG
VOLUME
AHB PRO
SNOOZE
TIMER1
TIMER2
FAVORITE
TIMER
SLEEP
CLOCK/
DISPLAY
STANDBY
STANDBY/ON
CD PORTABLE SYSTEM RD-T70R
DIMMER
CLOCK/DISPLAY
SNOOZE
/DIMMER
SLEEP
[RD-T70BU Only]
Jog dial
TIMER 1
TIMER 2
SLEEP indicator
SNOOZE/DIMMER
[RD-T70BU]
SNOOZE
[RD-T50LB]
SLEEP
Timer 1 indicator
Timer 2 indicator
(Display when using the Timer)
Setting the Clock
CLOCK/
DISPLAY
MULTIJOG
VOLUME
MULTIJOG
VOLUME
CLOCK/
DISPLAY
CLOCK/
DISPLAY
(for 3 sec)
Setting the Timer

