background image

3. Menu Operation


Press “MENU” and it will display menu system


  Revolve “OK” to select an item. The selected item will be highlighted display. 

  Press “OK” to enter the selected item. 

  Under menu system, press “MENU” to back to previous menu. 

  The menu will automatically save and quit if it remains idle. 


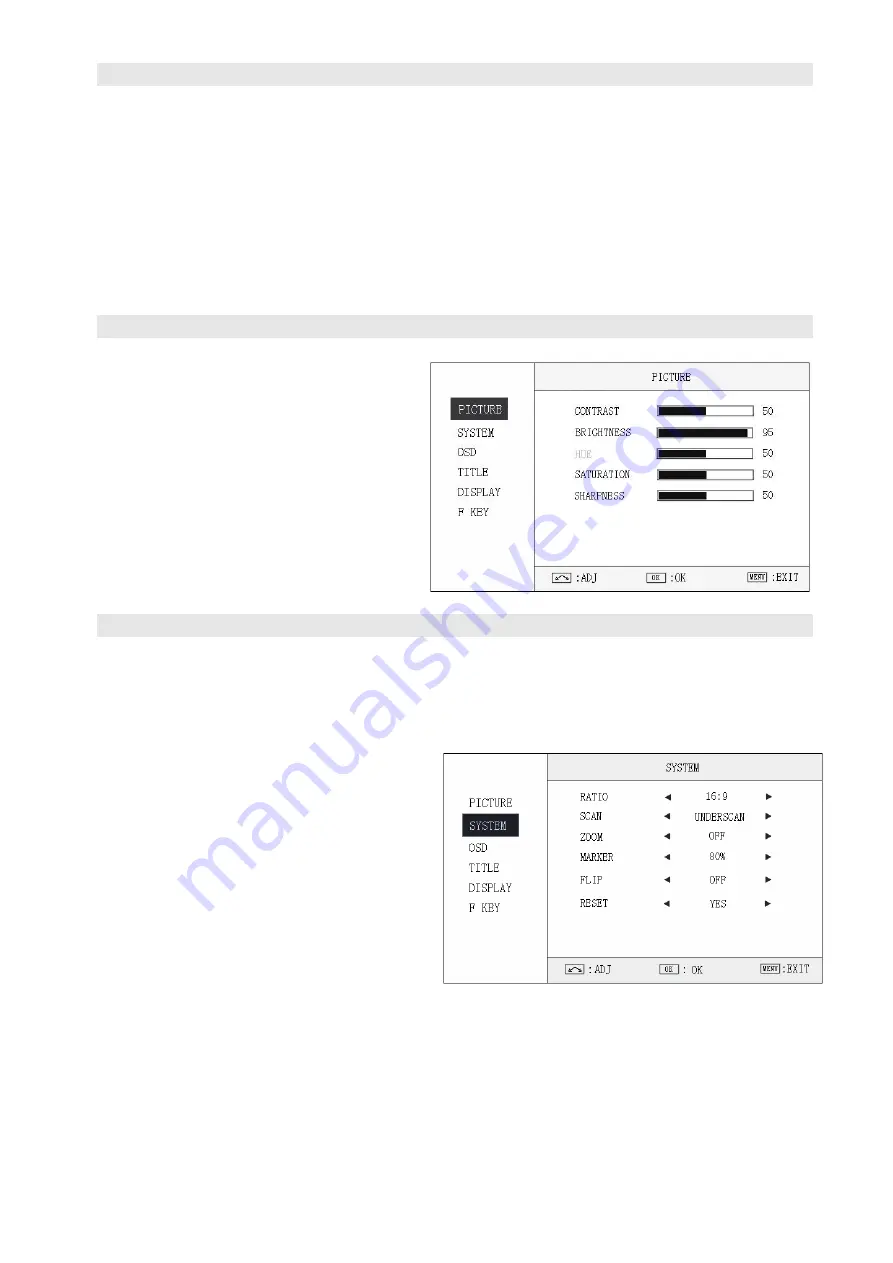
4. Picture Settings Submenu


The Picture Settings Submenu includes: 


CONTRAST:

 0-100 value adjustment 

⑵ 

BRIGHTNESS:

 0-100 value adjustment


HUE:

 0-100 value adjustment   

(Only available under Composite input) 

  SATURATION:

 0-100 value adjustment 


SHARPNESS:

 0-100 value adjustment       


5. System Configuration Submenu


The System Configuration Submenu includes:   


RATIO:

 Select “16:9” or “4:3” to adjust the aspect ratio.   


SCAN:

 “UNDERSCAN” / “OVERSCAN” selection   


ZOOM:

 “OFF”, “ZOOM1” and “ZOOM2” selection 

ZOOM1: Canon DSLR scale zoom-in   

ZOOM2: Pixel to Pixel zoom-in 

  MARKER:

  Select  and  set  the  safety  mark 

scale from 80%, 85%, 90% and 95%. 


FLIP: 

Select “YES” to flip the image by 180

°


RESET:

 Revolve “OK” to RESET and press to 

recover all to factory setting. 


All manuals and user guides at all-guides.com

Содержание ProHD DT-X71CI

Страница 1: ...or User Manual Model DT X71FI HDSDI HDMI Waveform Audio meter Focus assist DT X71HI 3GSDI HDMI DT X71CI HDMI Please read this User Manual throughout before using All manuals and user guides at all guides com a l l g u i d e s c o m ...

Страница 2: ...warranty period of this product is 2 years and does not cover the following 1 Physical damage to the surface of the products including scratches cracks or other damage to the LCD screen or other externally exposed parts 2 Misuse abuse or negligent operation to the product 3 The product is disassembled by anyone other than an authorized service center It is considered normal that the LCD bright dot...

Страница 3: ...make sure the voltage range supplied power and polarity of power lead are fit Please disconnect the power cable or take off the battery under the following situations 1 If you do not operate this monitor for a period of time 2 If the power cable or power adaptor is damaged 3 If the monitor housing is broken Working Environment 1 Please don t lay this product on the unstable place 2 Please don t la...

Страница 4: ...ay the SMPTE timecode which is used extensively for synchronization and for logging and identifying material in recorded media Peaking focus assist red blue switch The Peaking focus assist function is to mark the sharpest edges of the image with red or blue color for users to check if the subjects are focused Zebra stripes Zebra Stripes are used to check if the image is over exposed or not by show...

Страница 5: ... the top of screen Front and Rear 3 color TALLY light 2 TALLY lights design to give live signals to people in front of the camera as well as the camera operator behind DT X71CI High resolution 7 LCD Panel 16 9 1024 600 16 77 million colors 900 1 contrast and H160 V160 viewing angle Multiple inputs 1 HDMI 1 Composite input and L R stereo audio input Loop through outputs 1 HDMI and 1 Composite loop ...

Страница 6: ...e focus assist and switch off in turn F COLOR False color Press F COLOR once it will display the current false color on off status Press F COLOR again to switch on off the false color mode DISPLAY Display current settings Press Display to display safety mark title and the current input signal information F2 User definable function key 2 F3 User definable function key 3 WAVEFORM Display waveform Pr...

Страница 7: ...EEN light is on when connecting the terminal G with GND and goes out when disconnecting The YELLOW light is on when connecting the terminal Y with GND and goes out when disconnecting HDMI LOOP HDMI loop through output SDI IN1 2 HD SD SDI input BNC connector CVBS IN Composite video input BNC connector Input formats Terminal 1 2 3 4 5 6 7 8 9 Description Y G R GND GND GND Input Supported formats CVB...

Страница 8: ...mposite video HDMI Press to switch the input signal to HDMI SDI Press to switch the input signal to SDI OVERSCAN Overscan Underscan switch MENU Press to enter Menu F1 User definable function key 1 F2 User definable function key 2 RATIO 16 9 and 4 3 switch ZOOM Picture Zoom in Press ZOOM to switch ZOOM1 Canon DSLR scale zoom in and ZOOM2 pixel to pixel zoom in DISPLAY Display current settings Press...

Страница 9: ...ght is on when connecting the terminal G with GND and goes out when disconnecting The YELLOW light is on when connecting the terminal Y with GND and goes out when disconnecting AUDIO L Stereo audio left channel input RCA connector AUDIO R Stereo audio right channel input RCA connector CVBS LOOP Composite video loop through output BNC connector Input formats Terminal 1 2 3 4 5 6 7 8 9 Description Y...

Страница 10: ...MI Press to switch the input signal to HDMI B W Black and White mode OVERSCAN Overscan Underscan switch MENU Press to enter Menu F1 User definable function key 1 F2 User definable function key 2 RATIO 16 9 and 4 3 switch ZOOM Picture Zoom in Press ZOOM to switch ZOOM1 Canon DSLR scale zoom in and ZOOM2 pixel to pixel zoom in DISPLAY Display current settings Press Display to display safety mark tit...

Страница 11: ...hen disconnecting The GREEN light is on when connecting the terminal G with GND and goes out when disconnecting The YELLOW light is on when connecting the terminal Y with GND and goes out when disconnecting AUDIO L Stereo audio L input RCA connector AUDIO R Stereo audio R input RCA connector CVBS LOOP Composite video loop through output BNC connector Input formats Terminal 1 2 3 4 5 6 7 8 9 Descri...

Страница 12: ...tment HUE 0 100 value adjustment Only available under Composite input SATURATION 0 100 value adjustment SHARPNESS 0 100 value adjustment 5 System Configuration Submenu The System Configuration Submenu includes RATIO Select 16 9 or 4 3 to adjust the aspect ratio SCAN UNDERSCAN OVERSCAN selection ZOOM OFF ZOOM1 and ZOOM2 selection ZOOM1 Canon DSLR scale zoom in ZOOM2 Pixel to Pixel zoom in MARKER Se...

Страница 13: ...ton to select the letters and press OK to input Select SPACE to input space and DEL to delete the left letter Max 10 letters are supported After setting press MENU the system will save data to current user and quit menu The menu will automatically save and quit if it remains idle 8 Display Settings Submenu The DISPLAY settings submenu is to select the items to be displayed on screen when DISPLAY b...

Страница 14: ...itch 04 B W Color Black white switch 05 BLUE ONLY Blue only mode switch on off 05 FLIP Image flip 06 ZEBRA Zebra over exposure switch on off 07 VECTOR Vector scope switch on off 08 PATTERN Internal colorbar switch on off 09 RGB HIST R G B Histogram switch on off DT X71CI 10 TIMECODE SDI timecode display switch on off 01 RATIO Aspect ratio switch 11 F COLOR False color mode switch on off 02 SCAN Un...

Страница 15: ...I 480P 576P 1080i 60 59 94 50 720p 60 59 94 50 HDMI 1080p 60 59 94 50 30 29 97 25 24 23 98 General Working voltage DC12V or Battery 6 5V 17V DT X71FI 15W DT X71HI 8W Power consumption DT X71CI 7W Working temperature 0 40 Working humidity 10 90 Storage temperature 15 60 Storage humidity 10 90 Dimensions 192 139 47mm Net weight 550g DT X71CI doesn t support SDI input Only DT X71HI support SMPTE 425M...

Страница 16: ...onal Video Products To obtain service or for further information please contact SWIT Electronics USA LLC Address 4300 Stevens Creek Blvd Suite 230 San Jose CA 95129 Toll free 1 866 986 SWIT 7948 Tel 408 260 8258 Fax 408 228 8438 Email info swit us Website www swit us Version 130129 All manuals and user guides at all guides com a l l g u i d e s c o m ...

Отзывы: