background image

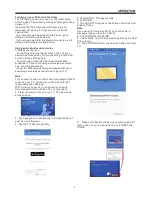
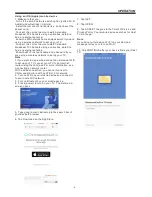
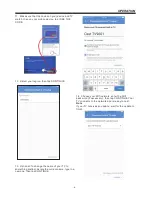
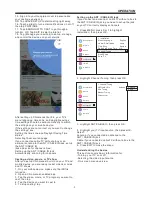
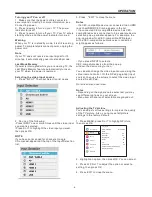
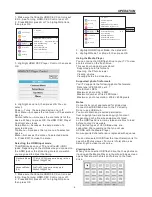
1.  Make sure that Enable HDMI CEC Control is set 
to On. See Turning  HDMI-CEC Control on or off .
2.  Press MENU, press S or T to highlight Options, 
then press OK.

3.  Highlight HDMI CEC Player  Control, then press
OK.

4.  Highlight an option, then press OK. You can 
select:
Power—Turns  the selected device on or off.
Root Menu—Accesses the root menu of the selected 
device.
Contents Menu—Accesses the contents list of the 
device. When you press OK, the HDMI CEC Player 
Control menu closes.
Setup Menu—Accesses  the setup menu of a 
selected device.
Top Menu—Accesses  the top menu of a selected 
device.
Menu—Accesses  the menu of a selected device.
5.  Press EXIT to close the menu.

Selecting the HDMI Input mode

The HDMI jacks on your TV are Ultra HD (UHD) 
jacks. Depending on the UHD device you connect to 
the HDMI jack or the streaming content you watch, 
you may need to adjust the timing.

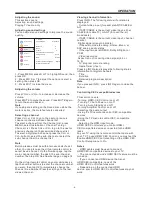
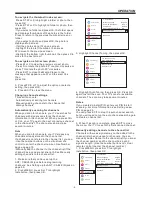
1.  Make sure that Enable HDMI CEC Control is set 
to On. See Turning  HDMI-CEC Control on or off .
2.  Press MENU, press S or T to highlight Options, 
then press OK.

Accessibility

Picture

Sound

Options

timers

Get Help

<  Options

HDMI CEC control Setup

HDMI CEC Player Control

HDMI Model       Advance Mode(2.0)

Auto Input Sensing                 Off

Input labeling

Power Mangement

Parental PIN Setup

Channel Options

Photos

Parental Control and Locks

Installation

Standard Mode:
(1.4)

Advance Mode:
(2.0)

YCbCr 422/444 (supports timing limit on
3840x2160@30Hz)

YcbCr 420  (supports timing up to
3840x2160@60Hz)

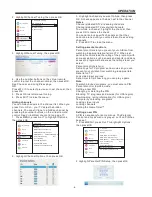
Accessibility

Picture

Sound

Options

timers

Get Help

<  Options

Channel Options

Photos

HDMI CEC control Setup

HDMI CEC Player Control

HDMI Model  Advance Mode(2.0)

Auto Input Sensing                 Off

Input labeling

Power Mangement

Parental PIN Setup

Parental Control and Locks

Installation

Standard Mode(1.4)

Advance Mode(2.0)

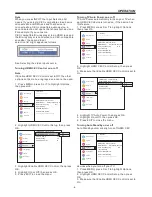
3.  Highlight HDMI Input Mode, then press OK.
4.  Highlight Mode 1 or Mode 2, then press OK.

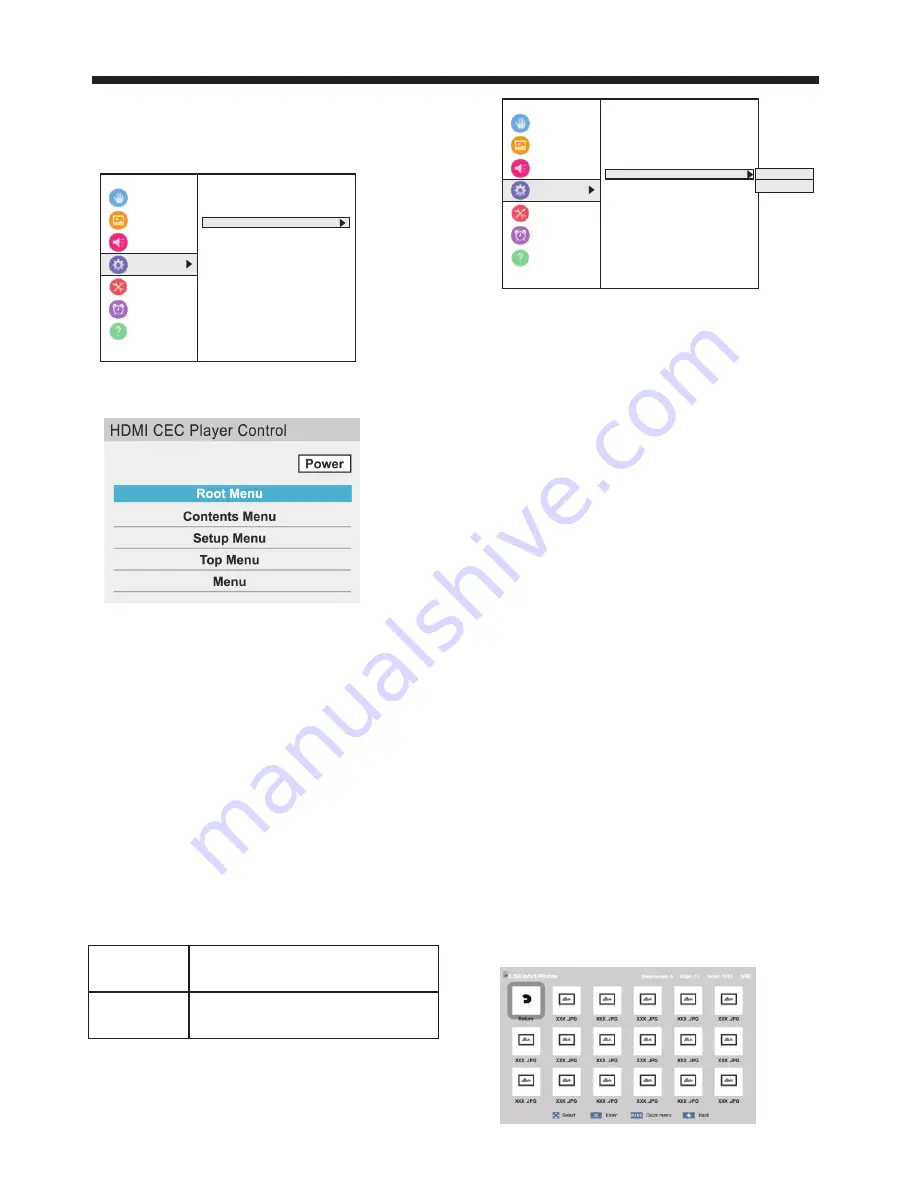
Using the Media Player

You can connect a USB flash drive to your TV to view 
photos stored on the flash drive.
This section includes topics about:
 Supported photo file formats
 Opening  the Photos viewer
 Viewing  photos
 Viewing photos in a slideshow

Supported photo file formats

Your TV supports the following photo file formats:
 Data type: JPEG EXIF ver 2.1
 File format: JPEG
 Maximum  photo size: 6 MB
 Maximum number of files: 500/folder
 Maximum  photo resolution: 4096 × 4096 pixels

Notes

Connectivity is not guaranteed for all devices.
Connect the USB flash drive to the TV directly.
Do not use a USB Hub.
You must obtain any required permission
from copyright owners to use copyright content.
Depending on the file size and amount stored
on the USB flash drive, it may take some time to load 
before content is viewable.
Only limited types of U3 USB devices  are
supported. We recommend that you not use
U3 USB with the Media Player.
Non-supported characters are replaced with squares.

You can also select USB from the Input Selection list to 
open the Photos viewer. For more information, see 
Selecting the video input source .

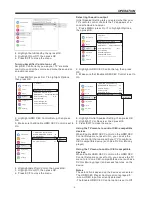
Viewing photos

When you connect a USB flash drive that has photos on 
it and open the Media Player, a thumbnail index screen 
opens that shows the files and folders on the flash 
drive.

OPERATION

-22-

Содержание LT-65MA 875

Страница 1: ...iversal remote control from your local retailer please contact the remote manufacturer for the required programming code PLEASE HAVE THE MODEL NUMBER READY PRIOR TO CALLING FOR RECYCLING INFORMATION PLEASE CONTACT CUSTOMER SERVICE CUSTOMER SERVICE 1 888 582 8870 ENGLISH USER GUIDE LT 65MA875 65 class 65 diagonal ...

Страница 2: ...Contents Safety and warnings 2 3 Warnings and Cautions 4 Introduction 5 6 Installation 7 10 11 Remote Control 12 Operation 13 25 Trouble Shooting 26 27 Wall Mount ...

Страница 3: ...ions 3 Heed all warnings 4 Follow all instructions 5 Do not use this apparatus near water 6 Clean only with non abrasive dry cloth 7 Do not block any ventilation openings install in accordance with the instructions 8 Do not install near any heat sources such as radiators heat registers stoves or other apparatus including amplifiers that produce heat 9 Do not defeat the safety purpose of the polari...

Страница 4: ...d to provide reasonable protection against harmful interference in a residential installation This equipment generates uses and can radiate radio frequency energy and if not installed and used in accordance with the instructions may cause harmful interference to radio communications However there is no guarantee that interference will not occur in a particular installation If this equipment does c...

Страница 5: ...er Adequate ventilation is essential to prevent failure of electrical components Caution Do not trap the power supply cord under the television receiver Caution Never stand on lean on or suddenly push the television or its stand You should pay special attention to children Serious injury may result if it should fall Caution Do not place your television on an unstable cart stand shelf or table Seri...

Страница 6: ...vid display HDR for TVs aims to show you a more realistic image one with more contrast brightness and color than before Audio accessibility Your TV provides audio descriptions of menus and some remote control functions Depending on the broadcaster audio narration of key elements in programs may also be available Congratulations on your purchase of a high quality JVC product Your represents the sta...

Страница 7: ...ng thunder and lighting unplug the power cord and antenna cord to prevent damage to your TV All repairs to this TV should only be performed by qualified TV service personnel Main Specifications Main features Integrated ATSC TV tuner for HDTV broadcast reception High brightness provides a vivid and brilliant picture Deeper blacks and brighter whites with high contrast Wide Screen aspect ratio 16 9 ...

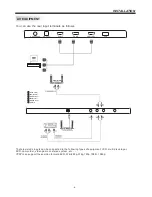
Страница 8: ...er button power key and source key hold it for a long time the TV will power down All the terminals are from left to right LAN VIDEO RF LAN VIDEO L R RF All the terminals are from left to right HEADPHONE OPTICAL HDMI3 HDMI2 HDMI1 ARC USB HEADPHONE OPTICAL HDMI3 HDMI2 HDMI1 ARC USB Front panel 1 Remote control sensor 2 Indicator LED RED STANDBY 3 Key board 3 2 1 INSTALLATION 7 Bottom ...

Страница 9: ...ale Input impendance 75 unbalanced F PRESET MODE HDMI 1 2 3 800 600 1024 768 60 60 37 88 48 36 RESOLUTION V Freq Hz H Freq KHz 1360 768 60 47 7 4 1280 768 60 47 3 5 1920 1080 60 67 5 6 30 67 5 7 60 135 3840 2160 3840 2160 INSTALLATION 8 ...

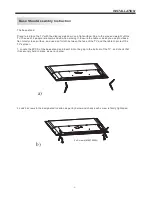
Страница 10: ...rface and use a soft cloth between the face of the TV and the table to protect the TV s screen 1 Locate the 2PCS of the base stand and insert it into the gap in the bottom of the TV and check that it is securely held in place as per a below 2 Lock 2 screws in the designated location as per b below and check each screw is firmly tightened The base stand b a 2 x Screws M6X18MM INSTALLATION Base Stan...

Страница 11: ... HDMI3 HDMI2 HDMI1 ARC USB LAN VIDEO L R RF INSTALLATION You can use the rear input terminals as follows 10 The television s inputs can be connected to the following types of equipment VCR multi disc player DVD camcorder video game or stereo system etc YPbPr can support these video formats 480i 576i 480p 576p 720p 1080i 1080p ...

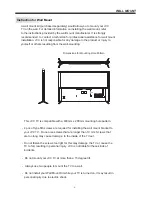
Страница 12: ...ble with a 400mm x 200mm mounting hole pattern JVC Do not mount your TV at more than a 15 degree tilt JVC Always use two people to mount the TV to a wall Do not install your Wall Mount Kit while your TV is turned on It may result in personal injury due to electric shock 4 pcs of type M6 screws are required for installing the wall mount bracket to your TV Do not use screws that are longer than 10 m...

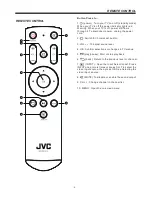
Страница 13: ... 3 VOL To adjust sound level 4 OK Confirm selections or changes in TV menus 5 play pause Start or stop playback 6 back Return to the previous level or channel 7 INPUT Open the Input Selection list Press INPUT one or more times or press S or T to select the video input source then press OK See Selecting the video input source 8 MUTE To disable or enable the sound output 9 CH Change channel in chann...

Страница 14: ...e Wifi network name and password if you are using a wireless network to set up your TV Note 1 If you want to use a wired connection instead of Wifi to set up your TV connect your TV to an Internet router using the LAN jack With a wired connection you cannot connect to Chromecast built in with an LTE or 3G network 2 Press power to turn on your TV The Set me up screen opens 3 Type google com cast se...

Страница 15: ...6 Tap LEARN HOW TO CAST to go through a tutorial ORTap SKIP to skip the tutorial 17 Tap Manage your devices to set up manage and control the devices on your network After setting up Chromecast built in your TV s menu language time zone and daylight savings time settings should be set automatically to match the settings on your mobile device If the settings are not correct or you want to change the...

Страница 16: ...u want to use a wired connection instead of Wifi to set up your TV connect your TV to an Internet router using the LAN jack For more information see Connecting a network router With a wired connection you cannot connect to Chromecast built in with an LTE or 3G network 2 Turn on Wifi on your mobile device and connect it to your home Wifi network 3 Turn on Bluetooth on your mobile device 4 Press pow...

Страница 17: ...UE 13 Optional To change the name of your TV to something distinct delete the current name type in a new one then tap CONTINUE 14 Choose your Wifi network enter the Wifi password if necessary then tap CONTINUE Your TV connects to the network and is ready to cast Note If your TV receives an update wait for the update to finish OPERATION 16 ...

Страница 18: ...ur mobile device make sure that Wifi is turned on 2 Open a Chromecast enabled app 3 Tap the video movie or TV program you want to cast then tap 4 Tap the device you want to cast to 5 To stop casting tap Setting up the ANT CABLE IN jack If you connect an antenna or cable TV without a box to the ANT CABLE IN jack you need to set up the jack so your TV correctly displays channels 1 Press MENU press S...

Страница 19: ...adjust the option or select a setting then press OK 4 Press EXIT to close the menu Turning your TV on or off 1 Make sure that the power cord is connected securely and correctly For more information see Connecting power 2 Press power to turn on your TV The power indicator turns off 3 Press power to turn off your TV Your TV enters standby mode and the power indicator turns red Warning When your TV i...

Страница 20: ... Autio MTS Stereo Primary Audio Language English Digital Audio Output Rest Digital Audio Selcetion Installation Viewing channel information Press INFO The following status information is displayed Current video input for example ANT CABLE or AV If ANT CABLE is the current video input either CABLE for cable TV or ANT for over the air broadcasts If ANT CABLE is the current video input channel number...

Страница 21: ...C control Setup Installation On Off Turning TV Auto Power on or off TV Auto Power automatically turns on your TV when an HDMI CEC device is turned on if the device has this feature 1 Press MENU press S or T to highlight Options then press OK 2 Highlight HDMI CEC Control Setup then press OK 3 Make sure that Enable HDMI CEC Control is set to On 4 Highlight TV Auto Power then press OK 5 Highlight On ...

Страница 22: ...light HDMI CEC Control Setup then press OK 3 Make sure that Enable HDMI CEC Control is set to On 4 Highlight Initial Speaker Setting then press OK 5 Highlight TV or Receiver then press OK 6 Press EXIT to close the menu Using the TV remote to control CEC compatible devices When Enable HDMI CEC Control on the HDMI CEC Control Setup menu is set to On you can use the remote control that came with your...

Страница 23: ...s timers Get Help Options Channel Options Photos HDMI CEC control Setup HDMI CEC Player Control HDMI Model Advance Mode 2 0 Auto Input Sensing Off Input labeling Power Mangement Parental PIN Setup Parental Control and Locks Installation Standard Mode 1 4 Advance Mode 2 0 3 Highlight HDMI Input Mode then press OK 4 Highlight Mode 1 or Mode 2 then press OK Using the Media Player You can connect a US...

Страница 24: ...See Number page on page 18 Manually add the channel to the channel list if the channel has a good signal strength See Manually adding channels to the channel list 1 Make sure that you have set up the ANT CABLE IN jack before programming channels See Setting up the ANT CABLE IN jack on page 50 2 Press MENU press S or T to highlight Installation then press OK Accessibility Picture Sound Options time...

Страница 25: ... the channel then press OK to remove the check You can also lock specific channels so that they cannot be tuned until you unlock them See Locking channels 4 Press EXIT to close the menu Setting parental controls Parental controls let you prevent your children from watching inappropriate material on TV When set parental controls read the rating of the program with some exceptions such as news and s...

Страница 26: ...Change PIN or Delete PIN then press OK Accessibility Picture Sound Options timers Get Help Options Channel Options Photos HDMI CEC control Setup HDMI CEC Player Control HDMI Model Advance Mode 2 0 Auto Input Sensing Off Input labeling Power Mangement Parental PIN Setup Parental Control and Locks Installation Accessibility Picture Sound Options timers Get Help Channel Pin Delete PIN Parental PIN Se...

Страница 27: ...e displayed on your TV should be the same network name selected in your mobile device s available Wifi list Make sure that firewall and antivirus software on your router are up to date and are not blocking connections to Google Chromecast If you are renting a router contact your Internet service provider about firewall settings If you purchased the router check your network firewall settings Probl...

Страница 28: ... Press standby key on the remote control for inspecting No colour Normal audio Colour control Picture breaking up Normal audio or weak retune channel No colour Noise TVsystem Normal audio antenna position direction or connection Trouble phenomenon Symptom Ghost TROUBLE SHOOTING The LED TV panel is built with very high precision technology giving you fine picture details in vibrant color Occasional...

Страница 29: ...ore of the following measures Reorient or relocate the receiving antenna Increase the separation between the equipment and receiver Connect the equipment into an outlet on a circuit different from that to which the receiver is connected Consult the dealer or an experienced radio TV technician for help Warning Changes or modifications not expressly approved by the party responsible for compliance c...

Страница 30: ......
Отзывы: