background image

14

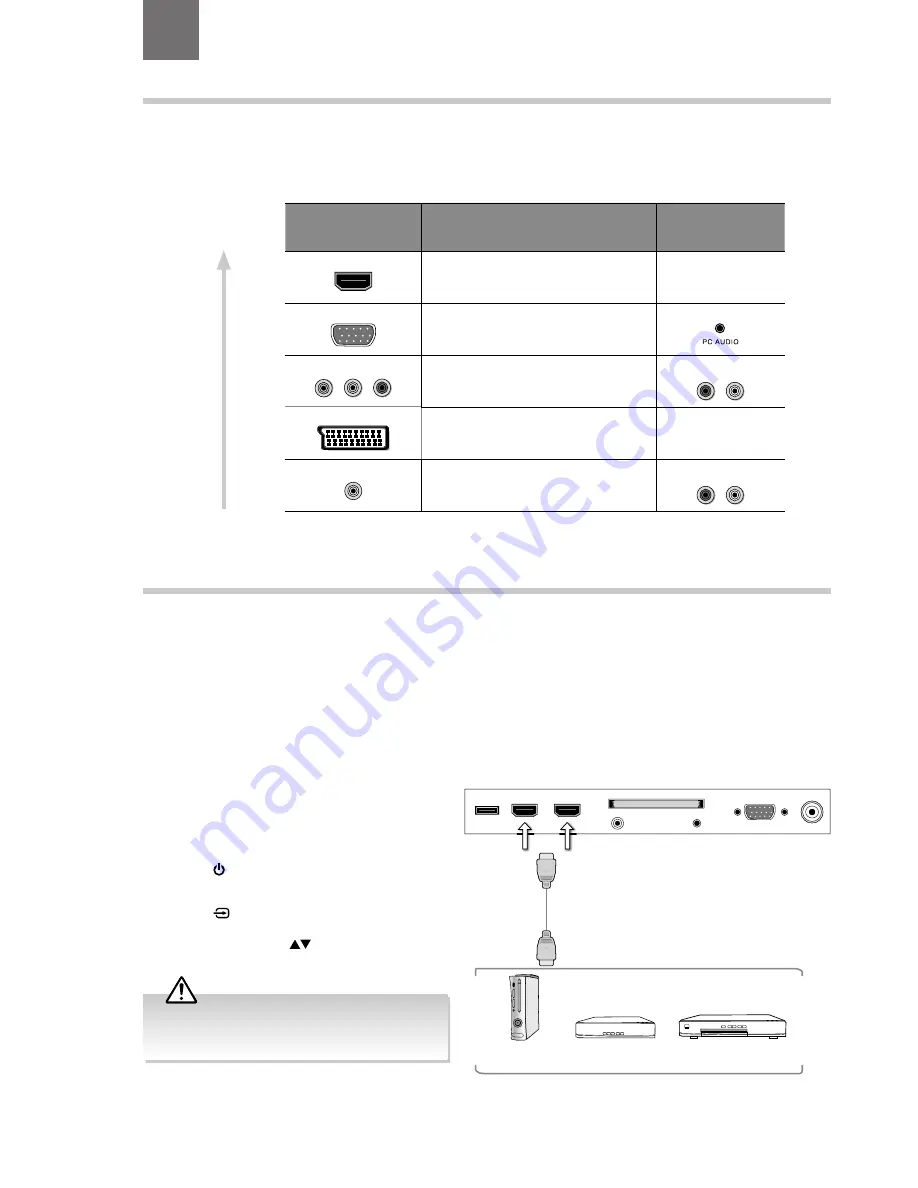
Connecting an AV Device Using an HDMI Cable

•  This TV can accept High-Definition Multimedia Interface (HDMI) supports HDCP (High-Bandwidth Digital Content Protection) 

Protocol.

•  This TV has a total of 2 HDMI input sockets, please make sure the correct input source is selected and corresponds to your 

connected HDMI input socket.

•  When you connect to the output of an HD ready player (blu-ray disc player, game console, set-top box or computer) switch to 

the HDMI function and the TV will automatically detect the resolution used by the HDMI source.

•  To get the best picture quality, adjust the blu-ray disc player, game console or set-top box output resolution up to 1920 x 

1080p.

1.  Use an HDMI cable to connect the TV’s HDMI input 

socket to the external AV device’s HDMI output socket. 

2.  Plug the connected devices into the mains socket 

before switching on the TV. 

3.  Press the   button on the right side panel of the TV 

or on the remote control to turn on your TV.

4.  Press the   button on the right side panel of the TV 

or the INPUT button on the remote control to display 
the Source List. Use the 

 buttons to select HDMI1 

HDMI2 and then press the OK button to confirm.

Making Video and Audio Connections

Not all AV devices have the ability to connect to a TV, please refer to the owner’s manual of your AV device for compatibility and 
connection procedures.

When connecting any external AV device, do not connect the mains cable to the mains socket until all other connections are 
complete.

Signal Type

Separate Audio 

Connection Required

HDMI1

HDMI
(480i/480p/576i/576p/720p/1080i/1080p)

No

PC IN

PC

Yes

Y

PB

PR

Component Video
(480i/480p/576i/576p/720p/1080i/1080p)

Yes

R

L

SCART

SCART (RGB Input)

No

VIDEO

Composite Video

Yes

R

L

Best Video 

Performance

3 Connections

Chapter

3

Although this TV is able to connect to an HDMI 
device, it is possible that some devices may not 
operate correctly.

USB

HDMI2

HDMI1(ARC)

PC IN

RF

COMMON  INTERFACE (CI)

HEADPHONE

PC AUDIO

Rear Right Side View of TV

HDMI Cable

(not included)

Blu-ray Player / DVD Player / 

Recorder

Set-top Box

Game Console

Содержание LT-22C540

Страница 1: ...Instruction Manual 22 LED TV WITH DVD PLAYER LT 22C540 ...

Страница 2: ......

Страница 3: ... the TV On for the First Time 18 Target Region Setting 19 Selecting the Input Source 19 Channel Selection 20 Listening to the Radio Radio Mode 20 Display Channel Information 20 Volume Adjustment 20 5 Customising TV Settings 21 Channel Setting TV DTV or Radio Mode 21 Auto Tuning 21 DTV Manual Tuning 22 ATV Manual Tuning 22 Channel Edit ATV DTV Mode 23 Signal Information DTV Mode 24 CI Common Interf...

Страница 4: ... Types 52 Supported Formats 52 Region Code 52 Basic DVD Playback Functions 53 Playing the DVD 53 Menu Playback for DVD 53 Stopping Playback 53 Previous Next for DVD CD Multimedia discs 53 Forward Backward for DVD CD Multimedia discs 53 Pause for DVD CD Multimedia discs 53 Repeat for DVD CD Multimedia discs 54 Display for DVD Multimedia discs 54 Goto for DVD CD Multimedia discs 54 Audio for DVD CD ...

Страница 5: ...eate a safety hazard If the mains cable is damaged it must be replaced by the manufacturer its service agent or similarly qualified persons in order to avoid a hazard Interference Do not place the unit on or near appliances which may cause electromagnetic interference If you do it may adversely affect the operating performance of the unit and cause a distorted picture or sound Optimum viewing View...

Страница 6: ...al electric shock CAUTION RISK OF ELECTRIC SHOCK DO NOT OPEN The lightning flash with arrowhead symbol within an equilateral triangle is intended to alert the user to the presence of uninsulated dangerous voltage within the unit s enclosure that may be of sufficient magnitude to constitute a risk of electric shock The exclamation point within an equilateral triangle is intended to alert the user t...

Страница 7: ...ew A x 1 Screw B x 4 Thank youfor purchasing your new JVC TV Your new TV has many features and incorporates the latest technology to enhance your viewing experience We recommend that you spend some time reading this instruction manual so that you fully understand these features You will also find some hints and tips to help you resolve any issues Read all the safety instructions carefully before u...

Страница 8: ...the instructions included in the mounting kit Due to space restrictions we recommend that you make all connections refer to page 14 17 and page 44 for details before mounting on to the wall Installing Removing the Base Stand The LCD display is very fragile and must be protected at all times when installing and removing the base stand Be sure that no hard or sharp object or anything that could scra...

Страница 9: ...ted 3 Disc Slot Insert a disc with the label side facing towards the front of the TV 12 cm discs only Don t insert 8 cm discs 4 Press to eject disc DVD mode 5 Press to start playback or pause DVD mode 6 Press to select among different input signal sources DTV ATV DVD AV SCART YPbPr HDMI1 HDMI2 PC USB Confirmed selection on the OSD menu 7 MENU Displays the OSD on screen display menu 8 CH Press to s...

Страница 10: ...RF Aerial Connects to the aerial socket on the wall with the RF coaxial cable 6 PC IN PC AUDIO Connects to a computer or other devices with a VGA interface 7 COMMON INTERFACE Allows the insertion of a Common Access Module 8 HEADPHONE Connects to the headphones 9 HDMI1 ARC HDMI2 Connects to a High Definition HD signal output device such as a set top box blu ray disc player or AV receiver 10 USB All...

Страница 11: ...ause corrosion or battery leakage which could cause fire personal injury or damage to property Only use the battery type indicated in this manual When the batteries are exhausted the remote will not function Replace both batteries at the same time with new ones Do not install new batteries with used ones and do not mix different types of batteries Do not dispose of used batteries as domestic waste...

Страница 12: ...ong the different input signal sources DTV ATV DVD AV SCART YPbPr HDMI1 HDMI2 PC USB 13 Allows you to navigate the OSD menus and adjust the system settings to your preference 14 OK Confirm the selection in the OSD menus 15 BACK Return to the previous menu in the OSD menus 16 PROG Display the channel edit menu ATV DTV mode Programme the DVD DVD mode 17 Exit Exit the OSD menu 18 TV RD A short cut to...

Страница 13: ...Stereo Dual Sound Reception ATV mode 28 PLAY Start playback DVD USB mode 29 REC Record the current programme DTV mode ZOOM Zoom in on the displayed frame DVD mode 30 Stop Stop the playback or recording DVD USB DTV mode 31 Pause Pause playback DVD USB mode Start the time shift function DTV mode STEP Play the playback forward frame by frame DVD mode 32 Coloured buttons Access the TELETEXT items DTV ...

Страница 14: ... control to turn on your TV 4 Press the button on the right side panel of the TV or the INPUT button on the remote control to display the Source List Use the buttons to select HDMI1 HDMI2 and then press the OK button to confirm Making Video and Audio Connections Not all AV devices have the ability to connect to a TV please refer to the owner s manual of your AV device for compatibility and connect...

Страница 15: ... computer s audio output socket 2 Plug the connected devices into the mains socket before switching on the TV 3 Press the button on the right side panel of the TV or on the remote control to turn on your TV 4 Press the button on the right side panel of the TV or the INPUT button on the remote control to display the Source List Use the buttons to select PC and then press the OK button to confirm Re...

Страница 16: ...ellow Audio Left white and Audio Right red 2 Plug the connected devices into the mains socket before switching on the TV 3 Press the button on the right side panel of the TV or on the remote control to turn on your TV 4 Press the button on the right side panel of the TV or the INPUT button on the remote control to display the Source List Use the buttons to select AV and then press the OK button to...

Страница 17: ... remote control to select the desired input source and then press the OK button to confirm Connecting Headphones Connect your headphones to the TV s HEADPHONE socket Before putting on the headphones turn the volume down then put the headphones on and slowly increase the volume until you reach a comfortable listening level The TV s volume will not be affected You may control the audio level via the...

Страница 18: ... AUDIO RF coaxial cable not included OR To the mains socket 7 Press the buttons to select your desired mode and then press the OK button Press the button to select Yes to confirm or the button to select No to cancel and return to the Mode Select menu Home Mode Intended for use in home environment Shop Mode Intended for use in retail environment 4 Initial Setup Chapter 4 Do not connect the TV to th...

Страница 19: ...press the OK button to confirm Country Code This will be shown as GBR for the UK Primary Region This will show the regional country e g England Wales Scotland NI Secondary Region This will allow you to set the region for your local news service on BBC and ITV e g London Beds and Cambs etc Tertiary Region You may receive signals from more than one transmitter within the Secondary Region e g Beds an...

Страница 20: ...etails on Channel Edit Press the button to return to the previously viewed channel Listening to the Radio Radio Mode In DTV mode press the TV RD button to switch between DTV and Digital radio channel Press the CH buttons on the remote control repeatedly to change the radio stations Alternative Press the LIST button to enter the Channel List Then use the buttons to highlight and select the station ...

Страница 21: ... channel menu refer to page 23 24 for details 3 In the Tune Type menu press the buttons to select DTV ATV DTV ATV Press the button and then press the buttons to select the country where you will operate the TV Press the OK button to confirm 2 Press the buttons to select Auto Tuning and then press the OK button Channel Setting TV DTV or Radio Mode Auto Tuning Use this to automatically find and stor...

Страница 22: ...and then press the buttons to select the CHANNEL menu and then press the OK button CHANNEL PICTURE SOUND TIME OPTION LOCK EXIT EXIT Auto Tuning DTV Manual Tuning ATV Manual Tuning Signal Information CI Information Software Update Channel Edit CHANNEL DTV Manual Tuning UHF CH 5 Bad Normal Good Press OK to search 2 Press the buttons to select ATV Manual Tuning and then press the OK button CHANNEL PI...

Страница 23: ...e CHANNEL menu and then press the OK button ATV Manual Tuning Storage To 1 System I Current CH 1 Search Fine Tune Frequency 255 25 MHz Save MENU a Delete Press the RED button to delete the selected channel b Rename ATV channels Press the GREEN button to rename the selected channel Press the buttons to select the characters to represent the station name Press the buttons to move to the next charact...

Страница 24: ...ss the MENU button to return to the main menu 5 Press the EXIT button to exit the menu 3 Press the BACK button to return to the previous menu or press the MENU button to return to the main menu 4 Press the EXIT button to exit the menu Signal Information DTV Mode Allows you to view the signal information 1 Press the MENU button and then press the buttons to select the CHANNEL menu and then press th...

Страница 25: ... button and then press the buttons to select the CHANNEL menu and then press the OK button 2 Press the buttons to select CI Information and then press the OK button CI Common Interface DTV Mode The common interface allows the use of a Common Access Module to enable you to view scrambled pay to view services These services are provided by TopUp TV UK only and others The Common Access Module and vie...

Страница 26: ...wing website http knowhow com or call our UK Call Centre on 0344 561 1234 Software Update Over Air Download DTV Mode The TV auto detects the latest firmware through the DTV signal and allows you to accept or refuse the firmware upgrade service This function may not be available in some countries Please follow the steps below if applicable 1 Press the MENU button and then press the buttons to selec...

Страница 27: ...PICTURE SOUND TIME OPTION LOCK EXIT EXIT Picture Mode Colour Temperature Aspect Ratio Noise Reduction Middle Screen Backlight Standard Medium Auto 6 PICTURE Picture Setting Allows you to set your preferred picture mode 1 Press the MENU button and then press the buttons to select the PICTURE menu and then press the OK button 3 Press the buttons to select the options Press the OK button and then pre...

Страница 28: ...ture horizontally in linear proportion to fill the entire screen This selection will allow you to view a picture with an original 16 9 aspect ratio Full HDMI and YPbPr mode only This selection will detect the resolution of the HDMI signal and display an image with the same number of pixels This selection will detect the resolution of the HDMI signal and display an image with the same number of pix...

Страница 29: ...sing the backlight setting will increase the brightness and display performance of the screen The higher the setting is the higher the power consumption You can select from 1 10 to strike a balance between the picture brightness display performance power consumption Reducing the backlight setting will help you reduce power consumption and thus save money by reducing electricity bills Backlight 6 B...

Страница 30: ... is an auxiliary audio function that provides an additional audio track for visually challenged persons This function handles the Audio Stream for the AD Audio Description when it is sent along with the main audio from the broadcaster Set to Off for normal broadcasting sound coming out from speakers Set to On to activate the description sound track if available The availability of Audio Descriptio...

Страница 31: ...lable and then press the buttons to select sound track between L R Stereo L L Mono Left and R R Mono Right Press the OK button to confirm and exit Audio Language OK English L R Norsk L R V I 3 Press the buttons to select the options Press the OK button and then press the buttons to adjust each option s setting Clock The clock is set automatically when receiving a digital signal Off Time Allows you...

Страница 32: ... OK button to select Off Press the EXIT button to exit the main menu To save energy you should always turn the auto standby function back to ON Time Zone When you select a Time Zone city the TV time is set by the time offset information based on Time Zone and GMT Greenwich Mean Time which is received with the broadcast signal and the time is set automatically by a digital signal 4 Press the BACK b...

Страница 33: ... language is English Hearing Impaired PVR File System Restore Factory Default HDMI CEC OSD Language Audio Language Country Subtitle Language On Off HDMI ARC Off English English UK English OPTION 3 Press the buttons to select the Primary Secondary Audio Language Press the button and then press the buttons to select your desired audio language Press the OK button to confirm 4 Press the BACK button t...

Страница 34: ...e control to display the Subtitle Language List and then press the buttons to select the Subtitle Language OFF Press the OK button to confirm Only applicable when the TV programme has this feature 2 Press the buttons to select Hearing Impaired and then press the OK button to select On Off 3 Press the BACK button to return to the previous menu or press the MENU button to return to the main menu 4 P...

Страница 35: ... preferred file size Press the OK button to confirm and then press the button to start formatting Format disk Format disk Warning All data will be lost Start Exit File System Size PVR File System Type PVR File System Size Duration 104 Mins FAT32 All MENU Format disk Do not unplug USB device Formatting Please wait Time Shift Size After formatting the Time Shift Size menu will appear if you have sel...

Страница 36: ...controlling a TV set set top box and DVD player using only the remote control of the TV CEC also allows individual CEC enabled devices to command and control each other without user intervention Make sure that your CEC compliant device is connected to your TV using a HDMI cable and the correct HDMI input source is selected prior to using this function Some HDMI cables may not support HDMI CEC func...

Страница 37: ...EXIT HDMI ARC Audio Return Channel The ARC Audio Return Channel function allows you to send audio from your ARC compliant TV to ARC compliant audio devices e g home theatre through a single HDMI connection HDMI ARC Connection To enjoy the ARC function please ensure your ARC compliant audio devices are connected by an HDMI cable that support the ARC function to the HDMI 1 ARC port of your ARC compl...

Страница 38: ...idental re tuning of the TV losing of channels and to prevent children from watching unsuitable programmes The Lock System must be set to On for this function to operate If the Lock System is set to On a valid password must be entered when you access Auto Tuning Manual Tuning Restore Factory Default 1 Press the MENU button and then press the buttons to select the LOCK menu and then press the OK bu...

Страница 39: ... button to return to the previous menu Press the MENU button to return to the main menu 7 Press the EXIT button to exit the menu 5 Use the 0 9 buttons to input the old password and then input the new 4 digit password Re enter new password for confirmation Confirm new password Please enter new password Please enter old password 3 Use the 0 9 buttons to input a 4 digit password to enter the LOCK men...

Страница 40: ...e MENU button once to return to the previous menu Press the MENU button again to return to the main menu 7 Press the EXIT button to exit the menu Block Channel OK Lock MENU 800 SZTVM01 DTV 800 SZTVM02 800 SZTVM03 800 SZTVM04 804 Date 1C 51 2C 53 3C 61 DTV DTV DTV DTV ATV ATV ATV 4 Press the buttons to select Block Channel and then press the OK button Block Channel Block Channel is designed to prev...

Страница 41: ...e default password is 6666 If you change the password be sure to remember the new password If you forget the new password enter the master password 9527 4 Press the buttons to select Parental Guidance and then press the OK button Lock System Set Password Block Channel Parental Guidance Off LOCK 5 Press the buttons to select an age rating Off 4 18 Then press the OK button to confirm 6 Press the BAC...

Страница 42: ...N button again to return to the EPG YELLOW Date Press the YELLOW button and then press the buttons to view the schedule of the previous next day Press the YELLOW button again to return to the EPG BLUE Remind Press the BLUE button while on the selected programme the Reminder setting menu will be displayed Press the buttons to adjust the settings and then press the OK button to confirm the settings ...

Страница 43: ... page 33 for details Teletext within Digital Service 1 In DTV mode press the TEXT button to display the teletext page 2 Follow the instructions on digital teletext and move onto the next step by pressing OK RED GREEN YELLOW BLUE or 0 9 buttons etc To change the digital teletext service you will need to exit the current text service and change channels Then enter the text service of the newly selec...

Страница 44: ...de View of TV USB HDMI2 HDMI1 ARC PC IN RF COMMON INTERFACE CI HEADPHONE PC AUDIO USB Cable not included Adapter Portable hard Disk USB Hub USB If a hard disk is used make sure its mains adapter is connected to the mains supply If a USB hub is used make sure its mains adapter is connected to the mains supply as the total current consumption may exceed 500mA The maximum supported storage space of t...

Страница 45: ...on If you want to select the specified photos press the buttons to select the picture file and then press the OK button A tick box will be displayed If you want to delete the file press the RED button to enter the Sub Menu and then press the button to confirm 3 Press the buttons to select your storage device and then press the OK button 7 Press the EXIT button to return to the previous menu 5 Pres...

Страница 46: ...ct Ratio 3 Press the buttons to select your storage device and then press the OK button Viewing Movies 1 Press the button on the right side panel of the TV or the INPUT button on the remote control then press the buttons to select the USB mode and then press the OK button 2 Press the buttons to select MOVIE and then press the OK button 5 The music information Album Title Bit Rate Artist Sampling Y...

Страница 47: ...e buttons and then press the OK button to select the function Prev page Next page Prev Next Stop Music Playlist Info 3 Press the buttons to select your storage device and then press the OK button My Text 1 Press the button on the right side panel of the TV or the INPUT button on the remote control then press the buttons to select the USB mode and then press the OK button 2 Press the buttons to sel...

Страница 48: ...me playback If you want to exit the PVR Time Shift progress bar and return to the current live broadcast press the button The PVR Time Shift Progress Bar 1 Indicates the status of the currently displayed video 2 Indicates the time lagging behind the live broadcast PVR reviewing 3 Indicates the available recording time on your USB storage device 4 Indicates the current time 2 3 4 1 During normal TV...

Страница 49: ...ing 2 Press the button again the recording progress bar will disappear 3 Press the button to stop recording Recording will stop automatically when the disk is full If you want to turn off your TV during recording press the button A dialogue will display Press the buttons to select your desired option and then press the OK button to confirm If you select the middle option in the box the screen will...

Страница 50: ...djustments press the OK button to confirm your settings Timer Programming This function is used to perform scheduled recording The recording from timer programme or direct recording may have a little bit of delay when it starts to record the broadcast programme Please make sure the USB device is inserted If not a warning message will pop up 1 Press the GUIDE button on the remote control The EPG me...

Страница 51: ...d then press the OK button 4 Press the buttons to select the _MSTPVR folder and then press the OK button 5 Press the buttons to select your recorded programme and then press the OK button A tick box will be displayed If you want to delete the file press the RED button to enter the Sub Menu and then press the button to confirm Press the PLAY button to view 6 Press the OK button or the i button to d...

Страница 52: ...udio Video format or JPEG files DVD ReWritable AUDIO VIDEO JPEG DVD R DVD Recordable Audio Video format or JPEG files DVD R AUDIO VIDEO JPEG CD R CD Recordable Audio Video format or JPEG files AUDIO VIDEO JPEG CD RW CD Rewritable Audio Video format or JPEG files AUDIO VIDEO JPEG AUDIO CD Compact Disc Digital Audio AUDIO Supported Formats JPEG The file extensions has to be jpg and not jpeg Pictures...

Страница 53: ...dge slightly and remove it from the disc slot When not using the DVD function in stand by mode or using other modes for a long period of time please take out the disc to protect the DVD loader and the disc Previous Next for DVD CD Multimedia discs Press the button to play the last Title Chapter Track Press the button to play the next Title Chapter Track For DVD discs the above functions may vary d...

Страница 54: ...r Time by pressing the 0 9 buttons or input the playback time After editing press the OK button to start If the input is invalid it will not function Repeat A B for DVD CD When playing DVD CD disc press the A B button to repeat certain content Press the A B button on the start point A and the end point B to select the repeat part Press the A B button a third time to cancel the A B button function ...

Страница 55: ...ight the Edit mode To leave the Edit mode press the OK button on the remote control again to cancel the highlight 3 Press the button on the remote control to skip to the left screen Press the buttons on the remote control to select a file in the preview list then press the OK button on the remote control to tick the file Press the OK button on the remote control again to cancel the tick Press the ...

Страница 56: ...ol to change from Browser view to Program view 2 Press the buttons on the remote control to select Edit mode then press the OK button on the remote control to leave the Edit mode Picture CD Playback When you insert a PICTURE CD while in DVD mode the menu on the right will appear Press the buttons to choose the root directory and then press the OK button to enter into the sub directory Press the bu...

Страница 57: ...ontrol Press the buttons to select the Video menu and then press the button to enter the sub menu Press the buttons to select the menu options Press the SETUP button to exit the menu Aspect Ratio TV System 16 9 PAL Language Video Rating Misc In Setup mode the disc playback function will not be available Not all DVD discs support multiple OSD Languages Not all DVD discs support multiple Subtitle La...

Страница 58: ...tton on the remote control Press the buttons to select the Misc menu and then press the button to enter the sub menu Press the buttons to select the menu options Press the SETUP button to exit the menu Using the DVD Rating Setup Page In DVD mode press the SETUP button on the remote control Press the buttons to select the Rating menu and then press the button to enter the sub menu Press the buttons...

Страница 59: ... fluid or other chemicals Do not use compressed air to remove dust Handling Discs Do not touch the playback side of the disc Do not attach paper or tape to the disc Playback side Cleaning Discs Fingerprints and dust on the disc cause picture and sound deterioration Wipe the disc from the centre outwards with a soft cloth Always keep the disc clean If you cannot wipe off the dust with a soft cloth ...

Страница 60: ...ed after five minutes No or poor colour or poor picture Adjust the settings in the PICTURE menu Try another channel The problem may be caused by the broadcaster Check if the video cables are connected properly Horizontal Vertical bar or picture shaking Check for local interference such as an electrical appliance or power tool Poor reception on some channels Station or cable channel may be experien...

Страница 61: ...ems persist you may need to get your aerial checked Talk to your retailer or contact your local aerial installer Why do I get blocking on my digital picture In most cases blocking is caused by a reception problem either the signal is too weak or there is some kind of interference Talk to your retailer or contact your local aerial installer Blocking can also be caused by a digital signal that is to...

Страница 62: ...C Mode Please check the display settings of your computer before connecting to the TV If the display setting of your computer does not match the TV there may be no video Resolution Vertical Frequency Hz Aspect Ratio 640 x 480 60 4 3 16 9 72 75 800 x 600 60 72 75 1024 x 768 60 70 75 1360 x 768 60 1366 x 768 60 1920 x 1080 60 HDMI Mode Resolution Vertical Frequency Hz Aspect Ratio 480I 1440 x 480 60...

Страница 63: ...Content mg 54 mg Presence of Lead Please refer to 2 under this table 3 Reference Period 2010 1062 2014 Speaker Power 3 W 3 W Dimension W x D x H with base 512 x 158 x 361 mm Weight Net 3 7 kg Inputs Output SCART 1 HDMI 2 PC IN 1 PC AUDIO 1 YPbPr 1 Common Interface 1 AV 1 SPDIF OUT 1 USB 1 AUDIO IN RCA 1 L R Aerial 1 Headphone 3 5mm 1 Features and specifications are subject to change without prior ...

Страница 64: ...64 9 Others Information A A B C D E F ENERG Y IE IJA IA 2010 1062 2014 32 kWh annum 22 Watt 55 cm 22 inch LT 22C540 A ...

Страница 65: ......

Страница 66: ......

Страница 67: ......

Страница 68: ...usehold waste For more information please contact the local authority or your retailer where you purchased the product The terms HDMI and HDMI High Definition Multimedia Interface and the HDMI Logo are trademarks or registered trademarks of HDMI Licensing LLC in the United States and other countries SRS TruSurround HD creates an immersive feature rich surround sound experience from two speakers co...

Отзывы: