background image

4

EN

THINGS TO DO FOR THE FIRST TIME

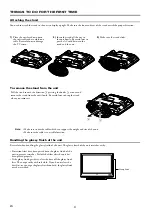
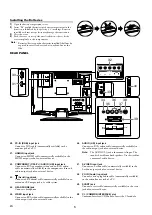
Attaching the stand

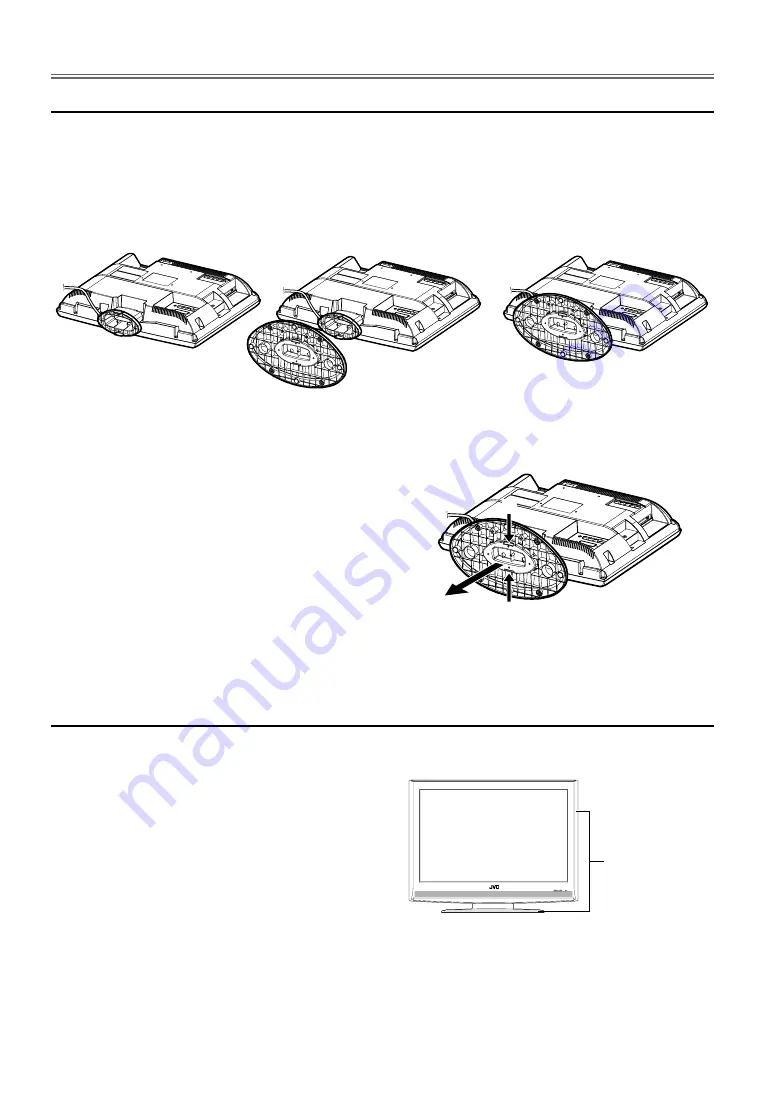
You need to attach the stand to the unit to display upright. Make sure the front and rear of the stand match the proper direction.

To remove the stand from the unit

Handling the glossy finish of the unit

Be careful when handling the glossy finish of the unit. The glossy finish of the unit scratches easily.

• Protection films have been pasted onto the glossy finish of the 

unit to prevent scratches. Peel off the films after the unit has 
been placed properly.

• If the glossy finish gets dirty, clear the dust off the glossy finish 

first. Then wipe softly with soft cloth. If you do not clear the 
dust first, or you wipe the glossy finish too hard, the glossy finish 
may be scratched.

1)

Place the unit face down onto 

the soft stuff such as a cloth on a 

table. Be careful not to damage 

the TV screen.

2)

Insert the stand all the way to 

the unit slowly. Be careful not to 

put the AC cord between the 

stand and the unit.

3)

Make sure the stand clicks.

Pull the stand toward the direction 

B

 pressing the hooks 

A

 at once and 

remove the stand from the unit slowly. Be careful not to drop the stand 
when you remove it.

Note:

• Make sure to use the table which can support the weight and size of the unit.
• Make sure the table is in a stable location.

A

A

B

Glossy finish

Содержание LT-19DA1BU

Страница 1: ...Česky LT 19DA1BU WIDE LCD PANEL TV INSTRUCTIONS 16 9 LCD TV BEDIENUNGSANLEITUNG TELEVISEUR A ECRAN LCD PANORAMIQUE MANUEL D INSTRUCTIONS TELEVISOR CON PANEL LCD PANORÁMICO MANUAL DE INSTRUCCIONES ŠIROKOÚHLÝ LCD MONITOR PŘÍRUČKA K OBSLUZE ...

Страница 2: ...nel breaks The LCD panel is a very high technology product with 921 600 thin film transistors giving you fine picture details Occasionally a few non active pixels may appear on the TV screen as a fixed point of blue green or red Please note that this does not affect the performance of your product 9 Disconnect the mains plug to switch off when the unit becomes faulty or not in use 10 The mains plu...

Страница 3: ... the electrical and electronic equipment and the battery with this symbol should not be disposed of as general household waste at its end of life Instead the products should be handed over to the applicable collection points for the recycling of electrical and electronic equipment as well as batteries for proper treatment recovery and recycling in accordance with your national legislation and the ...

Страница 4: ...ear the dust off the glossy finish first Then wipe softly with soft cloth If you do not clear the dust first or you wipe the glossy finish too hard the glossy finish may be scratched 1 Place the unit face down onto the soft stuff such as a cloth on a table Be careful not to damage the TV screen 2 Insert the stand all the way to the unit slowly Be careful not to put the AC cord between the stand an...

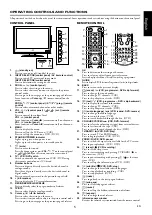
Страница 5: ...L s B buttons Press to select the setting on the menu Press to select item you want to adjust in the picture control mode Press to go to the next page or the previous page of teletext REMOTE CONTROL 14 OK Press to determine the setting on the menu Press to select or adjust from a particular menu Press to display the channel list while watching a programme 15 GUIDE Press to display EPG Electronic P...

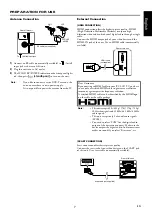
Страница 6: ... headphone 35 VIDEO input jack Connect an RCA video cable commercially available to the video output jack of an external device 36 AUDIO L R input jack Connect an RCA audio cable commercially available to the audio output jack of an external device 37 S VIDEO input jack Connect an S video cable commercially available to the S video output jack of an external device 38 PC IN Audio input jack Connec...

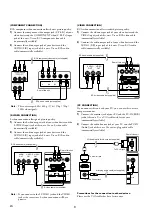
Страница 7: ... available Note If you like to connect a active DVB T antenna the antenna must have its own power supply It is not possible to power the antenna from the TV To Aerial input jack Rear of this unit RF cable not supplied VHF UHF MIXER VHF UHF Dear Customer By connecting an HDMI cable to your JVC LCD TV you have to use only a certified HDMI cable to guarantee a sufficient immunity against parasitic fr...

Страница 8: ...n RCA audio cable commercially available PC CONNECTION If you connect this unit and your PC you can use this unit as a computer monitor 1 Connect the monitor jack of your PC and the PC IN RGB jack of this unit Use a VGA cable with ferrite core commercially available 2 Connect the audio line out jack of your PC and the PC IN Audio jack of this unit Use a mini plug audio cable commercially available...

Страница 9: ...d If you press MENU during the scanning this operation will be stopped and the lowest memorised analogue channel will be displayed Please note that after tuning the analogue channels will be stored in the order that they are broadcast by your local transmitter This may not be in the same order in which you would like them to be stored If this is the case you can change the order according to your ...

Страница 10: ...System is SECAM 12 Press MENU to exit Language Selection You can select the main language 1 Press MENU to display the menu 2 Press K L to select LANGUAGE then press OK 3 Press K L to select your desired item then press OK 4 Press K L repeatedly to select the language you want then press OK 5 Press MENU to exit DTV 69 100 100 P P BACK EXIT Manual Scan PICTURE SOUND CHANNEL DETAIL LANGUAGE Channel N...

Страница 11: ...st Then insert the viewing card into the reader 3 Plug this unit into an AC outlet and press standby on to turn on the unit 4 Press MENU to display the menu 5 Press K L to select DETAIL then press OK 6 Press K L to select CI Menu then press OK 7 Follow the instructions on the TV screen Colour System You can change the TV colour system in video or scart mode Press COLOUR SYSTEM to change the TV col...

Страница 12: ... the sleep time period Each time you press sleep the timer increases by 30 minutes up to 120 minutes To cancel the sleep timer Press sleep repeatedly until Sleep Off will appear Switching the Input Mode You can switch the input mode to digital mode analogue mode or external input mode Press AV repeatedly to cycle through the input mode You can also change the input mode using BLUE 1 Press BLUE Sel...

Страница 13: ...t 11 Lock status 12 Parental rating 13 Pay TV 14 Subtitle 1 Channel number 2 Audio mode 3 Resolution Format TV aspect ratio In external input mode the following TV screen information will appear e g SCART Press I information again or BACK to exit TV screen information menu will automatically disappear in a few seconds Note Available sound modes differ depending on a programme DTV ATV DTV STEREO LE...

Страница 14: ...e centre of the picture is at its original size and the edges stretched horizontally to fill the TV screen 14 9 Displays a 4 3 picture at a 14 9 size Sidebars will be displayed on both edge of the TV screen For 16 9 video signal Full Displays a 16 9 picture at its original size Zoom1 Displays a 16 9 picture at its maximum size without changing its horizontal and vertical ratio Zoom2 Displays a ver...

Страница 15: ...hannel you want to allocate the decoder then press B 5 Press K L to select Decoder 6 Press OK to decoder on or off will appear on the left of the channel 7 Press MENU to exit Note You can edit the channel list Refer to Channel Edit on page 15 to page 17 DTV ATV 18 The Sounds 19 Cinema 20 Drama 21 Today s News 22 The Musical 38 Motors BACK Select OK Back DTV Radio Channels List DTV P02 TV02 P01 TV0...

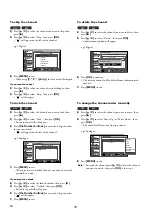
Страница 16: ...s K L to select Delete then press OK Confirmation window will appear e g Digital 6 Press OK to confirm The selected channel will be deleted from the memorised channel 7 Press MENU to exit To change the channel order manually 4 Press K L to select the channel you want to move then press B 5 Press K L to select Move Up or Move Down then press OK The channel will move one line up or down e g Analogue...

Страница 17: ...o watch the selected programme if it is currently available Select the programme then press I information to display more detailed programme information Press GUIDE or BACK to exit DTV 18 The Sounds 19 Cinema 20 Drama 21 Today s News 22 The Musical 38 Motors BACK Channel List EXIT PICTURE SOUND CHANNEL DETAIL LANGUAGE Channels List DTV Select OK Back DTV Radio Skip Delete Lock Move Up Move Down So...

Страница 18: ...B OK 30 Brightness Adjust Move OK Brightness decrease brightness increase brightness OK 30 Contrast Adjust Move OK Contrast decrease contrast increase contrast OK 30 Color Adjust Move OK Color decrease colour increase colour OK 0 Tint Adjust Move OK Tint add red add green OK 30 Sharpness Adjust Move OK Sharpness make soft make clear Note Press K L to change the items You can adjust Tint only when ...

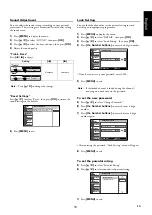
Страница 19: ...w password 5 Press K L to select Change Password 6 Press the Number buttons to enter the new 4 digit number 7 Press the Number buttons to enter the same 4 digit number again After entering the password Lock Setting menu will appear 8 Press MENU to exit To set the parental rating 5 Press K L to select Parental Rating 6 Press K L to select your desired parental rating 7 Press MENU to exit Setting s ...

Страница 20: ... the transparent level you want then press OK 5 Press MENU to exit Factory Preset You can restore all the settings to the default 1 Press MENU to display the menu 2 Press K L to select DETAIL then press OK 3 Press K L to select Factory Preset then press OK 4 Press K L to select Reset then press OK All the settings are restored to the default 5 Press MENU to exit Setting s B OK 0 H Position Adjust ...

Страница 21: ... TV screen Picture Distorted Picture Rolls Vertically No Colour Poor Reception on Some Channels Weak Picture Lines or Streaks in Picture Ghosts in picture Picture Blurred Sound OK Picture Poor Picture OK Sound Poor No Picture or Sound Different colour marks on TV screen Black or Luminous point on TV screen Forget the password POSSIBLE REMEDY Try a new channel if OK then possibly due to poor channe...

Страница 22: ... Video input RCA jack x 1 Audio input RCA jack x 4 PC input D Sub 15pin x1 RGB Mini jack Ø3 5mm x 1 AUDIO AUDIO VIDEO 21 pin scart jack with RGB Input x 1 Component Video input RCA jack x 3 Y 1Vp p x 1 Pb 700mVp p x 1 Pr 700mVp p x 1 HDMI input HDMI 19pin x 1 Stereo Sound System 2 speakers Sound output 1 W 8 ohm x 2 Remote control Digital encoded infrared light system Power requirements AC 220 240...

Страница 23: ...23 EN English Printed in Poland ...

Страница 24: ... 2009 Victor Company of Japan Limited 1EMN24539 A8CN8EP 0109TKH FU FU Vytištìno v Polsku ...

Отзывы: