


10
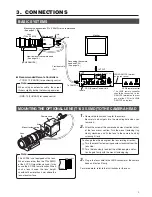
3. CONNECTIONS (Cont’d)
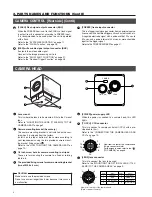
HOW TO MOUNT THE CAMERA HEAD
䡵
How To Mount The Camera
When this unit is mounted to a
fixed or a rotating table, fix it to
the camera mounting screw
hole located on the camera
mounting bracket.
• To prevent dropping, when
this unit is mounted to a fixer
or a rotating table, fix it firmly
by using the rotation preven-
tion hole.
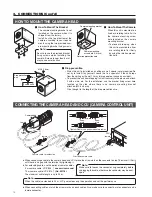
CONNECTING THE CAMERA HEAD AND CCU (CAMERA CONTROL UNIT)
Camera head
CCU
Camera cable for extension
Provided camera cable
arrow
mark
arrow
mark
arrow
mark
female male
male
male
male
male
female
female
female
female
Tight until there is no gap between two cables.
●
When connecting a cable to the camera head and CCU, place the arrow mark on the connector on top. Then insert it firmly
until there is no gap with the terminal by tightening it.
●
For extending cable, use the optional camera cables.
5 m camera cable: VC-P805
10 m camera cable: VC-P810
The maximum cable length is up to 25 m.
Note:
When the cable is extended to 25 m, JVC guarantees only the operation and not the performance.
●
When connecting cables, match the arrow marks on each cables. Also, make sure to connect a male connector and a
female connector.
Rotation prevention hole
Camera mounting bracket
Camera mounting
screw hole (1/4 inch)
䡵
Drop prevention
• When this unit is installed on a ceiling or a wall, special care is required. Do
not try to install it by yourself. Leave this to a specialist. If the unit drops
from the ceiling or the wall, it may injure people or cause an accident.
• To prevent the unit from dropping, install it securely to the place, and attach
it with a wire, etc. For the installation, use the bracket fixing screw hole
located on the side where there is no camera mounting bracket
attached.(M2.6 x 6 mm)
Give thought to the length of the drop prevention wire.
M2.6 X 6mm
6mm
Drop prevention
wire
Camera head
䡵
How To Mount The Bracket
The camera mounting bracket is not
installed on the camera when it is
shipped from the factory.
Install it on the top or bottom of the
camera according to your require-
ments using the two provided cam-
era mounting bracket fixing screws.
Note:
Be sure to use the provided bracket
fixing screws when installing the
camera. Screws longer than 6 mm
may cause a malfunction.
see service manual
(No. 60116)
Note:
Make sure to loosen the connector ring completely before
unplugging the cable, otherwise the connector may be dam-
aged.


