background image

ENGLISH

7

BASICS

Common screen operations


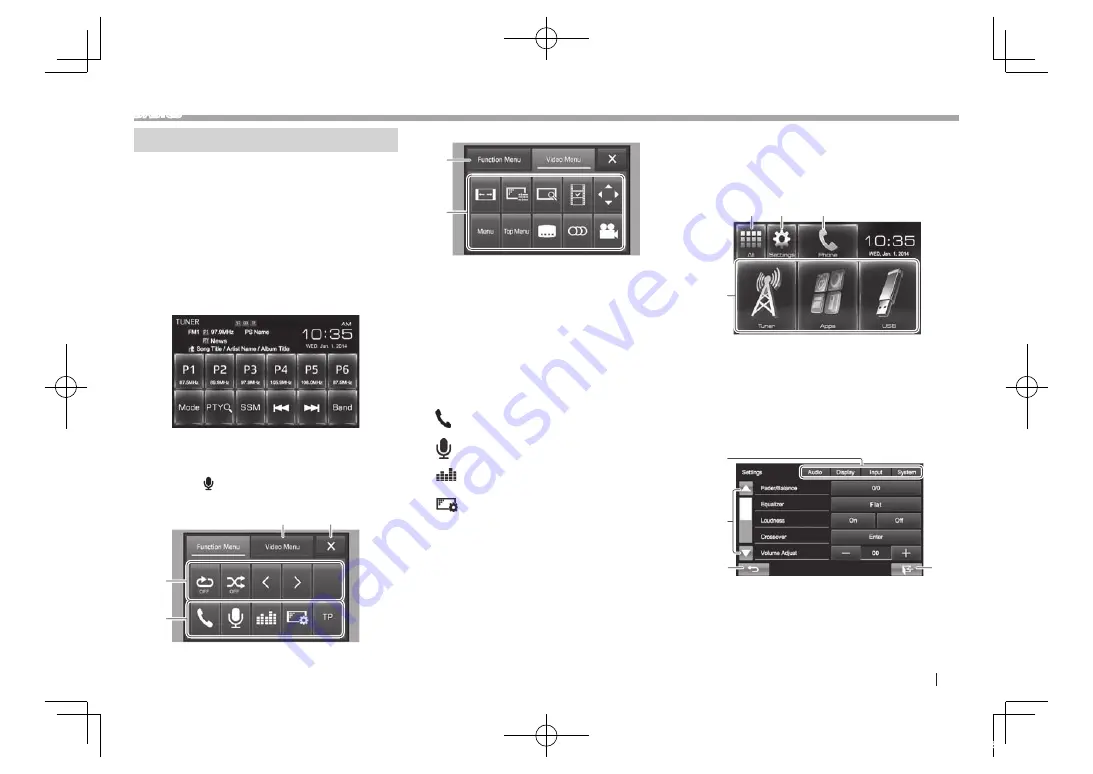
Common screen descriptions

You can display other screens any time to change 
the source, show the information, or change the 
settings, etc.

 Source control screen

Performs source playback operations.
•  The operation buttons vary depending on the 

selected source.

•  Touching the text information changes the 

information type.

 <Function Menu>/<Video Menu> screen

While displaying to the source control screen, 
you can display/hide other operation buttons by 
pressing FNC/  on the monitor panel.

 <Function Menu>

 screen

1

2

3

4


 <Video Menu>

 screen

5

6

Common operating buttons:

1

  Switches to the 

<Video Menu>

 screen.

2

  Closes the 

<Function Menu>

/

<Video Menu>


screen and returns to the source control screen.

3

  Displays sub-function buttons for source 

playback.
•  The buttons vary depending on the selected 

source.

4

  Short-cut buttons

[

]

Displays the phone control screen. 
(Page 31)

[

]

Activates the voice dialing. 
(Page 32)

[

]

Displays the sound adjustment 
screen. (Page 36)

[

]

Displays the 

<Display>

 menu 

screen. (Page 42)

[TP]

Activates/deactivates TA standby 
reception mode. (Page  22)

5

  Switches to the 

<Function Menu>

 screen.

6

  Operation buttons for video playback. 

(Page 37)
•  The buttons vary depending on the selected 

source.

 Home s creen

Displays the source control screen/settings screen 
and changes the picture source.
•  To display the Home screen, press HOME on the 

monitor panel.

4

1

2

3

Common operating buttons:

1

  Displays all the sources. (Page 8)

2

  Displays the 

<Settings>

 screen. (See below.)

3

  Displays the phone control screen. (Page 31)

4

  Changes the playback source. (Page 8)

<Settings> screen

Changes the detailed settings. (Page 41)

3

4

2

1

Common operating buttons:

1

  Selects the menu category.

2

  Changes the page.

3

  Returns to the previous screen.

4

  Displays the current source control screen.

KW-V̲Mid̲E.indb   7

2014/01/27   15:13

Downloaded from www.vandenborre.be

Содержание KW-V30BT

Страница 1: ...itte lesen Sie alle Bedienungsanweisungen vor dem Betrieb gründlich durch um richtiges Verständnis des Geräts zu gewährleisten und die beste Leistung mit dem Gerät zu erzielen Veuillez lire attentivement toutes les instructions avant d utiliser l appareil afin de bien comprendre son fonctionnement et d obtenir les meilleures performances possibles Wij verzoeken u de gebruiksaanwijzing goed door te...

Страница 2: ...be different from the actual displays or panels This manual mainly explains operations using the buttons on the monitor panel and touch panel For operations using the remote controller RM RK252P optional accessory see page 43 indicates the various screens menus operations settings that appear on the touch panel indicates the buttons on the touch panel Indication language English indications are us...

Страница 3: ...sing a ball point pen or similar tool with a sharp tip Touch the buttons on the touch panel with your finger directly if you are wearing a glove take it off When the temperature is very cold or very hot Chemical changes occur inside causing malfunction Pictures may not appear clearly or may move slowly Pictures may not be synchronized with the sound or picture quality may decline in such environme...

Страница 4: ...necting the rear view camera Display Design Page 42 Select the background and the panel color Demonstration Page 42 Activate or deactivate the display demonstration 2 Finish the procedure The Home screen is displayed AV Off is selected initially Select the playback source Page 8 Calendar Clock settings 1 Display the Home screen KW V50BT KW V30BT 2 Display the Settings screen 3 Display the Calendar...

Страница 5: ...the disc Press Page 9 Ejects the disc forcibly Hold Page 3 3 Loading slot 4 HOME button Displays the Home screen Press Page 7 Turns off the power Hold Page 6 Turns on the power Press Page 6 5 FNC button Pops up the Function Menu Video Menu screen on the source control screen Press Page 7 Activates the voice dialing Hold Page 32 6 VOLUME ATT knob Attenuates the sound Press Page 6 Adjusts the audio ...

Страница 6: ... attenuation Press the same button again Turning off the screen KW V50BT KW V30BT Hold Hold To turn on the screen Press and hold DISP on the monitor panel Turning on off the AV source You can activate the AV function by selecting a source on the Home screen To select a source not displayed on the Home screen Press All Page 8 To turn off the AV source Monitor panel operations Open Tilt only for KW ...

Страница 7: ... cut buttons Displays the phone control screen Page 31 Activates the voice dialing Page 32 Displays the sound adjustment screen Page 36 Displays the Display menu screen Page 42 TP Activates deactivates TA standby reception mode Page 22 5 Switches to the Function Menu screen 6 Operation buttons for video playback Page 37 The buttons vary depending on the selected source Homes creen Displays the sou...

Страница 8: ... display all sources and items on the screen To restore the screen Press Home AV Off Turns off the AV source Page 6 Camera Switches to a camera connected to the rear view camera input Page 25 RearSource Selects the rear source to display on the external monitor Page 26 Apps Switches to the App screen from the connected iPod touch iPhone Page 19 Tuner Switches to the radio broadcast Page 20 Disc Pl...

Страница 9: ... can eject a disc when playing another AV source If the ejected disc is not removed within 60 seconds the disc is automatically inserted again into the loading slot to protect it from dust If the disc cannot be ejected see page 3 Playback operations When the operation buttons are not displayed on the screen touch the area shown on the illustration To change settings for video playback see page 37 ...

Страница 10: ...ppears only for VCD ForC D MP3 WMA AAC 4 2 5 6 7 3 1 8 Playback information 1 Track file information Touching the text information changes the information type 2 Media type 3 Current playback item information MP3 WMA AAC Folder no Track no CD Track no 4 Audio format 5 Playback mode Page 12 6 Playing time 7 DISC IN indicator 8 Playback status Operation buttons 1 Displays the folder track list Page ...

Страница 11: ...icture adjustment screen Page 37 Displays the picture size selecting screen Page 38 Switches to the direct disc menu mode Touch the target item to select To exit from the menu selecting screen press Displays the menu playlist original program scene selecting screen J K H I Selects an item Enter Confirms the selection Return Returns to the previous screen Displays the menu screen of the top layer w...

Страница 12: ...close the Function Menu screen press or FNC on the monitor panel For DVD DVD VR VCD without PBC Repeat play is available For CD DivX MPEG1 MPEG2 MP3 WMA AAC Repeat and Random play are available You cannot activate the repeat mode and the random mode at the same time Each time you press the button the playback mode changes The corresponding indicator lights up Available items differ depending on th...

Страница 13: ...t this to display the angle mark Off Select this to hide the angle mark Monitor Type Select the monitor type to watch a wide screen picture on the external monitor 16 9 Initial 4 3 LB 4 3 PS Parental Level Set the parental level See the right column CD Read Select the files to play back a disc containing music files You cannot change the setting when a disc is inserted 1 initial Automatically dist...

Страница 14: ...See the right column 5 Playing time 6 Progress bar 7 Playback status 8 Jacket picture Shown while playing if the file has tag data that includes the jacket picture Operation buttons Mode Changes the picture display time setting on the Mode screen Page 15 Displays the list selection screen Page 15 S T Selects a track Press Reverse forward search 1 Hold I W Starts pauses playback 2 Selects a folder ...

Страница 15: ...r If you want to play all tracks in the folder press I on the right of the desired folder On the Category List Folder List screen You can switch the file type to list Press to list audio files to list video files or to list still picture files From the Category List screen Select the category 1 then the item in the selected category 2 From the Link Search screen Select the tag type to display the ...

Страница 16: ...htning Digital AV adapter accessory of the iPod iPhone Bluetooth connection Pair the iPod iPhone through Bluetooth Page 27 For iPhone 5 iPod touch 5th Generation iPod nano 7th Generation To watch the video connect your iPod iPhone to HDMI MHL input terminal using KS U60 optional accessory Page 48 For iPod iPhone except for iPhone 5 iPod touch 5th Generation iPod nano 7th Generation You cannot watc...

Страница 17: ...N or USB 1 wire go to step 5 4 When selecting HDMI Bluetooth or Bluetooth as the connection method paired device list appears Select the target device If desired device is not listed press Search for searching the available iPod iPhone devices then select the target device from the Available Devices screen You can change the page to display more items by pressing J K To stop searching press Cancel...

Страница 18: ... Displays the audio video file list See the right column S T Selects an audio video file Press Reverse forward search Hold I W Starts pauses playback 1 Selects repeat playback mode SONGS Functions the same as Repeat One ALL Functions the same as Repeat All 1 2 Selects random playback mode SONGS Functions the same as Shuffle Songs ALBUMS Functions the same as Shuffle Albums 1 Press FNC on the monit...

Страница 19: ... touch iPhone Android 2 Select Apps as the source Page 8 Operation buttons on the source control screen S T Selects an audio video file I W Starts pauses playback You can operate some functions of the App on the touch panel For some applications such as navigation applications the operating buttons and information are not shown You can perform the operations on the touch panel such as scrolling th...

Страница 20: ...3 PTY 1 Enters PTY search mode Page 22 SSM Presets the stations with the strongest signals automatically Page 21 S T Searches for a station Auto search Press Manual search Hold Band Selects the band MONO 1 2 Activates deactivates monaural mode See the right column TP 2 Activates deactivates TA standby reception mode Page 22 1 Appears only when FM is selected as the source 2 Press FNC on the monito...

Страница 21: ...e Subject to the interference from adjacent stations but sound quality will not be degraded and the stereo effect will remain Presetting stations Storing stations in the memory You can preset 6 stations for each band Automaticp resetting SSM St rong station Sequential Memory Hold Local stations with the strongest signals are found and stored automatically Manualp resetting 1 Tune in to a station y...

Страница 22: ...is lit in gray tune into another station providing Radio Data System signals To deactivate TA Standby Reception Press TP The TP indicator goes off The volume adjustment for Traffic Announcement is automatically memorized The next time the unit switches to Traffic Announcement the volume is set to the previous level News Standby Reception 1 2 The unit is in standby to switch to News Program if avai...

Страница 23: ... received the AF indicator lights up AF Reg Switches to another station broadcasting the same program the AF indicator lights up Off Cancels Automatic station selection Program Search Usually when you select preset stations the preset station is tuned in If the signals from the preset FM Radio Data System station are not sufficient for good reception this unit using the AF data tunes in to another...

Страница 24: ...g playback 1 Connect an external component to the AV IN1 terminal To connect an external component see page 49 2 Select AV IN as the source On the Home screen 3 Turn on the connected component and start playing the source Using external audio players Front AUX only for KW V30BT Indications and buttons on the source control screen Starting playback 1 Connect an external component to the AUX jack on...

Страница 25: ...iew screen is displayed when you shift the gear to the reverse R position To display the picture from the rear view camera manually On the Home screen Adjusting the picture from the rear view camera When displaying the picture from the rear view camera manually you can change the setting of the picture 1 Display the Video Menu screen KW V50BT KW V30BT 2 Selects the aspect ratio Page 38 Displays th...

Страница 26: ...nal accessory or MHL cable KS U61 optional accessory 2 Select HDMI MHL as the source On the Home screen 3 Start an application or playback on your smartphone Using an external monitor Rear Source You can enjoy the rear source playback on an external monitor connected to the AV OUT VIDEO and AV OUT AUDIO terminals while listening to any source You can control the rear source playback on the remote ...

Страница 27: ...hen the mobile phone is connected Phone book up to 600 entries Dialed calls received calls and missed calls up to 10 entries each Connecting Bluetooth devices Registering a new Bluetooth device When you connect a Bluetooth device to the unit for the first time pair the unit and the device Pairing allows Bluetooth devices to communicate with each other The pairing method differs depending on the Bl...

Страница 28: ...tep 3 The PIN code is initially set to 0000 The maximum number of digits in the PIN code is 15 Press Clear to delete the last entry 3 Search the unit KW V from your Bluetooth device 4 Select the unit KW V for your Bluetooth device If the PIN code is required enter 0000 initial When pairing is complete the device is listed on Paired Device List To use the paired device connect the device on Paired ...

Страница 29: ...splay the Bluetooth Setup screen Page 28 2 3 Select the device you want to connect 1 then press Connection 2 4 Select On or Off for the target Mobile phone Audio device The status is shown as follows Connected A connection has been established Connect Ready A connection can be established Disconnected No connection is established Deleting a registered Bluetooth device 1 Display the Bluetooth Setup...

Страница 30: ...st the volume level between 0 to 15 initial 3 This adjustment does not affect the volume level of the other sources Use the monitor panel to adjust the call earpiece volume Page 6 Switching between handsfree mode and phone mode While talking Each time you press the button the talking method is switched handsfree mode phone mode Reducing noise adjusting the echo cancel level While talking To adjust...

Страница 31: ...ne control screen by pressing on the Function Menu screen Page 7 2 Select a method to make a call 2 3 1 4 1 From the phone book call lists 2 Direct number entry 3 From the preset list To preset see page 33 4 Voice dialing When the mobile phone is not compatible with Phone Book Access Profile PBAP the phone book is not displayed From the preset list phone book call lists 1 From the preset list From...

Страница 32: ...up to 32 numbers Press to delete the last entry Press and hold 0 to add to the phone number Voicedi aling Available only when the connected mobile phone has a voice recognition system 1 Activate voice dialing On the phone control screen Press K repeatedly to change the page on the phone control screen You can also activate voice dialing by pressing on the Function Menu screen Page 7 or holding FNC...

Страница 33: ...e screen differ depending on the connected device Playback information 1 Tag data current track title artist name album title 1 Touching the text information changes the information type 2 Track no 1 3 Playing time 1 4 Playback status 1 Operation buttons 1 2 3 Selects repeat playback mode 1 2 3 Selects random playback mode W Pauses playback I Starts playback S T Selects a track Press Reverse forwa...

Страница 34: ...akers used for Bluetooth both phone and audio player Front Front speakers only All Initial All speakers Auto Answer On The unit answers the incoming calls automatically in 5 seconds Off Initial The unit does not answer the calls automatically Answer the calls manually AutoPai ring On initial Establishes pairing automatically with the connected iOS device such as iPhone even if the Bluetooth functi...

Страница 35: ...V IN Select this when the iPod iPhone is connected using KS U59 optional accessory USB 1 Wire Select this when the iPod iPhone is connected using USB 2 0 cable accessory of the iPod iPhone HDMI Bluetooth Select this when the iPod iPhone is connected using HDMI cable KS U60 optional accessory and USB 2 0 cable accessory of the iPod iPhone through Lightning Digital AV adapter accessory of the iPod i...

Страница 36: ... column 2 Adjust the level of each band 1 then select the subwoofer level 2 The adjustments are stored and User is activated To finish the procedure press Storing your own adjustment Adjusting the sound precisely 1 Select a sound mode see the left column then 2 Select a band 3 Adjust the sound Reset Changes the level of each band Low Middle High to 0 Freq Selects frequency Q Adjusts the width of t...

Страница 37: ...he crossover frequency Not selectable when Freq is set to Through Adjustment for video playback Adjusting the picture You can adjust the picture quality 1 Display the Video Menu screen KW V50BT KW V30BT 2 Display the adjustment menu 3 Select dimmer on or dimmer off 4 Adjust the picture Brightness Adjusts the brightness 15 to 15 Contrast Adjusts the contrast 10 to 10 Black Adjusts the blackness 10 ...

Страница 38: ...matically selected to match the video source While DivX is played back with Monitor Type set to 16 9 Page 13 the aspect ratio is not set correctly Zooming the picture You can zoom the picture Full Zoom1 to Zoom3 Zooming is available only when disc is played back When Aspect is set to Panorama see the left column the picture is zoomed with the aspect ratio of the Full setting 1 Display the Video Me...

Страница 39: ...your favorite image JPEG PNG BMP file stored on the connected USB device Use the JPEG PNG BMP file that the resolution is 800 x 480 pixels The color of the captured image may look different from that of the actual scene 1 Connect the USB device with the image stored Page 48 2 Display the Display Design screen See the left column 3 Display the User Background File Select screen 4 Select the file fo...

Страница 40: ...n Settings for AV IN AV IN Name On the Home screen Press K repeatedly to change the page on the System menu screen Recall Recalls saved settings Save Memorizes current settings Delete Deletes the memorized settings A confirmation message appears Press Yes Adjusting the touch position You can adjust the touch position on the touch panel if the position touched and the operation performed do not mat...

Страница 41: ...udio setting screen Fader Balance Fader Adjust the front and rear speaker output balance F6 to R6 Initial 0 When using a two speaker system set the fader to the center 0 Balance Adjust the left and right speaker output balance L6 to R6 Initial 0 Press J K H I or drag to adjust To clear the adjustment press Center Equalizer Change the sound mode or adjust and store the equalization for each source ...

Страница 42: ...creen e g a u g n a L Select the text language used for on screen information English Initial Español Français Deutsch Italiano Nederlands Руccĸий Português GUI Language Select a language used for displaying operation buttons and menu items English Initial Local the language selected above Calendar Setting iPod Setup APP Setup APP Connection Setup Configure the Apps e m u l o V t p u r r e t n I P...

Страница 43: ...rches for stations automatically Searches for stations manually Hold Selects a track Reverse search forward search Hold O N Reverse search forward search DVD Video DVD VR VCD Slow motion playback during pause DVD VR VCD Reverse slow motion does not work VOL VOL Adjusts the volume level The 2nd VOL function does not work for this unit SOURCE Selects the source I W Starts pauses playback PHONE Answe...

Страница 44: ...Each time you press DIRECT the item to search for changes 2 Press a number button while holding SHIFT to select a desired item To erase a misentry press CLR clear while holding SHIFT 3 Press ENT to confirm the selection Various disc operations Using the disc menu DVD Video DVD VR 1 For DVD Video press TOP M or MENU For DVD VR press TOP M To display Original Program MENU To display Playlist 2 Press...

Страница 45: ...sing and opening If the fuse blows first make sure the wires are not touching to cause a short circuit then replace the old fuse with one with the same rating Insulate unconnected wires with vinyl tape or other similar material To prevent a short circuit do not remove the caps on the ends of the unconnected wires or the terminals Connect the speaker wires correctly to the terminals to which they c...

Страница 46: ...gure Initial Setup page 4 Installing removing the unit Installing the unit Bend the tabs of the mounting sleeve with a screwdriver or similar utensil and attach it in place Installing the trim plate Attach the trim plate 2 2 Removing the trim plate 1 Engage the catch pins on the extraction key 4 and remove the two locks on the lower part Lower the frame and pull it forward 4 2 Remove the upper two...

Страница 47: ...fault wiring Connecting the ISO connectors You may need to modify the wiring of the supplied wiring harness as illustrated below Page 49 Page 49 USB terminal Pages 48 49 Connect the aerial cord to the aerial terminal 10 A fuse Connect to the vehicle s reverse lamp harness when using the optional rear view camera Connect to the vehicle s parking brake detection switch harness For best safety be sur...

Страница 48: ...ouch 5th Generation iPod nano 7th Generation commercially available Lightning Digital AV adapter accessory of the iPod iPhone USB 2 0 cable accessory of the iPod iPhone or KS U62 optional accessory USB 2 0 cable accessory of the iPod iPhone or KS U62 optional accessory KS U60 optional accessory HDMI MHL cable 6 7 If you connect the HDMI MHL connector fix the HDMI MHL cable using the fixture 6 and ...

Страница 49: ... mini plug 1 24 3 1 Left audio 2 Right audio 3 Ground 4 Composite video 4 HDMI MHL input 5 Subwoofer preout monaural output Subwoofer left output White Subwoofer right output Red 6 Rear preout Audio left output White Audio right output Red 7 Front preout Audio left output White Audio right output Red 8 AV OUT Audio output ø3 5 mini jack Resistance free stereo type mini plug Connecting microphone f...

Страница 50: ...h in a straight line from center to edge Do not use any solvents for example conventional record cleaner spray thinner benzine etc to clean discs To play new discs New discs may have some rough spots around the inner and outer edges If such a disc is used this unit may reject the disc To remove these rough spots rub the edges with a pencil or ball point pen etc More information File playback Playi...

Страница 51: ...s encoded using any other application than iTunes AAC files copy protected with FairPlay except those stored on an iPod Files which have data such as AIFF ATRAC3 etc This unit can display jacket pictures that meet the conditions below Picture size 32 x 32 to 1 232 x 672 resolution Data size less than 650 KB File type JPEG PNG BMP Playing H 264 WMV files for USB only This unit can play back files w...

Страница 52: ...LAC MPEG4 H 264 MPEG4 AVC WMV VC 1 This unit can recognize a total of 5 000 files and 250 folders a maximum of 999 files per folder Make sure all important data has been backed up to avoid losing the data Notes on using a USB device This unit may not play back files in a USB device properly when using a USB extension cable USB devices equipped with special functions such as data security functions...

Страница 53: ...Mongolian SS Siswati AR Arabic HI Hindi MO Moldavian ST Sesotho AS Assamese HR Croatian MR Marathi SU Sundanese AY Aymara HU Hungarian MS Malay MAY SW Swahili AZ Azerbaijani HY Armenian MT Maltese TA Tamil BA Bashkir IA Interlingua MY Burmese TE Telugu BE Byelorussian IE Interlingue NA Nauru TG Tajik BG Bulgarian IK Inupiak NE Nepali TH Thai BH Bihari IN Indonesian NO Norwegian TI Tigrinya BI Bisl...

Страница 54: ...ernal component connected to the AV IN1 input terminal Start playback on the smartphone connected to HDMI MHL input terminal Check the cords and connections Signal input is too weak MISWIRING Check wiring connection then reset unit WARNING Check wiring connection then reset unit A speaker cord has shorted or it has come in to contact with the car chassis Wire or insulate the speaker cord as approp...

Страница 55: ...t be skipped Insert a finalized disc Finalize the discs with the component which you used for recording Playback does not start The format of files is not supported by the unit No picture appears on the external monitor Connect the video cord correctly Select the correct input on the external monitor DivX MPEG1 MPEG2 MP3 WMA AAC disc cannot be played back Record the tracks using a compliant applic...

Страница 56: ...noise while listening to the radio Connect the aerial firmly AV IN No picture appears on the screen Turn on the video component if it is not on Connect the video component correctly Bluetooth Phone sound quality is poor Reduce the distance between the unit and the Bluetooth mobile phone Move the car to a place where you can get a better signal reception The sound is interrupted or skipped while us...

Страница 57: ...esponse 96 kHz Sampling 20 Hz to 22 000 Hz 48 kHz Sampling 20 Hz to 22 000 Hz 44 1 kHz Sampling 20 Hz to 20 000 Hz Total Harmonic Distortion 0 010 1 kHz Signal to Noise Ratio 94 dB DVD Video 96 kHz Dynamic Range 91 dB DVD Video 96 kHz Disc Format DVD Video DVD VR VIDEO CD CD DA Sampling Frequency 44 1 kHz 48 kHz 96 kHz Quantifying Bit Number 16 20 24 bit USB interface section USB Standard USB 2 0 ...

Страница 58: ...Profile PBAP Phonebook Access Profile A2DP Advanced Audio Distribution Profile AVRCP Audio Video Remote Control Profile GAP Generic Access Profile SDP Service Discovery Profile SPP Serial Port Profile FM tuner section Frequency Range 50 kHz 87 5 MHz to 108 0 MHz Usable Sensitivity S N 30 dB Dev 22 5 kHz 9 3 dBf 0 8 μV 75 Ω Quieting Sensitivity S N 46 dB Dev 22 5 kHz 15 2 dBf 1 6 μV 75 Ω Frequency ...

Страница 59: ... a trademark of DVD Format Logo Licensing Corporation registered in the US Japan and other countries The AAC logo is a trademark of Dolby Laboratories Microsoft and Windows Media are either registered trademarks or trademarks of Microsoft Corporation in the United States and or other countries Made for iPod and Made for iPhone mean that an electronic accessory has been designed to connect specific...

Страница 60: ...f Google Inc The Bluetooth word mark and logos are registered trademarks owned by Bluetooth SIG Inc and any use of such marks by JVC KENWOOD Corporation is under license Other trademarks and trade names are those of their respective owners The terms HDMI and HDMI High Definition Multimedia Interface and the HDMI logo are trademarks or registered trademarks of HDMI Licensing LLC in the United State...

Страница 61: ...tne postanowienia dyrektywy 1999 5 EC Český JVC KENWOOD tímto prohlašuje že tento KW V50BT KW V30BT je ve shode se základními požadavky a dalšími príslušnými ustanoveními smernice 1999 5 EC Magyar Alulírott JVC KENWOOD kijelenti hogy a jelen KW V50BT KW V30BT megfelel az 1999 5 EC irányelvben meghatározott alapvető követelményeknek és egyéb vonatkozó előírásoknak Svenska Härmed intygar JVC KENWOOD...

Страница 62: ...Flächen unterscheiden Diese Anleitung erläutert vor Allem die Bedienung über die Sensortasten am Monitorschirm und auf dem Sensordisplay Für Bedienung mit der Fernbedienung RM RK252P optionales Zubehör siehe Seite 43 zeigt die variablen Bildschirmbilder Menüs Vorgänge Einstellungen an die auf dem Sensordisplay erscheinen zeigt die Tasten am Sensordisplay an Anzeigesprache Englischsprachige Anzeige...

Страница 63: ...ufenden Gegenstand auf den Sensorschirm Berühren Sie die Sensordisplay Symbole direkt mit dem Finger immer ohne Handschuhe Bei extrem niedrigen oder hohen Temperaturen Chemische Veränderungen im Geräteinneren führen zu Fehlfunktionen Unter Umständen ist die Bildwiedergabe verschwommen oder verlangsamt Unter solchen Umständen sind Bild und Tonwiedergabe asynchron oder die Bildqualität beeinträchtig...

Страница 64: ...a anschließen Display Design Seite 42 Wählt den Hintergrund und die Feld Farbe Demonstration Seite 42 Aktivieren oder deaktivieren Sie die Displaydemonstration 2 Beenden Sie den Vorgang Das Home Schirmbild erscheint AV Off ist anfänglich gewählt Wählen Sie die Wiedergabequelle Seite 8 Kalender Uhreinstellungen 1 Rufen Sie das Home Schirmbild auf KW V50BT KW V30BT 2 Rufen Sie das Schirmbild Setting...

Страница 65: ...s Drücken Seite 9 Schiebt die Disc zwangsweise aus Gedrückthalten Seite 3 3 Ladeschlitz 4 HOME Taste Rufen Sie das Home Schirmbild auf Drücken Seite 7 Schaltet die Stromversorgung aus Gedrückthalten Seite 6 Einschalten Drücken Seite 6 5 FNC Taste Ruft das Schirmbild Function Menu Video Menu auf dem Quelle Steuerschirmbild auf Drücken Seite 7 Aktiviert Sprach Anwahl Gedrückthalten Seite 32 6 VOLUME...

Страница 66: ...en Sie die gleiche Taste erneut Ausschalten des Bildschirms KW V50BT KW V30BT Gedrückthalten Gedrückthalten Zum Einschalten des Bildschirmbildes Halten Sie DISP am Monitorfeld gedrückt Ein Ausschalten der AV Quelle Sie können die AV Funktion durch Wählen einer Quelle im Home Schirmbild aktivieren Zum Wählen einer Quelle die nicht im Home Schirmbild angezeigt wird Drücken Sie All Seite 8 Zum Aussch...

Страница 67: ...Quelle unterschiedlich 4 Kurzbedientasten Zeigt den Telefon Steuerbildschirm an Seite 31 Aktiviert Sprach Anwahl Seite 32 Zeigt den Klang Einstellbildschirm an Seite 36 Zeigt das Display Menüschirmbild an Seite 42 TP Aktiviert deaktiviert den TA Standby Empfangsmodus Seite 22 5 Schaltet auf das Function Menu Steuerschirmbild um 6 Bedientasten für Video Wiedergabe Seite 37 Die Tasten sind abhängig ...

Страница 68: ... Schirmbild Zum Wiederherstellen des Bildschirmbildes Drücken Sie Home AV Off Schaltet die AV Quelle aus Seite 6 Camera Schaltet auf eine Kamera um die an den Eingang für die Rückfahrkamera angeschlossen ist Seite 25 RearSource Wählt die Rückfahrquelle zur Anzeige auf dem externen Monitor Seite 26 Apps Schaltet auf das Bildschirmbild einer App vom angeschlossen iPod touch iPhone um Seite 19 Tuner ...

Страница 69: ...eraus Sie können eine Disc ausschieben während eine andere AV Quelle wiedergegeben wird Wenn die ausgeworfene Disc nicht innerhalb von 60 Sekunden entfernt wird wird die Disc automatisch wieder in den Ladeschlitz eingezogen um sie vor Staub zu schützen Falls die Disc nicht ausgeworfen werden kann siehe Seite 3 Wiedergabebetrieb Wenn die Bedientasten nicht im Bildschirm angezeigt werden berühren Si...

Страница 70: ... fürVCD FürC D MP3 WMA AAC 4 2 5 6 7 3 1 8 Wiedergabe Information 1 Track Datei Information Durch Berührung der Textinformation wird der Informationstyp angezeigt 2 Medientyp 3 Aktuelle Wiedergabegegenstand Information MP3 WMA AAC Ordner Nr Track Nr CD Track Nr 4 Audio Format 5 Wiedergabemodus Seite 12 6 Spielzeit 7 DISC IN Anzeige 8 Wiedergabestatus Bedientasten 1 Zeigt die Ordner Track Liste an ...

Страница 71: ...Bildeinstellung Bildschirm an Seite 37 Zeigt den Bildgröße Auswahlbildschirm an Seite 38 Schaltet auf den Direkt Diskmenü Modus um Berühren Sie das Zielelement zum Auswählen Zum Beenden des Menü Auswahlschirmbilds drücken Sie Zeigt den Menü Playlist Originalprogramm Szene Auswahlschirmbild an J K H I Wählt einen Gegenstand Enter Bestätigt die Auswahl Return Schaltet zum vorhergehenden Bildschirmbi...

Страница 72: ...ken Sie oder FNC am Monitorfeld Für DVD DVD VR VCD ohne PBC Wiederholte Wiedergabe ist verfügbar Für CD DivX MPEG1 MPEG2 MP3 WMA AAC Wiederholte und Zufallswiedergabe sind verfügbar Sie können nicht den Wiederhol Modus und den Zufallsmodus gleichzeitig aktivieren Bei jedem Drücken der Taste schaltet der Wiedergabemodus um Die entsprechende Anzeige leuchtet auf Verfügbare Gegenstände können sich je...

Страница 73: ...en Sie ob dieWinkelmarkierung ausgeblendet werden soll Monitor Type Wählen Sie den Monitortyp zum Betrachten eines Breitbilds auf dem externen Monitor 16 9 Anfänglich 4 3 LB 4 3 PS Parental Level Stellen Sie die Kindersicherungsstufe ein Siehe rechte Spalte CD Read Wählen Sie die Dateien zur Wiedergabe auf einer Disc die Musikdateien enthält Sie können nicht die Einstellung ändern wenn eine Disc e...

Страница 74: ...alte 5 Spielzeit 6 Fortschrittsbalken 7 Wiedergabestatus 8 Umschlagbild während der Wiedergabe angezeigt wenn die Datei Tag Daten einschließlich Umschlagbild hat Bedientasten Mode Ändert die Bildanzeige Zeiteinstellung im Mode Schirmbild Seite 15 Zeigt das Listenauswahl Schirmbild an Seite 15 S T Wählt einen Track Drücken Reverse Vorwärts Suche 1 Halten I W Zum Starten Pausieren der Wiedergabe 2 W...

Страница 75: ...en Ebene Wenn Sie alle Tracks im Ordner abspielen wollen drücken Sie I rechts vom gewünschten Ordner In den Category List Folder List Bildschirm Sie können den Dateityp zur Auflistung umschalten Drücken Sie zum Auflisten von Audiodateien zum Auflisten von Videodateien oder zum Auflisten von Bilddateien Vom Schirmbild Category List Wählen Sie die Kategorie 1 dann das Element in der gewählten Katego...

Страница 76: ... iPod iPhone Bluetooth Verbindung Koppeln Sie das iPod iPhone über Bluetooth Seite 27 iPhone 5 iPod touch 5 Generation iPod nano 7 Generation Zum Betrachten des Videos schließen Sie Ihr iPod iPhone an der HDMI MHL Eingangsklemme mittels des KS U60 optionales Zubehör an Seite 48 Für iPod iPhone ausgenommen iPhone 5 iPod touch 5 Generation iPod nano 7 Generation Sie können nicht das Video mit Blueto...

Страница 77: ...th oder Bluetooth als Verbindungsverfahren erscheint das Bildschirmbild mit der Liste von Pairing Geräten Wählen Sie das Zielgerät Wenn das gewünschte Gerät nicht aufgeführt ist drücken Sie Search um die verfügbaren iPod iPhone Gerät zu suchen und wählen Sie dann das Zielgerät im Schirmbild Available Devices Sie können die Seite zur Anzeige weiterer Gegenstände wechseln indem Sie J K drücken Zum S...

Страница 78: ...he rechte Spalte S T Wählt eine Audio Video Datei Drücken Reverse Vorwärts Suche Gedrückthalten I W Zum Starten Pausieren der Wiedergabe 1 Wählt den Wiederhol Wiedergabemodus SONGS Hat die gleiche Funktion wie Repeat One ALL Hat die gleiche Funktion wie Repeat All 1 2 Wählt den Zufallswiedergabemodus SONGS Hat die gleiche Funktion wie Shuffle Songs ALBUMS Hat die gleiche Funktion wie Shuffle Album...

Страница 79: ...hone Android 2 Wählen Sie Apps als Quelle Seite 8 Bedientasten auf dem Quell Steuerschirmbild S T Wählt eine Audio Video Datei I W Zum Starten Pausieren der Wiedergabe Sie können bestimmte Funktionen einer App im Sensordisplay bedienen Bei manchen Anwendungen wie Navigationsanwendungen werden die Bedientasten und die Informationen nicht angezeigt Sie können die Bedienungen auf dem Sensordisplay au...

Страница 80: ... 22 SSM Speichert die Sender mit den stärksten Signalen automatisch Seite 21 S T Sucht nach einem Sender Automatischer Suchlauf Drücken Manueller Suchlauf Halten Band Wählt das Frequenzband MONO 1 2 Aktiviert deaktiviert den Mono Modus Siehe rechte Spalte TP 2 Aktiviert deaktiviert den TA Standby Empfangsmodus Seite 22 1 Erscheint nur wenn UKW als Quelle gewählt ist 2 Drücken Sie FNC am Monitorfel...

Страница 81: ...angqualität wird nicht verringert und der Stereoeffekt bleibt erhalten Einstellung von Festsendern Speichern von Sendern Sie können für jedes Frequenzband bis zu 6 Sender voreinstellen Automatische Voreinstellung SSM Strong station Sequential Memory Gedrückthalten Das Gerät sucht nach den Ortssendern mit den stärksten Einfallssignalen und speichert sie automatisch als Festsender ab Manuelle Vorein...

Страница 82: ...er Radio Data System Signale ausstrahlt So deaktivieren Sie den TA Standbyempfang Drücken Sie TP Die TP Anzeige erlischt Die Lautstärkeeinstellung für Verkehrsansagen wird automatisch gespeichert Beim Nächsten Umschalten der Einheit auf Verkehrsansagen wird die Lautstärke auf den vorher eingestellten Pegel eingestellt Nachrichten Standbyempfang 1 2 Das Gerät ist im Bereitschaftsbetrieb um auf Nach...

Страница 83: ...eige leuchtet auf AF Reg Schaltet auf eine andere Frequenz mit demselben Programm um die AF Anzeige leuchtet auf Off Hebt auf Automatische Senderauswahl Programmsuche Normalerweise wird er aktuelle Sender abgestimmt wenn Sie Festsender wählen Wenn die Signale vom Radio Data System UKW Festsender nicht mit ausreichender Signalstärke empfangen werden können wählt das Gerät mithilfe der AF Alternativ...

Страница 84: ... externe Komponente an die AV IN1 Klemme an Zum Anschließen einer externen Komponente siehe Seite 49 2 Wählen Sie AV IN als Quelle Im den Home Schirmbild 3 Schalten Sie die angeschlossene Komponente ein und starten Sie die Wiedergabe der Quelle Verwendung externer Audio Player Front AUX nur für KW V30BT Anzeigen und Tasten auf dem Quell Steuerschirmbild Starten der Wiedergabe 1 Schließen Sie exter...

Страница 85: ...a Das Rückfahrschirmbild wird angezeigt wenn der Rückwärtsgang R eingelegt wird Zum manuellen Anzeigen des Bildes von der Rückfahrkamera Im den Home Schirmbild Anpassen des Bildes von der Rückfahrkamera Beim manuellen Anzeigen des Bildes von der Rückfahrkamera können Sie die Einstellung des Bildes ändern 1 Rufen Sie das Schirmbild Video Menu auf KW V50BT KW V30BT 2 Wählen Sie das Bildseitenverhält...

Страница 86: ...optionales Zubehör 2 Wählen Sie HDMI MHL als Quelle Im den Home Schirmbild 3 Starten Sie eine Anwendung auf Ihrem Smartphone Verwendung eines externen Monitors hintere Quelle Sie können eine hintere Quellenwiedergabe auf einem externen Monitor genießen der an die Klemmen AV OUT VIDEO und AV OUT AUDIO angeschlossen ist während Sie eine andere Quelle hören Sie können die Wiedergabe der hinteren Quel...

Страница 87: ...Getätigte Anrufe empfangene Anrufe und verpasste Anrufe bis zu je 10 Einträge Anschließen von Bluetooth Geräten Registrieren eines neuen Bluetooth Geräts Wenn Sie ein Bluetooth Gerät zum ersten Mal anschließen nehmen Sie Pairing zwischen der Einheit und dem Gerät vor Pairing erlaubt es Bluetooth Geräten miteinander zu kommunizieren Das Pairing Verfahren ist je nach der Bluetooth Version des Geräts...

Страница 88: ...t anfänglich auf 0000 gestellt Die maximale Anzahl von Stellen im PIN Code ist 15 Drücken Sie Clear um die letzte Eingabezu löschen 3 Suchen Sie die Einheit KW V von Ihrem Bluetooth Gerät 4 Wählen Sie die Einheit KW V auf Ihrem Bluetooth Gerät Wenn der PIN Code erforderlich ist geben Sie 0000 ein anfänglich Wenn das Pairing ausgeführt ist ist das Gerät in der Paired Device List aufgeführt Zur Verw...

Страница 89: ...as Schirmbild Bluetooth Setup auf Seite 28 2 3 Wählen Sie das Gerät das Sie anschließen wollen 1 und drücken Sie dann Connection 2 4 Wählen Sie On oder Off als Ziel Handy Audiogerät Der Status wird wie folgt angezeigt Connected Eine Verbindung wurde hergestellt Connect Ready Eine Verbindung kann hergestellt werden Disconnected Keine Verbindung ist hergestellt Löschen eines registrierten Bluetooth ...

Страница 90: ...chen 0 und 15 einstellen anfänglich 3 Diese Einstellung hat keine Auswirkung auf den Lautstärkepegel der anderen Quellen Verwenden Sie das Monitorfeld zum Anpassen der Ruf Ohrhörer Lautstärke Seite 6 Umschalten zwischen Handfrei Modus und Telefon Modus Während des Gesprächs Bei jedem Drücken der Taste schaltet die Sprechmethode um Handfrei Modus Telefon Modus Verringern des Rauschens Anpassen des ...

Страница 91: ...urch Drücken von am Schirmbild Function Menu anzeigen Seite 7 2 Wählen Sie die Methode zum Vornehmen eines Rufs 2 3 1 4 1 Aus dem Telefonbuch Anrufliste 2 Direkte Zahleneingabe 3 Aus der Vorwahlliste Zum Voreingeben siehe Seite 33 4 Sprach Anwahl Wenn das Handy nicht mit dem Phone Book Access Profile PBAP kompatibel ist wird dasTelefonbuch nicht angezeigt Aus der Vorwahlliste Telefonbuch Anruflist...

Страница 92: ...en Drücken Sie um die letzte Eingabezu löschen Halten Sie 0 gedrückt um zur Telefonnummer hinzuzufügen Sprach Anwahl Nur verfügbar wenn das angeschlossene Handy mit dem Spracherkennungssystem ausgestattet ist 1 Aktivieren Sie Sprach Anwahl Auf dem Telefon Steuerschirmbild Drücken Sie K wiederholt um die Seite im Telefon Steuerschirmbild zu wechseln Sie können auch die Sprach Anwahl durch Drücken v...

Страница 93: ...n und Informationen unterscheiden sich je nach dem angeschlossenen Gerät Wiedergabe Information 1 Tag Daten aktueller Tracktitel Interpretenname Albumtitel 1 Durch Berührung der Textinformation wird der Informationstyp angezeigt 2 Track Nr 1 3 Spielzeit 1 4 Wiedergabestatus 1 Bedientasten 1 2 3 Wählt den Wiederhol Wiedergabemodus 1 2 3 Wählt den Zufallswiedergabemodus W Pausiert die Wiedergabe I S...

Страница 94: ...ohl Telefon als auch Audioplayer Front Nur vordere Lautsprecher All Anfänglich Alle Lautsprecher Auto Answer On Die Einheit nimmt die ankommenden Rufe automatisch in 5 Sekunden entgegen Off Anfänglich Die Einheit nimmt keine Rufe nicht automatisch entgegen Nehmen Sie die Rufe manuell entgegen AutoP airing On Anfänglich Führt das Pairing automatisch mit dem angeschlossenen iOS Gerät aus wie iPhone ...

Страница 95: ...iPhone USB AV IN Wählen Sie dies wenn der iPod iPhone über das KS U59 optionales Zubehör angeschlossen wird USB 1 Wire Wählen Sie dies wenn der iPod iPhone mittels des USB 2 0 Kabels Zubehör von iPod iPhone angeschlossen wird HDMI Bluetooth Wählen Sie dies wenn das iPod iPhone mittels HDMI Kabel KS U60 optionales Zubehör und USB 2 0 Kabel Zubehör des iPod iPhone über Lightning Digital AV Adapter Z...

Страница 96: ...requenzbereichs 1 ein und wählen Sie dann den Subwooferpegel 2 Die Einstellungen werden gespeichert und User wird aktiviert Zum Fertigstellen des Vorgangs drücken Sie Speichern Ihrer eigenen Einstellungen Präzises Einstellen des Klangs 1 Wählen Sie einen Klangmodus siehe linke Spalte und 2 Wählen Sie einen Wellenbereich 3 Stellen Sie den Klang ein Reset Ändert den Pegel jedes Bereichs Low Middle H...

Страница 97: ...angsfrequenz ein Nicht wählbar wenn Freq auf Through gestellt ist Anpassung für Video Wiedergabe Anpassen des Bildes Sie können die Bildqualität einstellen 1 Rufen Sie das Schirmbild Video Menu auf KW V50BT KW V30BT 2 Zeigen Sie das Einstellungsmenü an 3 Wählen Sie Abblendung ein oder Abblendung aus 4 Passen Sie das Bild an Brightness Stellt die Helligkeit ein 15 bis 15 Contrast Stellt den Kontras...

Страница 98: ...omatisch entsprechend der Videoquelle gewählt Während derWiedergabe von DivX während Monitor Type auf 16 9 gestellt ist Seite 13 ist das Seitenverhältnis nicht richtig eingestellt Zoomen des Bildes Sie können das Bild Zoomen Full Zoom1 bis Zoom3 Zoomen ist nur verfügbar wenn die Disc abgespielt wird Wenn Aspect auf Panorama siehe linke Spalte gestellt ist wird das Bild mit dem Seitenverhältnis der...

Страница 99: ...atei einstellen das auf dem angeschlossenen USB Gerät gespeichert ist Verwenden Sie eine JPEG PNG BMP Datei mit einer Auflösung von 800 x 480 Pixel Die Farbe des festgehaltenen Bildes kann sich von der der tatsächlichen Szene unterscheiden 1 Schließen Sie das USB Gerät mit dem gespeicherten Bild an Seite 48 2 Zeigen Sie das Bildschirmbild Display Design an Siehe linke Spalte 3 Rufen Sie das Schirm...

Страница 100: ...ay Design Einstellungen für AV IN AV IN Name Im den Home Schirmbild Drücken Sie K wiederholt um die Seite im Menü Schirmbild System zu wechseln Recall Ruft gespeicherte Einstellungen ab Save Speichern die aktuellen Einstellungen Delete Löscht die gespeicherten Einstellungen Eine Bestätigungsmeldung erscheint Drücken Sie Yes Justieren der Berührungsposition Sie können die Berührungsposition am Sens...

Страница 101: ...Balance Fader Stellen Sie die Balance für die Lautsprecherausgabe auf den vorderen und hinteren Lautsprechern ein F6 bis R6 Anfänglich 0 Wenn Sie eine Anlage mit zwei Lautsprechern verwenden stellen Sie den Fader auf Mittenstellung 0 Balance Stellen Sie die Balance für die Lautsprecherausgabe auf den linken und rechten Lautsprechern ein L6 bis R6 Anfänglich 0 Drücken Sie J K H I oder ziehen Sie zu...

Страница 102: ...chirmbild e g a u g n a L Wählen Sie die Textsprache für die Bildschirminformation English Anfänglich Español Français Deutsch Italiano Nederlands Руccĸий Português GUI Language Wählen Sie eine Sprache zur Anzeige von Bedientasten und Menüelementen English Anfänglich Local die oben gewählte Sprache Calendar Setting iPod Setup APP Setup APP Connection Setup Konfigurieren Sie die APP Interrupt Volum...

Страница 103: ...alten Wählt einen Track Rückwärts Suche Vorwärts Suche Gedrückthalten O N Rückwärts Suche Vorwärts Suche DVD Video DVD VR VCD Zeitlupen Wiedergabe im Pausebetrieb DVD VR VCD Reverse Zeitlupe arbeitet nicht VOL VOL Zum Einstellen des Lautstärkepegels Die Funktion 2nd VOL arbeitet nicht für dieses Gerät SOURCE Wählt die Quelle I W Zum Starten Pausieren der Wiedergabe PHONE Nimmt ankommende Rufe entg...

Страница 104: ...e während Sie SHIFT gedrückt halten um einen gewünschten Gegenstand zu wählen Zum Löschen eine Fehleingabe drücken Sie CLR Löschen während gleichzeitig die SHIFT Taste gedrückt gehalten wird 3 Drücken Sie ENT zum Bestätigen der Wahl Verschiedene Disc Bedienungen Verwendung des Disc Menüs DVD Video DVD VR 1 Für DVD Video drücken Sie TOP M oder MENU Für DVD VR drücken Sie TOP M Zur Anzeige des Origi...

Страница 105: ...nen und Schließen nicht am Deckel stößt Wenn die Sicherung durchbrennt überprüfen Sie zuerst dass die Drähte sich nicht berühren und einen Kurzschluss verursachen Ersetzen Sie dann die durchgebrannte Sicherung durch eine neue Sicherung mit den gleichen Nenngrößen Isolieren Sie nicht angeschlossene Kabel mit Vinylband oder ähnlichem Material Entfernen Sie die Schutzhülsen von den Enden nicht angesc...

Страница 106: ... Entfernen der Einheit Einbau der Einheit Sichern Sie das Gerät indem Sie die Metalllaschen mit einem Schraubendreher o Ä umbiegen Anbringen des Frontrahmens Die Verkleidungsplatte anbringen 2 2 Abnehmen des Frontrahmens 1 Lassen Sie die Arretierstifte am Ausbauschlüssel 4 ineinander greifen und entfernen Sie die zwei Verriegelungen im unteren Teil Senken Sie den Rahmen und ziehen Sie ihn nach vor...

Страница 107: ...dkabel Rot A7 Gelb A4 Anschluss A Anschluss B Seite 48 49 Stift Farbe und Funktionen von Anschluss A und B A4 Gelb Batterie A5 Blau mit weißem Streifen Stromsteuerung A6 Orange mit weißem Streifen Abblendung A7 Rot Zündung ACC A8 Schwarz Masseanschluss B1 Lila Rechter Lautsprecher ª hinten B2 Lila mit schwarzem Streifen Rechter Lautsprecher hinten B3 Grau Rechter Lautsprecher ª vorne B4 Grau mit s...

Страница 108: ...ration iPod nano 7 Generation im Handel erhältlich Lighting Digital AV Adapter Zubehör für das iPod iPhone USB 2 0 Kabel Zubehör für den iPod iPhone oder KS U62 optionales Zubehör USB 2 0 Kabel Zubehör für den iPod iPhone oder KS U62 optionales Zubehör KS U60 optionales Zubehör HDMI MHL Kabel 6 7 Wenn Sie den HDMI MHL Stecker anschließen befestigen Sie das Kabel mit der Halterung 6 und Schraube 7 ...

Страница 109: ...Linkes Audio 2 Rechtes Audio 3 Masse 4 Composite Video 4 HDMI MHL Eingang 5 Subwoofer Vorverstärkerausgang Mono Subwoofer linker Ausgang Weiß Subwoofer rechter Ausgang Rot 6 Hinten Preout Audio links Ausgang Weiß Audio rechts Ausgang Rot 7 Vorne Preout Audio links Ausgang Weiß Audio rechts Ausgang Rot 8 AV OUT Audioausgang ø3 5 ø Minibuchse Widerstandsfreier Stereo Ministecker Anschließen des Mikr...

Страница 110: ...ischen Sie diese mit einem weichen Lappen gerade von der Mitte nach außen hin ab Verwenden Sie keine Lösungsmittel z B Schallplattenreiniger Spray Terpentin Benzol usw zur Reinigung von Discs Wiedergabe neuer Discs Neue Discs haben möglicherweise raue Stellen an den Innen und Außenrändern Wenn solch eine Disc verwendet wird kann sie von diesem Gerät abgewiesen werden Um solche rauen Stellen zu bes...

Страница 111: ...die mit DRM kopiergeschützt sind Von einer anderen Anwendung als iTunes codierte AAC Dateien AAC Dateien die mit FairPlay kopiergeschützt sind ausgenommen die auf einem iPod gespeicherten Dateien die Daten wie AIFF ATRAC3 usw enthalten Dieses Gerät kann Umschlagbilder anzeigen die den unten aufgeführten Bedingungen entsprechen Bildgröße 32 x 32 bis 1 232 x 672 Auflösung Datenmenge weniger als 650 ...

Страница 112: ...VC 1 Dieses Gerät kann insgesamt 5 000 Dateien und 250 Ordner maximal 999 Dateien pro Ordner erkennen Stellen Sie sicher dass alle wichtigen Daten gesichert sind um Datenverlust zu vermeiden Hinweise zur Verwendung eines USB Geräts Diese Einheit kann möglicherweise Dateien in einem USB Gerät nicht korrekt abspielen wenn ein USB Verlängerungskabel verwendet wird USB Geräte die mit speziellen Funkti...

Страница 113: ...i AR Arabisch HI Hindi MO Moldavisch ST Sesotho AS Assamesisch HR Kroatisch MR Marathi SU Sundanesisch AY Aymara HU Ungarisch MS Malayisch MAY SW Suahili AZ Aserbaijanisch HY Armenisch MT Maltesisch TA Tamilisch BA Bashkir IA Interlingua MY Burmesisch TE Telugu BE Weißrussisch IE Interlingue NA Nauru TG Tajik BG Bulgarisch IK Inupiak NE Nepalesisch TH Thailändisch BH Bihari IN Indonesisch NO Norwe...

Страница 114: ...der AV IN1 Eingangsklemme angeschlossen ist Starten Sie die Wiedergabe auf dem Smartphone das an der HDMI MHL Eingangsklemme angeschlossen ist Prüfen Sie die Kabel und Verbindungen Signaleingang ist zu schwach MISWIRING Check wiring connection then reset unit WARNING Check wiring connection then reset unit Ein Lautsprecherkabel ist kurzgeschlossen oder hat die Fahrzeugkarosserie berührt Verdrahten...

Страница 115: ...en nicht übersprungen werden Eine finalisierte Disc einsetzen Finalisieren Sie die Discs mit dem zur Aufnahme verwendeten Gerät Die Wiedergabe startet nicht Das Format von Dateien wird nicht vom Gerät unterstützt Es erscheint kein Bild im externen Monitor Schließen Sie das Videokabel richtig an Wählen Sie den richtigen Eingang am externen Monitor DivX MPEG1 MPEG2 MP3 WMA AAC Disc kann nicht abgesp...

Страница 116: ... Schließen Sie das Antennenkabel fest an AV IN Auf dem Bildschirm erscheint kein Bild Das Videogerät einschalten wenn dieses ausgeschaltet ist Schließen Sie die Videokomponente richtig an Bluetooth Die Telefon Tonqualität ist schlecht Verringern Sie den Abstand zwischen der Einheit und dem Bluetooth Handy Bewegen Sie das Fahrzeug zu einem Ort wo ein besseres Signal empfangen wird Der Ton wird unte...

Страница 117: ...gang 96 kHz Abtastung 20 Hz bis 22 000 Hz 48 kHz Abtastung 20 Hz bis 22 000 Hz 44 1 kHz Abtastung 20 Hz bis 20 000 Hz Klirrfaktor 0 010 1 kHz Signal Rauschabstand 94 dB DVD Video 96 kHz Dynamikumfang 91 dB DVD Video 96 kHz Disc Format DVD Video DVD VR VIDEO CD CD DA Samplingfrequenz 44 1 kHz 48 kHz 96 kHz Quantifizierung Bitzahl 16 20 24 bit USB Schnittstellensektion USB Standard USB 2 0 High Spee...

Страница 118: ...PBAP Phone Book Access Profile A2DP Advanced Audio Distribution Profile AVRCP Audio Video Remote Control Profile GAP Generic Access Profile SDP Service Discovery Profile SPP Serial Port Profile UKW Tuner Sektion Frequenzgang 50 kHz 87 5 MHz bis 108 0 MHz Nutzbare Empfindlichkeit S N 30 dB Dev 22 5 kHz 9 3 dBf 0 8 μV 75 Ω Geräuschberuhigung S N 46 dB Dev 22 5 kHz 15 2 dBf 1 6 μV 75 Ω Frequenzgang 3...

Страница 119: ... eingetragenes Warenzeichen von DVD Format Logo Licensing Corporation in den USA Japan und anderen Ländern Das AAC Logo ist ein Warenzeichen von Dolby Laboratories Microsoft und Windows Media sind eingetragene Warenzeichen oder Warenzeichen der Microsoft Corporation in den USA und oder anderen Ländern Made for iPod and Made for iPhone mean that an electronic accessory has been designed to connect ...

Страница 120: ...d die Logos sind eingetragene Marken und sind Eigentum der Bluetooth SIG Inc und jegliche Verwendung solcher Marken durch die JVC KENWOOD Corporation geschieht unter Lizenz Andere Warenzeichen und Handelsnamen sind Eigentum ihrer jeweiligen Besitzer und werden von uns anerkannt The terms HDMI and HDMI High Definition Multimedia Interface and the HDMI logo are trademarks or registered trademarks of...

Страница 121: ...ia dyrektywy 1999 5 EC Český JVC KENWOOD tímto prohlašuje že tento KW V50BT KW V30BT je ve shode se základními požadavky a dalšími príslušnými ustanoveními smernice 1999 5 EC Magyar Alulírott JVC KENWOOD kijelenti hogy a jelen KW V50BT KW V30BT megfelel az 1999 5 EC irányelvben meghatározott alapvető követelményeknek és egyéb vonatkozó előírásoknak Svenska Härmed intygar JVC KENWOOD att denna KW V...

Страница 122: ...on les affichages et les panneaux représentés peuvent être différents de leur apparence réelle Ce mode d emploi explique les opérations en utilisant les touches du panneau du moniteur et du panneau tactile Pour les opérations en utilisant de la télécommande RM RK252P en option voir page 43 indique les divers écrans menus opérations réglages qui apparaissent sur le panneau tactile indique les touch...

Страница 123: ...uches sur le panneau tactile directement avec un doigt si vous portez des gants retirez les Quand la température est très basse ou très élevée Un changement chimique se produit à l intérieur causant un mauvais fonctionnement Les images peuvent ne pas apparaître clairement ou se déplacer doucement Les images peuvent ne pas être synchronisées avec le son ou la qualité de l image peut être réduite da...

Страница 124: ...z On quand une caméra de recul est connectée Display Design Page 42 Choisissez la couleur du fond et du panneau Demonstration Page 42 Mettez en ou hors service la démonstration des affichages 2 Terminez la procédure L écran d accueil est affiché AV Off est choisi initialement Choisissez la source de lecture Page 8 Réglages du calendrier horloge 1 Affichez l écran d accueil KW V50BT KW V30BT 2 Affi...

Страница 125: ...sque Appuyer Page 9 Éjecte le disque de force Maintenir pressée Page 3 3 Fente d insertion 4 Touche HOME Affiche l écran d accueil Appuyer Page 7 Met l appareil hors tension Maintenir pressée Page 6 Met sous tension de l appareil Appuyer Page 6 5 Touche FNC Fait apparaître la fenêtre de l écran Function Menu Video Menu sur l écran de commande de la source Appuyer Page 7 Mets en service la composit...

Страница 126: ...nouveau sur la même touche Mise hors service de l écran KW V50BT KW V30BT Maintenir pressée Maintenir pressée Pour mettre en service l écran Maintenez enfoncé DISP sur le panneau du moniteur Mise en hors service la source AV Vous pouvez mettre en service la fonction AV en choisissant la source sur l écran d accueil Pour sélectionner une source non affichée sur l écran d accueil Appuyez sur All Pag...

Страница 127: ...ource sélectionnée 4 Touches de raccourci Affiche l écran de commande du téléphone Page 31 Mets en service la composition vocale Page 32 Affiche l écran d ajustement du son Page 36 Affiche l écran de menu Display Page 42 TP Met en hors service le mode d attente de réception TA Page 22 5 Commute sur l écran Function Menu 6 Touches de fonctionnement pour la lecture vidéo Page 37 Les touches varient ...

Страница 128: ...e 40 Pour afficher toutes les sources et tous les éléments de l écran Pour rétablir l écran Appuyez sur Home AV Off Met hors service la source AV Page 6 Camera Commute sur une caméra connecté à l entrée de la caméra de recul Page 25 RearSource Sélectionne la source arrière à afficher sur le moniteur extérieur Page 26 Apps Commute sur l écran de l App à partir de l iPod touch iPhone connecté Page 1...

Страница 129: ...un disque lors de la lecture d une autre source AV Si le disque éjecté n est pas retiré avant 60 secondes il est réinséré automatiquement dans la fente d insertion pour le protéger de la poussière Si le disque ne peut pas être éjecté voir page 3 Opérations de lecture Quand les touches de commande ne sont pas affichées sur l écran touchez la zone montrée sur l illustration Pour changer les réglages...

Страница 130: ... lesVCD PourC D MP3 WMA AAC 4 2 5 6 7 3 1 8 Informations sur la lecture 1 Informations sur la plage fichier Toucher le texte d information change le type d information 2 Type de support 3 Informations sur l élément en cours de lecture MP3 WMA AAC No de dossier No de plage CD No de plage 4 Format audio 5 Mode de lecture Page 12 6 Durée de lecture 7 Indicateur DISC IN 8 État de lecture Touches de co...

Страница 131: ...an d ajustement de l image Page 37 Affiche l écran de sélection de la taille de l image Page 38 Commute sur le mode de menu directe de disque Touchez l élément cible pour le choisir Pour quitter l écran de sélection de menu appuyez sur Affiche l écran de sélection du menu liste de lecture programme original scène J K H I Choisit un élément Enter Valide la sélection Return Retourne à l écran précéd...

Страница 132: ...unction Menu appuyez sur ou FNC sur le panneau du moniteur Pour les DVD DVD VR VCD sans PBC La lecture répétée est disponible Pour CD DivX MPEG1 MPEG2 MP3 WMA AAC La lecture répétée et aléatoire est disponible Vous ne pouvez pas mettre en service le mode de répétition et le mode de lecture aléatoire en même temps Chaque fois que vous appuyez sur la touche le mode de lecture change L indicateur cor...

Страница 133: ...fficher la marque d angle Off Sélectionnez ce réglage pour cacher la marque d angle Monitor Type Choisissez le type de moniteur de façon à ce qu il corresponde à une image d écran large sur votre moniteur extérieur 16 9 Réglage initial 4 3 LB 4 3 PS Parental Level Réglez le niveau de censure parental Référez vous à la colonne de droite CD Read Sélectionnez les fichiers pour lire un disque contenan...

Страница 134: ...urée de lecture 6 Barre de progression 7 État de lecture 8 Image de la pochette Affichée si le fichier possède de données de balise qui comprennent l image de la pochette Touches de commande Mode Change les réglages d affichage de l heure sur l image sur l écran Mode Page 15 Affiche l écran de sélection de liste Page 15 S T Choisit une plage Appuyer Recherche vers l arrière vers l avant 1 Maintene...

Страница 135: ...uhaitez lire toutes les pages du dossier appuyez sur I sur la droite du dossier souhaité Sur l écran Category List Folder List Vous pouvez commuter le type de fichier dans la liste Appuyez sur pour afficher la liste des fichiers audio sur pour afficher la liste des fichiers vidéo ou sur pour afficher la liste des images fixes À partir de l écran Category List Sélectionnez la catégorie 1 puis un él...

Страница 136: ...soire de l iPod iPhone Connexion Bluetooth Appariez le périphérique iPod iPhone par Bluetooth Page 27 Pour l iPhone 5 iPod touch 5e génération iPod nano 7e génération Pour regarder une vidéo connectez votre iPod iPhone à la prise d entrée HDMI MHL en utilisant le KS U60 accessoire en option Page 48 Pour l iPod iPhone sauf pour l iPhone 5 iPod touch 5e génération iPod nano 7e génération Vous ne pou...

Страница 137: ...HDMI Bluetooth ou Bluetooth comme méthode de connexion la liste des périphériques appariés apparaît Choisissez l appareil cible Si l appareil souhaité n est pas dans la liste appuyez sur Search pour rechercher les iPod iPhone disponibles puis sélectionnez l appareil cible sur l écran Available Devices Vous pouvez changer la page pour afficher plus d éléments en appuyant sur J K Pour arrêter la rec...

Страница 138: ...Choisit un fichier audio vidéo Appuyer Recherche vers l arrière vers l avant Maintenir pressée I W Démarre arrête momentanément pause la lecture 1 Choisit le mode de lecture répétée SONGS Fonctionne de la même façon que Repeat One ç ALL Fonctionne de la même façon que Repeat All 1 2 Choisit le mode de lecture aléatoire SONGS Fonctionne de la même façon que la fonction Shuffle Songs ç ç ç ALBUMS Fo...

Страница 139: ...h iPhone Android 2 Choisissez Apps comme source Page 8 Touches de fonctionnement sur l écran de commande de la source S T Choisit un fichier audio vidéo I W Démarre arrête momentanément pause la lecture Vous pouvez commander certaines fonction d une App sur le panneau tactile Pour certaines application telles que les applications de navigation les touches de commande et les informations n apparais...

Страница 140: ...herche de PTY Page 22 SSM Prérègle automatiquement les stations possédant les signaux les plus forts Page 21 S T Recherche une station Recherche automatique Appuyez Recherche manuelle Maintenez pressée Band Choisit la bande MONO 1 2 Met en hors service le mode monophonique Référez vous à la colonne de droite TP 2 Met en hors service le mode d attente de réception TA Page 22 1 Apparaît uniquement q...

Страница 141: ...es stations adjacentes mais la qualité du son n est pas dégradée et l effet stéréo est conservé Préréglage des stations Mémorisation des stations Vous pouvez prérégler 6 stations pour chaque bande Préréglage automatique SSM Mémorisation automatique séquentielle des stations puissantes Maintenir pressée Les stations locales avec les signaux les plus forts sont recherchées et mémorisées automatiquem...

Страница 142: ...Radio Data System Pour mettre hors service l attente de réception TA Appuyez sur TP L indicateur TP s éteint L ajustement du volume pour les annonces d informations routières est mémorisé automatiquement La prochaine fois que l appareil commute sur des annonces d informations routières le volume est réglé sur le niveau précédent Attente de réception d informations 1 2 L appareil est en attente pou...

Страница 143: ...F s allume AF Reg Commute sur une autre station diffusant le même programme l indicateur AF s allume Off Annulation Sélection automatique des stations Recherche de programme Normalement quand vous choisissez une station préréglé la station préréglée est accordée Si les signaux des stations préréglés FM Radio Data System ne permettent pas une bonne réception cet appareil utilise les données AF et a...

Страница 144: ...ure 1 Connectez un appareil extérieur à la prise AV IN1 Pour connecter un appareil extérieur voir la page 49 2 Choisissez AV IN comme source Sur l écran d accueil 3 Mettez l appareil connecté sous tension et démarrez la lecture de la source Utilisation d un lecteur audio extérieur Front AUX uniquement pour le KW V30BT Indications et touches sur l écran de commande de la source Démarrage de la lect...

Страница 145: ...ère apparaît quand vous déplacez le levier de vitesse en position de marche arrière R Pour afficher l image de la caméra de recul manuellement Sur l écran d accueil Ajustement de l image de la caméra de recul Lors de l affichage de l image à partir de la caméra de recule manuellement vous pouvez changer le réglage de l image 1 Affichez l écran Video Menu KW V50BT KW V30BT 2 Permet de choisir le fo...

Страница 146: ...option ou le câble MHL KS U61 accessoire en option 2 Choisissez HDMI MHL comme source Sur l écran d accueil 3 Démarrez une application ou la lecture sur votre smartphone Utilisation d un moniteur extérieur Source arrière Vous pouvez profiter de la lecture de la source arrière sur le moniteur extérieur connecté aux prises AV OUT VIDEO et AV OUT AUDIO tout en écoutant une autre source Vous pouvez co...

Страница 147: ...ofile PBAP vous pouvez afficher le répertoire téléphonique et les listes d appels sur l écran tactile quand le téléphone portable est connecté Répertoire téléphonique 600 entrées maximum Appels passées appels reçus et appels manqués 10 entrées maximum pour chaque Connexion de périphériques Bluetooth Enregistrement d un nouveau périphérique Bluetooth Quand vous connecter un périphérique Bluetooth à...

Страница 148: ...glé initialement sur 0000 Le nombre maximum de chiffres pour le code PIN est de 15 Appuyez sur Clear pour supprimer la dernière entrée 3 Recherchez l appareil KW V à partir de votre périphérique Bluetooth 4 Recherchez l appareil KW V pour votre périphérique Bluetooth Si le code PIN est requis entrez 0000 réglage initial Quand le pairage est terminé le périphérique apparaît dans la liste Paired Dev...

Страница 149: ... 1 Affichez l écran Bluetooth Setup Page 28 2 3 Sélectionnez le périphérique que vous souhaitez connecter 1 puis appuyez sur Connection 2 4 Sélectionnez On ou Off pour la cible Téléphone portable Périphérique audio L état est affiché de la façon suivante Connected Une connexion a été établie Connect Ready Une connexion peut être établie Disconnected Aucune connexion n est établie Suppression d un ...

Страница 150: ...veau de volume entre 0 et 15 réglage initial 3 Cet ajustement n affecte pas le niveau de volume des autres sources Utilisez le panneau du moniteur pour ajuster le volume d appel écouteurs Page 6 Commutation entre le mode mains libres et le mode téléphone Pendant une conversation Chaque fois que vous appuyez sur la touche la méthode change mode mains libres mode téléphone Réduction du bruit ajustem...

Страница 151: ... Choisissez une méthode pour faire un appel 2 3 1 4 1 À partir du répertoire téléphonique des listes d appels 2 Entrée directe de numéro 3 À partir de la liste des préréglages Pour le préréglage reportez vous à la page 33 4 Composition vocale Quand le téléphone portable n est pas compatible avec Phone Book Access Profile PBAP le répertoire téléphonique n est pas affiché À partir de la liste des pr...

Страница 152: ...yez sur pour supprimer la dernière entrée Maintenez pressé 0 pour ajouter au numéro de téléphone Compositionv ocale Disponible uniquement quand le téléphone portable connecté possède un système de reconnaissance vocale 1 Mettez en service voice dialing Sur l écran de commande du téléphone Appuyez répétitivement sur K pour changer de page sur l écran de commande du téléphone Vous pouvez aussi activ...

Страница 153: ...rent en fonction du périphérique connecté Informations sur la lecture 1 Données de balise titre de la plage actuelle nom de l artiste titre de l album 1 Toucher le texte d information change le type d information 2 No de plage 1 3 Durée de lecture 1 4 État de lecture 1 Touches de commande 1 2 3 Choisit le mode de lecture répétée 1 2 3 Choisit le mode de lecture aléatoire W Met la lecture en pause ...

Страница 154: ...nceintes avant uniquement All Réglage initial Toutes les enceintes Auto Answer On L appareil répond automatiquement aux appels entrant en 5 secondes Off Réglage initial L appareil ne répond pas automatiquement aux appels entrant Répondez aux appels manuellement Auto Pairing On Réglage initial Établit le pairage automatiquement avec le périphérique iOS connecté tel qu un iPhone même si la fonction ...

Страница 155: ... AV IN Sélectionnez ce réglage quand l iPod iPhone est connecté en utilisant le KS U59 en option USB 1 Wire Sélectionnez ce réglage quand l iPod iPhone est connecté en utilisant le câble USB 2 0 accessoire du iPod iPhone HDMI Bluetooth Sélectionnez ce réglage quand l iPod iPhone est connecté avec le câble HDMI KS U60 accessoire en option et un câble USB 2 0 accessoire de l iPod iPhone via l adapta...

Страница 156: ...z le niveau de chaque bande 1 puis choisissez le niveau du caisson de grave 2 Les réglages sont mémorisés et User est activé Pour terminer la procédure appuyez sur Mémorisation de votre propre ajustement Ajustement précis du son 1 Sélectionnez un mode sonore voir la colonne de gauche puis 2 Choisissez une bande 3 Ajustez le son Reset Change le niveau de chaque bande Low Middle High sur 0 Freq Choi...

Страница 157: ...fréquence de transition Ne peut pas être choisi quand Freq est réglé sur Through Ajustement pour la lecture vidéo Ajustement de l image Vous pouvez ajuster la qualité de l image 1 Affichez l écran Video Menu KW V50BT KW V30BT 2 Affichez le menu de réglage 3 Choisissez gradateur en service ou gradateur hors servie 4 Ajustez l image Brightness Ajuste la luminosité 15 à 15 Contrast Ajuste le contrast...

Страница 158: ...ent en fonction de la source vidéo Pendant une lecture DivX avec Monitor Type réglé sur 16 9 Page 13 le format de l image n est pas réglé correctement Agrandissement de l image Vous pouvez agrandir l image Full Zoom1 à Zoom3 La fonction de zoom est disponible uniquement quand un disque est lu Quand Aspect est réglé sur Panorama voir la colonne de gauche l image est agrandie avec le format d image ...

Страница 159: ...our le fond Vous pouvez régler votre image favorite fichier JPEG PNG BMP mémorisée sur le périphérique USB connecté Utilisez le fichier JPEG PNG BMP d une résolution de 800 x 480 pixels La couleur de l image capturée peut paraître différente de celle de la scène réelle 1 Connectez le périphérique USB qui contient l image mémorisée Page 48 2 Affichez l écran Display Design Voir la colonne de gauche...

Страница 160: ...our AV IN AV IN Name Sur l écran d accueil Appuyez répétitivement sur K pour changer de page sur l écran de menu System Recall Rappelle les réglages sauvegardés Save Mémorise les réglages actuels Delete Supprime les réglages mémorisés Un message de confirmation apparaît Appuyez sur Yes Réglage de la position tactile Vous pouvez ajuster la position tactile sur le panneau tactile si la position touc...

Страница 161: ...an de menu Setup Écran de réglage Audio Fader Balance Fader Ajustez la balance de sortie avant arrière des enceintes F6 à R6 Réglage initial 0 Lors de l utilisation d un système à deux enceintes réglez le fader au centre 0 Balance Ajustez la balance de sortie gauche droite des enceintes L6 à R6 Réglage initial 0 Appuyez sur J K H I ou faites glisser pour ajuster Pour annuler l ajustement appuyez s...

Страница 162: ... l écran English Réglage initial Español Français Deutsch Italiano Nederlands Руccĸий Português Sélectionnez une langue pour afficher les touches de fonctionnement et les options de menu English Réglage initial Local la langue choisie ci dessus Calendar Setting iPod Setup APP Setup Configurez les réglages Ajustez le volume de l application 00 à 35 17 p u t e S h t o o t e u l B Configurez les régl...

Страница 163: ...ir pressée Choisit une plage Recherche vers l arrière recherche vers l avant Maintenir pressée O N Recherche vers l arrière recherche vers l avant DVD Vidéo DVD VR VCD Lecture au ralenti pendant une pause DVD VR VCD La lecture au ralenti vers l arrière ne fonctionne pas VOL VOL Ajuste le niveau de volume La fonction 2nd VOL ne fonctionne pas avec cet appareil SOURCE Choisit la source I W Démarre a...

Страница 164: ...puyez sur DIRECT l élément à rechercher change 2 Appuyez sur une touche numérique tout en maintenant SHIFT pressée pour choisir un élément souhaité Pour annuler une mauvaise entrée appuyez sur CLR annuler tout en maintenant SHIFT pressée 3 Appuyez sur ENT pour valider le choix Diverses opérations relatives aux disques Utilisation du menu de disque DVD Vidéo DVD VR 1 Pour DVD Vidéo appuyez sur TOP ...

Страница 165: ... que les câbles n ont pas causé de court circuit puis remplacez le vieux fusible par un nouveau de même valeur Isolez les câbles non connectés avec un ruban de vinyle ou d un autre matériel similaire Pour éviter les courts circuits ne retirez pas non plus les capuchons à l extrémité des câbles non connectés ou des prises Connectez séparément chaque câble d enceinte à la borne correspondante L appa...

Страница 166: ... Initial Setup Page 4 Installation retrait de l appareil Installation de l appareil Tordre les pattes du manchon de montage avec un tournevis ou un outil similaire et fixer Installation de la plaque de garniture Fixez la plaque de garniture 2 2 Retrait de la plaque de garniture 1 Engagez les broches de saisie sur la clé d extraction 4 et retirez les deux verrous de la partie inférieure Abaissez le...

Страница 167: ...e volant Jaune Câble de batterie Rouge Câble d allumage Rouge A7 Jaune A4 Connecteur A Connecteur B Pages 48 49 Broche Couleurs et fonctions des connecteurs A et B A4 Jaune Batterie A5 Bleu avec bande blanche Commande d alimentation A6 Orange avec bande blanche Gradateur A7 Rouge Allumage ACC A8 Noir Connexion de la masse B1 Violet Enceinte droit ª arrière B2 Violet avec bande noire Enceinte droit...

Страница 168: ... 5 iPod touch 5e génération iPod nano 7e génération en vente dans le commerce Adaptateur Lightning Digital AV accessoire de l iPod iPhone Câble USB 2 0 accessoire du iPod iPhone ou KS U62 en option Câble USB 2 0 accessoire du iPod iPhone ou KS U62 en option KS U60 en option Câble HDMI MHL 6 7 Si vous connectez le connecteur HDMI MHL fixez le câble en utilisant la fixation de câble 6 et les vis 7 K...

Страница 169: ... Entrée HDMI MHL 5 Sortie de préamplification de caisson de grave sortie monophonique Sortie gauche du caisson de graves Blanc Sortie droite du caisson de grave Rouge 6 Préamplification arrière Sortie audio gauche Blanc Sortie audio droite Rouge 7 Préamplification avant Sortie audio gauche Blanc Sortie audio droite Rouge 8 AV OUT Sortie audio mini fiche ø3 5 Mini fiche de type stéréo sans résistan...

Страница 170: ...doux en ligne droite du centre vers les bords N utilisez pas de solvant par exemple un nettoyant conventionnel pour disque vinyle un vaporisateur un diluant du benzène etc pour nettoyer les disques Pour reproduire un disque neuf Les disques neufs ont parfois des ebarbures sur le bord intérieur et extérieur Si un tel disque est utilisé cet autoradio risque de le rejeter Pour retirer ces ebarbures f...

Страница 171: ...ées en utilisant un autre logiciel que iTunes Fichiers AAC protégés contre la copie avec FairPlay sauf ceux qui se trouvent sur un iPod Fichiers qui contiennent des données telles que AIFF ATRAC3 etc Cet appareil peut afficher les images de pochette qui respectent les conditions suivantes Taille de l image Résolution de 32 x 32 à 1 232 x 672 Taille des données moins de 650 KB Type de fichier JPEG ...

Страница 172: ...ître un maximum de 5 000 fichiers 250 dossiers un maximum de 999 fichiers par dossier Assurez vous que toutes les données importantes ont été sauvegardées pour éviter toute perte de données Remarques sur l utilisation d un périphérique USB Il se peut que cet appareil ne puisse pas reproduire correctement des fichiers d un périphérique USB quand celui ci est connecté à l aide d un cordon prolongate...

Страница 173: ...ans GU Gujarati ML Malayalam SR Serbe AM Amharique HA Hausa MN Mongol SS Siswati AR Arabe HI Hindi MO Moldavien ST Sesotho AS Assamais HR Croate MR Marathi SU Soudanais AY Aymara HU Hongrois MS Malais MAY SW Swahili AZ Azerbaïdjanais HY Arménien MT Maltais TA Tamil BA Bashkir IA Interlingua MY Birman TE Télougou BE Biélorusse IE Interlangue NA Nauruan TG Tadjik BG Bulgare IK Inupiak NE Népalais TH...

Страница 174: ...Démarrez la lecture sur l appareil extérieure connecté à la prise d entrée AV IN1 Démarrez la lecture sur le smartphone connecté à la prise d entrée HDMI MHL Vérifiez les cordons et les connexions Les signaux d entrée sont trop faibles MISWIRING Check wiring connection then reset unit WARNING Check wiring connection then reset unit Un cordon d enceinte a été court circuité ou est entré en contact ...

Страница 175: ...tées Insérez un disque finalisé Finalisez les disques avec l appareil qui a été utilisé pour l enregistrement La lecture ne démarre pas Le format des fichiers n est pas pris en charge par l appareil Aucune image n apparaît sur le moniteur extérieur Connectez le cordon vidéo correctement Choisissez l entrée correcte sur le moniteur extérieur Les disques DivX MPEG1 MPEG2 MP3 WMA AAC ne peuvent pas ê...

Страница 176: ...ute de la radio Connectez l antenne solidement AV IN Aucune image n apparaît sur l écran Mettez l appareil vidéo sous tension s il ne l est pas déjà Connectez le périphérique vidéo correctement Bluetooth Le son du téléphone est de mauvaise qualité Réduisez la distance entre cet appareil et le téléphone portable Bluetooth Déplacez la voiture dans un endroit où vous pouvez obtenir un meilleur signal...

Страница 177: ...e Échantillonnage 96 kHz 20 Hz à 22 000 Hz Échantillonnage 48 kHz 20 Hz à 22 000 Hz Échantillonnage 44 1 kHz 20 Hz à 20 000 Hz Distorsion harmonique totale 0 010 1 kHz Rapport signal sur bruit 94 dB DVD Vidéo 96 kHz Plage dynamique 91 dB DVD Vidéo 96 kHz Format du disque DVD Vidéo DVD VR VIDEO CD CD DA Fréquence d échantillonnage 44 1 kHz 48 kHz 96 kHz Nombre de bits quantificateur 16 20 24 bit Se...

Страница 178: ...rtoire téléphonique A2DP Advanced Audio Distribution Profile Profile de distribution audio avancé AVRCP Audio Video Remote Control Profile Profile de télécommande audio vidéo GAP Generic Access Profile Profile d accès générique SDP Service Discovery Profile Profile de découverte de service SPP Serial Port Profile Profile de port série Section du tuner FM Plage de fréquences 50 kHz 87 5 MHz à 108 0...

Страница 179: ...ales de Dolby Laboratories Le DVD Logo est une marque de commerce de DVD Format Logo Licensing Corporation enregistrée aux États Unis au Japon et dans d autres pays Le logo AAC est une marque de commerce de Dolby Laboratories Microsoft et Windows Media est une marque déposée ou une marque de commerce de Microsoft Corporation aux États Unis et ou dans les autres pays Made for iPod and Made for iPho...

Страница 180: ...c La marque du mot et les logos Bluetooth sont des marques déposées de Bluetooth SIG Inc et toute utilisation de ces marques par JVC KENWOOD est faite sous licence Les autres marques et noms de commerce sont la propriété de leur propriétaire respectif The terms HDMI and HDMI High Definition Multimedia Interface and the HDMI logo are trademarks or registered trademarks of HDMI Licensing LLC in the ...

Страница 181: ...postanowienia dyrektywy 1999 5 EC Český JVC KENWOOD tímto prohlašuje že tento KW V50BT KW V30BT je ve shode se základními požadavky a dalšími príslušnými ustanoveními smernice 1999 5 EC Magyar Alulírott JVC KENWOOD kijelenti hogy a jelen KW V50BT KW V30BT megfelel az 1999 5 EC irányelvben meghatározott alapvető követelményeknek és egyéb vonatkozó előírásoknak Svenska Härmed intygar JVC KENWOOD att...

Страница 182: ...e kunnen daarom afwijken van de werkelijke schermen of panelen Deze gebruiksaanwijzing beschrijf de bediening met gebruik van de toetsen op het monitorpaneel en aanraakpaneel Voor bediening met de afstandsbediening RM RK252P los verkrijgbaar zie bladzijde 43 toont de variabele schermen menu s bedieningen instellingen die op het aanraakpaneel verschijnen toont de toetsen op het aanraakpaneel Taal v...

Страница 183: ...t met uw vingers aan trek uw handschoenen uit indien u deze aan heeft Indien de temperatuur zeer laag of hoog is Het toestel werkt mogelijk onjuist vanwege een abnormale temperatuur De beelden worden niet helder getoond of de beweging van beelden is traag Het beeld en geluid is niet synchroon en de beeldkwaliteit is onder dergelijk omstandigheden mogelijk slechter Denk aan de veiligheid Stel voor ...

Страница 184: ... een achteruitkijkcamera heeft aangesloten Display Design Bladzijde 42 Kies de achtergrond en paneelkleur Demonstration Bladzijde 42 Activeren of uitschakelen van de displaydemonstratie 2 Voltooi de procedure Het startscherm verschijnt AV Off is als basisinstelling gekozen Kies de weergavebron Bladzijde 8 Instellingen voor de kalender klok 1 Toon het startscherm KW V50BT KW V30BT 2 Toon het Settin...

Страница 185: ...Bladzijde 9 Geforceerd uitwerpen van de disc Houden Bladzijde 3 3 Lade 4 HOME toets Tonen van het startscherm Drukken Bladzijde 7 Uitschakelen van de stroom Houden Bladzijde 6 Inschakelen van de stroom Drukken Bladzijde 6 5 FNC toets Oproepen van het Function Menu Video Menu scherm op het bronregelscherm Drukken Bladzijde 7 Activeren van bellen met stemherkenning Houden Bladzijde 32 6 VOLUME ATT r...

Страница 186: ...nogmaals op dezelfde toets Uitschakelen van het scherm KW V50BT KW V30BT Houd ingedrukt Houd ingedrukt Inschakelen van het scherm Houd DISP op het monitorpaneel even ingedrukt In uit schakelen van de AV bron U kunt de AV functie actvieren door een bron op het startscherm te kiezen Kiezen van een bron die niet op het startscherm wordt getoond Druk op All Bladzijde 8 Uitschakelen van de AV bron Bedi...

Страница 187: ...gstoetsen Tonen van het telefoonregelscherm Bladzijde 31 Activeren van bellen met stemherkenning Bladzijde 32 Tonen van het geluidregelscherm Bladzijde 36 Tonen van het Display menuscherm Bladzijde 42 TP Activeren uitschakelen van de TA standbyontvangstfunctie Bladzijde 22 5 Overschakelen naar het Function Menu scherm 6 Bedieningstoetsen voor videoweergave Bladzijde 37 De toetsen zijn verschillend...

Страница 188: ...me AV Off Uitschakelen van de AV bron Bladzijde 6 Camera Overschakelen naar een camera die met de achteruitkijkcamera ingang is verbonden Bladzijde 25 RearSource Kiezen van de achterbron die op de externe monitor wordt getoond Bladzijde 26 Apps Overschakelen naar het scherm van een app van de aangesloten iPod touch iPhone Bladzijde 19 Tuner Overschakelen naar een radio uitzending Bladzijde 20 Disc...

Страница 189: ... uitwerpen tijdens weergave van een andere AV bron Indien de uitgeworpen disc niet binnen 60 seconden wordt verwijderd wordt deze disc automatisch ter bescherming weer in het toestel getrokken Indien de disc niet kan worden verwijderd zie bladzijde 3 Bediening voor weergave Raak het in de afbeelding getoonde gedeelte aan indien de bedieningstoetsen niet op het scherm worden getoond Voor het verand...

Страница 190: ...VCD VoorC D MP3 WMA AAC 4 2 5 6 7 3 1 8 Weergave informatie 1 Informatie van fragment bestand Door de tekstinformatie aan te raken verandert het informatietype 2 Soort media 3 Informatie over huidige weergave onderdeel MP3 WMA AAC Mapnummer fragmentnummer CD Fragmentnummer 4 Audioformaat 5 Weergavefunctie Bladzijde 12 6 Weergavetijd 7 DISC IN indicator 8 Weergavestatus Bedieningstoetsen 1 Tonen va...

Страница 191: ...onen van het keuzescherm voor het beeldformaat Bladzijde 38 Schakelen naar de directe discmenufunctie Raak het te kiezen gewenste onderdeel aan Voor het verlaten van het menukeuzescherm drukt u op Toont een menu weergavelijst oorspronkelijk programma scènekeuzescherm J K H I Kiezen van een onderdeel Enter Bevestigen van de keuze Return Terugkeren naar het voorgaande scherm Toont het menuscherm van...

Страница 192: ...nction Menu scherm drukt u op of FNC op het monitorpaneel Voor DVD DVD VR VCD zonder PBC Herhaalde weergave is mogelijk Voor CD DivX MPEG1 MPEG2 MP3 WMA AAC Herhaalde weergave en willekeurige weergave zijn mogelijk De herhaalde weergavefunctie en willekeurige weergavefunctie kunnen niet tegelijk worden gebruikt Door iedere druk op de toets verandert de weergavefunctie De overeenkomende indicator l...

Страница 193: ...onen Off Kies om de hoekmarkering te verbergen Monitor Type Kies het monitortype voor het bekijken van breedbeelden op de externe monitor 16 9 Basisinstelling 4 3 LB 4 3 PS Parental Level Stel het niveau voor het kinderslot in Zie de rechterkolom CD Read Kies de bestanden voor weergave van een disc met muziekbestanden U kunt de instelling niet veranderen wanneer een disc is geplaatst 1 Basisinstel...

Страница 194: ...fbeelding wordt tijdens weergave getoond indien het bestand tagdata voor de hoes afbeelding heeft Bedieningstoetsen Mode Veranderen van de instelling voor de beeldweergavetijd op het Mode scherm Bladzijde 15 Tonen van het lijstkeuzescherm Bladzijde 15 S T Kiezen van een fragment Drukken Achterwaarts voorwaarts zoeken 1 Houd ingedrukt I W Starten pauzeren van de weergave 2 Kiezen van een map 2 3 4 ...

Страница 195: ...n u alle fragmenten in de map wilt afspelen drukt u op I rechts van de gewenste map Met de Category List Folder List scherme U kunt van lijst voor bestandstypes veranderen Druk op voor een lijst met audiobestanden voor een lijst met videobestanden of voor een lijst met beeldbestanden Met het Category List scherm Kies de categorie 1 en vervolgens het onderdeel in de gekozen categorie 2 Met het Link...

Страница 196: ...ightning Digital AV adapter accessoire van de iPod iPhone gebruiken Bluetooth verbinding Koppel de iPod iPhone via Bluetooth Bladzijde 27 Voor iPhone 5 iPod touch 5de generatie iPod nano 7de generatie Verbind voor het bekijken van video uw iPod iPhone met de HDMI MHL ingangsaansluiting met gebruik van de KS U60 los verkrijgbaar Bladzijde 48 Voor iPod iPhone uitgezonderd iPhone 5 iPod touch 5de gen...

Страница 197: ...tellen verschijnt indien u HDMI Bluetooth of Bluetooth als verbindingsmethode heeft gekozen Kies het gewenste toestel Indien het gewenste toestel niet in de lijst staat moet u op Search drukken om de beschikbare iPod iPhone toestellen te zoeken en vervolgens het gewenste toestel op het Available Devices scherm kiezen U kunt van pagina veranderen om meer onderdelen te tonen door een druk op J K Dru...

Страница 198: ...rechterkolom S T Kiezen van een audio videobestand Drukken Achterwaarts voorwaarts zoeken Houd ingedrukt I W Starten pauzeren van de weergave 1 Kiezen van de herhaalde weergavefunctie g SONGS Functioneert hetzelfde als Repeat One ALL Functioneert hetzelfde als Repeat All 1 2 Kiezen van de willekeurige weergavefunctie g g SONGS Functioneert hetzelfde als Shuffle Songs ALBUMS Functioneert hetzelfde ...

Страница 199: ...touch iPhone Android 2 Kies Apps als bron Bladzijde 8 Bedieningstoetsen op het bronregelscherm S T Kiezen van een audio videobestand I W Starten pauzeren van de weergave Bepaalde functies van een app kunnen op het aanraakpaneel worden bediend Voor sommige apps bijvoorbeeld navigatie apps worden de bedieningstoetsen en informatie niet getoond U kunt bedieningen bijvoorbeeld voor het rollen van de k...

Страница 200: ...tie Bladzijde 22 SSM Zenders met de sterkste signalen worden automatisch vastgelegd Bladzijde 21 S T Opzoeken van een zender Automatisch opzoeken Drukken Handmatig zoeken Houd ingedrukt Band Kiezen van de golfband MONO 1 2 Activeren uitschakelen van de monofunctie Zie de rechterkolom TP 2 Activeren uitschakelen van de TA standbyontvangstfunctie Bladzijde 22 1 Verschijnt uitsluitend indien FM als b...

Страница 201: ...interferentie van in de buurt liggende zenders maar de geluidskwaliteit wordt niet verslechterd en het stereo effect blijft behouden Vastleggen van zenders Vastleggen van zenders in het geheugen U kunt 6 zenders voor iedere golfband vastleggen Automatisch vastleggen SSM Strong station Sequential Memory Houd ingedrukt De lokale zenders met de sterkste signalen worden opgezocht en automatisch vastge...

Страница 202: ...gnalen uitzendt af indien de TP indicator grijs oplicht Annuleren van TA standbyontvangst Druk op TP De TP indicator dooft De volume instelling voor verkeersinformatie wordt automatisch opgeslagen De volgende keer dat u naar verkeersinformatie luistert wordt het volume op het voorgaande niveau ingesteld Nieuws standbyontvangst 1 2 Het toestel staat gereed om wanneer beschikbaar naar een nieuwsuitz...

Страница 203: ...gelijk van het huidige ontvangen programma de AF indicator licht op AF Reg Overschakelen naar een andere zender die hetzelfde programma uitzendt het AF indicator licht op Off Geannuleerd Automatisch kiezen van zenders Programmazoeken Indien voorkeurzenders zijn gekozen wordt normaliter op een voorkeurzender afgestemd Indien de signalen van een vastgelegde Radio Data Systeem FM zender te zwak voor ...

Страница 204: ...de weergave 1 Verbind een extern component met de AV IN1 aansluiting Zie bladzijde 49 voor het verbinden van een extern component 2 Kies AV IN als bron Op het startscherm 3 Schakel het aangesloten component in en start de weergave van de bron Gebruik van externe audiospelers Front AUX alleen voor KW V30BT Aanduidingen en toetsen op het bronregelscherm Starten van de weergave 1 Verbind een extern c...

Страница 205: ...chterzichtcamera Het achterzicht wordt getoond wanneer de versnelling in zijn achteruit R wordt geschakeld Handmatig tonen van het beeld van de achterzichtcamera Op het startscherm Instellen van het beeld van de achterzichtcamera U kunt het beeld veranderen wanneer u het beeld van de achterzichtcamera handmatig toont 1 Toon het Video Menu scherm KW V50BT KW V30BT 2 Kiezen van de aspectratio Bladzi...

Страница 206: ... verkrijgbaar of MHL kabel KS U61 los verkrijgbaar 2 Kies HDMI MHL als bron Op het startscherm 3 Start een app of de weergave op uw smartphone Gebruik van een externe monitor Achterbron U kunt de weergave van de achterbron tonen op de externe monitor die met de AV OUT VIDEO en AV OUT AUDIO aansluitingen is verbonden en tegelijkertijd een andere bron beluisteren U kunt de weergave van de achterbron...

Страница 207: ...al 600 gegevens Gebelde nummers ontvangen gesprekken en gemiste gesprekken ieder maximaal 10 Verbinden van Bluetooth apparatuur Registreren van een nieuw Bluetooth apparaat Nadat u voor het eerst een Bluetooth apparaat op dit toestel heeft aangesloten moet u het apparaat aan dit toestel koppelen Door te koppelen kan Bluetooth apparatuur met elkaar communiceren De koppelingsmethode is verschillend ...

Страница 208: ...andaard op 0000 gesteld Er kunnen maximaal 15 cijfers voor een PIN code worden gebruikt Druk op Clear om de laatste invoer te wissen 3 Zoek het toestel KW V met uw Bluetooth apparaat 4 Kies het toestel KW V met uw Bluetooth apparaat Voer 0000 Basisinstelling in indien een PIN code wordt gevraagd Nadat het koppelen is voltooid verschijnt het apparaat op Paired Device List Voor gebruik van het gekop...

Страница 209: ... Toon het Bluetooth Setup scherm Bladzijde 28 2 3 Kies het te verbinden apparaat 1 en druk vervolgens op Connection 2 4 Kies On of Off voor het gewenste apparaat Mobiele telefoon Audio apparaat De status wordt als volgt getoond Connected Er is een verbinding gemaakt Connect Ready Er kan een verbinding worden gemaakt Disconnected Er is geen verbinding gemaakt Wissen van een geregistreerd Bluetooth ...

Страница 210: ...n Tijdens gesprek U kunt het volume instellen vanaf 0 tot 15 standaard 3 Deze instelling heeft geen effect op het volume van andere bronnen Gebruik het monitorpaneel om het volume van een gesprek oortelefoon in te stellen Bladzijde 6 Kiezen van handsfree functie of telefoonfunctie Tijdens gesprek Door iedere druk op de toets verandert de gespreksfunctie handsfree functie telefoonfunctie Reduceren ...

Страница 211: ...ction Menu scherm Bladzijde 7 2 Kies een methode voor het bellen 2 3 1 4 1 Uit het telefoonboek de gesprekkenlijsten 2 Direct nummer invoeren 3 Uit de voorkeurlijst Zie bladzijde 33 voor het vastleggen 4 Stemcommando voor bellen Wanneer de mobiele telefoon niet compatibel is met Phone Book Access Profile PBAP wordt het telefoonboek niet getoond Uit de voorkeurlijst het telefoonboek de gesprekkenli...

Страница 212: ...de laatste invoer te wissen Houd 0 ingedrukt om aan het telefoonnummer toe te voegen Stemcommando voor bellen Alleen mogelijk indien de verbonden mobiele telefoon het stemherkenningssysteem heeft 1 Activeer stemcommando voor bellen Met het telefoonregelscherm Druk herhaaldelijk op K om van pagina op het telefoonregelscherm te veranderen U kunt het stemcommando voor bellen ook tonen door een druk o...

Страница 213: ...bonden apparatuur Weergave informatie 1 Tag data huidige fragmenttitel artiestnaam albumtitel 1 Door de tekstinformatie aan te raken verandert het informatietype 2 Fragmentnummer 1 3 Weergavetijd 1 4 Weergavestatus 1 Bedieningstoetsen 1 2 3 Kiezen van de herhaalde weergavefunctie 1 2 3 Kiezen van de willekeurige weergavefunctie W Pauzeren van de weergave I Starten van weergave S T Kiezen van een f...

Страница 214: ...idsprekers All Basisinstelling Alle luidsprekers Auto Answer On Het toestel antwoordt de binnenkomende gesprekken automatisch binnen 5 seconden Off Basisinstelling Het toestel beantwoordt het binnenkomende gesprek niet automatisch Beantwoordt het binnenkomend gesprek handmatig AutoP airing On Basisinstelling Het koppelen wordt automatisch uitgevoerd met het verbonden iOS apparaat bijvoorbeeld een ...

Страница 215: ...B AV IN Kies indien de iPod iPhone middels de KS U59 los verkrijgbaar is verbonden USB 1 Wire Kies indien de iPod iPhone met een USB 2 0 kabel accessoire van de iPod iPhone is verbonden HDMI Bluetooth Kies wanneer de iPod iPhone is verbonden met gebruik van een HDMI kabel KS U60 los verkrijgbaar en USB 2 0 kabel accessoire van de iPod iPhone via een Lightning Digital AV adapter accessoire van de i...

Страница 216: ...1 en selecteer daarna het subwoofer niveau 2 De instellingen worden vastgelegd en User wordt geactiveerd Voor het voltooien van de procedure drukt u op Vastleggen van uw eigen instellingen Nauwkeurig instellen van het geluid 1 Kies een geluidsfunctie zie de linkerkolom en vervolgens 2 Kies een band 3 Stel het geluid in Reset Het niveau van iedere band Low Middle High wordt naar 0 veranderd Freq Ki...

Страница 217: ...tellen van de drempelfrequentie Niet kiesbaar indien Freq op Through is gesteld Instellingen voor videoweergave Instellen van het beeld U kunt de beeldkwaliteit instellen 1 Toon het Video Menu scherm KW V50BT KW V30BT 2 Toon het instelmenu 3 Kies dimmer aan of dimmer uit 4 Stel het beeld in Brightness Instellen van de helderheid 15 t m 15 Contrast Instellen van het contrast 10 t m 10 Black Instell...

Страница 218: ...vereenstemming met de videobron gekozen Bij weergave van DivX met Monitor Type op 16 9 gesteld Bladzijde 13 kan de aspectratio niet juist worden ingesteld Zoomen van beeld U kunt op het beeld inzoomen Full Zoom1 t m Zoom3 Zoomen is alleen mogelijk tijdens weergave van een disc Als Aspect is ingesteld op Panorama zie de linkerkolom wordt de foto vergroot of verkleind volgens de aspectratio van de i...

Страница 219: ... PNG BMP dat op het aangesloten USB apparaat is opgeslagen instellen Gebruik een JPEG PNG BMP bestand met een resolutie van 800 x 480 pixels De kleur van het vastgelegde beeld kan anders zijn dan de werkelijke kleur 1 Verbind het USB apparaat met het opgeslagen beeld Bladzijde 48 2 Toon het Display Design scherm Zie de linkerkolom 3 Toon het User Background File Select scherm 4 Kies het bestand vo...

Страница 220: ...or AV IN AV IN Name Op het startscherm Druk herhaaldelijk op K om van pagina op het System menuscherm te veranderen Recall Oproepen van de opgeslagen instellingen Save Vastleggen van de huidige instellingen Delete Wissen van de vastgelegde instellingen Een bevestigingsmededeling verschijnt Druk op Yes Instellen van de aanraakpositie U kunt de aanraakpositie op het aanraakpaneel instellen indien de...

Страница 221: ...ader Balance Fader Instellen van het balans tussen de voor en achterluidsprekers F6 t m R6 Basisinstelling 0 Stel fader in het midden 0 indien u slechts twee luidsprekers heeft Balance Instellen van het balans tussen de linker en rechterluidsprekers L6 t m R6 Basisinstelling 0 Druk op J K H I of versleep om in te stellen Druk op Center voor het wissen van de instelling Equalizer Verander de geluid...

Страница 222: ...ystem instelscherm e g a u g n a L Kiesde taal voor de tekstinformatie op het scherm English Basisinstelling Español Français Deutsch Italiano Nederlands Руccĸий Português GUI Language Kies een taal voor de bedieningstoetsen en menu onderdelen English Basisinstelling Local de hiervoor gekozen taal Calendar Setting iPod Setup APP Setup APP Connection Setup Instellingen voor de app APP Interrupt Vol...

Страница 223: ...an zenders Houd ingedrukt Kiezen van een fragment Achterwaarts voorwaarts zoeken Houd ingedrukt O N Achterwaarts voorwaarts zoeken DVD Video DVD VR VCD Vertraagde weergave tijdens pauze DVD VR VCD Vertraagde weergave in achterwaarste richting is niet mogelijk VOL VOL Instellen van het volume 2nd VOL functioneert niet voor dit toestel SOURCE Kiezen van de bron I W Starten pauzeren van de weergave P...

Страница 224: ...IRECT verandert het te zoeken onderdeel 2 Houd SHIFT ingedrukt en druk op een cijfertoets om het gewenste onderdeel te kiezen Druk op CLR wissen met SHIFT ingedrukt om een fout te wissen 3 Druk op ENT om uw keuze te bevestigen Overige bedieningen voor discs Gebruik van het discmenu DVD Video DVD VR 1 Druk voor DVD video op TOP M of MENU Voor DVD VR druk op TOP M Tonen van oorspronkelijke programma...

Страница 225: ...ebrand controleert u eerst of de kabels elkaar niet raken en kortsluiting veroorzaken en vervangt u vervolgens de oude zekering door een nieuwe met eenzelfde waarde Isoleer niet aangesloten draden met isolatieband of ander geschikt materiaal Voorkom kortsluiting en verwijder derhalve niet de kapjes op het uiteinde van de niet aangesloten draden of aansluitingen Verbind de luidsprekerdraden juist m...

Страница 226: ...en Verwijderen van het toestel Installeren van het toestel Buig de lipjes van de bevestigingshuls met een schroevendraaier of iets dergelijks en bevestig op zijn plaats Installeren van de sierplaat Bevestig de sierplaat 2 2 Verwijderen van de sierplaat 1 Haak de aanslagpennen op de verwijdersleutel 4 en ontgrendel de twee vergrendelingen op het onderste gedeelte Druk het frame omlaag en trek naar ...

Страница 227: ...udraad Rood Ontstekingsdraad Rood A7 Geel A4 Aansluiting A Aansluiting B Bladzijden 48 49 Pen Kleur en functies van aansluiting A en B A4 Geel Accu A5 Blauw met witte streep Stroomregeling A6 Oranje met witte streep Dimmer A7 Rood Contact ACC A8 Zwart Aardeverbinding B1 Paars Rechterluidspreker ª achter B2 Paars met zwarte streep Rechterluidspreker achter B3 Grijs Rechterluidspreker ª voor B4 Grij...

Страница 228: ...generatie iPod nano 7de generatie los verkrijgbaar Lightning Digital AV adapter accessoire van de iPod iPhone USB 2 0 kabel accessoire van de iPod iPhone of KS U62 los verkrijgbaar USB 2 0 kabel accessoire van de iPod iPhone of KS U62 los verkrijgbaar KS U60 los verkrijgbaar HDMI MHL kabel 6 7 Indien u de HDMI MHL aansluiting verbindt moet u de HDMI MHL kabel vastzetten met de bevestiging 6 en sch...

Страница 229: ... Audio rechts 3 Aarding 4 Composiet video 4 HDMI MHL ingang 5 Subwoofer vooruitgang mono uitgang Subwoofer linkeruitgang wit Subwoofer rechteruitgang rood 6 Achter vooruitgang Audio linkeruitgang wit Audio rechteruitgang rood 7 Voor vooruitgang Audio linkeruitgang wit Audio rechteruitgang rood 8 AV OUT Audio uitgang ø3 5 mini aansluiting Stereo ministekker zonder weerstand Verbinden van een microf...

Страница 230: ... een zachte doek in een rechte lijn vanaf het midden naar de rand toe schoon Gebruik geen oplosmiddelen bijvoobeeld normale platenreinigers spray thinner benzine voor het reinigen van discs Afspelen van nieuwe discs Nieuwe discs hebben mogelijk ruwe plekjes aan de binnenste en buitenste rand Een dergelijke disc wordt mogelijk niet door het toestel herkend Verwijder deze bramen door een potlood of ...

Страница 231: ...en die met DRM tegen kopiëren zijn beschermd AAC bestanden die met andere programma s dan iTunes zijn opgeslagen AAC bestanden die met FairPlay tegen kopiëren zijn beschermd uitgezonderd wanneer deze zijn opgeslagen op een iPod Bestanden met data als AIFF ATRAC3 enz Dit toestel is geschikt voor het tonen van covers die aan de volgende voorwaarden voldoen Beeldformaat 32 x 32 t m 1 232 x 672 resolu...

Страница 232: ...anden en 250 mappen herkennen met maximaal 999 bestanden per map Voorkom dat u belangrijke data verliest en maak derhalve een back up van belangrijke data Opmerkingen aangaande het gebruik van USB apparatuur Het toestel kan op USB apparatuur opgeslagen bestanden mogelijk niet afspelen indien de apparatuur via een USB verlengsnoer is verbonden USB apparatuur met speciale functies bijvoorbeeld datab...

Страница 233: ...ongools SS Siswat AR Arabisch HI Hindoestani MO Moldavisch ST Sesotho AS Assamitisch HR Croatiaans MR Mahrattisch SU Soedanees AY Aymara HU Hongaars MS Maleis SW Swahilisch AZ Azerbeidzjaans HY Armenisch MT Maltees TA Tamil BA Bashkir IA Interlingua MY Birmees TE Telugu BE Wit Russisch IE Interlingue NA Nauruaans TG Tajik BG Bulgaars IK Inupiak NE Nepalees TH Thais BH Bihari IN Indonesian NO Noors...

Страница 234: ...te maatregelen No Signal Start de weergave van het externe component dat met de AV IN1 ingangsaansluiting is verbonden Start de weergave op de smartphone die met de HDMI MHL ingangsaansluiting is verbonden Controleer de snoeren en verbindingen Het ontvangen signaal is te zwak MISWIRING Check wiring connection then reset unit WARNING Check wiring connection then reset unit Een luidsprekersnoer maak...

Страница 235: ...isc is onmogelijk Plaats een afgeronde disc Rond de discs af met het component dat u voor de opname heeft gebruikt Weergave start niet Het formaat van de bestanden is niet geschikt voor dit toestel Geen beeld op de externe monitor Sluit het videosnoer juist aan Kies de juiste ingang met de externe monitor DivX MPEG1 MPEG2 MP3 WMA AAC discs kunnen niet worden afgespeeld Neem de fragmenten met een g...

Страница 236: ...de antenne goed aan AV IN Geen beeld op het scherm Schakel het videocomponent in indien het nog niet is ingeschakeld Sluit het videocomponent juist aan Bluetooth Kwaliteit van het geluid van de telefoon is slecht Zorg dat de afstand tussen het toestel en de Bluetooth mobiele telefoon korter is Rijd de auto naar een plaats waar de signaalontvangst beter is Geluid wordt onderbroken tijdens weergave ...

Страница 237: ... bemonstering 20 Hz t m 22 000 Hz 48 kHz bemonstering 20 Hz t m 22 000 Hz 44 1 kHz bemonstering 20 Hz t m 20 000 Hz Totale harmonische vervorming 0 010 1 kHz Signaal tot ruis ratio 94 dB DVD Video 96 kHz Dynamisch bereik 91 dB DVD Video 96 kHz Discformaat DVD Video DVD VR VIDEO CD CD DA Bemonsteringsfrequentie 44 1 kHz 48 kHz 96 kHz Quantiteit bitnummer 16 20 24 bit USB interfacegedeelte USB stand...

Страница 238: ...BAP Phone Book Access Profile A2DP Advanced Audio Distribution Profile AVRCP Audio Video Remote Control Profile GAP Generic Access Profile SDP Service Discovery Profile SPP Serial Port Profile FM tuner gedeelte Frequentiebereik 50 kHz 87 5 MHz t m 108 0 MHz Bruikbare gevoeligheid S N 30 dB Dev 22 5 kHz 9 3 dBf 0 8 μV 75 Ω Quieting gevoeligheid S N 46 dB Dev 22 5 kHz 15 2 dBf 1 6 μV 75 Ω Frequentie...

Страница 239: ...ries DVD Logo is een handelsmerk van DVD Format Logo Licensing Corporation geregistreerd in de US Japan en andere landen Het AAC logo is een handelsmerk van Dolby Laboratories Microsoft en Windows Media zijn ofwel geregistreerde handelsmerken of handelsmerken van Microsoft Corporation in de Verenigde Staten en of andere landen Made for iPod and Made for iPhone mean that an electronic accessory has...

Страница 240: ...ord Bluetooth en de bijbehorende markeringen en logo s zijn geregistreerde handelsmerken en eigendom van Bluetooth SIG Inc en JVC KENWOOD Corporation gebruikt deze onder licentie Overige handelsmerken en namen zijn eigendom van de overeenkomende eigenaren The terms HDMI and HDMI High Definition Multimedia Interface and the HDMI logo are trademarks or registered trademarks of HDMI Licensing LLC in ...

Страница 241: ...asadnicze wymogi oraz inne istotne postanowienia dyrektywy 1999 5 EC Český JVC KENWOOD tímto prohlašuje že tento KW V50BT KW V30BT je ve shode se základními požadavky a dalšími príslušnými ustanoveními smernice 1999 5 EC Magyar Alulírott JVC KENWOOD kijelenti hogy a jelen KW V50BT KW V30BT megfelel az 1999 5 EC irányelvben meghatározott alapvető követelményeknek és egyéb vonatkozó előírásoknak Sve...

Страница 242: ...itte lesen Sie alle Bedienungsanweisungen vor dem Betrieb gründlich durch um richtiges Verständnis des Geräts zu gewährleisten und die beste Leistung mit dem Gerät zu erzielen Veuillez lire attentivement toutes les instructions avant d utiliser l appareil afin de bien comprendre son fonctionnement et d obtenir les meilleures performances possibles Wij verzoeken u de gebruiksaanwijzing goed door te...

Отзывы: