background image

Basic Operations

10


[

Time Format

]


Select the time display format.

[

12-Hour

]

 (Default)/

[

24-Hour

]


[

Clock

]


[

GPS-SYNC

]

 (Default): Synchronizes the clock 

time with the GPS.

[

Manual

]

: Set the clock manually.


[

Time Zone

]

Select the time zone.


[

Clock Adjust

]

If you select 

[

Manual

]

 for Clock, adjust the 

date and time manually. 

(P.10)

NOTE

•  Please set the date and time. If they are not set, 

some functions may not work.

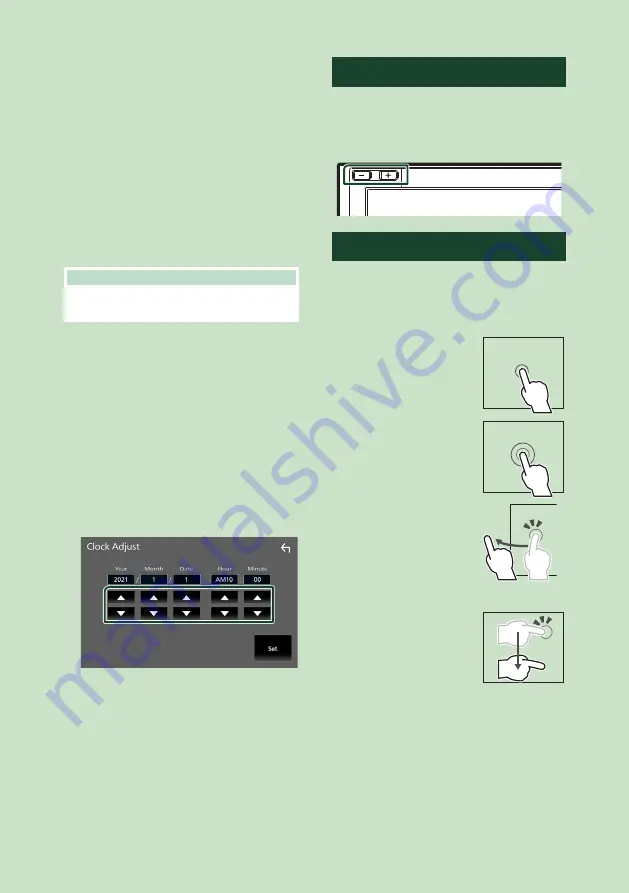
Adjust the date and time manually

Touch 

[

Clock

]

 on the User Interface screen.

Select 

[

Manual

]

.

Touch 

[

Time Zone

]

 on the User Interface 

screen.

Select the time zone.

Touch 

[

Clock Adjust

]

 on the User Interface 

screen.

Adjust the date, then adjust the time.

Touch 

[

Set

]

.

Adjusting the volume

You can adjust the volume (0 to 40).
Press 

[

+

]

 to increase, and press 

[

]

 to decrease.

Holding 

[

+

]

 increases the volume continuously 

to level 15.

Touch screen operations

To perform operations on the screen, you need 

to touch, touch and hold, flick or swipe to 

select an item, display a setting menu screen 

or change pages. 


Touch

Touch the screen gently to 

select an item on the screen.


Touch and hold

Touch the screen and keep 

your finger in place until 

the display changes or a 

message is displayed.


Flick

Slide your finger quickly 

to the left or right on the 

screen to change the page.
You can scroll a list screen 

by flicking up/down on the 

screen.


Swipe

Slide your finger up or down 

on the screen to scroll the 

screen.

Содержание KW-M875BW

Страница 1: ...der license from Japan Audio Society B5K 0860_ref_K_En_00 2021 JVCKENWOOD Corporation KW M875BW MONITOR WITH RECEIVER INSTRUCTION MANUAL Updated information the latest Instruction Manual system updates new functions etc is available from https www jvc net cs car ...

Страница 2: ... to the GPL LGPL embedded in this product are encouraged to read the terms of the corresponding license before use Because each individual license is prescribed by a third party other than JVCKENWOOD Corporation the original English of the license is presented EULA Ñ Ñ Software License Agreement JVCKENWOOD Corporation hereinafter called Licensor holds either the copyright to the embedded software ...

Страница 3: ...prior written consent from Licensor Article 8 Cancellation of the Agreement Licensor reserves the right to cancel this agreement forthwith and claim compensation from User for the damages caused by such cancellation when User 1 Breaches any of the provisions of this agreement or 2 Has received a petition for seizure provisional seizure provisional disposition or any other kind of compulsory execut...

Страница 4: ...ation 22 Wireless Mirroring Operation 24 USB 25 Connecting a USB device 25 USB Basic Operation 25 Search Operation 27 iPod iPhone 28 Preparation 28 iPod iPhone Basic Operation 29 Search Operation 30 Tuner 32 Tuner Basic Operation 32 Memory Operation 33 Selecting Operation 33 Traffic Information 34 Tuner SETUP 34 SiriusXM 35 SiriusXM Basic Operation 35 Storing Channels in Preset Memory 37 Preset se...

Страница 5: ...ection Setup 69 Controlling Audio 71 3 way speaker system setup 71 Speaker X over setup 72 Controlling General Audio 74 Equalizer Control 75 Volume Offset 76 Sound Effect 76 Listening Position DTA 77 Audio Setup memory 79 Remote control 80 Battery Installation 80 Functions of the Remote control Buttons 80 Connection Installation 82 Before Installation 82 Installing the unit 84 Troubleshooting 89 P...

Страница 6: ...l may scratch the surface or erase the screened print Ñ Ñ Acquiring GPS signal The first time you turn on this unit you must wait while the system acquires satellite signals for the first time This process could take up to several minutes Make sure your vehicle is outdoors in an open area away from tall buildings and trees for fastest acquisition After the system acquires satellites for the first ...

Страница 7: ...me will go up to 15 when you keep pressing P 10 2 FNC Displays the popup menu screen Pressing for 1 second starts the voice recognition function P 59 While Apple CarPlay or Android Auto is connected starts the function on the Apple CarPlay or the Android Auto screen When neither Apple CarPlay Android Auto nor a Bluetooth Hands Free phone is connected pressing and holding displays Bluetooth pairing...

Страница 8: ... this unit first time 1 Set each item as follows Language Select the language used for the control screen and setting items Default is American English en 1 Touch Language 2 Touch Language Select 3 Select the desired language 4 Touch For details see User Interface Setup P 64 Clock Sets the synchronization of the clock and adjusts it For details see Date and clock settings P 9 Display Set the displ...

Страница 9: ...n requires a commercial adaptor Consult your JVC dealer for details DEMO Set the demonstration mode Default is ON 2 Touch Finish NOTE These settings can be made from the SETUP menu See Setup P 63 Date and clock settings 1 Press the FNC button h h Popup menu appears 2 Touch h h HOME screen appears 3 Touch 4 Touch User Interface h h User Interface screen appears 5 Touch Time Zone 6 Select the time z...

Страница 10: ...rface screen 6 Adjust the date then adjust the time 7 Touch Set Adjusting the volume You can adjust the volume 0 to 40 Press to increase and press to decrease Holding increases the volume continuously to level 15 Touch screen operations To perform operations on the screen you need to touch touch and hold flick or swipe to select an item display a setting menu screen or change pages Touch Touch the...

Страница 11: ...enu 2 1 The contents of the menu are as follows Displays the HOME screen P 12 Switches between screens The screen to be switched to depends on the DISP Key setting on the User Interface screen P 64 Touch and hold to turns the screen off Displays the Screen Adjustment screen P 63 Close the popup menu Displays the Device List screen P 51 1 Function key1 to 3 The current screen changes to the one you...

Страница 12: ...on h h Popup menu appears 2 Touch h h HOME screen appears HOME screen descriptions Most functions can be performed from the HOME screen 1 1 1 3 4 5 1 2 1 Short cut playback source icons P 14 2 Current source information Touch to display the control screen of the current source 3 Displays the source selection screen P 13 4 Widget P 18 You can change the display to big or split widget mode by slidin...

Страница 13: ...e P 20 Switches to the Android Auto screen from the connected Android smartphone P 22 Displays the Hands Free screen P 57 When neither Apple CarPlay Android Auto nor a Bluetooth Hands Free phone is connected displays Bluetooth pairing waiting dialog 1 P 51 Switches to the Radio broadcast P 32 Switches to the SiriusXM satellite radio broadcast P 35 Plays a Bluetooth audio device P 55 Plays an iPod ...

Страница 14: ...e AV Audio input terminal P 86 3 This can be selected when the AV IN is set to NONE on the Camera Assignment Setting screen P 48 4 This function is enabled on the HOME screen To select the playback source on the HOME screen The 4 items displayed on the source selection screen with large icons are shown on the HOME screen You can change the items displayed on this area by customizing the source sel...

Страница 15: ...6 7 8 1 2 3 4 Short cut source icons 1 All sources icon Displays the source selection screen P 13 2 Secondary screen The Secondary screen changes to another one every time you touch it You can also change the Secondary screen by flicking left or right on the screen Indicators Displays the current source condition and so on ATT The attenuator is active LOUD The loudness control function is active S...

Страница 16: ...reen P 12 8 Operation keys You can operate the current source with these operation keys The available functions are different depending on the source type List screen There are some common function keys in the list screens of most sources The operation and the display screen are different for each source P27 30 56 Display the list screen For USB iPod 1 Touch 1 or the item listed on the information...

Страница 17: ... the current track Jumps to the letter you entered alphabetical search Moves to the upper hierarchy level 5 Page scroll You can change pages to display more items by touching Displays the top or bottom page 6 Return Returns to the previous screen NOTE Depending on the current source or mode some function key may not appear ...

Страница 18: ...the widget area You can change the displayed information or design To change the widget Slide two fingers leftward rightward When the split widget mode is selected you should put the fingers on each of the windows before slide To change the widget format Slide two fingers upward downward to switch between the big and the split widget mode Photo Frame Widget You can display a slideshow of the image...

Страница 19: ...rtphone Search for JVC Portal APP on Google Play to find and install the most current version For details see JVC Portal APP application 1 Connect the device To connect a device via Bluetooth register it as the Bluetooth device and do the App SPP profile setting of the connection beforehand See Register the Bluetooth device P 51 and Switch the connected device P 53 Connect an iPhone via the USB te...

Страница 20: ... Free phone currently connected is disconnected 2 Unlock your iPhone Wireless connection You can select the iPhone registered in Device List and use it as the Apple CarPlay device See Register the Bluetooth device P 51 1 Press the FNC button h h Popup menu appears 2 Touch h h HOME screen appears 3 Touch 4 Touch Apple CarPlay P 13 NOTE Turn on the Bluetooth function and Wi Fi function of an iPhone ...

Страница 21: ...tion keys Starts the application 3 HOME Exits the Apple CarPlay screen and displays the HOME screen The icon design may change depending on the iOS version To exit the Apple CarPlay screen 1 Press the FNC button h h Popup menu appears 2 Touch h h HOME screen appears Ñ Ñ Use Siri You can activate Siri 1 Press the FNC button for 1 second Press for 1 second 2 Talk to Siri To deactivate 1 Press the FN...

Страница 22: ...laces can lead to malfunction or damage of your smartphone Do not leave the smartphone in the vehicle Ñ Ñ Connect Android smartphone Wired connection 1 Connect an Android smartphone via the USB terminal P 88 To use the Hands Free function connect the Android smartphone via Bluetooth When an Android smartphone compatible with Android Auto is connected to the USB terminal the device is connected via...

Страница 23: ...plication or displays information To exit the Android Auto screen 1 Press the FNC button h h Popup menu appears 2 Touch h h HOME screen appears Ñ Ñ Using voice control 1 Press the FNC button for 1 second Press for 1 second 2 Start speaking NOTE When you press and hold the FNC button while inputting voice you can start over from the beginning To cancel 1 Press the FNC button Ñ Ñ Switch to the Andro...

Страница 24: ...ne is not ready for UIBC you cannot perform touch operation 1 Press the FNC button h h Popup menu appears 2 Touch h h HOME screen appears 3 Touch 4 Touch Wireless Mirroring P 13 h h The App screen is displayed 5 Operate your Android smartphone to activate the Wireless Mirroring function then connect to this unit 6 Select KW M as the network to use h h When the connection is established then the sa...

Страница 25: ...in this manual indicates a flash memory device About the file system The file system should be the one of the following FAT16 FAT32 exFAT NTFS NOTE Install the USB device in the place where it will not affect safe driving You cannot connect a USB device via a USB hub and Multi Card Reader Take backups of the audio files used with this unit The files can be erased depending on the operating conditi...

Страница 26: ...ion of current playing position You can drag the circle left or right to change the playing position Video file only 4 Operation keys 1 Searches track file For details on search operation see Search Operation P 27 E F Searches the previous next track file Touch and hold to fast forward or fast backward DH Plays or pauses Touch to attenuate restore the sound 5 Content list Touch the right side of t...

Страница 27: ...e desired item in the list Repeat this step until you find the desired file Ñ Ñ Link search Audio file only You can search for a file of the same artist album genre as that in the current track 1 Touch Link Search 2 Touch the desired tag type You can select from artists albums and genres h h The list corresponding to your selection appears 3 Touch the desired item in the content list Ñ Ñ Folder se...

Страница 28: ... held on If you restart playback after connecting the iPod the music that has been played by the iPod is played first Ñ Ñ Connect iPod iPhone Wired connection Preparation Connect an iPod iPhone while Apple CarPlay is not connected With an iPhone compatible with Apple CarPlay turn off Apple CarPlay by operating the iPhone at functional setup before connecting iPhone For details of the setup method ...

Страница 29: ...ME screen appears 3 Touch h h SETUP screen appears 4 Touch AV h h AV screen appears 5 Touch iPod Bluetooth Connection Bluetooth Default Output sound using a Bluetooth device Bluetooth HDMI Output sound using an HDMI device and perform music selection etc using a Bluetooth device iPod iPhone Basic Operation Control screen 4 2 3 5 1 Open the drawer 6 5 2 Close the drawer 5 7 2 1 Track information Di...

Страница 30: ...om Repeats the current track album Each time you touch the key repeat modes are switched in the following sequence Song repeat All songs repeat Repeat off Randomly plays all tracks in the current album Each time you touch the key random modes are switched in the following sequence Song random Random off 7 Indicator Items MUSIC Identifies the music file Search Operation You can search music files b...

Страница 31: ... the same artist album genre composer as that in the current track 1 Touch Link Search 2 Touch the desired tag type You can select from artists albums genres and composers h h The list corresponding to your selection appears 3 Touch the desired item in the content list ...

Страница 32: ...panel Touch the left side of the screen to display the function panel Touch again to close the panel TI FM only Selects the traffic information mode For details see Traffic Information P 34 SETUP FM only Displays the Tuner SETUP screen For details see Tuner SETUP P 34 SSM FM only Presets stations automatically For details see Auto memory P 33 PTY FM only Searches for a program by program type For ...

Страница 33: ... want to store the station for 2 seconds until a beep sounds Selecting Operation Ñ Ñ Preset select You can list and select memorized stations This function can be used from the remote control P 81 1 Touch on the right side of the screen Select a station from the list Ñ Ñ Search by program type FM only You can tune in the station broadcasting the specified type of program when listening to FM 1 Tou...

Страница 34: ...ed When the traffic information is received next time this unit recalls the volume setting automatically To cancel Traffic Information Touch Cancel Tuner SETUP FM only You can set tuner related parameters 1 Touch on the left side of the screen Touch SETUP h h Tuner SETUP screen appears 2 Set each function as follows Area Setting The tuner channel interval changes depending on the area where you us...

Страница 35: ...icle Tuner using either one of the two methods below In the USA you can activate online or by calling SiriusXM Listener care Visit www siriusxm com activatenow Call SiriusXM Listener Care at 1 866 635 2349 For Canadian Subscriptions please contact Visit www siriusxm ca activate Call SiriusXM Customer Care at 1 888 539 7474 NOTE To use SiriusXM Satellite Radio the optional accessory is necessary Co...

Страница 36: ...see SiriusXM SETUP P 41 Replay Live Touch to turn on or off the replay mode See Replay P 38 Traffic Weather For SXV300 1 Traffic Weather Now allows you to access the latest report whenever you want to hear it Select your city from the set up menu see Select a City for Traffic Weather P 46 and touch Traffic Weather to check the latest report It will start from the beginning White Played already Gre...

Страница 37: ...nnel for 2 seconds until a beep sounds Preset select You can list and select memorized channels This function can be used from the remote control P 80 To select from the preset list 1 Touch on the right side of the screen Select a channel from the list Direct search You can tune in a channel directly 1 Touch on the left side of the screen Touch Direct Channel 2 Enter the channel number and touch E...

Страница 38: ...dynamic and can change often allowing you to discover new channels You can set whether to be notified when the featured seasonal theme is updated P 46 Replay You can replay the last 60 minutes of the program from the current channel 1 Touch L or Replay on the function panel E F Press to skip to the previous next track Press and hold to rewind or fast forward DH Plays or pauses Replay time bar Play...

Страница 39: ...channel songs will be played from the beginning of each track TuneStart You can enable disable TuneStart See TuneStart P 46 NOTE Compatible with SXV200 or later tuner models TuneScan TuneScan is a feature that plays samples from the starts of multiple buffered songs from each of the SmartFavorites channels that predominantly play music selections You have easy access to a large sampling of music c...

Страница 40: ...patible with SXV300 or later tuner models Content Alerts When a broadcast program related to the registered artist song or team starts an Alert Content List screen appears to allow you to switch the current channel to the relevant channel 1 When the broadcast of the registered content starts an Alert Content List screen appears 2 Select a content from the list NOTE Touch Type Select a desired item...

Страница 41: ...rts for this game Cancel Touch to cancel SportsFlash alert No alerts for this game will be displayed afterward NOTE Compatible with SXV300 or later tuner models To learn how to set up the SportsFlash alert function see SportsFlash setup P 45 SiriusXM SETUP 1 Touch on the left side of the screen Touch SETUP h h SiriusXM SETUP screen appears See the following sections for each setting Set up the par...

Страница 42: ...content and user selected channels 1 Touch Parental Control on the SiriusXM SETUP screen 2 Touch User Mature or OFF User Locks only the selected channels Mature Locks channels classified as mature only OFF Deactivates the parental mature and user locks 3 Enter the parental code you originally input in as stated in Parental code P 42 and touch Enter When selecting User This allows you to limit acce...

Страница 43: ...ategory 3 Touch each channel in the list and set to ON or OFF NOTE To delete the skip channel setting touch Disable All and then touch YES on the confirmation screen Touch Info Change Select a desired item content info channel name artist name song title category name Direct Channel and Preset Memory functions allow you to select channels Ñ Ñ Content Alerts setup Activating content alert 1 Touch C...

Страница 44: ...list you want to select þ All Selects all contents All Clears all check marks 3 Touch Delete and then touch YES on the confirmation screen To select a Team Get alerted when your favorite sports team is playing on another SiriusXM channel with GameAlert 1 Touch My Games 2 Touch the desired league in the list 3 Touch the team s in the list you want to select NOTE You can select þ up to 30 teams ...

Страница 45: ...on the SiriusXM SETUP screen h h Team Set screen appears 2 Touch Edit 3 Touch the desired league in the list 4 Touch each team s in the list you want to select 5 Touch twice Edit Sets and removes teams Priority Sets the priority of a team Clear Removes all teams that have been set Touch Clear When the confirmation screen appears touch YES NOTE SportsFlash is available on SXV300 or later tuner mode...

Страница 46: ...he SiriusXM SETUP screen 2 Touch T and U to select a city 3 Touch Close Ñ Ñ Selecting Featured Bands Update Messages You can set whether to be notified when the featured seasonal theme is updated 1 Touch Featured Bands Update Messages on the SiriusXM SETUP screen Featured Bands Update Messages is turned on or off Ñ Ñ TuneStart 1 Touch Tune Start on the SiriusXM SETUP screen The TuneStart is turned...

Страница 47: ...item as follows 2 1 1 Camera Switching Keys 1 Touch to switch the view camera It is necessary to set Camera Assignment Settings beforehand except Rear See To set up the camera assignment settings P 48 2 Camera off Touch to exit the camera screen 1 When two or more cameras of rear front left right and 3rd are connected with this unit Ñ Ñ Camera Setup 1 Press the FNC button h h Popup menu appears 2 ...

Страница 48: ...a screen P 47 2 Select the item to set up FRONT VIEW CAMERA Set the camera assignment from view camera connected to Front view camera input terminal 3rd VIEW CAMERA Set the camera assignment from view camera connected to 3rd view camera input terminal AV IN Set the camera assignment from view camera connected to VIDEO input terminal 3 Select the view camera to set up 4 2 5 1 3 1 Picture from view ...

Страница 49: ...C D Make sure that lines A and B are horizontally parallel and that lines C and D are of the same length NOTE Touch Initialize and then touch Yes to set all the marks to their initial default position External audio video players AV IN 1 Connect an external component to the VIDEO input terminal and the AV Audio input terminal P 86 2 Select AV IN as the source P 13 3 Turn on the connected component...

Страница 50: ...ays the control screen of the media player source provided for the vehicle Displays the control screen of the Bluetooth streaming source provided for the vehicle Displays information about the Radar Detector Displays information about the instruments such as a speedometer Displays information about the air conditioner of the vehicle Displays information about the Parking Distance Sensor of the veh...

Страница 51: ...ell phone and Bluetooth audio device This unit conforms to the following Bluetooth specifications Version Bluetooth Ver 5 0 Profiles Smartphone Cell phone HFP V1 7 Hands Free Profile SPP Serial Port Profile PBAP Phonebook Access Profile Audio device A2DP Advanced Audio Distribution Profile AVRCP V1 6 Audio Video Remote Control Profile Sound codec LDAC SBC AAC NOTE The units supporting the Bluetoot...

Страница 52: ...disconnected When neither Apple CarPlay Android Auto nor a Bluetooth Hands Free phone is connected pressing and holding the FNC button displays Bluetooth pairing waiting dialog 7 Search for the unit KW M from your smartphone cell phone Complete steps 7 to 9 within 30 seconds 8 Operate your smartphone cell phone according to the displayed messages Confirm the request both on the smartphone cell pho...

Страница 53: ...t means that the unit will use that device You can confirm the connection status of Bluetooth Apple CarPlay or Android Auto as follows Bluetooth If the device compatible with Bluetooth is paired Blue Blue or Blue is lighted Apple CarPlay If the device compatible with Apple CarPlay is connected the device name Blue and White are lighted Android Auto If the device compatible with Android Auto is con...

Страница 54: ... when the device is connected with the unit as a Hands Free phone 1 or 2 Audio A2DP App SPP Select to use as an audio device or to interwork with an application installed in a smartphone 3 Touch Close To delete the registered device You can delete the device that is registered in device list 1 Touch on the Device List screen 2 Touch the device name to check þ All Selects all Bluetooth devices All ...

Страница 55: ...sic See JVC Streaming DJ P 56 5 Repeat Random Repeats the current track folder Each time you touch the key repeat modes are switched in the following sequence File repeat Folder repeat All songs repeat Repeat off Randomly plays all tracks in the current folder Each time you touch the key random modes are switched in the following sequence Folder random All random Random off 6 Information display D...

Страница 56: ...ite changes to Blue and starts playback Gray Not connected White Connected Blue During playback 4 Touch NOTE If a connected Bluetooth audio device is operated to play music connections are switched When a Bluetooth source is switched to another one its settings are deleted and the connection is restored to the connection before source switching You cannot select an Android smartphone connected as ...

Страница 57: ... you can display the phonebook and call lists onto the touch panel screen when the smartphone cell phone is connected Phonebook up to 1000 entries Up to 50 entries including dialed calls received calls and missed calls 5 Select a dialing method Call using call records Call using the phonebook Call using the preset number Call by entering a phone number Select the smartphone cell phone to use When ...

Страница 58: ... u A character with an accent character in a sentence cannot be searched for 4 Select the person you want to call from the list 5 Select the phone number from the list NOTE You can sort the phone numbers in the list by last name or first name For details see Hands Free Setup P 62 Call using the preset number 1 Touch 2 Touch the name or phone number Call by entering a phone number 1 Touch 2 Enter a...

Страница 59: ...ed Hands Free1 or Hands Free2 for HFP when registered Ñ Ñ Receive a call 1 Touch to answer a phone call or to reject an incoming call NOTE When shifting the gear to the reverse R position and monitoring the picture from the rear view camera this screen does not appear even if a call comes in The portrait registered in the phonebook is displayed while making receiving calls and during a call If you...

Страница 60: ...a new call while talking on the phone you can answer the newly received call by touching The current call is put on hold Each time you touch the caller will change to the other one When you touch the current call will end to be switched to the call waiting on hold Ñ Ñ Phone number preset You can register frequently used phone numbers in this unit 1 Touch 2 Touch Edit 3 Select where to preset Delet...

Страница 61: ...sferred If no Phonebook has been downloaded touching Download Phonebook Now will start downloading the Phonebook The portrait registered in the phonebook is displayed while making receiving calls and during a call If you edit the phonebook on the connected device side after downloading the phonebook the portrait may not be displayed depending on the edited content It is recommended that you downlo...

Страница 62: ...Default Outputs sound from all speakers Auto Response Set the automatic response time to pick up an incoming call OFF Default Turns off the Automatic response function 1 5 10 15 20 25 30 Sets the ringing time second Auto Pairing When set to ON the Apple Auto Pairing function is turned on to automatically register the iPod touch or iPhone connected to this unit ON Default Turns on the Apple Auto Pa...

Страница 63: ... mode Full Changes the aspect ratio of video and displays video fully on the screen Normal Displays video at the ratio of 4 3 Auto Displays video fully vertically or horizontally with no ratio change NOTE Settings to adjust vary depending on the current source System Setup 1 Press the FNC button h h Popup menu appears 2 Touch h h HOME screen appears 3 Touch See the following section for each setti...

Страница 64: ... the iDatalink commercially available is connected you can display information about obstacles around the car ON Always displays information Dyn Default Displays information when the sensor detects obstacles OFF Cancels this function This can be set when the iDatalink commercially available is connected Parking Assist Position Select where to display information about obstacles on the screen left ...

Страница 65: ... NOTE You can also change the assignment when you touch and hold Favorite icon on the HOME screen If it is your first time to touch Favorite icon after installation Customize Favorite Key screen will appear Ñ Ñ Customize popup menu functions You can register a function for each of the function key1 to 3 Function key1 key2 key3 To register a function 1 Touch Customize FNC Menu on the User Interface...

Страница 66: ... Touch h h HOME screen appears 3 Touch h h SETUP screen appears 4 Touch Special h h Special screen appears 5 Set each parameter as follows DEMO Select the demonstration mode Default is ON Operation Guide Display Determine whether to show the touch screen operation guide screen every time before HOME screen is displayed Default is ON Software Information Confirm the software version of this unit P ...

Страница 67: ...or off when the vehicle light control switch is turned on or off OSD Clock Select if you want to display the clock while the screen is off or while watching video files etc ON Default OFF Wallpaper Customize You can change the wallpaper image or color P 67 Viewing Angle If it is hard to see the image on the screen evenly adjust the viewing angle The smaller the negative value the more whitish the ...

Страница 68: ...s 5 Set each parameter as follows Guidance Voice Recognition Volume Adjust the volume of the guidance and voice recognition in Apple CarPlay Android Auto mode Default is 19 Incoming Call Volume Ring Adjust the ring tone volume in Apple CarPlay Android Auto mode Default is 15 In Call Volume Talking Adjust the dial tone volume and the volume during a call in Apple CarPlay Android Auto mode Default i...

Страница 69: ...opup menu appears 2 Touch h h HOME screen appears 3 Touch h h SETUP screen appears 4 Touch Connection h h Connection Setup screen appears 5 Set each parameter as follows Bluetooth Turns the Bluetooth function on or off Device List Select the connected device to be used P 53 Device Name If you select ON for Bluetooth you can change the Bluetooth device name See Change the device name for Bluetooth ...

Страница 70: ...h Device Name on the Connection Setup screen h h Change Device Name screen appears 2 Touch and hold 3 Input the device name 4 Touch Enter Ñ Ñ Change the PIN Code 1 Touch PIN Code on the Connection Setup screen h h Change PIN Code screen appears 2 Touch and hold 3 Input the PIN Code 4 Touch SET Ñ Ñ Change the device name for Wireless Mirroring 1 Touch Wi Fi SETUP on the Connection Setup screen 2 To...

Страница 71: ...Controlling Fader Balance P 74 Set Volume Offset P 76 Set Sound Effect P 76 Use Audio Memory P 79 3 way speaker system setup Select the appropriate crossover network mode for the speaker system used 2 way or 3 way speaker system CAUTION Connecting 3 way speakers with the 2 way mode selected can break the speakers 1 Press the FNC button h h Popup menu appears 2 Touch h h HOME screen appears 3 Touch...

Страница 72: ...d Speaker X over setup 1 Press the FNC button h h Popup menu appears 2 Touch h h HOME screen appears 3 Touch h h SETUP screen appears 4 Touch Audio h h Audio screen appears 5 Touch Speaker Xʼover 6 Select a car type You can select the car type and speaker network etc When you select your car type the Delay Time Alignment is activated automatically for timing adjustment of sound output for each cha...

Страница 73: ...setup You can set the crossover frequency of speakers 1 Touch Xʼover 2 Touch the speaker to set up 3 Set each parameter as follows HPF FREQ High Pass Filter adjustment When Front or Rear is selected on the Speaker Select screen LPF FREQ Low Pass Filter adjustment When Subwoofer is selected on the Speaker Select screen Slope 1 Set a crossover slope Gain Adjust the gain of the front speaker rear spe...

Страница 74: ...other than Through in Xʼover 2 Only when FREQ Low Pass is set to a mode other than Through in Xʼover NOTE For how to switch to the 3 way speaker system see 3 way speaker system setup P 71 Connecting 3 way speakers with the 2 way mode selected can break the speakers Controlling General Audio 1 Press the FNC button h h Popup menu appears 2 Touch h h HOME screen appears 3 Touch h h SETUP screen appea...

Страница 75: ...eset Select Display the screen for selecting the preset equalizer curve P 75 Memory Saves the adjusted equalizer curve as User1 to User4 P 75 Initialize Initialize flatten the current EQ curve ALL SRC Apply the adjusted equalizer curve to all sources Touch ALL SRC and then touch OK on the confirmation screen Bass EXT Bass Extend Settings When turned on the frequencies lower than 62 5 Hz is set to ...

Страница 76: ...e volume using Volume Offset Switching the current source to another source suddenly may output extremely loud sound Sound Effect You can set sound effects 1 Press the FNC button h h Popup menu appears 2 Touch h h HOME screen appears 3 Touch h h SETUP screen appears 4 Touch Audio h h Audio screen appears 5 Touch Sound Effect 6 Set each parameter as follows Bass Boost Set the amount of bass boost O...

Страница 77: ...ield depending on the position of the seat you sit Listening Position DTA allows you to set Listening Position and Front Focus You cannot set both at the same time 1 Press the FNC button h h Popup menu appears 2 Touch h h HOME screen appears 3 Touch h h SETUP screen appears 4 Touch Audio h h Audio screen appears 5 Touch Position DTA Set up Listening Position P 77 Set up Front Focus P 78 Ñ Ñ Listen...

Страница 78: ... NOTE To initialize the Delay and Level settings touch Initialize and Yes on the confirmation screen Ñ Ñ Front Focus You can focus the imaginary sound image on the front of the selected seat 1 Touch Front Focus on the Position DTA screen 2 Select a front focus position For Front All and All select Priority L or R depending on which side you want to put the imaginary sound image NOTE When the 3 way...

Страница 79: ...d Level settings touch Initialize and Yes on the confirmation screen Audio Setup memory Audio Control settings can be memorized The memorized settings can be recalled at any time 1 Press the FNC button h h Popup menu appears 2 Touch h h HOME screen appears 3 Touch h h SETUP screen appears 4 Touch Audio h h Audio screen appears 5 Touch Audio Memory SETUP Memory Lock or unlock the Audio SETUP Memory...

Страница 80: ...s left in an extremely high temperature surrounding environment and or subjected extremely low air pressure The battery pack or batteries shall not be exposed to excessive heat such as sunshine fire or the like Risk of fire explosion or the leakage of flammable liquid or gas if the battery is disposed into fire or a hot oven recharged shorted mechanically crushed or cut of the battery If spilled f...

Страница 81: ...ails on the direct search mode see Direct search mode P 81 For the tuner and SiriusXM sources allows you to enter the preset number If the preset number is single digit press the number If the preset number is double digits press continuously the numbers within 3 seconds Pressing E or F within 3 seconds allows you to determine the preset number of single digit CLR Deletes a character while in dire...

Страница 82: ...e vehicle and the protection function may have been activated Therefore the speaker wire should be checked If your car s ignition does not have an ACC position connect the ignition wires to a power source that can be turned on and off with the ignition key If you connect the ignition wire to a power source with a constant voltage supply such as with battery wires the battery may be drained If the ...

Страница 83: ... Fi antenna Bluetooth Wi Fi antenna unit Ñ Ñ Supplied accessories for installation 1 x1 2 x1 3 x1 4 3 m x1 5 M5 x 8 mm x6 6 M5 x 8 mm x6 7 3 5 m x1 8 x1 Ñ Ñ Installation procedure 1 To prevent a short circuit remove the key from the ignition and disconnect the terminal of the battery 2 Make the proper input and output wire connections for each unit 3 Connect the speaker wires of the wiring harness...

Страница 84: ...an the supplied one may cause a drop in positioning accuracy Depending on the type of car reception of the GPS satellite signals might not be possible with an inside installation Please install this GPS antenna in an area away from any antennas that are used with CB radios or satellite televisions The GPS antenna should be installed at a position that is spaced at least 12 inch 30 cm from smartpho...

Страница 85: ...erse lamp harness when using the optional rear view camera To steering remote To use the steering wheel remote control feature you need an exclusive remote adapter not supplied matched to your car If no connections are made do not let the cable come out from the tab Purple Black To rear right speaker To rear left speaker To front right speaker To front left speaker Speaker impedance 4 8 Ω Other ca...

Страница 86: ...low 8 3rd view camera input Yellow For more information see To set up the camera assignment settings P 48 9 Accessory 7 GPS Antenna Use the supplied GPS antenna Using the GPS antenna other than the supplied one may cause a drop in positioning accuracy When connecting to an external amplifier connect its ground wire to the car s chassis to avoid damaging the unit White Black Gray Black Green Black ...

Страница 87: ...can also be connected to 6 Installation removal of fixing bracket When you connect the cable to HDMI terminal and USB terminal remove the fixture After connecting the cable put the fixture again Fixture USB cable HDMI cable Ñ Ñ Connecting a USB device Accessory 2 1 0 m Accessory 3 USB terminal 1 USB Type A device 2 1 USB maximum power supply current DC 5 V 3 0 A 2 Sold separately Ñ Ñ Connecting an...

Страница 88: ...2 USB terminal 1 USB Type C Cable 2 Accessory 2 1 0 m Accessory 3 1 USB maximum power supply current DC 5 V 3 0 A 2 Sold separately Ñ Ñ Connecting the camera 2 Front view camera 1 Left side view camera 1 Right side view camera 1 Rear view camera 1 1 Sold separately 2 See Camera Assignment Settings P 47 ...

Страница 89: ... cord has shorted or it has come in contact with the car chassis Wire or insulate the speaker cord as appropriate and turn the power off and on again Hot Error When the internal temperature of this unit rises to 60 C or more the protection circuit is activated and you may not be able to operate the unit Use the unit again after reducing the temperature of the unit Error 07 67 The unit is not opera...

Страница 90: ...enna No antenna is connected to the SiriusXM tuner Check that an antenna is connected to the SiriusXM tuner Check antenna for damages SXM No Signal No SiriusXM radio signal is received Verify that your vehicle is outdoors with a clear view of the sky Channel Locked The selected channel has been locked by the parental controls Enter the unlock code when you are asked See Parental Control P 42 Incor...

Страница 91: ...mmended that a car audio system should be configured with all High Resolution Audio compatible products from player to speaker to enjoy its high quality sound Acceptable Video files Profile Max Picture size Max bit rate Audio format MPEG 1 mpg mpeg 352 240 352 288 1 5 Mbps MPEG Audio Layer 2 MPEG 2 mpg mpeg MP ML 720 480 720 576 8 Mbps MPEG Audio Layer 2 H 264 MPEG 4 AVC mp4 m4v avi flv f4v Baseli...

Страница 92: ...kHz S N Ratio dB 98 5 dB Dynamic Range 89 dB HDMI section Connector type Type D Input Resolution VGA 640x480p 59 94Hz 60Hz 480p 720x480p 59 94Hz 60Hz 720p 1280x720p 59 94Hz 60Hz Input Audio Type 32K 44 1K 48K 88 2K 96K 176 2K 192K Hz 16 bit 20 bit 24 bit Linear PCM Wireless Mirroring section Mode Sink Copyright protection HDCP2 2 Touch Control UIBC Wi Fi section IEEE Standard 802 11 a b g n ac Fre...

Страница 93: ...Graphics equalizer Band 13 Band Frequency BAND1 13 62 5 100 160 250 400 630 1k 1 6k 2 5k 4k 6 3k 10k 16k Hz Gain 9 8 7 6 5 4 3 2 1 0 1 2 3 4 5 6 7 8 9 dB 2 way X Over High pass filter Frequency Through 30 40 50 60 70 80 90 100 120 150 180 220 250 Hz Slope 6 12 18 24 dB Oct Gain 8 7 6 5 4 3 2 1 0 dB Low pass filter Frequency 30 40 50 60 70 80 90 100 120 150 180 220 250 Hz Through Slope 6 12 18 24 d...

Страница 94: ...d 6 or higher and the Android Auto app Wi Fi is a registered trademark of Wi Fi Alliance The Wi Fi CERTIFIED Logo is a certification mark of Wi Fi Alliance The terms HDMI HDMI High Definition Multimedia Interface and the HDMI Logo are trademarks or registered trademarks of HDMI Licensing Administrator Inc Linux is the registered trademark of Linus Torvalds in the U S and other countries This produ...

Страница 95: ...ther the name of the Xiph org Foundation nor the names of its contributors may be used to endorse or promote products derived from this software without specific prior written permission THIS SOFTWARE IS PROVIDED BY THE COPYRIGHT HOLDERS AND CONTRIBUTORS AS IS AND ANY EXPRESS OR IMPLIED WARRANTIES INCLUDING BUT NOT LIMITED TO THE IMPLIED WARRANTIES OF MERCHANTABILITY AND FITNESS FOR A PARTICULAR P...

Страница 96: ...located or operated in conjunction with any other antenna or transmitter ISED CAUTION This device contains licence exempt transmitter s receiver s that comply with Innovation Science and Economic Development Canada s licence exempt RSS s Operation is subject to the following two conditions 1 This device may not cause interference 2 This device must accept any interference including interference th...

Страница 97: ...recto del reciclaje y la eliminación de residuos ayuda a conservar los recursos y evita al mismo tiempo efectos perjudiciales en la salud y el medio ambiente Informação sobre a eliminação de pilhas Este produto não deve ser eliminado como lixo doméstico geral Devolva a pilha usada ao revendedor ou entidade autorizada para que a mesma seja devolvida ao fabricante ou importador A reciclagem e a elim...

Страница 98: ......

Отзывы: