background image

37

ENGLISH

 Listening to the SiriusXM

 Radio


for Region 1 models

Before operating, connect the SiriusXM Connect Vehicle Tuner (not supplied) to the expansion port on the rear of the 
unit. (

 Installation/Connection Manual)

Everything worth listening to is on SiriusXM, getting over 130 channels, including the most commercial-free music, 
plus the best sports, news, talk and entertainment. To start listening to the SiriusXM™ Satellite Radio, a SiriusXM 
Connect Vehicle Tuner (separately purchased) and subscription are required. For more information, visits www.
siriusxm.com.

 Activating  subscription

1

  Check your Radio ID.

Radio ID is labeled on the casing of the SiriusXM Connect Vehicle Tuner or the bottom of the SiriusXM Connect 
Vehicle Tuner unit.
•  You can also display the Radio ID on the screen by tuning in to Channel 0.

2

  To listen to SiriusXM Satellite Radio, a subscription is required. Activate the SiriusXM 

Connect Vehicle Tuner using one of the two methods below:

•  Online: Go to www.siriusxm.com/activatenow 
•  Phone: Call 1-866-635-2349

3

 Select 

Satellite

” as the source. 

(

 page 12)

SiriusXM Connect Vehicle Tuner starts updating all the SiriusXM channels.

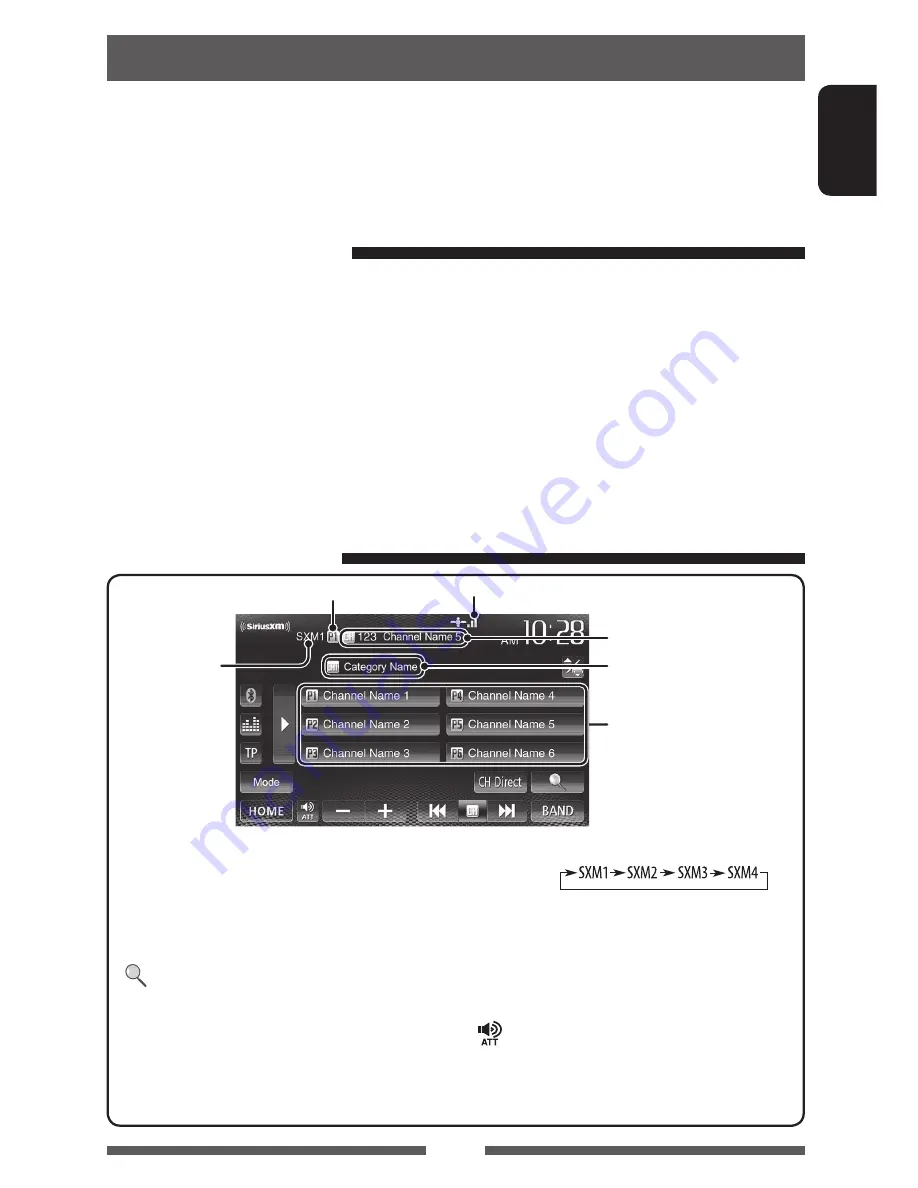
 Tuning in to a channel

Band

Preset no.

Preset list

Channel no./Channel name

Signal reception indicator

Category name

[

P1

] – [

P6

]

•  Selects a stored channel. (Press)
•  Stores the current channel. (Hold)

[

3

Displays/hides the information on the 
current channel. (

 page 38)

 ]

Displays the Category/Channel List. 
(

 page 38)

[

CH Direct

]

Displays the <

Direct Channel 

Number

> screen. (

 page 38)

[

BAND

]

Selects the band.

[

4

] [

¢

]•  Selects a channel. (Press)

•  Changes the channel rapidly. (Hold)

–  While searching, invalid, skipped 

and unsubscribed channels are 
skipped.

   [

] [

] [

+

]  Adjusts the volume.

[

Mode

]

Changes the settings for restrictions. 
(

 page 39)

[

HOME

]

Displays the <

HOME

> screen.

EN_KW-AV71JJW.indb   37

12/11/02   10:02

Содержание KW-AV71BT

Страница 1: ... référer au manuel séparé INSTRUCTION MANUAL MANUAL DE INSTRUCCIONES MODE D EMPLOI For customer Use Enter below the Model No and Serial No which are located on the top or bottom of the cabinet Retain this information for future reference Model No Serial No This instruction manual is used to describe models listed below Region 1 DVD Region Code 1 area Region 4 DVD Region Code 4 area En este manual ...

Страница 2: ...d says that the component uses laser beams that have been classified as Class 1 It means that the unit is utilizing laser beams that are of a weaker class There is no danger of hazardous radiation outside the unit For Region 1 models FCCWARNING This equipment may generate or use radio frequency energy Changes or modifications to this equipment may cause harmful interference unless the modification...

Страница 3: ...any complicated operations Temperature inside the car If you have parked the car for a long time in hot or cold weather wait until the temperature in the car becomes normal before operating the unit How to read this manual Illustrations of Region 1 models are mainly used for explanation This manual mainly explains operations using the buttons on the monitor panel and touch panel For operations usi...

Страница 4: ... for iPod Out mode 31 Using an App of iPod touch iPhone 32 Pandora operations for Region 1 models 34 Using other external components 36 AV IN 36 Listening to the SiriusXM Radio for Region 1 models 37 Activating subscription 37 Tuning in to a channel 37 Setting the reception restrictions 39 Rear source operations 41 Sound adjustment 42 Using the sound equalization 42 Adjusting the crossover frequen...

Страница 5: ...or panel before this happens Cautions Hold the monitor panel securely so as not to drop it accidentally Fit the monitor panel onto the attaching plate until it is firmly locked Detaching attachingthemonitorpanel 3 Attaching plate The monitor panel is unlocked The attaching plate closes automatically about 10 seconds after the monitor panel is unlocked 4 Soft case supplied INTRODUCTIONS ...

Страница 6: ...ion buttons and menu items in the selected language Local initially selected or English English AV Input Select an external component to play page 50 Camera Input Select On when connecting the rear view camera page 51 Display Design Select the background and the colors of the text and the touch panel buttons page 44 Demonstration Activate or deactivate the display demonstration page 50 2 Finish th...

Страница 7: ...urce control screen 2 Display the Settings screen 3 Display the Time Set screen 4 Set the clock time To synchronize the clock time with FM RBDS To set the clock manually 1 Select the time display format 2 Adjust the hour 3 Adjust the minute 5 Finish the procedure ...

Страница 8: ...page 10 Turning on the power Turning off the power Hold Turning on off the AV source You can activate the AV function by selecting a source on the HOME screen To turn off the AV source The AV source is turned off Turning off the screen On HOME screen The screen is turned off To turn on the screen or Touch the screen to display the HOME screen Commonoperations ...

Страница 9: ...ise compared with other sources Lower the volume before playing these digital sources to avoid damaging the speakers by sudden increase of the output level Monitor panel operations Open Tilt 1 On the source control screen 2 Open Opens the monitor panel Eject Ejects the disc Close Closes the monitor panel Do not place your finger behind the monitor panel Tilt Tilt Tilts the monitor panel Detach Det...

Страница 10: ...nectionstatusof theBluetoothdevice page54 Select an item to display on the screen AV Displays the source control screen above Camera Displays the picture from the rear view camera page 48 Apps 1 Displays the screen of App from the connected iPod touch iPhone page 32 Off Turns off the screen page 8 Common operating buttons 1 Displays the screen of App from the connectediPodtouch iPhone page32 2 Dis...

Страница 11: ...s the Motion or Touch function To hide the buttons and playback information again when Motion or Touch is selected touch the screen repeatedly Motion Sensitiv Selects the sensor sensitivity High or Low Availablewhen Sensor issetto Motion Time Out Mode Selects the items shown on the screen when no operation is performed for approximately 10 seconds and when the light of the HOME on the monitor pane...

Страница 12: ...o the Pandora Bluetooth page 63 Plays a Bluetooth audio player AV IN 2 page 36 Switches to an external component connected to LINE IN VIDEO IN jacks on the rear panel Apps 3 page 32 Switches to the screen of App from the connected iPod touch iPhone AV Off page 8 Turns off the AV source 1 OnlyforRegion1models 2 Appearsonlywhen AV Input issetto AV IN page50 3 Appearsonlywhen AV Input issetto iPod pa...

Страница 13: ...e16 BAND Selects the band 4 Searches for a station Auto search Press Manual search Hold Adjusts the volume Mode Changes the settings for tuner reception pages 14 15 HOME Displays the HOME screen Band Preset no Preset list ST MO indicator page 16 The station frequency currently tuned in PS station name for FM RBDS when PS signal is coming in Displaying the information on the current station Hides t...

Страница 14: ... signals LO DX Local Distance extreme 1 2 Local Select this to tune in only to stations with sufficient signal strength The LO indicator lights up DX Deactivate the function The DX indicator lights up When the FM reception is interfered 1 2 Auto Increases the tuner selectivity to reduce interference noises between adjacent stations Stereo effect may be lost Wide Subject to the interference from ad...

Страница 15: ...er Hold The station selected in step 1is stored Changing the tuner channel interval Tuner channel interval changes depending on the area you use this unit 1 2 US Select this when using in North Central South America FM AM intervals are set to 200 kHz 10 kHz Europe Select this when using in any other areas FM AM intervals are set to 50 kHz 9 kHz SA Select this when using in South American countries...

Страница 16: ... automatically memorized The next time the unit switches toTraffic Announcement the volume is set to the previous level The following features are available only for FM RBDS stations Searching for FM RBDS program PTY Search You can search for your favorite programs being broadcast by selecting the PTY code for your favorite programs 1 2 Select a PTY code Changes the page Hold PTY Search starts If ...

Страница 17: ... cancel the prohibition repeat the same procedure to select Eject OK Discoperations Playing a disc If a disc does not have any disc menu all tracks on it will be played repeatedly until you change the source or eject the disc Inserting a disc 1 Open the monitor panel On the source control screen 2 Label side The source changes to DISC and playback starts The DISC IN indicator lights up while a dis...

Страница 18: ... 2 Romeo Joliet CD DA VCD Video CD DivX 4 MPEG1 MPEG2 JPEG MP3 WMA WAV MPEG4 AAC 1 IfyouinsertaDVDVideodiscofanincorrectRegionCode RegionCodeError appearsonthescreen 2 DVD Rrecordedinmulti borderformatisalsoplayable exceptforduallayerdiscs DVD RWduallayerdiscsarenot playable 3 Itispossibletoplaybackfinalized R RW Videoformatonly discs DVD isselectedasitsdisctypewhena R RWdiscisloaded RWdoublelayer...

Страница 19: ...er no Track no JPEG Folder no File no VCD Track no Playback mode page 22 page 9 DISC IN indicator 7 2 Stops playback 3 Displays the folder track list page 20 4 Selects playback mode page 22 6 Starts pauses playback 4 5 Selects a chapter track Press Reverse forward search 6 Hold Adjusts the volume Mode 7 Changes the settings for disc playback page 23 HOME Displays the HOME screen 1 TodisplaytheOrig...

Страница 20: ...ayer For CD MP3 WMA WAV DISC IN indicator Media type Audio format Playback status 3 play 8 pause Playing time MP3 WMA WAV Folder no Track no CD Track no Playback mode page 22 Track file information Touching an information bar scrolls the text if not all of the text is shown While playing the jacket picture is shown if the file has the tag data including the jacket picture page 9 1 Displays the fol...

Страница 21: ...menu DVD playlist DVD VR Top Menu Displays the disc menu DVD original program DVD VR Displays the menu playlist original program scene selecting screen below Switches to the direct disc menu mode Touch the target item to select To exit from the menu selecting screen press Touching any position other than operation buttons displays the source control screen Using the menu playlist original program ...

Страница 22: ...k mode For DVD DVD VR Selects Repeat playback mode ForVCD without PBC CD DivX MPEG1 MPEG2 MP3 WMA WAV Selects Repeat playback mode Selects Random playback mode Youcannotactivatetherepeatmodeandtherandom modeatthesametime Each time you press the button the playback mode changes The corresponding indicator lights up Available items differ depending on the types of loaded disc and playback file Indic...

Страница 23: ...ompres Compression You can change the dynamic range while playing Dolby Digital software zOff Select this to enjoy a powerful sound at a low volume level with its full dynamic range zOn Select this to reduce the dynamic range a little zDialog Select this to reproduce the movie dialog more clearly For discs except VCD CD MonitorType Select the monitor type to watch a wide screen picture on the exte...

Страница 24: ...tensioncode mod Inserting an SD card 1 Open the monitor panel On the source control screen 2 Push in the SD card until it clicks The source changes to SD and playback starts All tracks in the SD card will be played repeatedly until you change the source Playing files in an SD card SDoperations 3 Close the monitor panel To eject the SD card 1 Open the monitor panel 2 Push the SD card gently Do not ...

Страница 25: ... the jacket picture Audio format Video format MPEG JPEG Selects repeat playback mode 1 2 SONGS Repeats the current track FOLDER Repeats all tracks in the current folder Selects random playback mode 1 2 FOLDER Randomly plays all tracks in the folder ALL Randomly plays all tracks Displays the folder track list page 20 6 Starts pauses playback 4 3 Selects a track Press Reverse forward search 4 Hold A...

Страница 26: ...ce with 2 or more partitions Depending on the shape of the USB devices and connection ports some USB devices may not be attached properly or the connection might be loose This unit cannot recognize a USB device whose rating is other than 5V and exceeds 1 A This unit may not recognize a memory card inserted into the USB card reader Connect only one USB device to the unit at a time Do not use a USB ...

Страница 27: ...G JPEG Displays the folder track list page 20 Selects repeat playback mode 1 2 SONGS Repeats the current track FOLDER Repeats all tracks in the current folder Selects random playback mode 1 2 FOLDER Randomly plays all tracks in the folder ALL Randomly plays all tracks Switches between the internal and external memory source of the connected device such as mobile phone 6 Starts pauses playback 4 3 ...

Страница 28: ...c USB Audio andVideo cable for iPod iPhone KS U30 separately purchased Installation Connection Manual Caution Video is not displayed on the screen if connected with any cable other than KS U30 ListeningtotheiPod iPhonedevice Preparation To use App of iPod touch iPhone such as MotionX GPS Drive page 32 To listen to Pandora page 34 Setting AV Input for iPod iPhone playback Select an appropriate inpu...

Страница 29: ...hefollowingiPod iPhone models iPodnano 6thGeneration iPodtouch 4thGeneration iPodtouch 3rdGeneration iPodtouch 2ndGeneration iPhone4S iPhone4 iPhone3GS iPhone3G Selecting preference settings for iPod iPhone playback When the source is iPod 1 2 Audiobooks Select the speed of audio books Artwork Shows hides the iPod artwork You can change the settings when iPod Control is set to Head Notice When ope...

Страница 30: ... picture displayed on the screen of iPod iPhone is shown if the song contains the Artwork page 29 Displays the audio video file list page 31 Selects Repeat playback mode 1 SONGS Functions the same as Repeat One Selects Random playback mode 1 SONGS Functions the same as Shuffle Songs ALBUMS Functions the same as Shuffle Albums 6 Starts pauses playback 4 Selects an audio video file 2 Press Reverse f...

Страница 31: ...ngtab Playlist Artist Albums orSongs iPod iPhone playback operations for iPod Out mode Connect the iPod iPhone using KS U30 separately purchased Installation Connection Manual Select iPod for AV Input page 28 Make sure to select iPod Out for iPod Control page 29 Select iPod as the source page 12 Selecting a track from the menu on the iPod iPhone 5 Selects a category Select 6 Confirms the selection...

Страница 32: ... Start App on your iPod touch iPhone 2 Select Apps as the source On HOME screen You can operate for basic playback on the touch panel Audio Video For some applications such as MotionX GPS Drive the operating buttons and information are not shown You can perform the operations on the touch panel such as scrolling the map You can also play back the audio video using iPod iPhone itself instead of the...

Страница 33: ... no risk obstruction or injury will be incurred to you your passengers or other road users The requirements of the RoadTraffic Regulations must always be followed and may vary by state The destination must not be entered while the vehicle is in motion iPhone Navigation guidance may not be applicable to the current situation because of changes in traffic conditions e g changes in tollroads principa...

Страница 34: ...nre List page 35 Registers the current track as favorite Thumbs down to the current track and skips to the next track Adds the current artist to the Station List Adds the current track to the Station List 6 Starts pauses playback Skips the current track Not available when the Pandora skip reaches its limit Mode Displays the connection mode switch screen below Adjusts the volume HOME Displays the H...

Страница 35: ...t current version Android Visit the Google play and search for Pandora to install Bluetooth must be built in and the following profiles must be supported SPP Serial Port Profile A2DP Advanced Audio Distribution Profile BlackBerry Visit www pandora com from the built in browser to download the Pandora application Bluetooth must be built in and the following profiles must be supported SPP Serial Por...

Страница 36: ...Off Usingotherexternalcomponents To select the method to display the source control screen page 10 The operation buttons disappear when no operation is done for about 10 seconds To change settings for video playback page 46 Adjusts the volume Mode Changes the AV IN name Press 2 or 3 to select an AV IN name HOME Displays the HOME screen 1 Select AV IN as the source page 12 2 Turn on the connected c...

Страница 37: ...screen by tuning in to Channel 0 2 To listen to SiriusXM Satellite Radio a subscription is required Activate the SiriusXM ConnectVehicleTuner using one of the two methods below Online Go to www siriusxm com activatenow Phone Call 1 866 635 2349 3 Select Satellite as the source page 12 SiriusXM ConnectVehicleTuner starts updating all the SiriusXM channels Tuning in to a channel Band Preset no Prese...

Страница 38: ...hannel directly 1 2 Enter a channel no 1 and then confirm 2 To clear the entry press Clear Displaying the information on the current channel Hides the text information Text information Scrolls the text information Storing channels in memory You can preset six channels for each band 1 Tune in to a channel you want to preset page 37 2 Select a preset number Hold The channel selected in step 1is stor...

Страница 39: ...a new code in New Code and then the new code again for confirmation the entry in Confirm Code 1 Enter a code 2 Confirm the entry Deletes last entry To change the parental code press Change on step 1 enter current code then new code on step 2 above Activating the parental lock 1 On Mode screen 2 Enter your parental code number 1 then confirm the entry 2 Deletes last entry 3 Select a category 1 and ...

Страница 40: ...ll locked channel 1 0n Mode screen 2 Enter your parental code number 1 and then confirm the entry 2 Deletes last entry Skipping unwanted channels If you do not want to receive some channels you can skip them Setting the channel skipping 1 Activate the channel skip 0n Mode screen 2 Select a category 1 and then select a channel you want to skip 2 Changes the page The icon appears beside the selected...

Страница 41: ...e external monitor connected to theVIDEO OUT and 2nd AUDIO OUT jacks while listening to any source When you press Same as Front while listening to music the track list appears If the selected source is other than DISC SD USB iPod or AV IN nothing appears on the rear monitor Operations on the external monitor from the remote controller only Selecting a folder or track on the control screen For DivX...

Страница 42: ...level of each band 1 then select the subwoofer level 2 The adjustments are stored and User is activated To finish the procedure press To make precise adjustments page 43 Using the sound equalization The adjustment is memorized for each source until you adjust the sound again If the source is a disc the adjustment is stored for each of the following categories DVD DVD VR VCD CD DivX MPEG1 MPEG2 MP3...

Страница 43: ...tto Through Adjusting the sound precisely 1 Perform steps 1and 2of Selecting a preset sound mode then 2 Select a band 3 Adjust the sound Reset Changes level of Low Mid High to 0 Freq Selects frequency Q Adjusts the width of the frequency 1 Bass Activates deactivates bass 2 SW Level Adjusts subwoofer level The adjustments are overwritten if the User setting has been made page 42 and User is activat...

Страница 44: ...vorite scene as the background page 45 Changingdisplaydesign You can change the background the color of text and touch panel buttons 2 Select adjust the color User color adjuster You can make your own color adjustment and store it to User Dimmer setting You can make selections for each dimmer setting Dimmer On or Dimmer Off Color palette Text Buttons Select adjust the color For details above On th...

Страница 45: ...ctual scene 1 Play a video or JPEG 2 Display the Display Design screen page 44 3 4 Adjust the image 6 1 Starts pauses playback E 1 Advances scenes frame by frame 3 Magnifies the scene Full Zoom1 Zoom3 5 2 3 2 Moves the zooming frame To cancel the capture press 1 Notdisplayedwhenplayinganexternal componentconnectedtoLINEIN VIDEOINjacks 2 Notdisplayedwhen Full isselected 5 Capture the image displaye...

Страница 46: ...ust the picture quality 1 Touch any position of the screen other than operation buttons 2 3 Select dimmer on or dimmer off 4 Adjust the picture 15 to 15 Adjusts the brightness Adjusts the contrast Adjusts the tint Adjusts the color Adjusts the blackness Adjusts the detail Adjustableonlywhentheincomingsignalis NTSC ...

Страница 47: ...y The aspect ratio is automatically selected to match the incoming signals WhileDivXisplayedbackwith MonitorType setto 16 9 page23 theaspectratioisnotset correctly Zooming the picture You can zoom the picture Full Zoom1 to Zoom3 When Aspect is set to Panorama or Auto the left column the picture is zoomed with the aspect ratio of the Full setting 1 Touch any position of the screen other than operat...

Страница 48: ...els To erase the caution message touch the screen Usingarearviewcamera To use a rear view camera the REVERSE GEAR SIGNAL lead connection is required For connecting a rear view camera Installation Connection Manual To display the picture from the rear view camera manually On HOME screen When displaying the picture from the rear view camera manually you can change the setting of the picture pages 46...

Страница 49: ... each source page 42 zFlat Natural Dynamic Vocal Boost Bass Boost Vibrant User Loudness You can activate deactivate loudness zOn zOff Boost low and high frequencies to produce a well balanced sound at a low volume level Cancels Crossover Adjust the crossover frequency page 43 Volume Adjust Adjust and store the auto adjustment volume level for each source For discs the adjustment is stored for each...

Страница 50: ...ettings zBrightness zBlack Adjusts brightness 15 to 15 Initial 00 for Dimmer On 15 for Dimmer Off Adjusts blackness 15 to 15 Initial 00 NTSC PAL 1 Select the color system of the external monitor zNTSC PAL Display Sensor Change the settings of how to display the buttons the sensitivity of the motion sensor and how the screen is changed when no operation is performed for a while page 11 Input AV Inp...

Страница 51: ... and menu items Time Set Adjust the clock time page 7 Beep zOn zOff Activates the key touch tone Cancels User Profile You can memorize recall or clear the settings you have made page 52 Touch Panel Adjust Adjust the touch position of the buttons on the screen page 53 Initialize Initialize all settings you have made Hold Enter to initialize the settings After initializing the settings adjust the se...

Страница 52: ...ft column A confirmation message appears Press Yes 2 Finish the procedure Clearing your settings 1 On User Profile screen step 2on the left column 2 Clears all settings memorized in User1 User2 and User3 A confirmation message appears Press Yes 3 Finish the procedure Memorizing recalling the settings You can memorize the following settings Settings on the Settings screen Fader Balance Equalizer Lo...

Страница 53: ...pleted appears Reset the unit If the update has failed turn the power off and then on and retry the update Even if you have turned off the power during the update you can restart the update after the power is turned on The update will be performed from the beginning Adjusting the touch position You can adjust the touch position on the touch panel if the position touched and the operation performed...

Страница 54: ...e This unit supports the following Bluetooth profiles HFP Hands Free Profile 1 5 OPP Object Push Profile 1 1 A2DP Advanced Audio Distribution Profile 1 2 AVRCP Audio Video Remote Control Profile 1 3 PBAP Phone Book Access Profile 1 0 SPP Serial Port Profile Icons for Bluetooth button No device is connected A Bluetooth audio player is connected A Bluetooth mobile phone is connected Both a Bluetooth...

Страница 55: ...is established it is registered in the unit even if you reset the unit Up to 5 devices can be registered in total Only one device for Bluetooth phone and one for Bluetooth audio can be connected at a time To use the Bluetooth function you need to turn on Bluetooth function of the device To use the registered device you need to connect the device to the unit page 56 Connecting Bluetooth devices Pai...

Страница 56: ...red device connect the device on Connect Device the right column OnlyforRegion1models Connecting disconnecting a registered Bluetooth device 1 Display the Bluetooth Setup screen page 55 2 To connect Select Connect for the target device and then select the device you want to connect Connected appears Press OK to confirm the operation All registered devices mobile phone and audio player are listed o...

Страница 57: ... press Save Device Name Shows the device name to be shown on the Bluetooth device JVC Unit Device Address Shows the MAC address of the unit Auto Connect zOn zOff The connection is automatically established with the last connected Bluetooth device when the unit is turned on Cancels HF Audio Output Select the speakers used for Bluetooth both phone and audio player zFront zAll From front speakers onl...

Страница 58: ...lking Adjusts the microphone volume Adjusts the volume of calls earpiece This adjustment does not affect the volume level of the other sources Switching between handsfree mode and phone mode While talking Each time you press the button the talking method is switched handsfree mode phone mode Notifying SMS reception If the mobile phone is compatible with SMS Short Message Service the unit tells you...

Страница 59: ...hone control screen by pressing Phone on the HOME screen 2 Select a method to make a call Preset list For presetting page 61 Direct number entry the right column Voice dialing the right column Preset list phone book call lists page 60 Direct number entry Hold Adds Presets the entered phone number on the preset list page 61 Deletes last entry You can enter up to 32 numbers Voice dialing Available o...

Страница 60: ...h on phone book When phone book list screen is displayed you can search by initial 1 2 Select the initial Displays the other letters 3 Select a phone number from the list To display the details of an entry When phone book list screen is displayed you can display the details of an entry and select a phone number if several phone numbers are registered 1 Display the details of the desired entry 2 Se...

Страница 61: ...he direct number entry screen by pressing Save page 59 Copying the phone book You can copy the phone book memory of a mobile phone into the unit up to 400 entries 1 On the source control screen 2 Numbers of the phone book entries copied PIN code initial 0000 3 Operate the target mobile phone Refer to the instruction manual supplied with your mobile phone To cancel the transfer press Finish 4 Finis...

Страница 62: ...e The unit does not inform you of the arrival of a message Ring Mode zSystem zPhone The ring tone set on the unit is used The ring tone set on the mobile phone is used This function may not work depending on the mobile phone RingTone Change When Ring Mode is set to System press Enter then select the ring tone for received calls and SMS from Tone1 Tone2 Tone3 zCallTone zMessageTone Selects the ring...

Страница 63: ...Playback status 3 play 8 pause 1 Track no Playing time 1 Playback mode 1 below page 54 The operation buttons indications and information displayed on the screen differ depending on the connected device 8 Pauses playback Selects Repeat playback mode 1 2 Selects Random playback mode 1 2 3 Starts playback 4 Selects a track Press Reverse forward search Hold Adjusts the volume HOME Displays the HOME sc...

Страница 64: ...controller decreases replace the batteries Before using the remote controller Aim the remote controller directly at the remote sensor on the unit DO NOT expose the remote sensor to bright light direct sunlight or artificial lighting The unit is equipped with the steering wheel remote control function See the Installation Connection Manual separate volume for connection Operations may differ depend...

Страница 65: ...age 47 RETURN Returns to the previous screen TOP M page 66 DVD Video Shows the disc menu DVD VR Shows the Original Program screen VCD Resumes PBC playback MENU page 66 DVD Video Shows the disc menu DVD VR Shows the Playlist screen VCD Resumes PBC playback fi DVD Video Makes selection settings DivX 1 Skips back or forward by about 5 minutes Button Operations ENT Confirms selection OSD Does not funct...

Страница 66: ...ress DIRECT while holding SHIFT 3 Press a number button while holding SHIFT to select a desired track 4 Press ENT to confirm the selection To resume PBC pressTOP M or MENU Searching for an item directly Tuner frequency 1 Press DIRECT while holding SHIFT to enter the search mode 2 Press number buttons while holding SHIFT to enter a frequency To erase a misentry press CLR clear while holding SHIFT 3...

Страница 67: ...se press down the center holder of the case and lift the disc out holding it by the edges Always hold the disc by the edges Do not touch its recording surface When storing a disc in its case gently insert the disc around the center holder with the printed surface facing up Make sure to store discs in their cases after use Connectors Center holder To keep discs clean A dirty disc may not play corre...

Страница 68: ...ng DivX files for discs only for Region 1 models only This unit can play back DivX files with the extension code divx div or avi regardless of the letter case upper lower Audio stream should conform to MP3 or Dolby Digital The file encoded in the interlaced scanning mode may not be played back correctly The maximum bit rate for video signals average is 4 Mbps Playing MPEG1 MPEG2 files This unit ca...

Страница 69: ...NA Nauru TG Tajik BG Bulgarian IK Inupiak NE Nepali TH Thai BH Bihari IN Indonesian NO Norwegian TI Tigrinya BI Bislama IS Icelandic OC Occitan TK Turkmen BN Bengali Bangla IW Hebrew OM Afan Oromo TL Tagalog BO Tibetan JA Japanese OR Oriya TN Setswana BR Breton JI Yiddish PA Panjabi TO Tonga CA Catalan JW Javanese PL Polish TR Turkish CO Corsican KA Georgian PS Pashto Pushto TS Tsonga CS Czech KK ...

Страница 70: ...mark and logos are registered trademarks owned by Bluetooth SIG Inc and any use of such marks by JVC KENWOOD Corporation is under license Other trademarks and trade names are those of their respective owners Only for Region 1 models DivX DivX Certified and associated logos are trademarks of Rovi Corporation or its subsidiaries and are used under license ABOUT DIVXVIDEO DivX is a digital video form...

Страница 71: ...ce No BT Dongle The Bluetooth adapter KS UBT1 is removed Connection Error The device is registered but the connection has failed Connect the registered device page 56 PleaseWait The unit is preparing to use the Bluetooth function If the message does not disappear turn off and turn on the unit then connect the device again or reset the unit NoVoice Device The connected mobile phone does not have th...

Страница 72: ...elect an appropriate setting for AV Input page 50 The Apps switch button on the source control screen or Apps button on the HOME screen is not displayed Select an appropriate setting for Navigation Input page 51 TUNER SSM automatic presetting does not work Store stations manually page 15 Static noise while listening to the radio Connect the antenna firmly Disc in general Disc can be neither recogn...

Страница 73: ...ecting cable and its connection Update the firmware version Charge the battery Check whether the iPod control mode is correctly selected page 29 Reset the iPod iPhone Sound is distorted Deactivate the equalizer either on this unit or the iPod iPhone A lot of noise is generated Turn off uncheck VoiceOver of the iPod For details visit http www apple com No operations are available when playing back ...

Страница 74: ...ars on the screen for about 2 seconds then returns to the previous channel Selected channel is no longer available or is unauthorized Select another channel or continue listening to the previous channel Ch Unsubscribed appears on the screen Selected channel is not part of your current subscription plan Call 1 866 635 2349 to subscribe Subscription Updated Press Enter to Continue appears on the scr...

Страница 75: ...e Control Profile Bluetooth device does not detect the unit Check whether the Bluetooth adapter KS UBT1 is inserted correctly Search from the Bluetooth device again The unit does not make pairing with the Bluetooth device For devices compatible with Bluetooth 2 1 Register the device using a PIN code page 55 For devices compatible with Bluetooth 2 0 Enter the same PIN code for both the unit and tar...

Страница 76: ... SXi OE REMOTE FM AM TUNER Frequency Range FM with channel interval set to 200 kHz 87 9 MHz to 107 9 MHz with channel interval set to 50 kHz 87 5 MHz to 108 0 MHz AM 530 kHz to 1 700 kHz FMTuner Usable Sensitivity 9 3 dBf 0 8 μV 75 Ω 50 dB Quieting Sensitivity 16 3 dBf 1 8 μV 75 Ω Alternate Channel Selectivity 400 kHz 65 dB Frequency Response 40 Hz to 15 000 Hz Stereo Separation 40 dB AMTuner Sens...

Страница 77: ...l Port Profile MONITOR Screen Size 7 inch wide liquid crystal display Number of Pixel 1 152 000 pixels 800 horizontal 3 RGB 480 vertical Drive Method TFT Thin FilmTransistor active matrix format Color System NTSC PAL Aspect Ratio 16 9 wide GENERAL Power Requirement OperatingVoltage DC 14 4V 11V to 16V allowance Grounding System Negative ground Allowable StorageTemperature 10 C to 60 C 14 F to 140 ...

Страница 78: ... varat izmantot Bluetooth funkciju 7 Šalys kuriose galite naudotis Bluetooth funkcija 7 Il pajjiżi fejn tista tuża l funzjoni Bluetooth 7 Lönd þar sem hægt er að nota Bluetooth 7 Riigid kus on võimalik kasutada Bluetooth funktsiooni 7 Bluetooth fonksiyonunu kullanabileceğiniz ülkeler 7 7 Na tíortha inar féidir leat feidhmiú Bluetooth a úsáid 7 Länner an denen der d Bluetooth Funktioun benotze kënn...

Страница 79: ...y Ireland Éire India ȯ ȯ ȡȱ OXHWRRWKp ȡ ȡ ȡ Ȫ ȯ ɇ ȡ Ísland Italia 대한민국 Lichtenstein Lietuva Luxemburg Luxembourg Lëtzebuerg Latvija Monaco Crna Gora Македонија Malta Malaysia Nederland Norge New Zealand Perú Philippines Pilipinas Polska Portugal República Oriental del Uruguay România Srbija Россия Country Sverige Singapore 新加坡 Singapura Slovenija Slovensko Türkiye 台湾 United States of America Venez...

Страница 80: ...N EN SP FR 2012 JVC KENWOOD Corporation Having TROUBLE with operation Please reset your unit Refer to page of How to reset your unit Still having trouble USA ONLY Call 1 800 252 5722 http www jvc com We can help you ...

Страница 81: ... la unidad desconecte el terminal negativo de la batería y realice todas las conexiones eléctricas para evitar cortocircuitos Asegúrese de volver a conectar a masa esta unidad al chasis del automóvil después de la instalación Asegúrese de que ningún cable quede atrapado en el chasis del automóvil o debajo de los asientos Notas sobre las conexiones eléctricas Reemplace el fusible por otro del régim...

Страница 82: ... los tornillos suministrados de acuerdo con las instrucciones El uso de otros tornillos podrá provocar flojedad de o daños a las piezas Al apretar los tornillos o los pernos asegúrese de que ningún cable de conexión quede pillado Al efectuar la instalación asegúrese de no bloquear el ventilador del panel trasero a fin de mantener una ventilación correcta No podrá instalar la unidad en un coche en ...

Страница 83: ...k the speaker wiring in your car RACCORDEMENTS ELECTRIQUES PRECAUCIONES sobre las conexiones de la fuente de alimentación y de los altavoces NO conecte los cables de los altavoces del mazo de cables a la batería del coche de lo contrario la unidad quedará seriamente dañada ANTES de conectar los cables de los altavoces del mazo de cables a los altavoces revise el cableado de los altavoces de su coc...

Страница 84: ...is Gris Green with black stripe Verde con rayas negras Vert avec bande noire Green Verde Vert Purple with black stripe Púrpura con rayas negras Violet avec bande noire Purple Púrpura Violet Left speaker front Altavoz izquierdo delantero Enceinte gauche avant Right speaker front Altavoz derecho delantero Enceinte droit avant Left speaker rear Altavoz izquierdo trasero Enceinte gauche arrière Right ...

Страница 85: ... al amplificador Los cables de los altavoces de esta unidad quedan sin usar Podrá desconectar el amplificador incorporado y enviar las señales de audio solamente al los amplificador es externo s para obtener sonidos nítidos y evitar que se caliente el interior de la unidad Consulte la página 49 del MANUAL DE INSTRUCCIONES 6 No suministrado con esta unidad 7 Cable de audio no suministrado con esta ...

Страница 86: ...dos a una masa común Este receptor no funciona en absoluto Reinicializó el receptor EN CAS DE DIFFICULTES Le fusible saute Les fils rouge et noir sont ils racordés correctement L appareil ne peut pas être mise sous tension Le fil jaune est elle raccordée Pas de son des enceintes Le fil de sortie d enceinte est il court circuité Le son est déformé Le fil de sortie d enceinte est il à la masse Les b...

Страница 87: ...low the simple steps below to assure audio playback Please go to HOME Select AV Off Select HOME Select Settings Input then select AV IN at AV Input Menu Important Notice When you using your white 30 Pin iPod USB Cable audio signal does not come through via USB if you select iPod You must select AV IN when using your white 30 Pin iPod USB Cable Setting AV Input for iPod iPhone playback Make sure th...

Страница 88: ...de 30 pines Vous avez deux options quand vous reliant un iPhone ou un iPod a votre nouvelle unite Option 1 Arrangement de defaut Utilisant le JVC KS U30 en option Votre unité est préréglée de l usine pour permettre le lecture audio et vidéo quand vous reliez votre iPhone ou iPod en utilisant le câble JVC KS U30 en option vendu séparément Si vous avez achetez le KS U30 reliez simplement votre iPhon...

Страница 89: ...inserted in the unit when shipped from the factory When you remove the Bluetooth adapter KS UBT1 from the unit store it in this bag For removing the Bluetooth adapter KS UBT1 refer to the Instructions c J __ Bluetooth adapter KS UBTl LVT2224 001A ...

Страница 90: ... henvisningtil R TIEdirektivet 1999 5 Ef kan hentes fra felgende websteder http wwwl jvckenwood com ecdoc CE0984 JVC KENWOOD erkla rer herved at denne enhed KS UBTl erioverensstemmelse med de va sentlige krav og andre relevante bestemmelser idirektiv1999 5 Ef Suomi Vaatimustenmukaisuusvakuutuksen radio ja telepaatelaitteita R TIE koskeva direktiivi 1999 5 EY voidaan ladata seuraavista verkko osoit...

Страница 91: ... not required to detach the front control panel from the main unit use the provided screws to attach the control panel to the main unit L L_j d j OPENTHE Q PANEL UNIT TURN THE GEAR IN THIS DIRECTION LV45165 001 A ...

Страница 92: ...ing the unit Do not use any solvent for example thinner benzine etc detergent or insecticide This may da mage the monitor or the unit Recommended cleaning method Gently wipe the panel with a soft dry cloth LVT1970 001A ...

Страница 93: ...HERWISE DAMAGE TO YOUR UNIT MAY OCCUR INCORRECT CONNECnON CAUSES SERIOUS DAMAGE TO THIS UNIT PLEASE READ INSTALLATION CONNECTION MANUAL CAREFULLY CONNECT GROUND FIRST METALUC BODY OR CHASSIS OF THE CAR CONNECT OTHER WIRES CONNECT POWER CORD TO THE UNIT ...

Страница 94: ...ous normal use and maintenance from any defects in utilisation et entretien normal de tout defaut material and workmanship subject to the following materiel et de fabrication sous reserve des terms and conditions modalites et conditions suivantes 1 To Obtain Warranty Service a JVC Product requiring service must be Presented together with Proof of purchase b The JVC product must be brought in for s...

Страница 95: ...t Projecteur Avant et Audio d Auto de Serie ARSENAL AC Adapters Remote Controls Headphones Microphones and 90 DAYS 90 DAYS Projector Lamps AdaptateursAC Telecommande Casque D ecoute Microphones 90JOURS 90 JOURS et Lampe de Projecteur Wood Cone Speakers 5 5 Enceinte aCone en Bois All Other Categories 1 1 Toutes les autres categories I Any defects caused by fire flood lightning power surge or other ...

Страница 96: ...t attempt to service the product yourself Caution To prevent electrical shock do not open the cabinet There are no user serviceable parts inside Please refer to qualified service personnel for repairs PRODUCT REGISTRATION We suggest that you register your product since it will enable us to contact you directly if it is ever necessary to correct a safety related condition in your product You can re...

Страница 97: ...ther than a service facility authorized by JVC to render such service or if affixed to any attachment not provided with the products or if the model or serial number has been altered tampered with defaced or removed 2 Initial installation installation and removal from cabinets or mounting systems 3 Operational adjustments covered in the Owner s Manual normal maintenance video and audio head cleani...

Отзывы: