background image

(No.MA511<Rev.001>)5/16

1.5

Preventing static electricity

Electrostatic discharge (ESD), which occurs when static electricity stored in the body, fabric, etc. is discharged, can destroy the laser
diode in the traverse unit (optical pickup).  Take care to prevent this when performing repairs.

1.5.1  Grounding to prevent damage by static electricity

Static electricity in the work area can destroy the optical pickup (laser diode) in devices such as laser products. 
Be careful to use proper grounding in the area where repairs are being performed. 

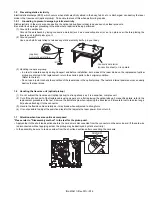
(1) Ground the workbench

Ground the workbench by laying conductive material (such as a conductive sheet) or an iron plate over it before placing the
traverse unit (optical pickup) on it.

(2) Ground yourself

Use an anti-static wrist strap to release any static electricity built up in your body.      

(3) Handling the optical pickup

• In order to maintain quality during transport and before installation, both sides of the laser diode on the replacement optical

pickup are shorted. After replacement, return the shorted parts to their original condition. 
(Refer to the text.)

• Do not use a tester to check the condition of the laser diode in the optical pickup. The tester's internal power source can easily

destroy the laser diode. 

1.6

Handling the traverse unit (optical pickup)

(1)  Do not subject the traverse unit (optical pickup) to strong shocks, as it is a sensitive, complex unit. 
(2)  Cut off the shorted part of the flexible cable using nippers, etc. after replacing the optical pickup. For specific details, refer to the

replacement procedure in the text. Remove the anti-static pin when replacing the traverse unit. Be careful not to take too long a
time when attaching it to the connector. 

(3)  Handle the flexible cable carefully as it may break when subjected to strong force. 
(4) I t is not possible to adjust the semi-fixed resistor that adjusts the laser power. Do not turn it.

1.7

Attention when traverse unit is decomposed

*Please refer to "Disassembly method" in the text for the pickup unit. 

• Apply solder to the short land sections before the card wire is disconnected from the connector on the servo board. (If the card wire

is disconnected without applying solder, the pickup may be destroyed by static electricity.)

• In the assembly, be sure to remove solder from the short land sections after connecting the card wire.

1M

Conductive material
(conductive sheet) or iron palate

(caption)
Anti-static wrist strap

SOLDER

Содержание KD-SD631E

Страница 1: ...OPYRIGHT 2011 JVC KENWOOD Corporation Lead free solder used in the board material Sn Ag Cu melting point 219 Centigrade Lead free solder used in the board material Sn Cu melting point 230 Centigrade DETACH PANEL KD SD631E KD SD631EN KD SD631EY KD SD636U KD SD636UN KD SD636UT KD SD636UP KD SD637EE CP SD631ED CP SD631ED CP SD631ED CP SD636UD CP SD636UD CP SD636UD CP SD636UD CP SD637EED Model Parts n...

Страница 2: ...uency Range 531 kHz to 1 611 kHz Sensitivity Selectivity 20 µV 40 dB CD PLAYER SECTION Signal Detection System Non contact optical pickup semiconductor laser Number of Channels 2 channels stereo Frequency Response 5 Hz to 20 000 Hz Signal to Noise Ratio 98 dB Wow and Flutter Less than measurable limit USB SECTION USB Standard USB 1 1 USB 2 0 Data Transfer Rate Full Speed Max 12 Mbps Compatible Dev...

Страница 3: ...1 kHz to 1 611 kHz LW 153 kHz to 279 kHz Sensitivity Selectivity MW 20 µV 40 dB LW 50 µV CD PLAYER SECTION Signal Detection System Non contact optical pickup semiconductor laser Number of Channels 2 channels stereo Frequency Response 5 Hz to 20 000 Hz Signal to Noise Ratio 98 dB Wow and Flutter Less than measurable limit USB SECTION USB Standard USB 1 1 USB 2 0 Data Transfer Rate Full Speed Max 12...

Страница 4: ...one jack control shafts etc to be sure the product is safe to operate without danger of electrical shock Do not use a line isolation transformer during this check Plug the AC line cord directly into the AC outlet Using a Leakage Current Tester measure the leakage current from each exposed metal parts of the cabinet particular ly any exposed metal part having a return path to the chassis to a known...

Страница 5: ... to check the condition of the laser diode in the optical pickup The tester s internal power source can easily destroy the laser diode 1 6 Handling the traverse unit optical pickup 1 Do not subject the traverse unit optical pickup to strong shocks as it is a sensitive complex unit 2 Cut off the shorted part of the flexible cable using nippers etc after replacing the optical pickup For specific det...

Страница 6: ...his laser product uses visible and or invisible laser radiation and is equipped with safety switches which prevent emission of radiation when the drawer is open and the safety interlocks have failed or are defeated It is dangerous to defeat the safety switches 5 CAUTION If safety switches malfunction the laser is able to function 6 CAUTION Use of controls adjustments or performance of procedures o...

Страница 7: ... Fig 1 3 1 2 Removing the Front chassis See Fig 2 1 Disengage the 4 hooks b engaging both sides of the Front chassis Fig 2 3 1 3 Removing the Erectric unit See Fig 3 4 and 6 1 Remove the 1 screw A attaching the Rear bracket See Fig 3 Fig 3 2 Remove the 2 screws B attaching both sides of the Top chassis See Fig 4 Fig 4 3 Remove the 3 screws C attaching the Main board See Fig 5 Fig 5 4 Disconnect th...

Страница 8: ... 8 3 2 CD mechanism assembly section 3 2 1 Removing the Mecha control board 1 Solder the short land on the pickup See Fig 1 Fig 1 2 Remove the 8 wires from the Mecha control board See Fig 2 Fig 2 3 Disconnect the flexible wire from the pickup connected to the connector CN102 on the Mecha control board See Fig 3 4 Remove the 2 screws A attaching the Mecha control board See Fig 3 Fig 3 D D D E E E E...

Страница 9: ...rame assembly See Fig 5 Fig 5 3 2 3 Removing the Pickup See Fig 6 7 1 Remove the 2 screws C attaching the feed bracket assem bly See Fig 6 Fig 6 2 Remove the shaft from the TM base See Fig 7 3 Disengage the hook a on the pickup from the TM base See Fig 7 Fig 7 3 2 4 Removing the Spindle motor See Fig 8 9 1 Remove the HC CL Spring from the HC CL base and the TM base and then lift up the HC CL base ...

Страница 10: ... attaching the spindle motor See Fig 10 Fig 10 3 2 5 Removing the Loading motor 1 Remove the roller arm assembly from the bottom frame as sembly See Fig 11 Fig 11 2 Remove the 2 screws E attaching the loading motor as sembly and then remove the loading motor assembly in the direction of the arrow See Fig 12 Fig 12 D E ...

Страница 11: ...1 hour the display is indicated per 10 minutes 00001 10922 are displayed in XXXXX MAX 10922 hours DOWN Disc operation duration display 00 50 are displayed in X X For less than 1 hour the display is indicated per 10 minutes 00001 10922 are displayed in XXXXX MAX 10922 hours BRIGHTNESS TAG iPod SD Disc eject number of times 00001 99999 are displayed in XXXXX BRIGHTNESS TAG iPod SD Disc eject number ...

Страница 12: ... error count information display count skip CD DA error count number information CD DA error count numbers XX numbers of errors and when there is none Can only be checked via debugger by jap member CD ROM compressed file error count numbers XX numbers of errors and when there is none Can only be checked via debugger by jap member CD time code error count information display no count update CD time...

Страница 13: ... is not detected in case that none of capacitor leakage wrong con nection or other detection is found D C E R R D C O K Operation Display content Detail UP DC ERR1 display When wrong connection DC error in other detection duration is detected When wrong connection DC error in other detection duration is not detected UP DC ERR1 clear Clear detection information when wrong connection DC er ror in ot...

Страница 14: ...0th error occurred in Mis connect detection period judge as Mis connect If detected error 10 consecutive times and 10th error occurred in Capacitor leak detection period judge as Capacitor leak If detected error 10 consecutive times and 10th error occurred in Other detection period and detected another 10 errors con secutively then judge as Other If judge as Mis connect turn off speaker output dis...

Страница 15: ... No MA511 Rev 001 15 16 SECTION 5 TROUBLESHOOTING This service manual does not describe TROUBLESHOOTING ...

Страница 16: ... No MA511 Rev 001 VSE Printed in Japan JVC KENWOOD Corporation Car Electronics Business Group 2967 3 Ishikawa machi Hachioji shi Tokyo 192 8525 Japan ...

Отзывы: