background image

ENGLISH

18

  •  Pressing and holding  

4


/

¢


 skips 10 

items at a time.

3

  Confirm the selection.

  •  If a track is selected, playback starts 

automatically.

  • Press 

5

 to return to the previous menu.

3


REPEAT

ONE RPT

:  Functions the same as “Repeat 

One” of the iPod.

ALL RPT

:  Functions the same as “Repeat 

All” of the iPod.

RANDOM

ALBUM 
RND

:  Functions the same as “Shuffle 

Albums” of the iPod.

SONG RND

:  Functions the same as “Shuffle 

Songs” of the iPod.

•  To cancel repeat play or random play, select “

RPT 

OFF

” or “

RND OFF

.”

•  “ALBUM RND” is not available for some iPod.

•  To return to the previous menu, press BACK.

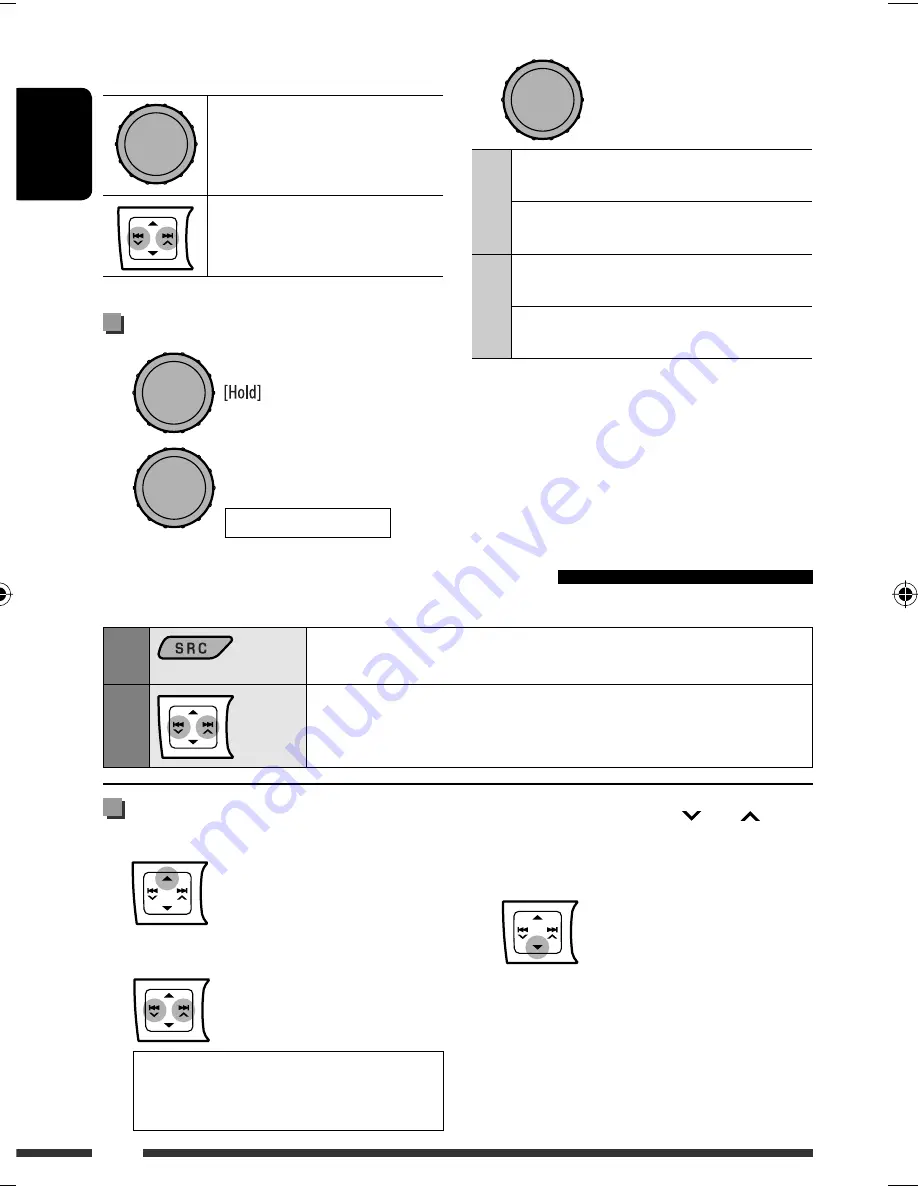
Pressing (or holding) the following buttons allows you 
to...

[Press] Pause/resume playback.

[Press] Select track
[Hold] Reverse/fast-forward 

track

  Selecting the playback modes

1


2


When connected with the interface adapter 

Preparation: 

Make sure “

CH/IPOD

” is selected in the “

SRC SELECT

” 

=

 “

EXT IN

” setting, see page 25.

1

Select “IPOD.”

Playback starts automatically.

2

Select a song.

  Selecting a track from the menu

1

  Enter the main menu.


This mode will be canceled if no 
operations are done for about 
5 seconds.

2

  Select the desired menu.


PLAYLISTS


Ô


ARTISTS


Ô


ALBUMS


Ô


SONGS


Ô


GENRES


Ô


COMPOSERS


Ô


(back to the beginning)

REPEAT


Ô


RANDOM

[Turn]


=


[Press]

[Turn]


=


[Press]

EN12-21_KD-R606_001A_f.indd   18

EN12-21_KD-R606_001A_f.indd   18

12/23/08   5:21:22 PM

12/23/08   5:21:22 PM

Содержание KD-R605

Страница 1: ...ENGLISH KD R606 KD R605 CD RECEIVER KD R606 KD R605 INSTRUCTIONS For canceling the display demonstration see page 7 For installation and connections refer to the separate manual ...

Страница 2: ...g If you need to operate the unit while driving be sure to look around carefully or you may be involved in a traffic accident Caution on volume setting Digital devices CD USB produce very little noise compared with other sources Lower the volume before playing these digital sources to avoid damaging the speakers by sudden increase of the output level This mark is used to indicate Turn the control ...

Страница 3: ...Using the control panel 4 Using the remote controller RM RK50 5 Preparation 7 Listening to the radio 8 Disc USB operations 9 Playing a disc 9 Playing a file on a USB device 10 Disc file operations 11 EXTERNAL DEVICES Using the Bluetooth devices 12 Using the Bluetooth cellular phone 14 Using the Bluetooth audio player 15 Listening to the CD changer 16 Listening to the iPod iPhone 17 When connected ...

Страница 4: ...vailablefortheconnectediPod see page30 6 Youcanstilladjustthevolumeduringpausewhen theselectedsourceisCD USB USB IPOD Beforeresumeplayback checktobesurethatyou havenotraisethevolumeleveltoomuch 1 FM AM Select preset station CD USB CD CH Select folder IPOD Enter the main menu Pause playback Confirm selection BT PHONE BT AUDIO Enter go back to previous Bluetooth menu 2 Turn on the power Attenuate th...

Страница 5: ...inder 0 3 w Main display e Disc device information indicators track file folder Asthenumberincreases thesignal batterypower becomesstronger Using the remote controller RM RK50 Continuedonthenextpage Before using the remote controller Aim the remote controller directly at the remote sensor on the unit DO NOT expose the remote sensor to bright light direct sunlight or artificial lighting Installing ...

Страница 6: ...d and held 7 Searches for stations if pressed briefly Fast forwards or reverses the track if pressed and held Changes the tracks if pressed briefly While listening to an iPod in menu selecting mode Connected with the interface adapter Selects an item if pressed briefly Then press D to confirm the selection Skips 10 items at a time if pressed and held Reverse skip forward skip for Bluetooth audio p...

Страница 7: ...CD CH Audio CD CD Text Disc title performer 2 Track title 2 Current track number with the elapsed playing time Current track number with the clock time back to the beginning MP3 WMA 5 Album name performer folder name 3 4 Track title file name 3 4 Current track number with the elapsed playing time Current track number with the clock time back to the beginning IPOD Album name Artist name Track name ...

Страница 8: ...Improving the FM reception When an FM stereo broadcast is hard to receive activate monaural mode for better reception See also page 24 Reception improves but stereo effect will be lost To restore the stereo effect repeat the same procedure to select MONO OFF Storing stations in memory Automatic presetting FM SSM Strong station Sequential Memory You can preset up to 18 stations for FM 1 While liste...

Страница 9: ...ing FM station of 92 50 MHz into preset number 04 1 2 Select preset number 04 3 Selecting preset station Disc USB operations Playing a disc 1 Turn on the power 2 Insert a disc All tracks will be played repeatedly until you change the source or eject the disc Stop playing and ejecting the disc NO DISC appears Press SRC to listen to another playback source Continuedonthenextpage or Turn Press ...

Страница 10: ...the USB device Straightly pull it out from the unit NO USB appears Press SRC to listen to another playback source Cautions Avoid using the USB device if it might hinder your safety driving Do not pull out and attach the USB device repeatedly while READING is shown on the display Do not start the car engine if a USB device is connected This unit may not be able to play the files depending on the ty...

Страница 11: ...ck Hold Reverse fast forward track Turn Press Disc file operations Selecting the playback modes You can use only one of the following playback modes at a time 1 2 3 REPEAT TRACK RPT Repeats current track FOLDER RPT MP3 WMA Repeats current folder RANDOM FOLDER RND MP3 WMA Randomly plays all tracks of current folder then tracks of next folders ALL RND Randomly plays all tracks To cancel repeat play ...

Страница 12: ...h device Registration Pairing methods Use either of the following items in the Bluetooth menu to register and establish the connection with a device Select BT PHONE or BT AUDIO as the source to operate the Bluetooth menu OPEN Make the unit ready to establish a new Bluetooth connection Connection is established by operating the Bluetooth device SEARCH Make the unit ready to establish a new Bluetoot...

Страница 13: ...device is detected UNFOUND appears To connect a special device Select SPECIAL The unit displays the list of the preset devices 4 Select a device you want to connect 5 For available devices 1 Enter the specific PIN code of the device to the unit Refer to the instructions supplied with the device to check the PIN code 2 Use the Bluetooth device to connect Now connection is established and you can us...

Страница 14: ... Bluetooth setting menu See the following and page 22 When a call comes in The source is automatically changed to BT PHONE The display will flash in blue see RING COLOR on page 24 for setting When AUTO ANSWER is activated The unit answers the incoming calls automatically see page 22 When AUTO ANSWER is deactivated press any button except 0 to answer the incoming call You can adjust the microphone ...

Страница 15: ...not start operate the Bluetooth audio player to start playback Operate the Bluetooth audio player to pause if playback does not pause when you change the source Reverse skip forward skip Pause start playback Enter the Bluetooth menu see page 22 Operationmaybedifferentaccordingtotheconnected Bluetoothaudioplayer Refer also to page 13 for connecting disconnecting deleting a registered device If the ...

Страница 16: ...folder track is selected The selection always start from disc number first If another disc folder is selected playback starts from the 1st track of the selected disc folder Pressing or holding the following buttons allows you to MP3 Select folders Press Select track Hold Reverse fast forward track Selecting the playback modes 1 2 3 REPEAT TRACK RPT Repeats current track FOLDER RPT MP3 Repeats all ...

Страница 17: ...iPod iPhone Caution Avoid using the iPod iPhone if it might hinder your safety while driving Make sure all important data has been backed up to avoid losing the data When connected with the USB cable There are 2 control terminals in USB IPOD source HEAD MODE Control by this unit IPOD MODE Control by the connected iPod iPhone Preparation Select the controlling terminal HEAD MODE or IPOD MODE for iP...

Страница 18: ...available for some iPod To return to the previous menu press BACK Pressing or holding the following buttons allows you to Press Pause resume playback Press Select track Hold Reverse fast forward track Selecting the playback modes 1 2 When connected with the interface adapter Preparation Make sure CH IPOD is selected in the SRC SELECT EXT IN setting see page 25 1 Select IPOD Playback starts automat...

Страница 19: ...the control panel Preparation Make sure AUX ON is selected in the SRC SELECT AUX IN setting see page 25 1 Select EXT INPUT or AUX IN 2 Turn on the connected component and start playing the source 3 Adjust the volume 4 Adjust the sound as you want see pages 20 and 21 Connecting an external component to the AUX input jack Pressing or holding the following buttons allows you to Pause resume playback ...

Страница 20: ... 12 5 kHz 15 0 kHz 17 5 kHz Level 06 to 06 06 to 06 06 to 06 Q Q1 0 Q1 25 Q1 5 Q2 0 Q0 75 Q1 0 Q1 25 Fix Storing your own sound mode You can store your own adjustments in memory 1 Select USER 2 While USER is shown on the display 3 Select a tone You can select a preset sound mode suitable to the music genre See also page 23 Selecting from Menu See the following for USER settings Selecting a preset ...

Страница 21: ...LE TREBLE LOUD loudness Freq Level Q Freq Level Q Freq Level Q USER 60 Hz 00 Q1 25 1 0 kHz 00 Q1 0 10 0 kHz 00 OFF ROCK 100 Hz 03 Q1 0 1 0 kHz 00 Q1 25 10 0 kHz 02 CLASSIC 80 Hz 01 Q1 25 1 0 kHz 00 Q1 25 10 0 kHz 03 POPS 100 Hz 02 Q1 25 1 0 kHz 01 Q1 25 10 0 kHz 02 HIP HOP 60 Hz 04 Q1 0 1 0 kHz 02 Q1 0 10 0 kHz 01 JAZZ 80 Hz 03 Q1 25 1 0 kHz 00 Q1 25 10 0 kHz 03 Freq Frequency Q Q slope You can as...

Страница 22: ...nging and displaying RCV MESSAGE receiving message The display illuminate in blue see RING COLOR on page 24 MANUAL The unit does not inform you of the arrival of a message MIC SETTING microphone setting Only for the device being connected for BT PHONE Adjust the volume of the microphone connected to the Bluetooth adapter LEVEL 01 02 03 VERSION The Bluetooth software and hardware versions are shown...

Страница 23: ...l 1 00 EQ EQ Equalizer Select a preset sound mode suitable to the music genre USER ROCK CLASSIC POPS HIP HOP JAZZ DISPLAY DIMMER Dimmer DIMMER AUTO DIMMER ON DIMMER OFF Dims the display when you turn on the headlights 2 Dims the display and button illumination Cancels SCROLL 3 Scroll SCROLL ONCE SCROLL AUTO SCROLL OFF Scrolls the displayed information once Repeats scrolling at 5 second intervals C...

Страница 24: ...lor ON OFF Changes the display and button except EQ 0 illumination during menu list search and playback mode operations Cancels RING COLOR RING COLOR 5 Ring color ON OFF When a call comes in the display will flash in blue The display will change to the original color when you answer the call or the incoming call stops When the unit receive a text message the display only illuminate in blue Cancels...

Страница 25: ... 00 SUB W 08 Adjust the subwoofer output level Initial SUB W 04 BEEP Key touch tone BEEP ON BEEP OFF Activates the key touch tone Deactivates the key touch tone AMP GAIN 9 Amplifier gain control LOW POWER HIGH POWER VOLUME 00 VOLUME 30 Select if the maximum power of each speaker is less than 50 W to prevent damaging the speaker VOLUME 00 VOLUME 50 SRC SELECT AM 10 AM station AM ON AM OFF Enable AM...

Страница 26: ...med To dim the display see DIMMER on page 23 1 Select USER Color settings Turn Press Turn Press Turn Press Category Menu items Selectable settings reference page AUDIOBOOKS AUDIOBOOKS 14 Speed control of Audiobooks NORMAL FASTER SLOWER You can select the playback speed of the Audiobook sound file in your iPod Initial selected item depends on your iPod setting IPOD SWITCH IPOD SWITCH 15 iPod iPhone...

Страница 27: ... operations Storing stations in memory During SSM search All previously stored stations are erased and the stations are stored anew When SSM is over the station stored in the lowest preset number will be automatically tuned in When storing a station manually the previously preset station is erased when a new station is stored in the same preset number Disc operations Caution for DualDisc playback ...

Страница 28: ...C3 etc The search function works but search speed is not constant Playing a CD R or CD RW Use only finalized CD Rs or CD RWs This unit can only play back files of the same type as those detected first if a disc includes both audio CD CD DA files and MP3 WMA files This unit can play back multi session discs however unclosed sessions will be skipped while playing Some CD Rs or CD RWs may not play ba...

Страница 29: ...his unit does not support SD card reader This unit cannot recognize a USB device whose rating is other than 5 V and exceeds 500 mA USB devices equipped with special functions such as data security functions cannot be used with the unit Do not use a USB device with 2 or more partitions This unit may not recognized a USB device connected through a USB card reader This unit may not play back files in...

Страница 30: ... the volume level to VOLUME 30 JVC bears no responsibility for any loss of data in an iPod iPhone and or USB mass storage class device while using this System LOADING The unit is updating the phone book PLEASE WAIT The unit is preparing to use the Bluetooth function If the message does not disappear turn off and turn on the unit then connect the device again or reset the unit RESET 8 Check the con...

Страница 31: ...t be played back Insert the disc correctly CD R CD RW cannot be played back Tracks on the CD R CD RW cannot be skipped Insert a finalized CD R CD RW Finalize the CD R CD RW with the component which you used for recording Disc can neither be played back nor ejected Unlock the disc see page 9 Eject the disc forcibly see page 3 Disc sound is sometimes interrupted Stop playback while driving on rough ...

Страница 32: ...e power then on again Do not pull out or connect the USB device repeatedly while READING is displayed on the display NO FILE appears on the display Check whether the selected folder the connected USB device or the iPod iPhone contains a playable file Tracks folders are not played back in the order you have intended The playback order is determined by the file name Folders with numbers on the initi...

Страница 33: ...or Reduce the distance between the unit and the Bluetooth cellular phone Move the car to a place where you can get a better signal reception The sound is interrupted or skipped during playback of a Bluetooth audio player Reduce the distance between the unit and the Bluetooth audio player Disconnect the device connected for BT PHONE Turn off then turn on the unit Connect the player again when the s...

Страница 34: ...ge the battery No sound can be heard when connecting an iPod nano Disconnect the headphones from the iPod nano Update the firmware version of the iPod nano RESET 1 RESET 7 appears on the display Disconnect the adapter from both this unit and iPod Then connect it again RESET 8 appears on the display Check the connection between the adapter and this unit Microsoft and Windows Media are either regist...

Страница 35: ...he disc by the edges Do not touch its recording surface When storing a disc in its case gently insert the disc around the center holder with the printed surface facing up Make sure to store discs in cases after use Connectors Center holder To keep discs clean A dirty disc may not play correctly If a disc does become dirty wipe it with a soft cloth in a straight line from center to edge Do not use ...

Страница 36: ...kHz 17 5 kHz Q Fixed Frequency Response 40 Hz to 20 000 Hz Signal to Noise Ratio 70 dB Line Out Level Impedance 2 5 V 20 kΩ load full scale Subwoofer Out Level Impedance 2 5 V 20 kΩ load full scale Output Impedance 1 kΩ Other Terminal USB input jack AUX auxiliary input jack CD changer jack TUNER SECTION Frequency Range FM 87 5 MHz to 108 0 MHz AM 531 kHz to 1 602 kHz FM Tuner Usable Sensitivity 9 ...

Страница 37: ...Audio Decoding Format Max Bit Rate 320 kbps USB SECTION USB Standard USB 1 1 USB 2 0 Data Transfer Rate Full Speed Max 12 Mbps Compatible Device Mass storage class CompatibleFileSystem FAT 32 16 12 PlayableAudioFormat MP3 WMA Max Current DC 5 V 500 mA GENERAL Power Requirement Operating Voltage DC 14 4 V 11 V to 16 V allowance Grounding System Negative ground Allowable Operating Temperature 0 C to...

Страница 38: ...Having TROUBLE with operation Please reset your unit Refer to page of How to reset your unit ...

Страница 39: ...er installation Notes Replace the fuse with one of the specified rating If the fuse blows frequently consult your JVC car audio dealer It is recommended to connect speakers with a maximum power of more than 50 W both at the rear and at the front with an impedance of 4 Ω to 8 Ω If the maximum power is less than 50 W change AMP GAIN setting to prevent the speakers from being damaged see page 25 of t...

Страница 40: ...nd install the unit in its place µ Õ Ë ß Ëπ π πµÏ µ µÈ ÀÈ Õ ÿµ πµÏÕÕ ËÕπ ô ßµ µíôß ËÕßπ ô ô π Ë 1 When you stand the unit be careful not to damage the fuse on the rear 2 Not supplied for this unit µ µ Èß ª Õ ºßÀπÈ ªí Ï È æµ Õ Ë ßµËÕ ªπ È ß ß µ µ Èß Ë ª À ÿ ªí À À ÕµÈÕß ÈÕ Ÿ Ë ÿ µ µ Èß ÿ ª ºŸÈ ËÕß ß πµÏ JVC Õß Ë πÀ Õ ÿ ª Õ È ÿ Ë πË Ë µ µ Èß ÿ ª Õ π È Ÿ µÈÕßÀ Õ Ë ÀÈÀ Ë ßºŸÈ Ë ªìπºŸÈµ µ Èß Õ ÿ ª Õ ËÕ...

Страница 41: ...y bypassing the ignition switch constant 12 V µËÕ È Ë øøÈ π ºßøî Ï ËßµËÕ µ µÕ Ë πµ ˵ÈÕß È Ï ÿ 12 Ï ß Ë To an accessory terminal in the fuse block µËÕ È Ë πª Õ π ºßøî Black Red ß Yellow 2 À Õß 2 Ignition switch Ï ÿ Fuse block ºßøî Purple Ë ß Purple with black stripe Ë ß Green Green with black stripe Gray Gray with black stripe White White with black stripe Right speaker rear æß À ß Left speaker re...

Страница 42: ...rnal components refer also to the manuals supplied for the components and adapters CAUTION Before connecting the external components make sure that the unit is turned off You can connect the following JVC components to the CD changer jack JVC component Model name CD changer CD CH CH X1500 etc You can also connect the following components through the various JVC adapters Connection cords may need t...

Отзывы: