4
CAUTION
•Turn off all the epuipment including the TV before
connecting anything.
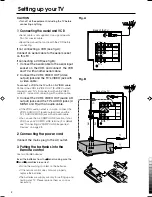
1 Connecting the aerial and VCR
•Aerial cable is not supplied. Use a good quality
75-ohm coaxial cable.
•Read the manual that came with the VCR before
connecting.
If not connecting a VCR (see fig.A) :
Connect an aerial cable to the aerial socket
on this TV .
If connecting a VCR (see fig.B) :
1 Connect the aerial cable to the aerial input
socket on the VCR, and connect the VCR
and TV with another aerial cable.
2 Connect the VCR's VIDEO OUT (video
output) jack and the TV's VIDEO jack with
a video cable.
To connect a VCR to the TV with an S-VIDEO cable:
Connect the VCR's S-VIDEO OUT (S-VIDEO output)
connector and TV's S connector with an S-VIDEO
cable
A
, instead of connecting with a video cable.
3 Connect the VCR's VIDEO OUT (audio L/R
output) jacks and the TV's AUDIO jacks (L/
MONO and R) with an audio cable.
•If the VCR's audio output is in mono, connect the
VCR's AUDIO OUT (audio output) jack and the
TV's AUDIO L/MONO jack with an audio cable.
•You can use the AV COMPU LINK function if your
VCR has an AV COMPU LINK terminal. For details,
see “Connecting AV COMPU LINK Supported
Devices” on page 29.
2 Connecting the power cord
Connect the mains plug to the AC outlet.
3 Putting the batteries into the
Remote control
Use two AA/R6 batteries.
Insert the batteries from the end, making sure the
and polaritiles are correct.
•Follow the warnings printed on the batteries.
•If the remote control does not work properly,
replace the batteries.
•The batteries we supply are only for setting up and
testing your TV. Please replace them as soon as
necessary.
Setting up your TV
Fig.A
R
R
L
L/MONO
AUDIO
AUDIO
L/MONO
R
AUDIO
C
R
C
Y/VIDEO
B
VIDEO
VIDEO-2
VIDEO
OVER
S
VIDEO-3/
COMPONENT
VIDEO-1
OUTPUT
AV COMPU LINK
Back of the TV
Fig.B
Back of the TV
R
R
L
L/MONO
AUDIO
AUDIO
L/MONO
R
AUDIO
C
R
C
Y/VIDEO
B
VIDEO
VIDEO-2
VIDEO
OVER
S
VIDEO-3/
COMPONENT
VIDEO-1
OUTPUT
AV COMPU LINK
A
LCT1078-001A_p01-15
11/2/01, 2:11 PM
4
Black


