


February 3, 2003 7:03 pm
Page 4
— 4 —
Master Page: Right
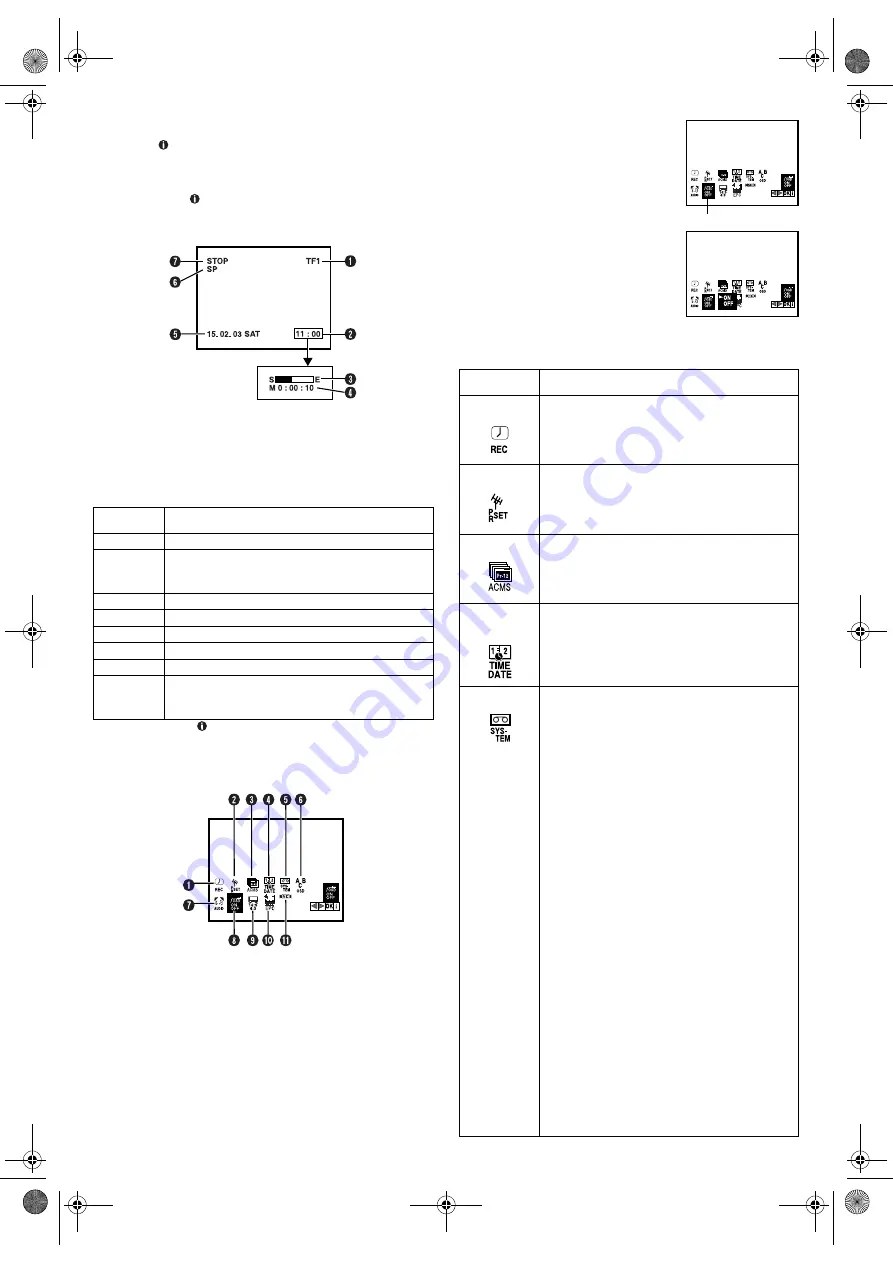
On-screen display
If you press
(
OK
) on the remote control when “OSD” is set to
“ON” (
墌
5), you can see the current recorder status on the
screen. The indications except the clock or time counter
disappears in about 5 seconds. To clear the on-screen display
completely, press
(
OK
) again.
The indications are not recorded even if the recorder is in the
recording mode.
A
Channel and auxiliary input
B
Clock*
C
Tape position*
D
Time counter*
E
Current day/month/year
F
Tape speed
G
Recorder operation mode
* Each time you press (
OK
), the display shows clock or tape position
and time counter alternatively.
Main Menu
You can perform various operations or change various mode
settings on the Main Menu Screen.
●
Turn on the recorder and the TV, and set your TV to its AV
mode or video channel.
●
The procedure shows how to set “OSD” to “ON”.
A
Access Main Menu screen
Press
MENU
. Press
w
e
to select the icon
“OSD”, then press
OK
.
●
If you select the icon
A
to
D
, follow the
each setting procedure.
●
If you select the icon
E
to
K
, go to
step
2
.
B
Change setting
Press
rt
to set to “ON”, then press
w
or
e
.
C
Return to normal screen
Press
MENU
.
*The default setting is
bold
in the following table.
On-screen
display
Description
PLAY
appears when you playback.
REW
appears during rewinding, or blinks during
rewinding with Rewind Power Off function.
(
墌
10)
FF
appears during fast-forwarding.
EJECT
appears when you eject the cassette.
STOP
appears when you stop playback or recording.
RECORD
appears during recording.
RECP
appears in the record pause mode.
SAFE
appears when the recorder enters in child lock
mode, or any buttons on the recorder are pressed
during child lock mode. (
墌
15)
Icon
Description
A
REC
Select this icon to timer-record the programme.
(
墌
12)
B
PR SET
Select this icon to perform Manual Channel Set.
(
墌
8, 9)
C
ACMS
Select this icon to perform Auto Channel Set.
(
墌
7) Auto Channel Set automatically assigns
all receivable stations in your area.
D
TIME
DATE
Select this icon to set clock. (
墌
7)
E
SYSTEM
AUTO
/ PAL / MESECAM
You can play back PAL, NTSC and MESECAM
tapes, or record PAL and SECAM* signals on
this recorder. Select the appropriate colour
system.
* SECAM signals will be recorded as MESECAM on
this recorder; MESECAM is the designation for tapes
with SECAM signals that have been recorded on a
MESECAM-compatible PAL video cassette recorder.
AUTO
: Normally select this. The appropriate
colour system is selected automatically
depending on the playback or recording signals.
If “AUTO” does not work correctly, set the
following mode manually.
PAL
: To record PAL signals, or playback a PAL.
MESECAM
: To record SECAM signals, or play
back a MESECAM tape.
NOTES:
About NTSC Playback
●
Some TVs shrink the picture vertically and
place black bars at the top and bottom of the
screen, or cut off the top and bottom portions
of superimposed displays. This is not a
malfunction.
●
The picture may roll up and down. This can
be corrected if your TV has the V-HOLD
control function.
●
The counter and tape remaining time readings
will be incorrect.
●
During search, still, or frame-by-frame
playback, the picture will be distorted, and
there may be a loss of colour.
OSD
HR-V500_200E-001EN.fm Page 4 Monday, February 3, 2003 7:04 PM


