12
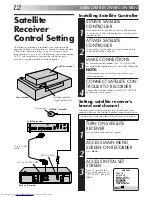
Installing Satellite Controller
SITUATE SATELLITE
CONTROLLER
1
Place the Satellite Controller so that the path between
its transmitter and the satellite receiver’s remote sensor
is unobstructed.
ATTACH SATELLITE
CONTROLLER
2
Fix securely using the adhesive strip attached on the
back of the Satellite Controller.
MAKE CONNECTIONS
3
Be sure to connect the recorder’s AV2 (L-2) IN/DECODER
connector to the satellite receiver’s 21-pin SCART connector.
NOTE:
When connecting your satellite receiver, refer to its
instruction manual.
CONNECT SATELLITE CON-
TROLLER TO RECORDER
4
Connect the Satellite Controller to the SAT CONTROL
connector on the rear panel.
Satellite
Receiver
Control Setting
The following procedure is required if you receive satellite
channels through a satellite receiver. Around 20 seconds before
VIDEO Plus+ timer recording (
Z
pg. 18) or Express timer
programming (
Z
pg. 20) starts, the recorder sets its input mode
to "L-2" and automatically switches the satellite receiver’s
channels using the provided Satellite Controller.
Your recorder
Back of Recorder
Satellite receiver
Satellite Controller
Satellite receiver
Satellite Controller
(suggested locations)
Transmitter
AV2 (L-2) IN/DECODER
SATELLITE RECEIVER CONTROL
TURN ON SATELLITE
RECEIVER
1
Turn on the satellite receiver’s power.
ACCESS MAIN MENU
SCREEN ON RECORDER
2
Press
MENU
.
ACCESS INITIAL SET
SCREEN
3
Press
%fi
to move the
highlight bar (pointer) to
“INITIAL SET”, then press
OK
or
#
.
MAIN MENU
MODE SET
AUTO CH SET
MANUAL CH SET
OUTPUT/INPUT SET
INITIAL SET
REC LEVEL CTL
T
VIDEO NAVIGATION
[
5∞
]
=
[MENU] : EXIT
Setting satellite receiver's
brand and channel
After installation, set the satellite receiver’s brand and channel
correctly; otherwise, the Satellite Controller cannot work correctly.
Turn on the TV and select the VIDEO channel (or AV mode).
SAT CONTROL
21-pin SCART
cable


