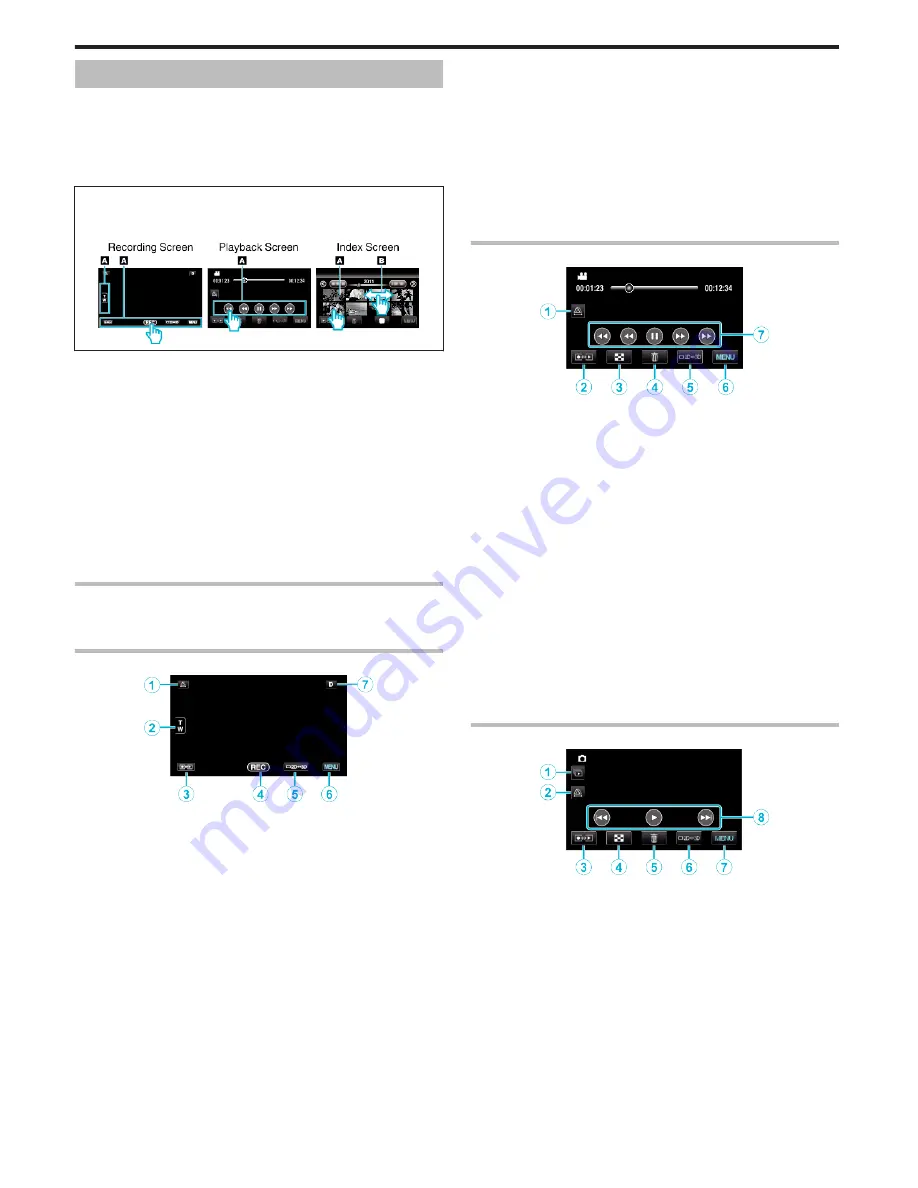
Using the Touch Screen
Icon operation buttons, thumbnails, and menu items are displayed on the
touch screen according to the mode in use.
0
To operate, tap the icon operation buttons, thumbnails, or menu items on
the touch screen lightly.
0
There are two ways to operate the touch screen, namely “tap” and “drag”.
The following are some examples.
0
A
Tap the displayed button (icon) or thumbnail (file) on the touch screen
to make selection.
0
B
Drag the thumbnails on the touch screen to search for the desired file.
.
0
The touch screen of this unit is pressure-sensitive. When the touch screen
does not respond smoothly, apply slightly more force to your fingertip.
0
Do not press or rub with excessive force.
0
If you apply a protect sheet or a sticker, the touch screen may not respond
smoothly.
0
Do not operate the touch screen using an object with a sharp or hard tip.
0
Pressing two or more places at a time may cause a malfunction.
0
Tap the buttons (icons) on the touch screen accurately. The buttons may
not respond if they are not tapped on the right area.
0
Perform “TOUCH SCREEN ADJUST” if the reactive area of the screen is
misaligned with the touched area. (Adjust by lightly tapping with a corner
of an SD card, etc. Do not press with an object with a sharp tip or do not
press hard.)
“TOUCH SCREEN ADJUST” (
A
p. 126)
Names of Buttons and Functions on the LCD Monitor
The following screens are displayed during the video and still image modes,
and operate as the touch screens.
Recording Screen (Video/Still Image)
.
1
Parallax Adjustment Button
0
Adjusts the 3D effect when 3D images are displayed on the LCD
monitor.
“Adjusting Parallax During Recording” (
A
p. 34)
2
Zoom Button
“Zooming” (
A
p. 31)
3
Recording/Playback Mode Button
0
Switches between recording and playback modes.
4
Recording Start/Stop Button
0
g
: Video Recording Start Button
0
a
: Video Recording Stop Button
0
Q
: Still Image Recording Button
5
LCD Monitor 3D/2D Display Switching Button
0
Switches the display on the LCD monitor between 3D and 2D. The
image will be recorded in 3D even if the display on the LCD monitor
is set to 2D.
6
Menu Button
“Operating the Menu” (
A
p. 99)
7
Display Button
Some displays disappear after approximately 3 seconds.
Use the
n
button to change the displays as shown below.
0
Tap
n
button
Displays appear for approximately 3 seconds with every tap.
0
Tap and hold
n
button
Displays are fixed such that they do not disappear. After setting, the
display button changes from
n
to
m
.
Tap
m
to release the displays.
Playback Screen (Video)
.
1
Parallax Adjustment Button
0
Adjusts the 3D effect when 3D images are displayed on the LCD
monitor.
“Adjusting Parallax During Playback” (
A
p. 56)
2
Recording/Playback Mode Button
0
Switches between recording and playback modes.
3
Index Screen Button
“Operation Buttons for Video Playback” (
A
p. 53)
4
Delete Button
“Deleting the Currently Displayed File” (
A
p. 65)
5
LCD Monitor 3D/2D Display Switching Button
0
Switches the display on the LCD monitor between 3D and 2D.
6
Menu Button
“Operating the Menu” (
A
p. 99)
7
Operation Buttons
“Operation Buttons for Video Playback” (
A
p. 53)
Playback Screen (Still Image)
.
1
Group Playback Button
0
Continuous playback of grouped files (such as still images captured
by continuous shooting).
“Playing Back Still Images” (
A
p. 55)
2
Parallax Adjustment Button
0
Adjusts the 3D effect when 3D images are displayed on the LCD
monitor.
“Adjusting Parallax During Playback” (
A
p. 56)
3
Recording/Playback Mode Button
0
Switches between recording and playback modes.
4
Index Screen Button
“Operation Buttons for Still Image Playback” (
A
p. 55)
5
Delete Button
Getting Started
18
Содержание GS-TD1BUS
Страница 1: ...HD MEMORY CAMERA LYT2327 002A Detailed User Guide GS TD1 ...
Страница 146: ......


