background image

15

ENGLISH

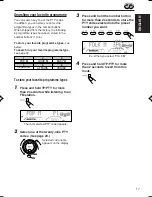
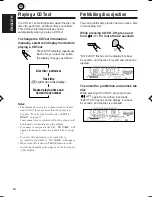
1

Press and hold SEL (select) for more
than 2 seconds so that one of the
PSM items appears on the display.
(PSM: see pages 34 and 35.)

2

Select “AF-REG” (alternative
frequency/regionalization reception)
if not shown on the display.

3

Select the desired mode—“AF ON,”
“AF REG,” or “AF OFF.”

4

Finish the setting.

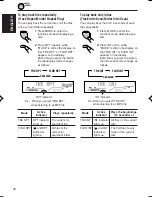
Using TA Standby Reception

TA Standby Reception allows the unit to switch
temporarily to Traffic Announcement (TA) from
the current source (another FM station, CD, or
other connected components).

• TA Standby Reception will not work if you are

listening to an AM station.

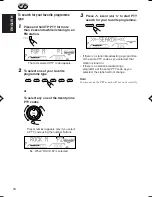
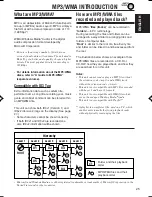
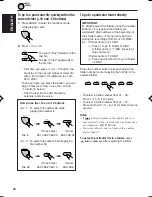
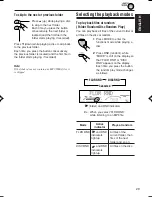
Press TP/PTY to activate TA Standby Reception.

7

When the current source is FM,

 the TP

indicator either lights up or flashes.
• If the TP indicator lights up, TA Standby

Reception is activated.
If a station starts broadcasting a traffic
announcement, “TRAFFIC” appears on the
display, and this unit automatically tunes in to
the station. The volume changes to the
preset TA volume level (see page 19) and the
traffic announcement can be heard.

• If the TP indicator flashes, TA Standby

Reception is not yet activated since the
station being received does not provide the
signals used for TA Standby Reception.
To activate TA Standby Reception, you need
to tune in to another station providing these
signals. Press 


¢

 or 

4


 to search

for such a station.
When a station providing these signals is
tuned in, the TP indicator stops flashing and
remains lit. Now TA Standby Reception is
activated.

7

When the current source is other than FM,

the TP indicator lights up.
If a station starts broadcasting a traffic
announcement, “TRAFFIC” appears on the
display, and this unit automatically changes the
source and tunes in to the station.

To deactivate the TA Standby Reception,

press TP/PTY again. The TP indicator
disappears.

EN14-20_KD-G807[EE]f.p65

1/15/04, 2:09 PM

15

Содержание GET0199-001A

Страница 1: ...INSTRUCTIONS BEDIENUNGSANLEITUNG MANUEL D INSTRUCTIONS GEBRUIKSAANWIJZING This unit is equipped with the display demonstration To cancel it see page 8 Dieses Gerät ist mit einer Demonstrationsfunktion für das Display ausgestattet Auf Seite 8 wird beschrieben wie Sie diese Demonstrationsfunktion deaktivieren können Cet appareil est équipé d une fonction de démonstration des affichages Pour l annule...

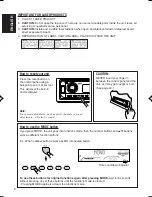
Страница 2: ...mode is cleared Pressing MODE again also clears the functions mode Time countdown indicator CAUTION NEVER insert your finger in between the control panel and the unit as it may get caught or hurt See page 40 IMPORTANT FOR LASER PRODUCTS 1 CLASS 1 LASER PRODUCT 2 CAUTION Do not open the top cover There are no user serviceable parts inside the unit leave all servicing to qualified service personnel ...

Страница 3: ...rticular portion on a disc 27 Selecting the playback modes 29 CONTENTS Temperature inside the car If you have parked the car for a long time in hot or cold weather wait until the temperature in the car becomes normal before operating the unit BEFORE USE For safety Do not raise the volume level too much as this will block outside sounds making driving dangerous Stop the car before performing any co...

Страница 4: ...T repeat TRACK indicator Source clock display P LOUD loudness indicator Q Audio level indicator Volume level indicator Control panel 1 Remote sensor 2 standby on attenuator button 3 DISP display button 4 SEL select button 5 Control dial 6 Display window 7 TP PTY traffic programme programme type button 8 0 eject button angle button 9 5 up button 10 button p MODE button q For KD G801 CD CD CH CD cha...

Страница 5: ...while listening to the radio Selects services while listening to the DAB tuner if pressed briefly Searches for ensembles while listening to the DAB tuner if pressed and held Fast forwards or reverses the track file if pressed and held while listening to a disc Skips to the beginning of the next track file or goes back to the beginning of the current or previous tracks files if pressed briefly whil...

Страница 6: ...n a place where children cannot reach If a child accidentally swallows the battery consult a doctor immediately Do not recharge short disassemble or heat the battery or dispose of it in a fire Doing any of these things may cause the battery to give off heat crack or start a fire Do not leave the battery with other metallic materials Doing this may cause the battery to give off heat crack or start ...

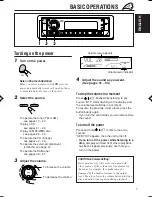
Страница 7: ...ume level is adjusted for the tuner for example the speakers may be damaged by the sudden increase in the output level Therefore lower the volume before playing a disc and adjust it as required during playback Turning on the power 1 Turn on the power Note on One Touch Operation When you select a source in step 2 below the power automatically comes on You do not have to press this button to turn on...

Страница 8: ...stration before you use the unit for the first time To cancel the display demonstration follow the procedure below 1 Press and hold SEL select for more than 2 seconds so that one of the PSM items appears on the display PSM see pages 34 and 35 2 Select DEMO MODE if not shown on the display 3 Select DEMO OFF 4 Finish the setting To activate the display demonstration repeat the same procedure and sel...

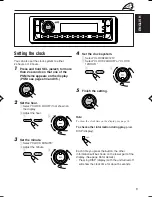
Страница 9: ...he lower part of the display See page 36 for details Pressing DISP display with the unit turned off will show the clock time for about 5 seconds Setting the clock You can also set the clock system to either 24 hours or 12 hours 1 Press and hold SEL select for more than 2 seconds so that one of the PSM items appears on the display PSM see pages 34 and 35 2 Set the hour 1 Select CLOCK HOUR if not sh...

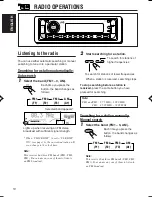
Страница 10: ...d appears Lights up when receiving an FM stereo broadcast with sufficient signal strength 2 Start searching for a station When a station is received searching stops To stop searching before a station is received press the same button you have pressed for searching Searching for a station manually Manual search 1 Select the band FM1 3 AM Each time you press the button the band changes as follows No...

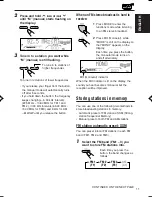
Страница 11: ...aural while MODE is still on the display so that MONO appears on the display Each time you press the button the monaural mode turns on and off alternately When the MO indicator is lit on the display the sound you hear becomes monaural but the reception will be improved Storing stations in memory You can use one of the following two methods to store broadcasting stations in memory Automatic preset ...

Страница 12: ...higher frequencies To tune in to stations of lower frequencies 2 Press MODE to enter the functions mode 3 Press and hold SSM for about 2 seconds Local FM stations with the strongest signals are searched and stored automatically in the band number you have selected FM1 FM2 or FM3 These stations are preset in the number buttons No 1 lowest frequency to No 6 highest frequency When automatic preset is...

Страница 13: ... next or previous preset stations Each time you press the 5 up or down button the next or previous preset station is tuned in 3 Press and hold the number button in this example 1 for more than 2 seconds 4 Repeat the above procedure to store other stations into other preset numbers Notes A previously preset station is erased when a new station is stored in the same preset number Preset stations are...

Страница 14: ...o make Network Tracking Reception work correctly PI Programme Identification and AF Alternative Frequency Without receiving these data correctly from the RDS station you are listening to Network Tracking Reception will not operate To use Network Tracking Reception You can select the different modes of network tracking reception to continue listening to the same programme in its finest reception Wh...

Страница 15: ...roadcasting a traffic announcement TRAFFIC appears on the display and this unit automatically tunes in to the station The volume changes to the preset TA volume level see page 19 and the traffic announcement can be heard If the TP indicator flashes TA Standby Reception is not yet activated since the station being received does not provide the signals used for TA Standby Reception To activate TA St...

Страница 16: ...en the current source is FM the PTY indicator either lights up or flashes If the PTY indicator lights up PTY Standby Reception is activated If a station starts broadcasting the selected PTY programme this unit automatically tunes in to the station If the PTY indicator flashes PTY Standby Reception is not yet activated since the station being received does not provide the signals used for PTY Stand...

Страница 17: ...programme type see page 18 To store your favorite programme types 1 Press and hold TP PTY for more than 2 seconds while listening to an FM station 2 Select one of the twenty nine PTY codes See page 20 Selected code name appears on the display 3 Press and hold the number button for more than 2 seconds to store the PTY code selected into the preset number you want 4 Press and hold TP PTY for more th...

Страница 18: ...u selected the station will not change Note In some areas the PTY search will not work correctly To search for your favorite programme type 1 Press and hold TP PTY for more than 2 seconds while listening to an FM station 2 To select one of your favorite programme type or To select any one of the twenty nine PTY codes Ex When ROCK M is selected The last selected PTY code appears Preset number appea...

Страница 19: ... the same procedure and select ADJUST ON in step 3 by turning the control dial clockwise Note You must stay tuned to the same station for more than 2 minutes after setting AUTO ADJUST to ADJUST ON Otherwise the clock time will not be adjusted This is because the unit takes up to 2 minutes to capture the CT data in the RDS signal Other convenient RDS functions and adjustments Automatic selection of...

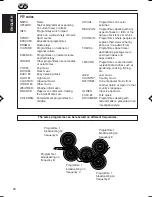
Страница 20: ...N Programmes dealing with any aspect of belief or faith or the nature of existence or ethics PHONE IN Programmes where people can express their views either by phone or in a public forum TRAVEL Programmes about travel destinations package tours and travel ideas and opportunities LEISURE Programmes concerned with recreational activities such as gardening cooking fishing etc JAZZ Jazz music COUNTRY ...

Страница 21: ...repeatedly until you stop playback The display changes to show the following When CLOCK DISP is set to CLK DISP ON see page 36 the current indication will soon change to the clock time Notes When a CD is inserted upside down the control panel moves down the CD automatically ejects from the loading slot The source changes to the previously selected source If there is no CD in the loading slot you c...

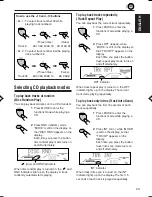
Страница 22: ... beginning of the previous tracks is located and played back To skip 10 tracks forwards to the last track To skip 10 tracks backwards to the first track To stop play and eject the CD Press 0 CD play stops and the control panel moves down The CD automatically ejects from the loading slot If you change the source or turn the power off CD play also stops without ejecting the CD Next time you select C...

Страница 23: ... repeatedly 1 Press MODE to enter the functions mode while playing a CD 2 Press RPT repeat while MODE is still on the display so that TRK RPT appears on the display Each time you press the button track repeat play mode turns on and off alternately When track repeat play is turned on the RPT indicator lights up on the display The current track starts playing repeatedly To play back only intros Trac...

Страница 24: ...en you play a CD Text To change the CD Text information manually select text display mode while playing a CD Text Press DISP display repeatedly Each time you press the button the display changes as follows Notes The display shows up to 12 characters at one time and scrolls if there are more than 12 characters See also To select the scroll mode SCROLL MODE on page 37 Some characters or symbols will...

Страница 25: ...MA files tracks can be recorded in folders in PC terminology During recording the files and folders can be arranged in a way similar to arranging files and folders of computer data Root is similar to the root of a tree Every file and folder can be linked to and be accessed from the root The illustration below shows an example of how MP3 WMA files are recorded on a CD R or CD RW how they are played...

Страница 26: ...SP is set to CLK DISP ON see page 36 the current indication will soon change to the clock time 2 WMA or MP3 indicator lights up depending on the first detected file Notes MP3 WMA discs require a longer readout time It differs due to the complexity of the folder file configuration When playback starts folder and file names or ID3 tags will automatically appear See also page 27 If you change the sou...

Страница 27: ... and scrolls if there are more than 12 characters See also To select the scroll mode SCROLL MODE on page 37 When file name is shown TRACK indicator and current file number also appear on the lower part of the display Locating a file or a particular portion on a disc To fast forward or reverse the file Note During this operation you can only hear intermittent sounds The elapsed playing time also ch...

Страница 28: ...splay after you have selected a folder it means that the folder does not contain any MP3 WMA files You cannot directly select a folder with a number greater than 12 To select a particular file in a folder press or 4 after selecting the folder To go to a particular file quickly within the current folder 10 and 10 buttons 1 Press MODE to enter the functions mode while playing a disc 2 Press 10 or 10...

Страница 29: ...g the playback modes To play back files at random Folder Random Disc Random Play You can play back all files of the current folder or all files on the disc at random 1 Press MODE to enter the functions mode while playing a disc 2 Press RND random while MODE is still on the display so that FLDR RND or DISC RND appears on the display Each time you press the button the random play mode changes as fol...

Страница 30: ... up disc Ex When you select TRK INT while listening to an MP3 file To play back files repeatedly Track Repeat Folder Repeat Play You can play back the current file or all the files in the current folder repeatedly 1 Press MODE to enter the functions mode while playing a disc 2 Press RPT repeat while MODE is still on the display so that TRK RPT or FLDR RPT appears on the display Each time you press...

Страница 31: ... Adjust the 00 min volume 30 or 50 max 4 To increase the level or turn on the loudness To decrease the level or turn off the loudness LOUD ON LOUD OFF 1 If you are using a two speaker system set the fader level to 00 2 This takes effect only when a subwoofer is connected 3 Normally the control dial works as the volume control So you do not have to select VOL to adjust the volume level 4 Depending ...

Страница 32: ...O POP O JAZZ O DANCE MUSIC O COUNTRY O REGGAE O CLASSIC O USER 1 O USER 2 O USER 3 O back to the beginning Ex When you select HARD ROCK To cancel the preset sound mode select FLAT in step 3 Notes You can adjust the preset sound modes temporarily However your temporary adjustments will be reset when you select another sound mode For details about the preset settings of each sound mode see table on ...

Страница 33: ...elements change as follows LOW LEVEL LOW FREQ LOW WIDTH MID LEVEL MID WIDTH HI high LEVEL HI high FREQ back to the beginning LEVEL LOW MID HI Adjust the enhancement level By pressing or 4 you can directly move as follows FREQ LOW HI Select the center frequency to adjust WIDTH LOW MID Select the band width level 5 Adjust the selected sound element Indication Preset values LOW MID HI LEVEL 06 min 06...

Страница 34: ...ds so that one of the PSM items appears on the display See below and page 35 2 Select the PSM item you want to adjust 3 Adjust the PSM item selected 4 Repeat steps 2 and 3 to adjust the other PSM items if necessary 5 Finish the setting 0 23 1 12 00 59 9 Preferred Setting Mode PSM items For detailed operations of each PSM items refer to the pages listed in the table Indications Selectable values it...

Страница 35: ... AF 3 Alternative frequency search DAB VOL 3 DAB volume adjustment LEVELMETER Level meter DIMMER MODE Dimmer mode TELEPHONE Telephone muting BEEP SWITCH Key touch tone CONTRAST Display contrast SCROLL MODE Scroll mode WOOFER FREQ 2 Subwoofer cutoff frequency EXTERNAL IN 5 External component TAG DISPLAY Tag display AMP GAIN Amplifier gain control SLOT LIGHT Slot light OFF OFF 29 programme types see...

Страница 36: ...se set the dimmer mode to DIMMER ON or DIMMER OFF To set the clock display CLOCK DISP You can set the clock to be shown on the lower part of the display when the unit is turned on When shipped from the factory the clock is set to be shown on the display CLK DISP ON Clock display is turned on CLK DISP OFF Clock display is turned off When CLK DISP OFF is selected the current source name station band...

Страница 37: ...T Adjust the display contrast 01 10 to make the display indications clear and legible When shipped from the factory the display contrast level is set at level 05 To select the scroll mode SCROLL MODE You can select the scroll mode for the disc information when the entire text cannot be shown at a time When shipped from the factory scroll mode is set to SCROLL ONCE SCROLL ONCE Scrolls only once SCR...

Страница 38: ...To use the external component as the playback source through this unit you need to select which component CD changer or external component to use When shipped from the factory CD changer is selected as the external component CHANGER To use the CD changer LINE IN To use the external component other than CD changer Note For connecting the Line Input Adapter KS U57 and the external component refer to...

Страница 39: ...s 4 Select a character About the available characters see page 52 5 Move the cursor to the next or previous character position 6 Repeat steps 3 to 5 until you finish entering the name 7 Finish the procedure while the last selected character is flashing To erase the input characters To erase all the characters at a time press and hold DISP display for more than 1 second as described in the procedur...

Страница 40: ... adjust the angle to the position you want The control panel angles changes as follows CAUTION NEVER insert your finger in between the control panel and the unit as it may get caught or hurt Note If you turn the power off the control panel automatically returns to the closed position Next time you turn on the power the control panel moves to its previous position ANGLE 01 ANGLE 02 ANGLE 03 ANGLE 0...

Страница 41: ...ors with a cotton swab or cloth moistened with alcohol being careful not to damage the connectors Detaching the control panel You can detach the control panel when leaving the car When detaching or attaching the control panel be careful not to damage the connectors on the back of the control panel and on the panel holder Detaching the control panel Before detaching the control panel be sure to tur...

Страница 42: ...owever they are not compatible with MP3 discs so you cannot play back MP3 discs You cannot use the KD MK series CD changers with this unit Before operating your CD changer Refer also to the Instructions supplied for your CD changer If no discs are in the magazine of the CD changer or the discs are inserted upside down NO DISC will appear on the display If this happens remove the magazine and set t...

Страница 43: ...ring play to skip back to the beginning of the current track file Each time you press the button consecutively the beginning of the previous tracks files is located and played back Press and hold during play to fast forward the track file Note Folder name appears on the display instead of ROOT if an MP3 disc contains a folder When the current disc is a CD Playback starts from the first track of th...

Страница 44: ...20th 30th Then each time you press the button you can skip 10 tracks files see How to use the 10 and 10 buttons below After the last track file the first track file will be selected and vice versa Note If the current playing disc is an MP3 disc files are skipped within the same folder How to use the 10 and 10 buttons Ex 1 To select track file number 32 while playing track file number 6 Ex 2 To sel...

Страница 45: ... of the next folder and so on DISC RND and RND All tracks files of the indicators current or specified light up disc MAG RND RND indicator All tracks files of the lights up inserted discs FLDR RND is only applicable for MP3 disc To play back tracks files repeatedly Track Repeat Folder Repeat Disc Repeat Play 1 Press MODE to enter the functions mode while playing a disc 2 Press RPT repeat while MOD...

Страница 46: ... MODE to enter the functions mode while playing a disc 2 Press INT intro while MODE is still on the display Each time you press the button the intro scan mode changes as follows For MP3 discs For CDs Note MP3 indicator also lights up if the current playing disc is an MP3 disc Mode Active Plays the beginnings indicator 15 seconds of TRK INT INT indicator All tracks files of the lights up current di...

Страница 47: ...efore operating the external component using the following procedure select the external input correctly See To select the external component to use EXTERNAL IN on page 38 1 Select the external component LINE IN If LINE IN does not appear on the display see page 38 and select the external input LINE IN Note on One Touch Operation When you press CD CD CH the power automatically comes on You do not ...

Страница 48: ... CAR ENTERTAINMENT dealer Refer also to the Instructions supplied for your DAB tuner What is DAB system DAB is one of the digital radio broadcasting systems available today It can deliver CD quality sound without any annoying interference and signal distortion Furthermore it can carry text pictures and data In contrast to FM broadcast where each programme is transmitted on its own frequency DAB co...

Страница 49: ...the ensemble you want is reached If you hold down the button the frequency keeps changing until you release the button 5 Press 5 up or down to select a service either primary or secondary you want to listen to To restore the FM AM tuner Press and hold FM AM DAB again Storing DAB services in memory You can preset up to 6 DAB services in each DAB band DAB1 DAB2 and DAB3 manually Before you start Pre...

Страница 50: ...he DAB services again To select the next service To select the previous service Tuning in to a preset DAB service You can easily tune in to a preset DAB service Remember that you must store services first If you have not stored them yet see Storing DAB services in memory on pages 49 and 50 Before you start Press FM AM DAB briefly if CD CD changer or external component is the current source 1 Selec...

Страница 51: ... programme among DAB services and FM RDS stations Alternative Reception The AF indicator lights up on the display see page 14 AF OFF Alternative Reception is deactivated 4 Press SEL select to finish the setting Note When Alternative Reception for DAB services is activated Network Tracking Reception for RDS stations see page 14 is also activated automatically On the other hand Network Tracking Rece...

Страница 52: ...MUSIC 04 60Hz 2 02 2 01 8kHz COUNTRY 02 60Hz 3 00 1 02 12kHz REGGAE 03 60Hz 1 02 1 02 12kHz CLASSIC 01 80Hz 1 00 1 03 10kHz USER 1 00 60Hz 1 00 1 00 8kHz USER 2 00 60Hz 1 00 1 00 8kHz USER 3 00 60Hz 1 00 1 00 8kHz ADDITIONAL INFORMATION Available characters In addition to the alphabets A Z a z you can use the following characters to assign names to CDs and CD changer only for KD G801 See page 39 T...

Страница 53: ...CH for KD G801 or CD for KD G701 press and hold SEL select for more than 2 seconds to eject the disc Causes The volume level is set to the minimum level Connections are incorrect The built in microcomputer may have functioned incorrectly due to noise etc There is something blocking the control movement Signals are too weak The aerial is not connected firmly Disc is inserted upside down CD R CD RW ...

Страница 54: ...as the extension code mp3 or wma Readout time varies due to the complexity of the folder file configuration Playback order is determined when the files are recorded This sometimes occurs during play This is caused by how the files are recorded on the disc The current folder does not contain any MP3 WMA file The current disc does not contain any MP3 WMA file This unit can only display alphabets cap...

Страница 55: ... magazine is loaded in the CD changer This unit is not connected to the CD changer correctly The built in microcomputer may function incorrectly due to noise etc Symptoms NO DISC appears on the display NO MAG appears on the display RESET 8 appears on the display RESET 1 RESET 7 appears on the display The CD changer does not work at all CD Changer About mistracking Mistracking may result from drivi...

Страница 56: ...ad their instructions or cautions carefully Use only finalized CD Rs or CD RWs Some CD Rs or CD RWs may not be played back on this unit because of their disc characteristics and for the following reasons Discs are dirty or scratched Moisture condensation on the lens inside the unit The pickup lens inside the unit is dirty CD RWs may require a longer readout time since the reflectance of CD RWs is ...

Страница 57: ...44 kHz to 279 kHz FM Tuner Usable Sensitivity 11 3 dBf 1 0 µV 75 Ω 50 dB Quieting Sensitivity 16 3 dBf 1 8 µV 75 Ω Alternate Channel Selectivity 400 kHz 65 dB Frequency Response 40 Hz to 15 000 Hz Stereo Separation 30 dB Capture Ratio 1 5 dB MW Tuner Sensitivity 20 µV Selectivity 35 dB LW Tuner Sensitivity 50 µV CD PLAYER SECTION Type Compact disc player Signal Detection System Non contact optical...

Страница 58: ...te setzen Sie Ihr Gerät zurück Siehe Seite Zurücksetzen des Geräts Vous avez des PROBLÈMES de fonctionnement Réinitialisez votre appareil Référez vous à la page intitulée Comment réinitialiser votre appareil Hebt u PROBLEMEN met de bediening Stel het apparaat terug Zie de pagina met de paragraaf Het apparaat terugstellen 2004 VICTOR COMPANY OF JAPAN LIMITED ...

Страница 59: ...s faut un convertisseur de tension que vous pouvez acheter chez un revendeur d autoradios JVC DEUTSCH Dieses Gerät ist für einen Betrieb in elektrischen Anlagen mit 12 V Gleichstrom und Erdung ausgelegt Verfügt Ihr Fahrzeug nicht über diese Anlage ist ein Spannungsinverter erforderlich der bei JVC Autoradiohändler erworben werden kann ENGLISH This unit is designed to operate on 12 V DC NEGATIVE gr...

Страница 60: ...oorkeur luidsprekers met een hoger maximaal vermogen dan 50 W zowel achter als voor met een impedantie van 4 Ω t m 8 Ω aan Indien het maximale vermogen lager dan 50 W is moet u AMP GAIN in de andere stand stellen zodat de luidsprekers niet kunnen worden beschadigd zie bladzijde 38 van de GEBRUIKSAANWIJZING Om kortsluiting te voorkomen moet u de aansluitklemmen van ONGEBRUIKTE gekleurde draden met ...

Страница 61: ...onente siehe Diagramm Nur für KD G801 Au changeur de CD tuner DAB ou à un autre appareil extérieur voir le diagramme Seulement pour le KD G801 Naar CD wisselaar DAB tuner of ander extern component zie schema Uitsluitend voor de KD G801 Typical Connections Typische Anschlüsse Raccordements typiques Normale verbindingen To steering wheel remote controller see diagram An Lenkradfernbedienung siehe Di...

Страница 62: ...t the unit is turned off Bevor Sie den CD Wechsler und oder den DAB Tuner anschließen vergewissern Sie sich daß das Gerät ausgeschaltet ist Avant de connecter le changeur CD et ou le tuner DAB s assurer que l unité est éteinte Zorg ervoor dat het apparaat is uitgeschakeld alvorens u de CD wisselaar en of DAB tuner aansluit KD G801 JVC DAB tuner DAB Tuner von JVC Tuner DAB JVC JVC DAB tuner JVC CD ...

Страница 63: ...юдения инструкции по эксплуатации данного товара проводя необходимое обслуживание включающее замену расходных материалов и или соответствующее ремонтное обеспечение в специализированном сервисном центре Дополнительные косметические материалы к данному товару поставляемые вместе с ним могут храниться в течение двух 2 лет со дня его производства Срок службы годности кроме срока хранения дополнительн...

Страница 64: ...unctions again after pressing MODE wait for 5 seconds without pressing any of these buttons until the functions mode is cleared Pressing MODE again also clears the functions mode Time countdown indicator CAUTION NEVER insert your finger in between the control panel and the unit as it may get caught or hurt See page 40 IMPORTANT FOR LASER PRODUCTS 1 CLASS 1 LASER PRODUCT 2 CAUTION Do not open the t...

Страница 65: ...6 Locating a file or a particular portion on a disc 27 Selecting the playback modes 29 CONTENTS Temperature inside the car If you have parked the car for a long time in hot or cold weather wait until the temperature in the car becomes normal before operating the unit BEFORE USE For safety Do not raise the volume level too much as this will block outside sounds making driving dangerous Stop the car...

Страница 66: ...er disc RND random INT intro RPT repeat TRACK indicator Source clock display P LOUD loudness indicator Q Audio level indicator Volume level indicator Control panel 1 Remote sensor 2 standby on attenuator button 3 DISP display button 4 SEL select button 5 Control dial 6 Display window 7 TP PTY traffic programme programme type button 8 0 eject button angle button 9 5 up button 10 button p MODE butto...

Страница 67: ...stations while listening to the radio Selects services while listening to the DAB tuner if pressed briefly Searches for ensembles while listening to the DAB tuner if pressed and held Fast forwards or reverses the track file if pressed and held while listening to a disc Skips to the beginning of the next track file or goes back to the beginning of the current or previous tracks files if pressed bri...

Страница 68: ... back side 3 Return the battery holder Insert again the battery holder by pushing it until you hear a clicking sound WARNING Store the battery in a place where children cannot reach If a child accidentally swallows the battery consult a doctor immediately Do not recharge short disassemble or heat the battery or dispose of it in a fire Doing any of these things may cause the battery to give off hea...

Страница 69: ...ompared with other sources If the volume level is adjusted for the tuner for example the speakers may be damaged by the sudden increase in the output level Therefore lower the volume before playing a disc and adjust it as required during playback Turning on the power 1 Turn on the power Note on One Touch Operation When you select a source in step 2 below the power automatically comes on You do not...

Страница 70: ...stration before you use the unit for the first time To cancel the display demonstration follow the procedure below 1 Press and hold SEL select for more than 2 seconds so that one of the PSM items appears on the display PSM see pages 34 and 35 2 Select DEMO MODE if not shown on the display 3 Select DEMO OFF 4 Finish the setting To activate the display demonstration repeat the same procedure and sel...

Страница 71: ...he lower part of the display See page 36 for details Pressing DISP display with the unit turned off will show the clock time for about 5 seconds Setting the clock You can also set the clock system to either 24 hours or 12 hours 1 Press and hold SEL select for more than 2 seconds so that one of the PSM items appears on the display PSM see pages 34 and 35 2 Set the hour 1 Select CLOCK HOUR if not sh...

Страница 72: ...ng for a station When a station is received searching stops To stop searching before a station is received press the same button you have pressed for searching Note FM1 and FM2 87 5 MHz 108 0 MHz FM3 65 00 MHz 74 00 MHz Searching for a station manually Manual search 1 Select the band FM1 3 AM Each time you press the button the band changes as follows Note This receiver has three FM bands FM1 FM2 F...

Страница 73: ...le listening to an FM stereo broadcast 2 Press MO monaural while MODE is still on the display so that MONO appears on the display Each time you press the button the monaural mode turns on and off alternately When the MO indicator is lit on the display the sound you hear becomes monaural but the reception will be improved Storing stations in memory You can use one of the following two methods to st...

Страница 74: ... stations of higher frequencies To tune in to stations of lower frequencies 2 Press MODE to enter the functions mode 3 Press and hold SSM for about 2 seconds Local FM stations with the strongest signals are searched and stored automatically in the band number you have selected FM1 FM2 or FM3 These stations are preset in the number buttons No 1 lowest frequency to No 6 highest frequency When automa...

Страница 75: ...for the preset station you want 3 Press and hold the number button in this example 1 for more than 2 seconds 4 Repeat the above procedure to store other stations into other preset numbers Notes A previously preset station is erased when a new station is stored in the same preset number Preset stations are erased when the power supply to the memory circuit is interrupted for example during battery ...

Страница 76: ...re used to make Network Tracking Reception work correctly PI Programme Identification and AF Alternative Frequency Without receiving these data correctly from the RDS station you are listening to Network Tracking Reception will not operate To use Network Tracking Reception You can select the different modes of network tracking reception to continue listening to the same programme in its finest rec...

Страница 77: ...roadcasting a traffic announcement TRAFFIC appears on the display and this unit automatically tunes in to the station The volume changes to the preset TA volume level see page 19 and the traffic announcement can be heard If the TP indicator flashes TA Standby Reception is not yet activated since the station being received does not provide the signals used for TA Standby Reception To activate TA St...

Страница 78: ...en the current source is FM the PTY indicator either lights up or flashes If the PTY indicator lights up PTY Standby Reception is activated If a station starts broadcasting the selected PTY programme this unit automatically tunes in to the station If the PTY indicator flashes PTY Standby Reception is not yet activated since the station being received does not provide the signals used for PTY Stand...

Страница 79: ...programme type see page 18 To store your favorite programme types 1 Press and hold TP PTY for more than 2 seconds while listening to an FM station 2 Select one of the twenty nine PTY codes See page 20 Selected code name appears on the display 3 Press and hold the number button for more than 2 seconds to store the PTY code selected into the preset number you want 4 Press and hold TP PTY for more th...

Страница 80: ...u selected the station will not change Note In some areas the PTY search will not work correctly To search for your favorite programme type 1 Press and hold TP PTY for more than 2 seconds while listening to an FM station 2 To select one of your favorite programme type or To select any one of the twenty nine PTY codes Ex When ROCK M is selected The last selected PTY code appears Preset number appea...

Страница 81: ... the same procedure and select ADJUST ON in step 3 by turning the control dial clockwise Note You must stay tuned to the same station for more than 2 minutes after setting AUTO ADJUST to ADJUST ON Otherwise the clock time will not be adjusted This is because the unit takes up to 2 minutes to capture the CT data in the RDS signal Other convenient RDS functions and adjustments Automatic selection of...

Страница 82: ...N Programmes dealing with any aspect of belief or faith or the nature of existence or ethics PHONE IN Programmes where people can express their views either by phone or in a public forum TRAVEL Programmes about travel destinations package tours and travel ideas and opportunities LEISURE Programmes concerned with recreational activities such as gardening cooking fishing etc JAZZ Jazz music COUNTRY ...

Страница 83: ...l you stop playback The display changes to show the following When CLOCK DISP is set to CLK DISP ON see page 36 the current indication will soon change to the clock time Notes When a CD is inserted upside down the control panel moves down the CD automatically ejects from the loading slot The source changes to the previously selected source If there is no CD in the loading slot you cannot select CD...

Страница 84: ... beginning of the previous tracks is located and played back To skip 10 tracks forwards to the last track To skip 10 tracks backwards to the first track To stop play and eject the CD Press 0 CD play stops and the control panel moves down The CD automatically ejects from the loading slot If you change the source or turn the power off CD play also stops without ejecting the CD Next time you select C...

Страница 85: ... repeatedly 1 Press MODE to enter the functions mode while playing a CD 2 Press RPT repeat while MODE is still on the display so that TRK RPT appears on the display Each time you press the button track repeat play mode turns on and off alternately When track repeat play is turned on the RPT indicator lights up on the display The current track starts playing repeatedly To play back only intros Trac...

Страница 86: ... Text To change the CD Text information manually select text display mode while playing a CD Text Press DISP display repeatedly Each time you press the button the display changes as follows Notes The display shows up to 12 characters at one time and scrolls if there are more than 12 characters See also To select the scroll mode SCROLL MODE on page 37 Some characters or symbols will not be shown wi...

Страница 87: ...MA files tracks can be recorded in folders in PC terminology During recording the files and folders can be arranged in a way similar to arranging files and folders of computer data Root is similar to the root of a tree Every file and folder can be linked to and be accessed from the root The illustration below shows an example of how MP3 WMA files are recorded on a CD R or CD RW how they are played...

Страница 88: ...K DISP ON see page 36 the current indication will soon change to the clock time 2 WMA or MP3 indicator lights up depending on the first detected file Notes MP3 WMA discs require a longer readout time It differs due to the complexity of the folder file configuration When playback starts folder and file names or ID3 tags will automatically appear See also page 27 If you change the source or turn the...

Страница 89: ... and scrolls if there are more than 12 characters See also To select the scroll mode SCROLL MODE on page 37 When file name is shown TRACK indicator and current file number also appear on the lower part of the display Locating a file or a particular portion on a disc To fast forward or reverse the file Note During this operation you can only hear intermittent sounds The elapsed playing time also ch...

Страница 90: ...splay after you have selected a folder it means that the folder does not contain any MP3 WMA files You cannot directly select a folder with a number greater than 12 To select a particular file in a folder press or 4 after selecting the folder To go to a particular file quickly within the current folder 10 and 10 buttons 1 Press MODE to enter the functions mode while playing a disc 2 Press 10 or 10...

Страница 91: ...g the playback modes To play back files at random Folder Random Disc Random Play You can play back all files of the current folder or all files on the disc at random 1 Press MODE to enter the functions mode while playing a disc 2 Press RND random while MODE is still on the display so that FLDR RND or DISC RND appears on the display Each time you press the button the random play mode changes as fol...

Страница 92: ... up disc Ex When you select TRK INT while listening to an MP3 file To play back files repeatedly Track Repeat Folder Repeat Play You can play back the current file or all the files in the current folder repeatedly 1 Press MODE to enter the functions mode while playing a disc 2 Press RPT repeat while MODE is still on the display so that TRK RPT or FLDR RPT appears on the display Each time you press...

Страница 93: ...L 3 Adjust the 00 min volume 30 or 50 max 4 LOUD ON LOUD OFF 1 If you are using a two speaker system set the fader level to 00 2 This takes effect only when a subwoofer is connected 3 Normally the control dial works as the volume control So you do not have to select VOL to adjust the volume level 4 Depending on the amplifier gain control setting See page 38 for details 2 Adjust the setting 3 Repea...

Страница 94: ...O POP O JAZZ O DANCE MUSIC O COUNTRY O REGGAE O CLASSIC O USER 1 O USER 2 O USER 3 O back to the beginning Ex When you select HARD ROCK To cancel the preset sound mode select FLAT in step 3 Notes You can adjust the preset sound modes temporarily However your temporary adjustments will be reset when you select another sound mode For details about the preset settings of each sound mode see table on ...

Страница 95: ...elements change as follows LOW LEVEL LOW FREQ LOW WIDTH MID LEVEL MID WIDTH HI high LEVEL HI high FREQ back to the beginning LEVEL LOW MID HI Adjust the enhancement level By pressing or 4 you can directly move as follows FREQ LOW HI Select the center frequency to adjust WIDTH LOW MID Select the band width level 5 Adjust the selected sound element Indication Preset values LOW MID HI LEVEL 06 min 06...

Страница 96: ...n 2 seconds so that one of the PSM items appears on the display See below and page 35 2 Select the PSM item you want to adjust 3 Adjust the PSM item selected 4 Repeat steps 2 and 3 to adjust the other PSM items if necessary 5 Finish the setting 0 23 1 12 00 59 9 Preferred Setting Mode PSM items For detailed operations of each PSM items refer to the pages listed in the table Indications Selectable ...

Страница 97: ...SEARCH Programme search DAB AF 2 Alternative frequency search DAB VOL 2 DAB volume adjustment LEVELMETER Level meter DIMMER MODE Dimmer mode TELEPHONE Telephone muting BEEP SWITCH Key touch tone CONTRAST Display contrast SCROLL MODE Scroll mode WOOFER FREQ Subwoofer cutoff frequency EXTERNAL IN 4 External component TAG DISPLAY Tag display AMP GAIN Amplifier gain control SLOT LIGHT Slot light OFF O...

Страница 98: ... this case set the dimmer mode to DIMMER ON or DIMMER OFF To set the clock display CLOCK DISP You can set the clock to be shown on the lower part of the display when the unit is turned on When shipped from the factory the clock is set to be shown on the display CLK DISP ON Clock display is turned on CLK DISP OFF Clock display is turned off When CLK DISP OFF is selected the current source name stat...

Страница 99: ...T Adjust the display contrast 01 10 to make the display indications clear and legible When shipped from the factory the display contrast level is set at level 05 To select the scroll mode SCROLL MODE You can select the scroll mode for the disc information when the entire text cannot be shown at a time When shipped from the factory scroll mode is set to SCROLL ONCE SCROLL ONCE Scrolls only once SCR...

Страница 100: ...To use the external component as the playback source through this unit you need to select which component CD changer or external component to use When shipped from the factory CD changer is selected as the external component CHANGER To use the CD changer LINE IN To use the external component other than CD changer Note For connecting the Line Input Adapter KS U57 and the external component refer to...

Страница 101: ...ges as follows 4 Select a character About the available characters see page 52 5 Move the cursor to the next or previous character position 6 Repeat steps 3 to 5 until you finish entering the name 7 Finish the procedure while the last selected character is flashing To erase the input characters To erase all the characters at a time press and hold DISP display for more than 1 second as described in...

Страница 102: ... adjust the angle to the position you want The control panel angles changes as follows CAUTION NEVER insert your finger in between the control panel and the unit as it may get caught or hurt Note If you turn the power off the control panel automatically returns to the closed position Next time you turn on the power the control panel moves to its previous position ANGLE 01 ANGLE 02 ANGLE 03 ANGLE 0...

Страница 103: ...ors with a cotton swab or cloth moistened with alcohol being careful not to damage the connectors Detaching the control panel You can detach the control panel when leaving the car When detaching or attaching the control panel be careful not to damage the connectors on the back of the control panel and on the panel holder Detaching the control panel Before detaching the control panel be sure to tur...

Страница 104: ...ot compatible with MP3 discs so you cannot play back MP3 discs You cannot use the KD MK series CD changers with this unit Before operating your CD changer Refer also to the Instructions supplied for your CD changer If no discs are in the magazine of the CD changer or the discs are inserted upside down NO DISC will appear on the display If this happens remove the magazine and set the discs correctl...

Страница 105: ...ring play to skip back to the beginning of the current track file Each time you press the button consecutively the beginning of the previous tracks files is located and played back Press and hold during play to fast forward the track file Note Folder name appears on the display instead of ROOT if an MP3 disc contains a folder When the current disc is a CD Playback starts from the first track of th...

Страница 106: ...20th 30th Then each time you press the button you can skip 10 tracks files see How to use the 10 and 10 buttons below After the last track file the first track file will be selected and vice versa Note If the current playing disc is an MP3 disc files are skipped within the same folder How to use the 10 and 10 buttons Ex 1 To select track file number 32 while playing track file number 6 Ex 2 To sel...

Страница 107: ... of the next folder and so on DISC RND and RND All tracks files of the indicators current or specified light up disc MAG RND RND indicator All tracks files of the lights up inserted discs FLDR RND is only applicable for MP3 disc To play back tracks files repeatedly Track Repeat Folder Repeat Disc Repeat Play 1 Press MODE to enter the functions mode while playing a disc 2 Press RPT repeat while MOD...

Страница 108: ... MODE to enter the functions mode while playing a disc 2 Press INT intro while MODE is still on the display Each time you press the button the intro scan mode changes as follows For MP3 discs For CDs Note MP3 indicator also lights up if the current playing disc is an MP3 disc Mode Active Plays the beginnings indicator 15 seconds of TRK INT INT indicator All tracks files of the lights up current di...

Страница 109: ...he external component using the following procedure select the external input correctly See To select the external component to use EXTERNAL IN on page 38 1 Select the external component LINE IN If LINE IN does not appear on the display see page 38 and select the external input LINE IN Note on One Touch Operation When you press CD CD CH the power automatically comes on You do not have to press to ...

Страница 110: ...NT dealer Refer also to the Instructions supplied for your DAB tuner What is DAB system DAB is one of the digital radio broadcasting systems available today It can deliver CD quality sound without any annoying interference and signal distortion Furthermore it can carry text pictures and data In contrast to FM broadcast where each programme is transmitted on its own frequency DAB combines several p...

Страница 111: ...the ensemble you want is reached If you hold down the button the frequency keeps changing until you release the button 5 Press 5 up or down to select a service either primary or secondary you want to listen to To restore the FM AM tuner Press and hold FM AM DAB again Storing DAB services in memory You can preset up to 6 DAB services in each DAB band DAB1 DAB2 and DAB3 manually Before you start Pre...

Страница 112: ...he DAB services again To select the next service To select the previous service Tuning in to a preset DAB service You can easily tune in to a preset DAB service Remember that you must store services first If you have not stored them yet see Storing DAB services in memory on pages 49 and 50 Before you start Press FM AM DAB briefly if CD CD changer or external component is the current source 1 Selec...

Страница 113: ... programme among DAB services and FM RDS stations Alternative Reception The AF indicator lights up on the display see page 14 AF OFF Alternative Reception is deactivated 4 Press SEL select to finish the setting Note When Alternative Reception for DAB services is activated Network Tracking Reception for RDS stations see page 14 is also activated automatically On the other hand Network Tracking Rece...

Страница 114: ...03 10kHz DANCE MUSIC 04 60Hz 2 02 2 01 8kHz COUNTRY 02 60Hz 3 00 1 02 12kHz REGGAE 03 60Hz 1 02 1 02 12kHz CLASSIC 01 80Hz 1 00 1 03 10kHz USER 1 00 60Hz 1 00 1 00 8kHz USER 2 00 60Hz 1 00 1 00 8kHz USER 3 00 60Hz 1 00 1 00 8kHz ADDITIONAL INFORMATION Available characters In addition to the alphabets A Z a z you can use the following characters to assign names to CDs and CD changer See page 39 The...

Страница 115: ...pressing CD CD CH press and hold SEL select for more than 2 seconds to eject the disc Causes The volume level is set to the minimum level Connections are incorrect The built in microcomputer may have functioned incorrectly due to noise etc There is something blocking the control movement Signals are too weak The aerial is not connected firmly Disc is inserted upside down CD R CD RW is not finalize...

Страница 116: ...has the extension code mp3 or wma Readout time varies due to the complexity of the folder file configuration Playback order is determined when the files are recorded This sometimes occurs during play This is caused by how the files are recorded on the disc The current folder does not contain any MP3 WMA file The current disc does not contain any MP3 WMA file This unit can only display alphabets ca...

Страница 117: ...d upside down No magazine is loaded in the CD changer This unit is not connected to the CD changer correctly The built in microcomputer may function incorrectly due to noise etc Symptoms NO DISC appears on the display NO MAG appears on the display RESET 8 appears on the display RESET 1 RESET 7 appears on the display The CD changer does not work at all CD Changer About mistracking Mistracking may r...

Страница 118: ...ad their instructions or cautions carefully Use only finalized CD Rs or CD RWs Some CD Rs or CD RWs may not be played back on this unit because of their disc characteristics and for the following reasons Discs are dirty or scratched Moisture condensation on the lens inside the unit The pickup lens inside the unit is dirty CD RWs may require a longer readout time since the reflectance of CD RWs is ...

Страница 119: ...nsitivity 11 3 dBf 1 0 µV 75 Ω 50 dB Quieting Sensitivity 16 3 dBf 1 8 µV 75 Ω Alternate Channel Selectivity 400 kHz 65 dB Frequency Response 40 Hz to 15 000 Hz Stereo Separation 30 dB Capture Ratio 1 5 dB MW Tuner Sensitivity 20 µV Selectivity 35 dB LW Tuner Sensitivity 50 µV CD PLAYER SECTION Type Compact disc player Signal Detection System Non contact optical pickup semiconductor laser Number o...

Страница 120: ...reset your unit Refer to page of How to reset your unit Затруднения при эксплуатации Пожалуйста перезагрузите Ваше устройство Для получения информации о перезагрузке Вашего устройства обратитесь на соответствующую страницу 2004 VICTOR COMPANY OF JAPAN LIMITED ...

Страница 121: ...voltage inverter is required which can be purchased at JVC IN CAR ENTERTAINMENT dealers J Список деталей для установки и подключения Следующие детали поставлены в комплекте с устройством После проверки комплектации пожалуйста установите их правильно РУССКИЙ Это устройство разработано для эксплуатации на 12 В постоянного напряжения с минусом на массе Если Ваш автомобиль не имеет этой системы требуе...

Страница 122: ...коговорителей к кабелю питания громкоговорителя проверьте схему соединений громкоговорителей в Вашем автомобиле Удаление устройства Перед удалением устройства освободите заднюю часть Screw option Винт дополнительно Stay option Стойка дополнительно Fire wall Стена Dashboard Приборная панель C F I G Bracket Кронштейн Bracket Кронштейн Not included with this unit Не входят в комплект Flat type screws...

Страница 123: ... 1 предохранителя Перед началом подключений Тщательно проверьте проводку в автомобиле Неправильное подключение может привести к серьезному повреждению устройства Жилы силового кабеля и жилы соединителя от кузова автомобиля могут быть разного цвета 1 Подсоедините цветные провода шнура питания в указанном ниже порядке 2 Подключите кабель антенны 3 В последнюю очередь подключите электропроводку к уст...

Страница 124: ...чтобы им можно было управлять с этого устройства Только для усилителя Отсоедините громкоговорители от данного устройства подключите их к усилителю Оставьте провода громкоговорителей данного устройства неиспользованными Уровень выходного сигнала линии данного устройства поддерживается высоким чтобы обеспечить высококачественный звук воспроизводимый данным устройством При подключении внешнего усилит...

Отзывы: